

You're standing in the yard with a stack of cut posts, a box of pyramid caps, and a tape measure that keeps giving you an answer you don't quite trust. The cap looks like a small finishing detail, but its height can change the railing measurement, the way the post connection works, and whether the completed deck looks balanced.
So, how high should deck post caps be? The practical answer is that the cap usually sits only high enough to finish and protect the post above the rail, but the exact height depends on three things: the permitted structural post height, the required railing height measured from the deck surface, and the proportion between the cap and the post. Confirm those in that order, then choose the style.
Why Post Cap Height Is a Bigger Decision Than It Looks
A DIY deck can go wrong in a surprisingly small space above the top rail. A cap that looks harmless on the sawhorse may become awkward once it sits on a 4×4 post, overlaps the rail, and changes the finished guard height. The same cap may disappear on a heavier post or make a clean horizontal railing look overly ornate.
Think of the decision as three connected measurements:
- Structural post height: The post must suit the beam, footing, load, and permitted deck framing condition.
- Railing height: The guard is measured from the walking surface to the required top point. The cap doesn't replace that measurement.
- Visual proportion: The cap needs enough height and overhang to look intentional without becoming a tower above the rail.
A common mistake is to install the railing first and treat the cap as an afterthought. That can leave too little post above the top rail for a secure cap fit, or force the cap higher than the design can comfortably carry. The opposite mistake is equally common. A homeowner chooses a tall decorative cap before confirming the guard height, then discovers that the finished detail sits awkwardly above a code-constrained railing.
Practical rule: Confirm the post and guard dimensions before you shop for the decorative profile.
For a deck using standard square posts, start by measuring the actual post and identifying where the top rail attaches. The cap should finish that post, shed water away from the exposed end grain, and preserve the intended railing line. Xtreme eDeals' post caps for decks give you a useful way to compare profiles and sizes after those site measurements are settled.
A flat cap usually reads as a quiet architectural detail. A pyramid cap adds more visible height, while a ball or finial creates a focal point. None of those styles can correct an incorrectly sized post or an improperly located rail. Good cap height begins with construction, then ends with appearance.
Structural Post Height Limits by Post Size
Before choosing a cap, establish the maximum height allowed for the structural post under the applicable deck-framing rules. California's commonly used residential deck table for Section R507.4 measures post height to the underside of the beam. For a 4×4 post, the general IRC R507.4 maximum is 8 feet 6 inches. Certain beam arrangements create a lower limit, including 6 feet 9 inches for a three-ply beam supported on a post cap. The table also lists 8 feet for 4×6 posts and 14 feet for 6×6 and 8×8 posts, subject to the post and beam conditions. Check the California Section R507.4 deck post table before applying any figure to your project.
Those limits govern the structural post, not the decorative cap. The cap sits above the post and cannot correct an undersized member or an over-height framing condition. Local plan reviewers may also require an approved manufactured post cap connector for the post-to-beam joint. Review the Firm Foundations deck guide while checking the footing, support, and post layout before finalising cuts.
| Post size | Actual measurement | Post height for 36" railing | Post height for 42" railing |
|---|---|---|---|
| Nominal 4×4 | 3-1/2 by 3-1/2 inches | Measure from deck surface to rail attachment, then allow cap clearance | Measure from deck surface to rail attachment, then allow cap clearance |
| Nominal 4×6 | 3-1/2 by 5-1/2 inches | Confirm the post condition and beam connection locally | Confirm the post condition and beam connection locally |
| True 6×6 | 5-1/2 by 5-1/2 inches | Allow the heavier post to carry the chosen cap proportionally | Allow the heavier post to carry the chosen cap proportionally |
Use the table for planning, not as a substitute for the structural table or local approval. A California deck permitting handout also uses Table R507.4 as a first-pass reference. It distinguishes between 4×4 posts limited to 6 feet 9 inches or 8 feet 6 inches depending on the condition, 4×6 posts limited to 8 feet, and 6×6 and 8×8 posts limited to 14 feet, measured to the underside of the beam. The Eureka deck permitting handout reinforces that these limits apply to the post, not its decorative cap.
The post-to-beam connection needs the same attention as post height. A three-ply beam may require a post cap connection, and a cap connector is part of the load path, not a trim piece. Misaligned beam seats and missing fasteners can compromise the joint, so review the Jackson deck construction flyer before closing in the framing.
Railing Height Rules and Where the Cap Fits In
The cap sits above the rail, but the guardrail measurement starts at the deck surface. That distinction is the source of many failed layouts. California-facing guidance commonly calls for a 42-inch guard height in many cases, while other residential guidance still uses a 36-inch baseline. The correct figure depends on the jurisdiction and situation, so check the local building department before cutting the final post length.
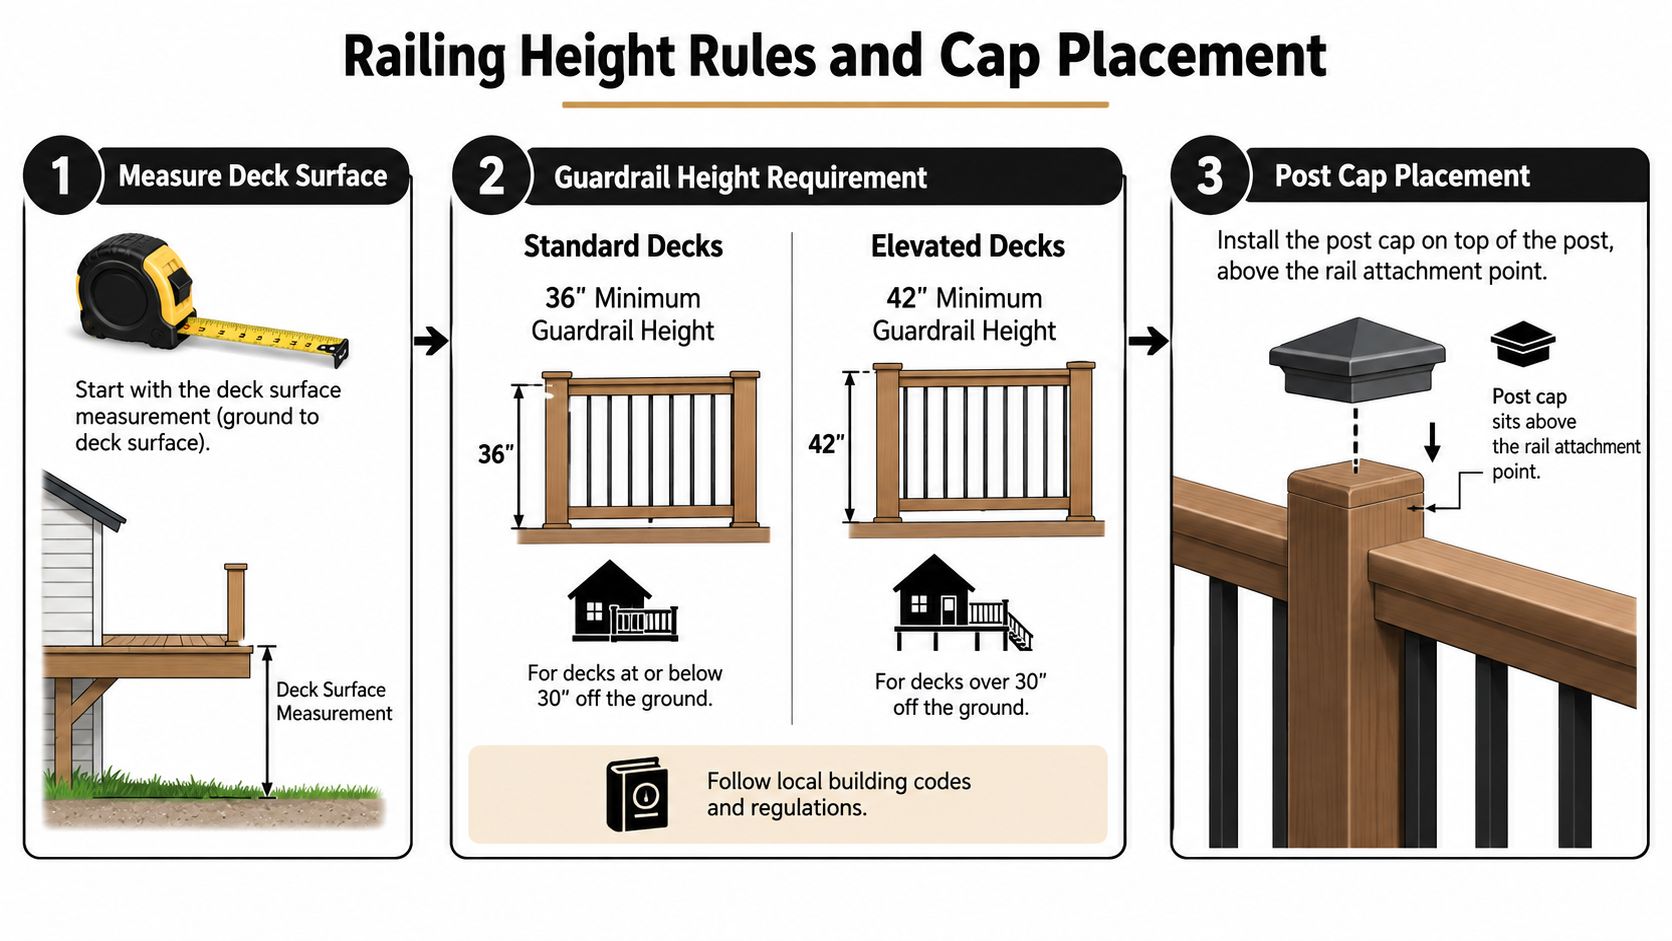
Measure from the finished walking surface to the top of the required guard or rail. Don't measure from the beam, the footing, or a lower grade point. The cap may extend above the rail, but it shouldn't be counted as a replacement for the guard height unless the local authority specifically defines the measurement that way.
Cap selection becomes a layout decision. A low-profile flat cap can finish the post close to the rail attachment. A pyramid cap or decorative finial needs more visible space above the rail and may require a longer post projection. The cap also needs a sound seating area, so forcing a tall profile into a short projection can leave the joint exposed or make fastening difficult.
The finished cap can change the appearance of the guard, but the walking surface remains the starting point for the guard-height measurement.
A cap should shed water away from the post end and avoid creating a ledge that traps moisture at the rail joint. Check the underside of the cap, the opening dimensions, and the planned fastener location together. If you're coordinating a larger renovation, a guide to premium patio project materials may help you keep the cap, railing, and surrounding outdoor finishes visually consistent.
California rules also vary for fences and walls. Residential fence height is commonly capped at 6 feet, while some jurisdictions permit up to 7 feet before a building permit is required. Local rules may measure from finished grade to the top edge, using the lower side where grades differ. That benchmark is useful for fence caps, but it doesn't replace the deck guard measurement.
Measuring Your Post and Picking the Right Cap Height
Start at the top of the finished deck board and measure up the post to the intended rail attachment point. Use the actual built assembly, because code-driven post height, the railing's position above the deck surface, and the cap's visual proportion all depend on measurements that drawings may not show accurately.
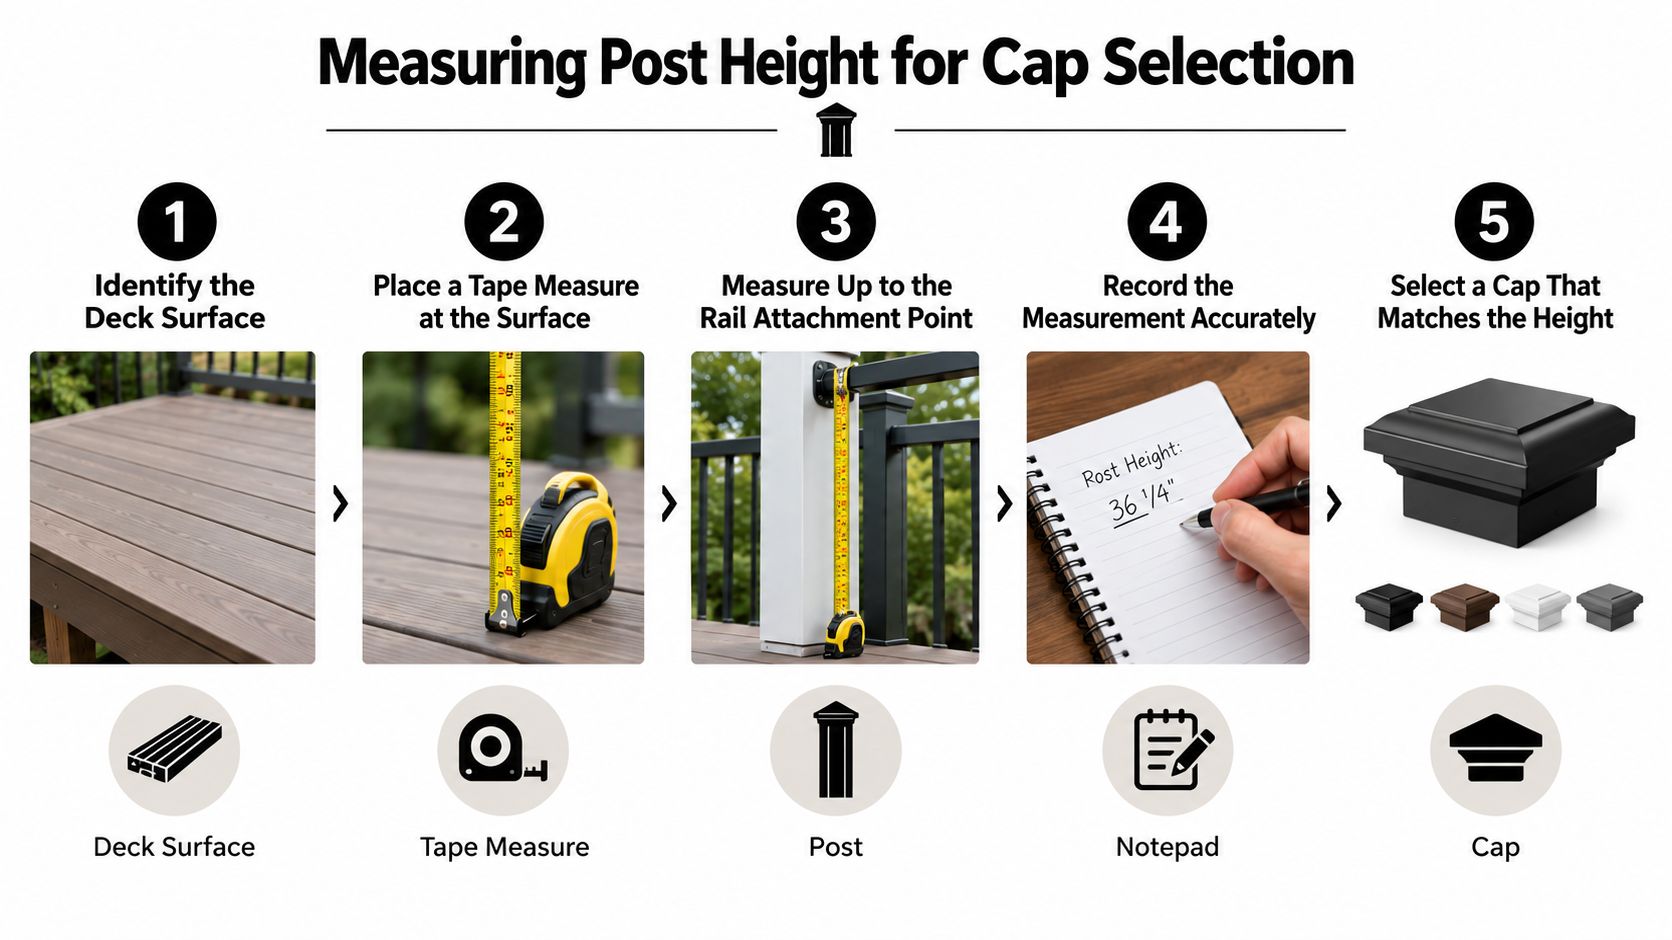
Start at the surface people stand on
Place the tape on the finished deck board, not on the beam or framing below it. Measure to the rail attachment line. If the rail sits against the post, subtract the top rail thickness from the required overall guard height. The remaining dimension shows how much post should project above the deck before the cap is fitted.
Hold a short piece of the actual top rail against the post at that line, then place the cap above it. This dry layout shows whether the cap overlaps the post cleanly or creates a tall, awkward projection. It also makes the relationship between the rail height and the cap profile easier to judge.
Dry-fit before fastening
Check the post with a level in both directions. A cap can appear crooked even when the rail looks straight, particularly where the railing follows a slope. Mark the rail attachment line, the post top, and the lowest point inside the cap opening before drilling.
Measure the cap from every side. A 2-inch cap generally adds about 1.5 to 1.75 inches of new height per side, depending on its overhang and profile. Treat that dimension as a fitting reference, not as part of the guard-height allowance. Keep the required rail measurement separate from the cap's decorative rise.
Measure each corner post individually. Bearing pad thickness and small framing differences can leave neighboring posts at slightly different heights, even when the lumber came from one bundle. Assuming they match can cause a cap to bind, sit unevenly, or leave an inconsistent amount of post showing.
For a square post, compare the recorded opening with a 4 x 4 post cap only after checking the post's actual dimensions. The cap should sit squarely, leave space for the planned fastener, and avoid crushing the post corners.
The video demonstrates the same process, including measuring from the finished deck surface, dry-fitting the cap, and checking the resulting projection before fastening.
Finish with a water-management check. Keep the cap level enough to drain as designed, confirm that the post top is clean and sound, and follow the product's mechanical-fastening requirements rather than relying on adhesive alone. Dry-fitting exposes errors while the correction is still simple.
Matching Cap Style and Height to Post Size
A cap can fit the post and still look out of scale. The height ranges from the measuring section apply here, but proportion makes the final decision. A narrow sleeve needs restraint, while a broad post can carry more visual weight without appearing crowded.
| Post size | Cap style direction | Visual result |
|---|---|---|
| 2×2 sleeve | Flat, compact pyramid, small finial | The cap reads as a deliberate accent without overwhelming the sleeve |
| 4×4 post | Flat, pyramid, restrained ball top | The silhouette stays clean and the post does not look stuffed |
| True 6×6 | Banded, stepped, broad pyramid | The cap has enough presence to match the post |
A 2×2 sleeve usually suits a compact cap with limited overhang and a simple profile. Extra height or an ornate finial can make the sleeve look top-heavy. A 4×4 gives you more room for a shaped top, but restrained proportions still keep the post from looking crowded. A true 6×6 has substantially more visual mass, so a broader or stepped profile can look deliberate rather than oversized.
Use the railing style as a second filter. Flat caps suit modern horizontal rails and simple square balusters. Pyramid caps work well with traditional cedar or pressure-treated posts because the sloping top gives the post a finished roofline. Ball-top and finial caps fit accent locations where the ornament can stand apart instead of repeating too much detail along the entire railing.
A large post needs a cap with enough presence. A small sleeve needs restraint.
Width and height must work together. A taller cap will not correct a cap that is too narrow for the post. Likewise, a short cap can look lost on a true 6×6 even when the fit is secure. Check the profile from the approach path, the deck seating area, and the yard. Those viewing angles often reveal whether the cap complements the post or sits on top of it.
On a sloped railing, keep the visual line consistent by comparing neighboring posts after the caps are dry-fitted. Matching profiles across the run usually looks cleaner than choosing an elaborate cap for one location unless that post marks a stair, corner, or entry.
Buying Tips When Nominal and Actual Sizes Don't Match
Buy by the measurement on the tape, not by the label on the lumber rack. A nominal 4×4 measures 3.5 by 3.5 inches, while a nominal 6×6 measures 5.5 by 5.5 inches. Those actual dimensions are the ones a slip-over cap must accommodate.
Measure the post across both directions at the top and again lower down. Pressure-treated lumber can cup, twist, or retain moisture, so a cap that fits the lower section may bind at the top. Clean away old paint, splinters, and treatment residue before measuring, because buildup can make the opening seem smaller than the finished post really is.
If your post falls between standard cap sizes, you've got several workable choices:
- Use a tapered slip-over cap when the post varies slightly and the product allows that tolerance.
- Add a trim ring or adapter when you need to cover a modest gap without making the cap look loose.
- Install a sleeve when the post needs to step up to a larger visual or nominal size.
- Shim carefully only where the manufacturer permits it and where the cap will still drain and fasten securely.
A sleeve changes more than the appearance. It changes the cap opening, the amount of overhang, and the scale of the finished post, so measure the sleeved post rather than ordering from the original structural post label. Xtreme eDeals' 4 x 4 post cover is relevant when a cover is part of that sizing transition.
Fasteners deserve the same attention as fit. On cedar, stainless or ceramic-coated screws are a safer choice than plain galvanized fasteners because cedar tannins can stain surrounding wood and metal. Match the screw length to the cap base and post thickness, and pre-drill when the cap material or post edge could split.
Finishing also affects the result. If you're painting or sealing the post and cap together, choose a compatible product and follow a preparation process such as the guidance on waterproof paint for wood. Order a spare cap when the project allows it, particularly if the finish or colour must match across the whole railing. Use it as a test fit before committing to every post.
Quick Checklist Before You Order Your Caps
Use this final list beside the checkout page. It keeps the purchase focused on three measurements: compliant post height, guard height above the deck, and the cap's proportion on the post.
- Measure the actual post: Record the width and depth at the top. Nominal 4×4 and 6×6 labels do not guarantee the cap opening will fit.
- Confirm the structural condition: Recheck the permitted post height, footing, beam arrangement, and post-to-beam connection against local requirements.
- Mark the guard height: Measure from the finished deck surface to the top of the required guard, using the applicable 36-inch or 42-inch rule.
- Allow for cap projection: Leave enough post above the rail for the cap to seat and fasten without making the post look disproportionately tall.
- Check the proportion: Keep the cap visually restrained on a 4×4 and substantial enough to suit a true 6×6.
- Test the rail line: Before drilling, use a scrap top-rail block and a level to confirm the rail will meet the post cleanly.
- Plan for size drift: If the post needs a sleeve, shim, trim ring, or adapter, measure the finished outside dimension before choosing the cap.
- Match the fastener: Check compatibility with pressure-treated lumber, cedar, the cap material, and the fastening method.
- Buy a test piece: Fit one cap first and inspect the opening, overhang, colour, drainage, and fastener access. This catches a poor profile before you order the full set.
- Check returns: Read the seller's return policy before buying a tight-fit cap or a profile that may be difficult to exchange.
A sound order leaves no guesswork at installation. The post must meet structural requirements, the guard must finish at the correct height, and the cap must suit both the post size and the railing's visual scale.
XTREME EDEALS INC. offers deck and fencing accessories, including pyramid, ball, and decorative post caps for common wood and metal post sizes, along with fasteners and related hardware. Visit XTREME EDEALS INC. with your actual post measurements, then compare the cap opening, projection, and profile before ordering.