
You’ve laid the deck boards, squared the railing, tightened the fasteners, and stepped back to admire the job. Then your eye lands on the tops of the posts. Bare. Flat. Exposed. The build looks close to finished, but not finished.
That last detail matters more than expected. Post caps for decks change the look of the whole project, but they also do one of the most important protection jobs on the structure. A good cap helps shield the most vulnerable part of the post. A bad one, or no cap at all, leaves the top open to weather, movement, splitting, and premature ageing.
I’ve seen plenty of deck projects where the cap was treated like a decorative extra and chosen at the very end with almost no measuring, no thought about material, and no plan for installation. That’s where trouble starts. The wrong size rattles or won’t fit. The wrong finish looks out of place. The wrong material weathers badly for the location. And on older decks, the wrong installation method can trap water instead of helping shed it.
Choosing post caps for decks isn’t complicated once you know what to look for. The right choice comes down to four things. Material, style, fit, and installation. Get those right and the caps won’t just complete the appearance of the deck. They’ll help the whole build last longer and look cleaner year after year.
The Finishing Touch Your Deck Deserves
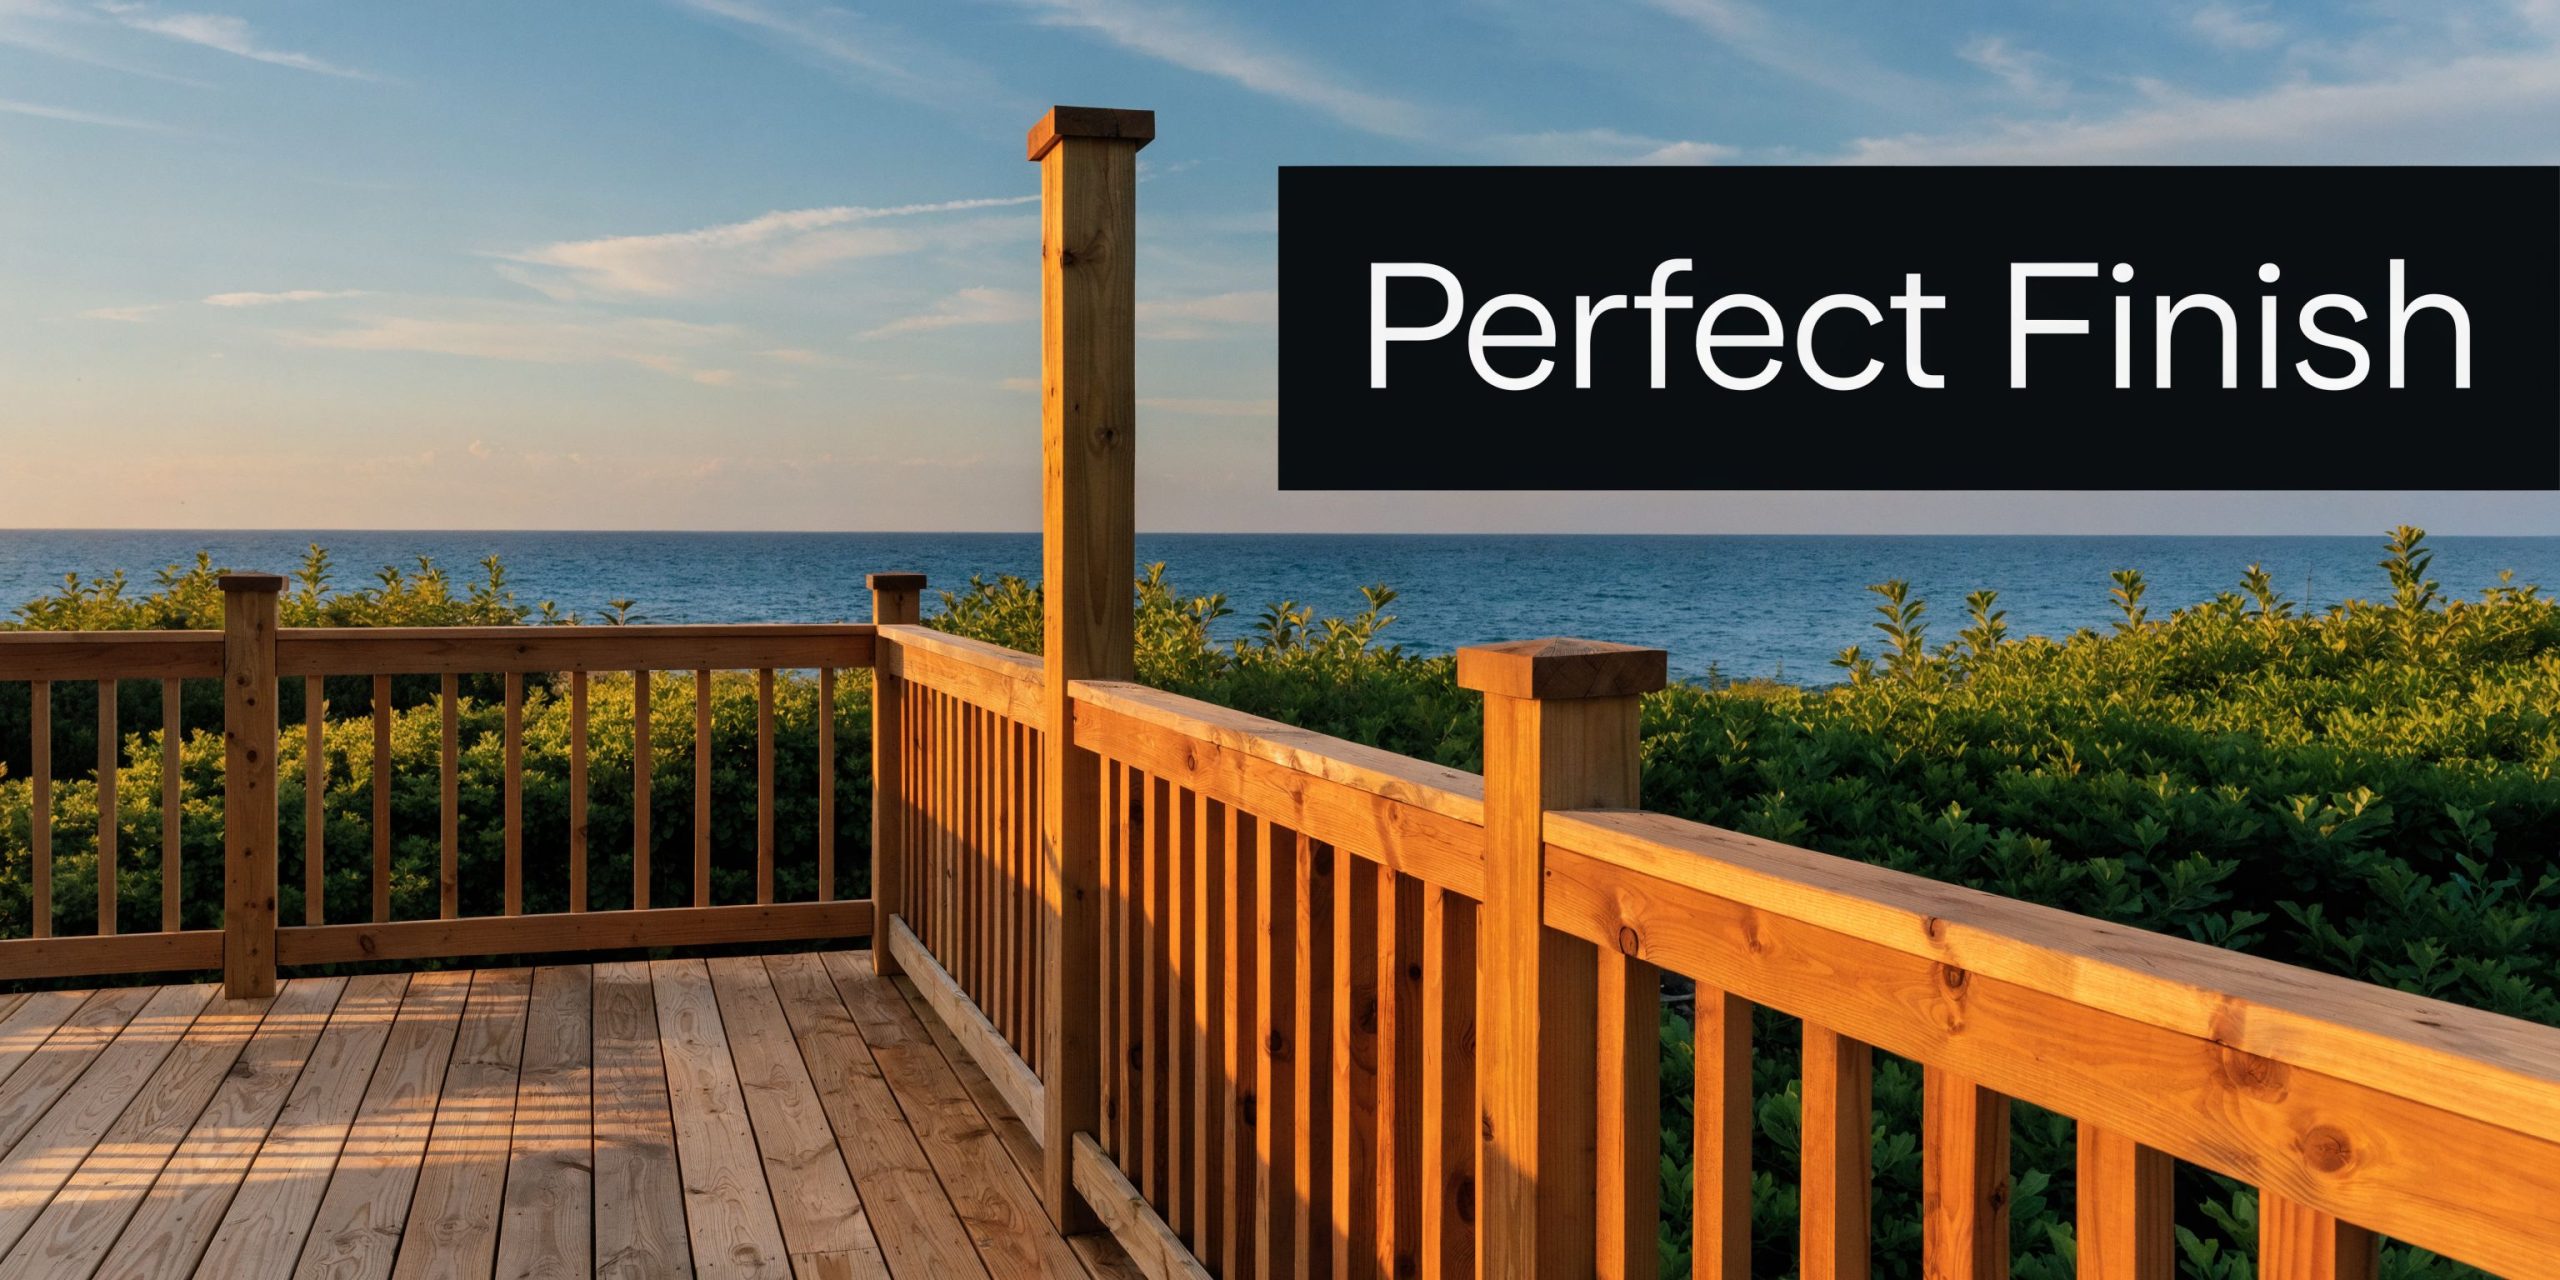
A deck rarely looks unfinished because of the decking. It usually looks unfinished because the details at eye level haven’t been resolved. Bare posts are one of those details.
A simple cap changes that immediately. The top line of the railing looks intentional, the posts read as finished components instead of cut lumber, and the whole build feels cleaner. On a fence, the effect is the same. On a deck, it’s even more obvious because people see the railing up close.
The visual side is what most homeowners notice first. A low-profile pyramid cap can sharpen a modern build. A ball top can make a traditional deck feel more established. A more decorative topper can tie the rail line into gates, balusters, or fence sections nearby.
But appearance is only half the reason these parts matter. Post tops take direct exposure. Sun, rain, standing moisture, and seasonal movement all hit that cut end grain. That’s why I treat caps as part of the deck protection plan, not just a finishing accessory.
If you’re still shaping the overall look of your outdoor space, this set of deck railing ideas that will inspire you and your guests guide can help you line up cap style with the rest of the project.
Bare posts make a new deck look paused, not complete.
The best way to think about post caps for decks is simple. They’re the final visible detail and one of the first protective details. When those two jobs come together, the deck looks better on day one and holds up better after seasons of use.
Why Post Caps Are More Than Just Decoration
An uncovered post top behaves like a sponge. That’s the practical truth.
Wood end grain absorbs moisture much faster than the face or side of a post. Once water gets into that top surface, it doesn’t always leave quickly. Sun then bakes the post, the wood expands and contracts, and small checks can turn into larger splits. Over time, the post can start failing from the top down while still looking acceptable from a distance.
The post top is the weak point
Think of a post cap as a roof for each post. It doesn’t carry the whole weather load by itself, but it stops direct exposure at the point where the post is most vulnerable.
That matters because the performance gap between protected and unprotected post tops isn’t small. Studies by the California Redwood Association indicate untreated post ends rot 3 to 5 times faster, reducing lifespan from 20+ years to under 7 in humid coastal areas, and selecting the right post caps prevents up to 90% of UV-induced degradation and moisture wicking, which is a primary rot vector (Fortress Building Products).
Those numbers line up with what deck builders see in the field. The post may look solid on the sides, but the top edge often reveals its true condition first. Discolouration, hairline splits, soft fibres near fasteners, and finish failure usually start there.
What a good cap does
A proper cap helps in several ways:
- Shields the end grain: It reduces direct water exposure on the cut top.
- Cuts sun damage: UV exposure is hardest on the exposed top edge.
- Reduces splitting: A covered top is less likely to dry out unevenly.
- Cleans up the look: Even a plain cap gives the deck a finished line.
That’s why I don’t treat post caps for decks as optional on wood posts. If you’ve paid for decent lumber, fasteners, rails, and finishes, leaving the post tops exposed is one of the easiest ways to shorten the life of the build.
Ornament and protection can be the same part
Many buyers get stuck at this point. They think they have to choose between a nice-looking cap and a protective cap. In reality, most of the well-designed options do both.
Nuvo Iron and similar hardware lines are a good example of that approach. A metal pyramid cap can look sharp on a contemporary deck while still acting as a protective cover. Decorative styles can do the same job if they fit properly and shed water well.
Practical rule: If a cap looks good but fits loosely, sits unevenly, or leaves the top exposed, it’s a styling piece, not a protective one.
The right mindset is simple. Buy the cap for protection first, then choose the shape and finish that suits the build. That order prevents a lot of expensive mistakes.
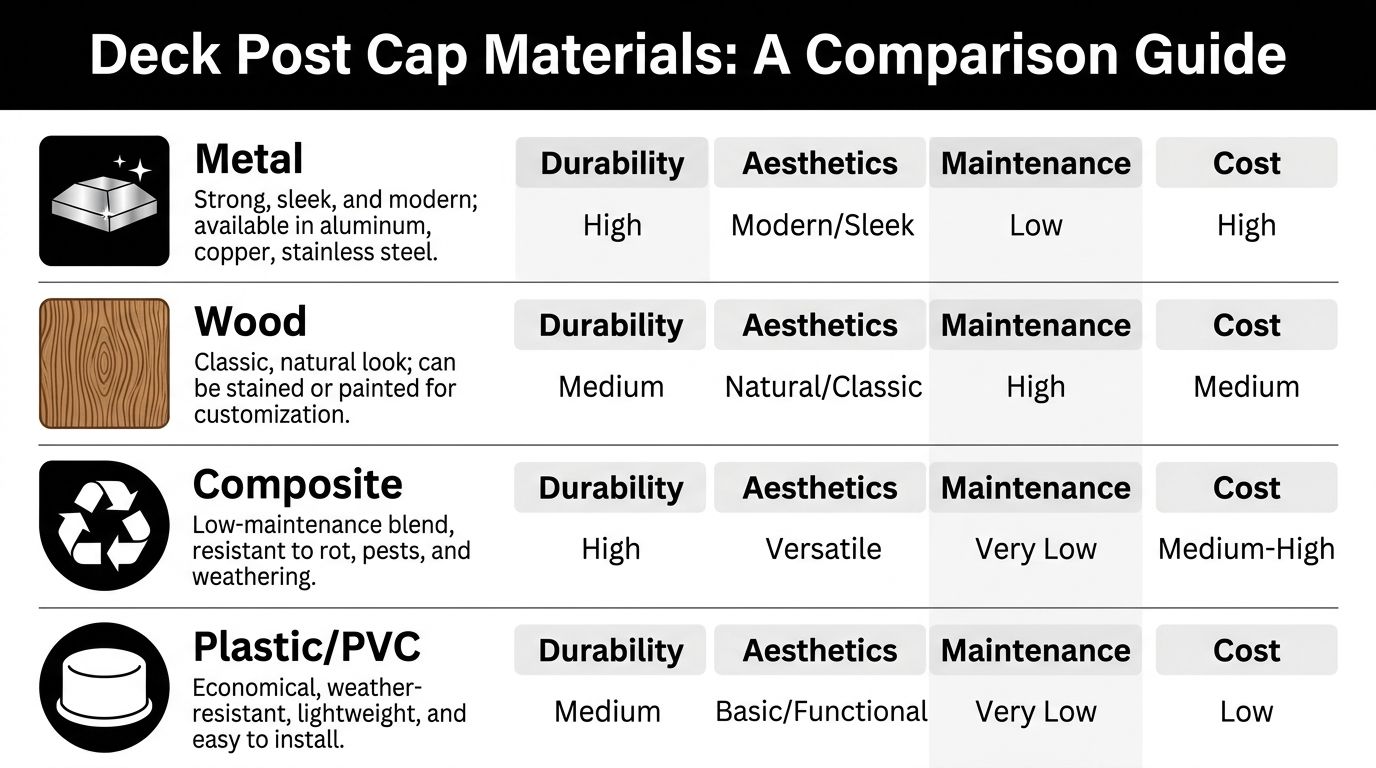
A Complete Guide to Post Cap Materials
Material choice decides how the cap will age, how much maintenance it needs, and how well it suits the deck around it. Most problems people blame on the product stem from a mismatch between material and application.
Some homeowners want a cap that disappears into the design. Others want the cap to stand out as a feature. Both approaches can work. What matters is choosing a material that matches the climate, the post type, and the level of upkeep you’re willing to live with.
If you’re planning the whole build from scratch, a broader complete deck building materials list is useful for checking that the cap material makes sense alongside your railing, fasteners, posts, and finishes.
Metal caps
Metal is usually the first choice when the goal is durability and a crisp finished look. Powder-coated aluminium and coated steel are common for decks and fences because they hold shape well and suit a wide range of railing styles.
Aluminium is the easy recommendation for many projects. It’s light, clean-looking, and well suited to modern or transitional designs. A powder-coated finish also gives you a consistent appearance that pairs well with metal balusters, black hardware, and darker rail packages.
Steel has a similar visual effect but usually feels heavier and more substantial in the hand. If the coating is damaged, though, steel needs more attention. On exposed decks, that matters. Once the finish is scratched, neglect can show up faster.
At the practical level, metal caps make sense when you want:
- A sharp profile: Pyramid and flat-top shapes look precise in metal.
- Lower routine upkeep: Cleaning is usually straightforward.
- A stronger style line: Metal works especially well on contemporary decks.
For those looking at product options in this category, metal fence post caps cover common styles and sizes used on deck and fence builds.
Copper caps
Copper sits in its own category. It isn’t chosen because it disappears. It’s chosen because it develops character.
Fresh copper has a warm, polished look that stands out against cedar, pressure-treated lumber, darker stains, and stone accents. Over time it develops a patina. Some homeowners love that change. Others don’t. That’s the trade-off.
Copper works best when the cap is supposed to read as a design element. On a plain utility deck it can feel too formal. On a custom deck with timber posts, masonry columns, or a more crafted exterior, it can look right at home.
Use copper if you want:
- A classic material with visual warmth.
- A cap that ages visibly rather than staying uniform.
- A deliberate accent, not just a cover.
Skip it if you want every part of the railing to keep the same fresh-installed appearance.
Polymer and vinyl caps
Polymer and vinyl caps make sense when low maintenance is the top priority. These are often the easiest caps to live with on family decks, rental properties, and straightforward fence projects.
They don’t offer the same visual weight as metal or copper, but they’re practical. They’re light, simple to install, and usually forgiving in wet conditions. For many buyers, that’s enough.
This category is a good fit when the goal is function first:
- Minimal upkeep: Routine washing is usually all that’s needed.
- Budget control: They’re often a sensible value choice.
- Simple compatibility: They pair well with low-fuss outdoor projects.
The downside is style depth. Some polymer and vinyl caps look clean and purposeful. Others can look thin or generic if the deck is otherwise high-end. That’s why finish quality and profile matter more here.
Wood caps
Wood caps can look excellent on the right build, especially where you want a fully timber appearance. Cedar caps on cedar posts can give a deck a cohesive, traditional finish that doesn’t introduce another material.
But wood asks more from the owner. It needs sealing, staining, or painting in step with the rest of the exterior woodwork. If maintenance slips, wood caps can age unevenly.
I use them where the visual continuity is worth the extra care. I avoid them where the owner wants a fit-and-forget solution.
Post Cap Material Comparison
| Material | Durability | Maintenance | Best For |
|---|---|---|---|
| Metal | High | Low | Modern decks, strong visual definition, long-term exterior use |
| Copper | High | Moderate | Traditional or custom builds where patina is welcome |
| Wood | Medium | High | Natural timber designs, stain-matched projects |
| Polymer or PVC | Medium to High | Very low | Low-maintenance decks, practical upgrades, budget-conscious installs |
The best cap material isn’t the fanciest one. It’s the one that still suits the deck after a few seasons outdoors.
Choosing Your Perfect Post Cap Style
Once the material is sorted, style becomes much easier to choose. Most buyers do better when they stop asking which cap is the most attractive in isolation and start asking which cap belongs on this particular deck.
A cap can be beautifully made and still look wrong on the project. Scale, profile, and architectural fit matter more than showroom appeal.
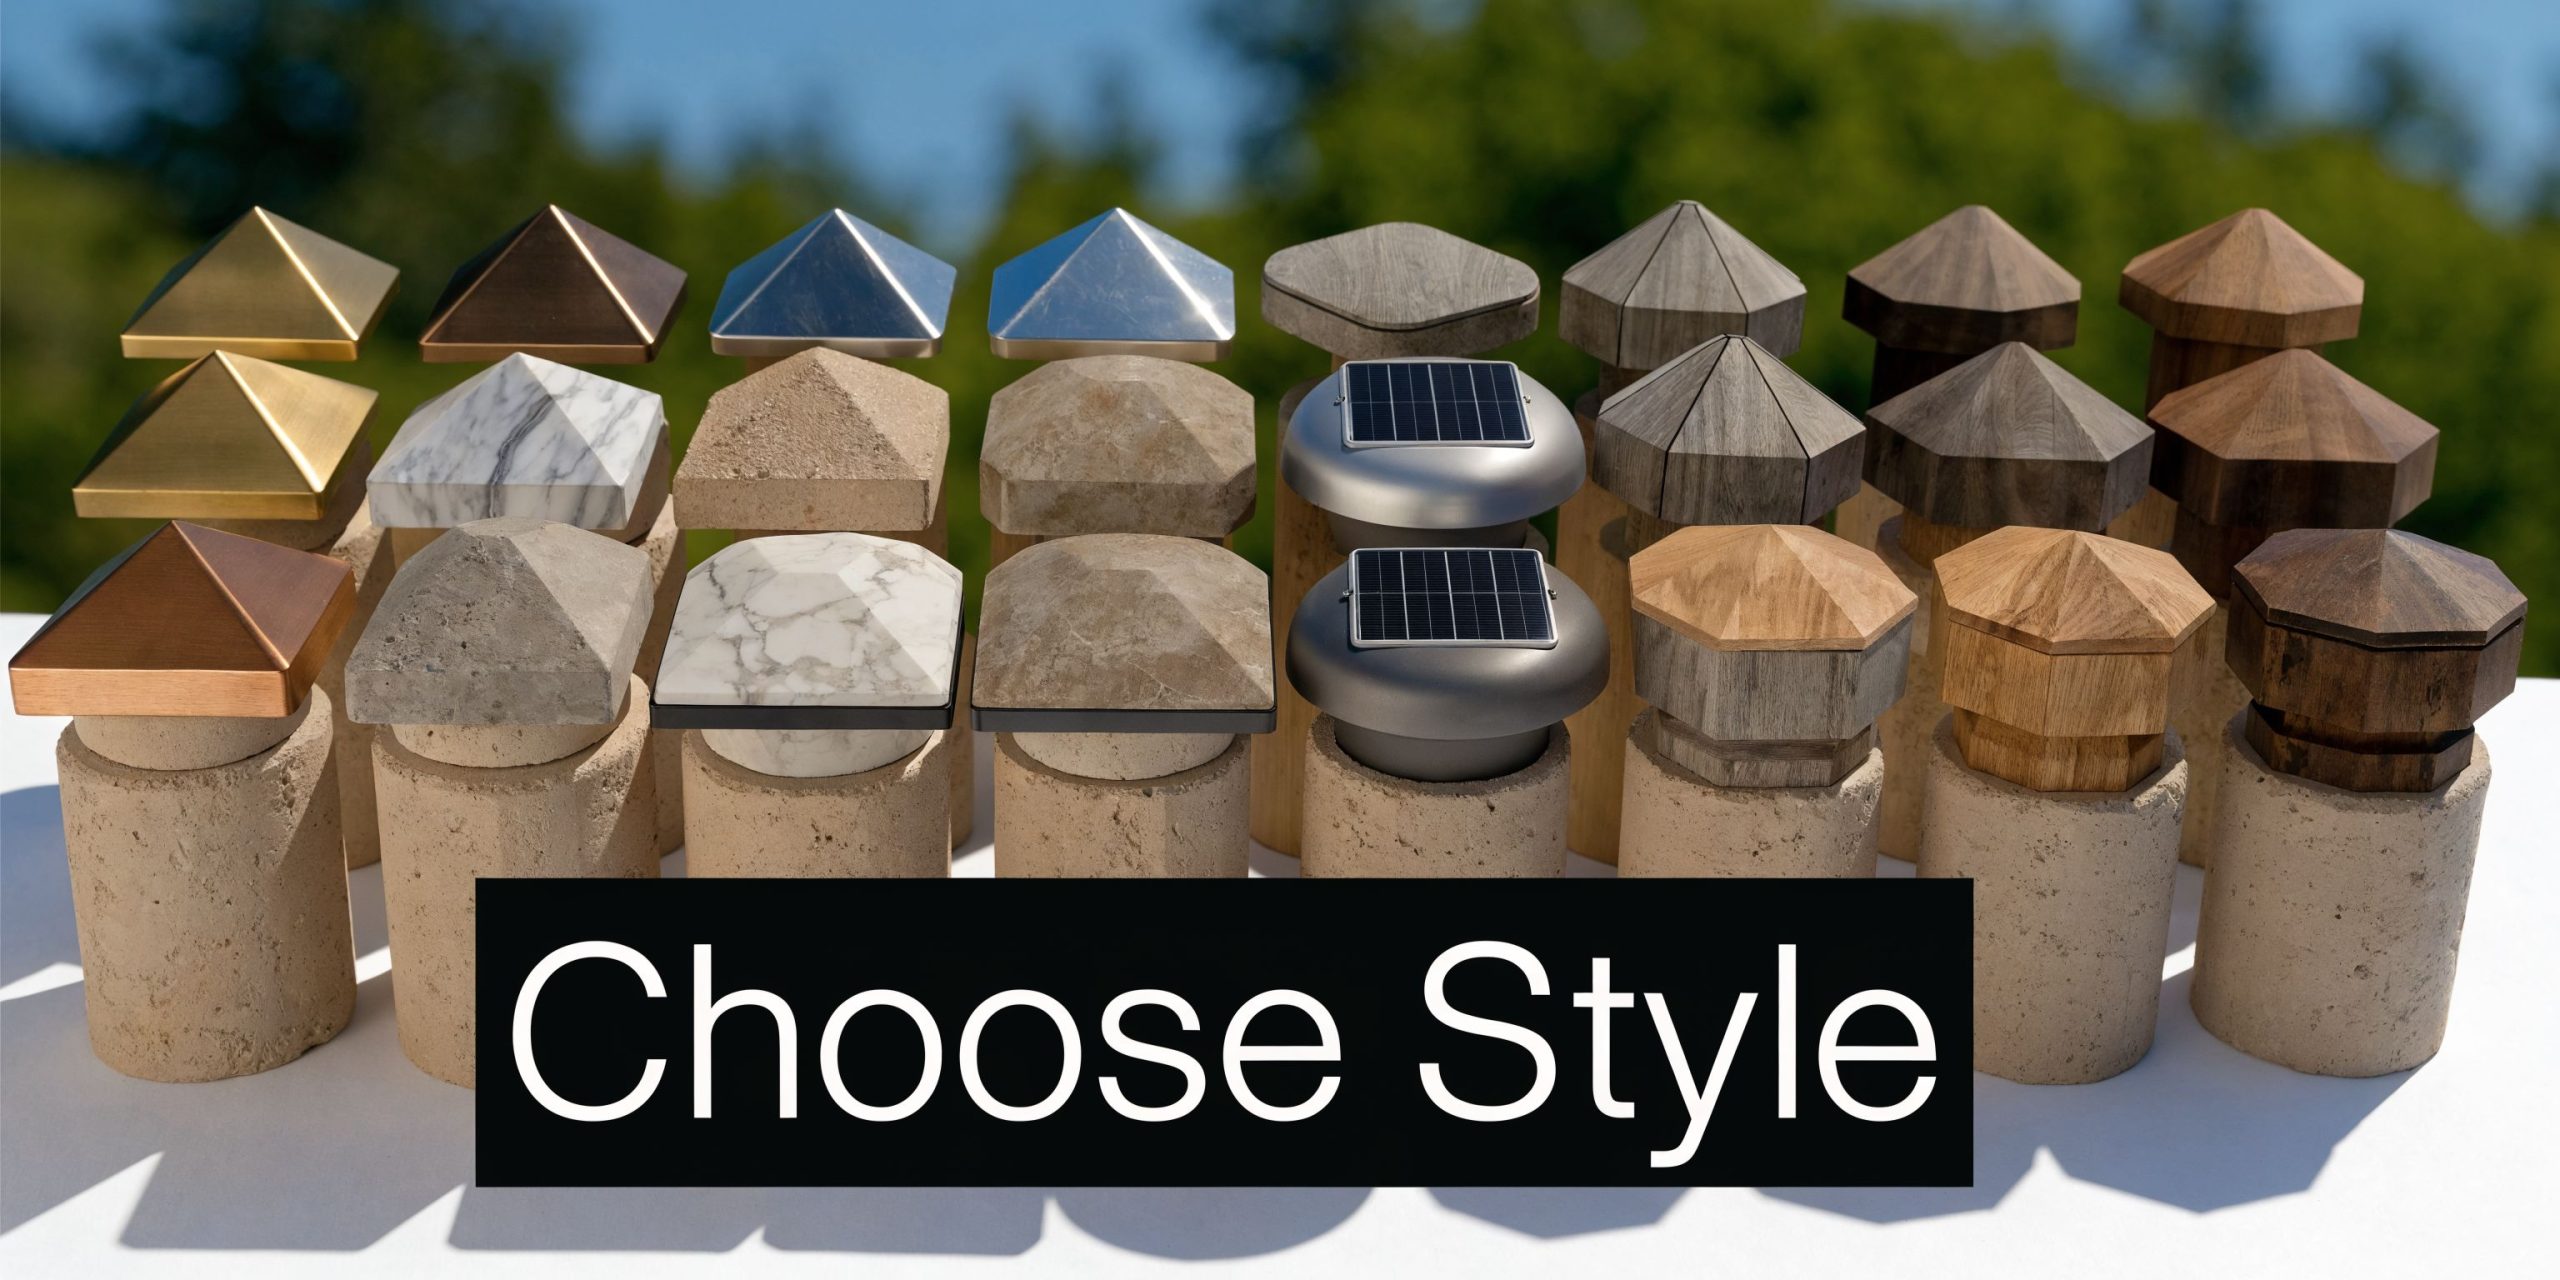
Pyramid caps
Pyramid caps are the safest choice for most decks because they work with almost everything.
They have a clean slope that sheds water well and gives the post a finished top without drawing too much attention. On modern homes, they look crisp. On more traditional homes, they still fit because the form is simple and familiar.
Choose a pyramid cap if your deck has:
- Straight lines and simple rails
- Black or dark hardware
- A modern, farmhouse, or transitional exterior
This is also the style I’d point DIY buyers toward first if they’re unsure. It’s hard to make a visual mistake with a well-sized pyramid cap.
Ball top and finial styles
Ball top caps carry more visual weight. They feel more traditional and more formal.
On the right deck, they can look excellent. They suit heritage-style homes, classic porch railings, older neighbourhood character homes, and some garden-adjacent decks where you want the railing to feel softer and less sharp. On a very modern deck, though, they can look out of place.
What matters here is repetition. If the home already has turned elements, ornamental gate hardware, or classic trim profiles, a ball top cap can echo that language nicely.
Decorative caps
Decorative caps are where people either create a standout finish or overdo the whole railing line.
This category includes more detailed profiles, shaped toppers, and statement pieces from hardware lines such as Decorex Hardware and Nuvo Iron. They can work very well when the deck is part of a more decorative outdoor plan or when the same motifs appear elsewhere in the property.
A few rules keep decorative choices under control:
- Match the cap to the house, not just to the deck.
- Use more restraint on smaller decks.
- Let one feature lead. If the balusters, gates, and lighting are already busy, choose a cleaner cap.
A quick way to narrow the style
If you’re deciding between several options, use this simple filter:
- Choose pyramid if you want clean, versatile, and low risk.
- Choose ball top if the home leans traditional and the railing wants a classic finish.
- Choose decorative if the property already carries ornamental details and the cap is meant to be seen.
A cap should complete the railing line, not compete with it.
This is one of those details that people notice without always knowing why. When the style is right, the deck looks organised. When it’s wrong, the top of every post pulls attention for the wrong reason.
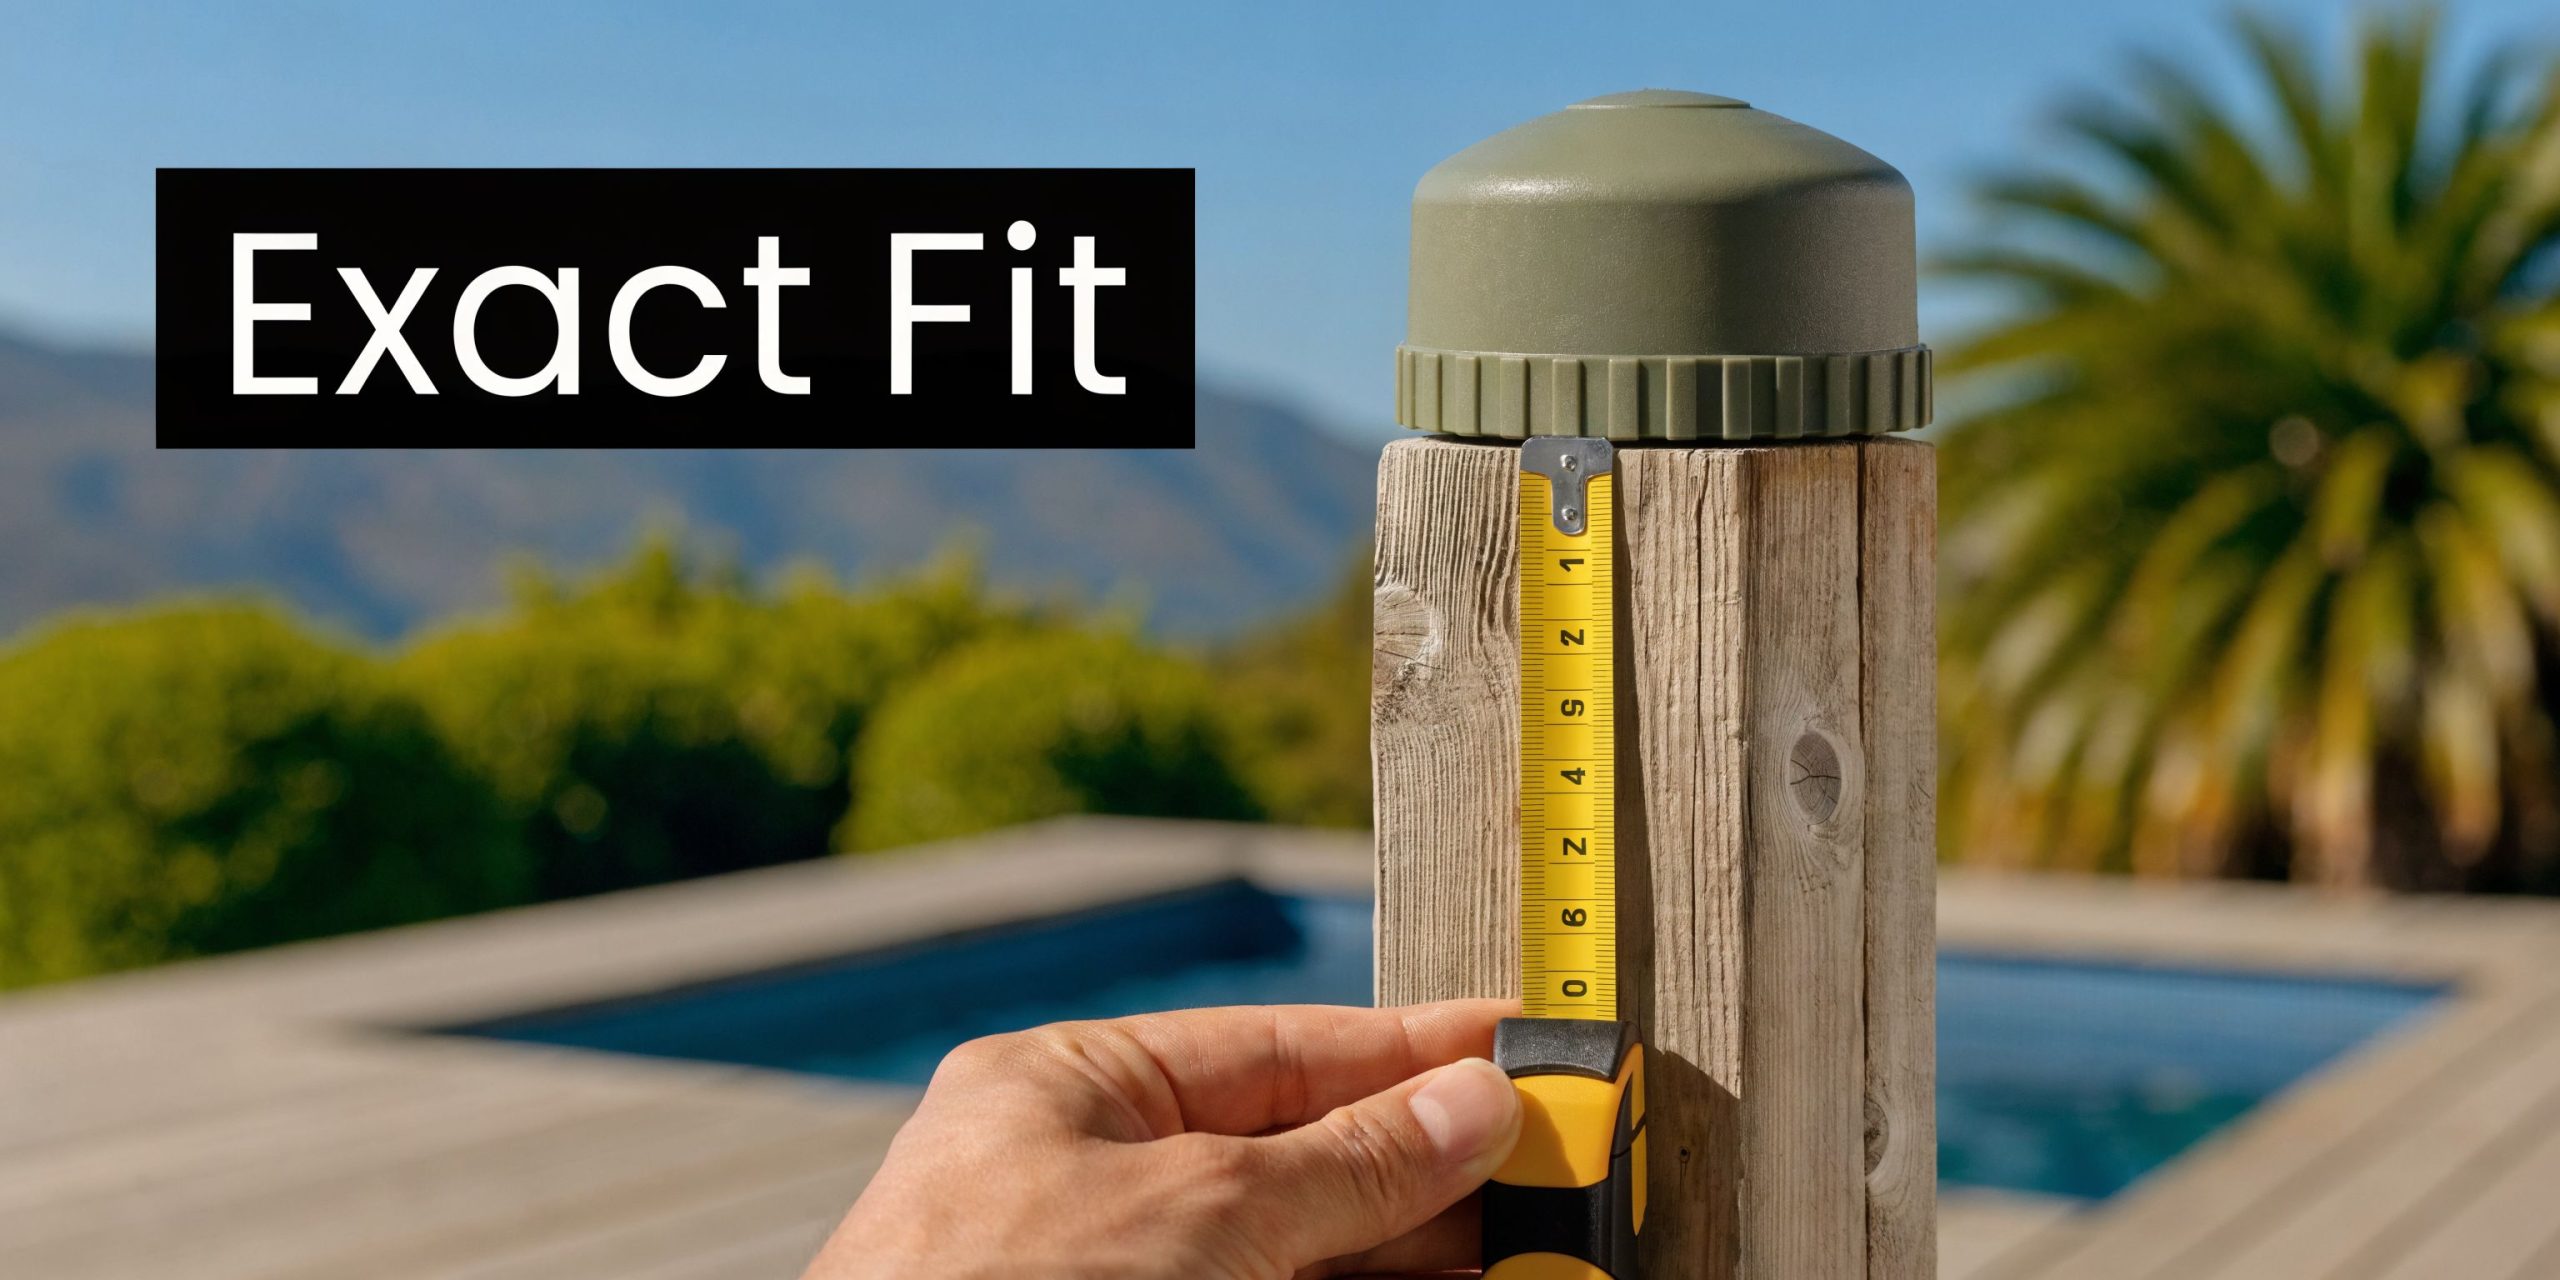
Getting the Post Size and Fit Right
Most ordering mistakes come down to sizing. Not style. Not colour. Sizing.
People see a post sold as 4×4 and assume the top measures four inches by four inches. It usually doesn’t. That’s the trap. In deck hardware, nominal size and actual size are not the same thing, and post caps for decks have to match the actual top measurement.
Nominal size versus actual size
A nominal 4×4 wood post is commonly a smaller dimension than its label suggests. That’s why many caps are labelled for nominal 4×4 posts but manufactured to fit the smaller dimension.
The same issue shows up with 6×6 posts. Some caps fit nominal posts. Others fit true or full-size posts. Those are not interchangeable.
A cap that’s even slightly oversized can look sloppy and may not stay secure. A cap that’s too tight may damage the finish during installation or won’t seat properly.
How to measure a post properly
Use a tape measure across the actual top of the installed post. Don’t measure lower down if the post has swollen, rounded edges, or surface irregularities. Measure the top where the cap will sit.
Do this in both directions, even on square posts. Wood movement, old paint, and minor field variations can throw the dimension off enough to matter.
Follow this sequence:
- Clean the top first: Dirt, finish build-up, or splinters can distort the reading.
- Measure edge to edge: Get the full width at the cap seat.
- Check both axes: Don’t assume the post is perfectly square.
- Note the material: Wood and metal posts often use different fit tolerances.
- Read the product listing carefully: Look for “fits actual” versus “fits nominal”.
Code and structure matter too
Sizing isn’t only about fit and appearance. It also ties back to structural expectations. Building codes like the CBC mandate minimum 4×4 post sizes for most decks but often require 6×6 posts for decks exceeding 6 feet in height or in high-wind zones. The code also requires post-to-beam connections using approved post caps for multi-ply beams, with specified uplift capacities, making the cap a structural safeguard and not just an ornament (Simpson Strong-Tie blog).
That code point matters for two reasons. First, you don’t want to buy a decorative topper when the application calls for a structural connector. Second, larger posts often need a different cap family entirely.
If you’re working with larger posts, this range of 6 x 6 post caps is the kind of category worth checking because it separates sizes that often get mixed up.
Common fit mistakes
The mistakes repeat themselves on job after job:
- Ordering by lumber label only: “4×4” on the invoice doesn’t confirm the top dimension.
- Ignoring finish build-up: Paint and stain can tighten the fit.
- Mixing true-size and nominal products: This is common on custom pergolas and older decks.
- Assuming every manufacturer sizes the same way: They don’t. Read the stated fit.
When to choose a slightly roomier fit
There are cases where a touch more clearance is useful. Posts that have been painted several times, reclaimed posts, rough-sawn material, and older weathered posts may not accept a very tight cap cleanly.
In those cases, a cap designed with practical tolerance can save time and avoid forcing the fit. What you don’t want is visible wobble. A cap should seat cleanly, sit level, and fasten without distortion.
Measure the post you have, not the post you think you bought.
If you get this part right, everything else gets easier. The cap looks better, installs faster, and does its job properly.
Your Guide to Flawless Installation
A good post cap can still fail if it’s installed badly. Most installation problems come from rushing the prep, choosing the wrong attachment method, or trapping moisture under the cap.
The first rule is simple. Start with a sound post top. If the wood is split, punky, badly out of level, or saturated, the cap won’t fix that. Sort the post first.
Prep before fastening
The top should be clean, dry enough for the chosen method, and free of loose fibres. I usually knock down rough edges lightly, remove debris, and check that the cap seats flat before adding any screws or adhesive.
Dry-fitting matters. It tells you whether the problem is the cap, the post, or the finish build-up.
Use a basic prep checklist:
- Clear the surface: Remove dust, flakes, and splinters.
- Check for level: A cap on a badly uneven top will always look wrong.
- Test the fit dry: Never open the adhesive first.
- Inspect drainage shape: The cap should shed water, not create a basin.
Screws versus adhesive
Both methods have their place. Neither is universally right.
Screws are the better option when you want a mechanical connection, especially on caps designed with pre-drilled holes or fastening tabs. They’re also useful where future removal is likely, such as repainting, repair work, or cap replacement.
Adhesive can work well on clean, well-fitting decorative caps where visible fasteners would spoil the look. But it only works when the surfaces are suitable and the cap design doesn’t encourage trapped moisture.
My rule is straightforward. If the cap is structural or designed to be mechanically fixed, use the fastening method intended by the manufacturer. If it’s a decorative cap on a stable post, adhesive can be acceptable when used carefully.
What works on older outdoor structures
On older decks, patio covers, and similar outdoor framing, conditions are less predictable. Posts may have slight twist, uneven tops, or old coatings. In those situations, attachment has to account for movement and exposure.
If you’re comparing cap work with other exterior finishing jobs, this overview of professional patio cover installation is useful because it shows the same broader principle. Exterior details last longer when the fit, fasteners, and weather exposure are all treated as one system.
Installation habits that prevent callbacks
The small details are the ones that save you from trouble later.
- Don’t force a tight cap with a mallet: That can damage coatings or split the post edge.
- Don’t bury every gap in adhesive: Too much product can create a moisture trap.
- Use corrosion-appropriate fasteners: Outdoor hardware needs outdoor fasteners.
- Keep the cap square: A slightly rotated cap is obvious from a distance.
Install the cap so water sheds away from the post. If your method creates a pocket where water can sit, start over.
A neat installation should look almost effortless. The cap sits flat, the alignment matches the rail line, and the attachment method suits the product. That’s what separates a cap that lasts from one that becomes a maintenance problem.
Long-Term Care and Frequently Asked Questions
Post caps don’t need much maintenance if the right material was chosen in the first place. Most of the care is routine inspection, basic cleaning, and catching small issues before they become bigger ones.
What changes from one cap to another is the kind of maintenance. Metal, polymer, copper, and wood don’t age the same way, so they shouldn’t be treated the same way.
Long-term care by material
For powder-coated metal, wash off dirt, pollen, and residue with mild soap and water. If the finish gets scratched, deal with it early so the exposed area doesn’t become the weak point.
For polymer or vinyl, the main job is cleaning. Surface grime can make an otherwise sound cap look worn before its time.
For copper, decide whether you want to preserve the brighter finish or let the patina develop naturally. Neither approach is wrong. It just needs to be intentional.
For wood caps, keep them on the same staining or painting schedule as the rest of the timber details. If the deck gets refinished and the caps don’t, the mismatch shows quickly.
FAQ on older decks and special situations
Can I add post caps to an existing deck?
Yes, but older posts need closer inspection first. A common question involves retrofitting caps onto existing decks. A nuanced solution involves using sleeve anchors for uneven tops rather than just adhesives, as trapped water can cause hidden rot. That’s especially relevant because many inspected decks show some form of moisture damage at post tops (Festool Owners Group discussion).
That tells you two things. First, older posts often need more than a cosmetic add-on. Second, adhesive alone isn’t always the smart answer.
What should I check before retrofitting?
Start with the post top itself.
- Check for softness: Press with a tool, not just your thumb.
- Look for deep splits: Surface checking is one thing. Structural decay is another.
- Confirm the top is reasonably flat: Severe unevenness should be corrected first.
- Choose the fastening method for the condition of the post: Not every old post is an adhesive job.
If the top is badly decayed, replacing or cutting back the damaged section may be the better choice before any cap goes on.
Can I paint post caps?
Sometimes. It depends on the material and finish.
Wood caps are usually the easiest to paint or stain. Some metal and polymer products can be painted, but only if the surface prep and coating compatibility are right. If the product already has a durable finish, painting it may create more maintenance than it solves.
I’d only paint a cap when there’s a clear design reason. Otherwise, buy the finish you want from the start.
Are solar or lighted caps worth it?
They can be, if you want a combination of finishing detail and low-level perimeter lighting. The key is still the same as with any cap. Fit comes first, then weather resistance, then appearance.
A lighted cap that looks good but doesn’t seat properly is still the wrong cap.
How often should I inspect them?
A quick check during seasonal deck cleaning is enough for most homes. Look for loose fasteners, finish damage, trapped debris, and signs that water is not shedding cleanly.
A post cap isn’t a fit-and-forget detail if the post underneath is already compromised.
A well-chosen cap earns its keep. It helps the deck look complete, protects a vulnerable point, and reduces the chance that a small weather problem turns into a repair job.
If you’re comparing sizes, finishes, and styles for your next deck or fence project, XTREME EDEALS INC. carries post caps in common nominal sizes, true-size options, and decorative profiles that help you match the cap to your post's true dimensions.