
You're halfway through a Saturday-morning gate repair when the problem becomes obvious. The wooden side gate drags across the paving, then swings back hard enough to rattle the latch. Tightening hinge screws may steady it for a while, but it won't control the gate's momentum or make it close reliably.
A correctly fitted spring does more than pull a gate shut. It helps manage the swing, return energy through the closing arc, and deliver predictable contact with the latch. For pool enclosures, child-safe areas, accessible routes, and busy driveways, “almost closed” isn't good enough. The hardware has to work with the gate's alignment, latch position, operating force, and applicable California requirements.
Why Your Gate Needs a Spring in the First Place
A gate usually starts misbehaving for one of three reasons: the hinges are worn, the frame has sagged, or the closing hardware no longer matches the gate. Adding a heavier hinge can support weight, but a hinge alone won't provide controlled self-closing. A spring supplies the return force that helps a gate move from open to shut instead of stopping wherever wind, slope, or friction leaves it.
That distinction matters on a wooden side gate. If the gate is heavy and the spring is weak, it may creep toward the post but fail to seat the latch. If the spring is too aggressive, the gate gains speed near the stop and slams. The right setup balances gate weight, momentum, hinge friction, and latch resistance rather than using the strongest spring available.
Practical rule: Fix the gate's alignment before asking the spring to solve a structural problem.
Self-closing hardware becomes more important where people rely on the gate for safety. A pool gate needs a dependable closing action, and a child-safe enclosure shouldn't depend on someone remembering to pull the gate shut. A driveway gate also benefits from controlled movement because repeated slamming loosens fasteners and damages catches.
Performance matters as much as appearance
California accessibility guidance for spring-hinged gates sets a measurable target. A gate should close from a 70-degree open position in at least 1.5 seconds, and exterior doors or gates should operate with a maximum force of 8.5 pounds, as described in California spring-hinge guidance. The separate gate spring adjustment guidance also recommends hanging and levelling the gate first, then adjusting the spring gradually.
That's why a proper self-closing and self-latching gate setup starts with the whole assembly, not the spring alone. The spring must close the gate consistently without making the latch difficult to operate or reducing the clear opening.
Surface-Mounted vs Hinge-Mounted Gate Springs
The two spring types most homeowners encounter are surface-mounted springs and hinge-mounted springs. Both can close a gate, but they behave differently once the gate becomes heavy, the swing direction changes, or the hardware needs adjustment.
A surface-mounted spring sits across the gate frame and post, often using a tension arm, cable, pulley, or anchor point. It's visible, straightforward to retrofit, and useful when you want to add self-closing action without replacing existing hinges. It also gives you room to alter the anchor position and tension after installation.
A hinge-mounted spring places the closing mechanism in or around the hinge barrel. The finished look is cleaner, and the spring's force follows the hinge axis rather than pulling across the face of the gate. That makes it a sensible choice for pedestrian gates where visible hardware would be distracting, particularly when the hinges are already being replaced.
| Feature | Surface-Mounted Spring | Hinge-Mounted Spring |
|---|---|---|
| Appearance | Hardware remains visible on the gate and post | Cleaner profile with the mechanism integrated into the hinge |
| Retrofit work | Often fits an existing hinge arrangement | Usually requires hinge replacement or hinge-specific fitting |
| Adjustment | Tension and anchor position are accessible after fitting | Adjustment depends on the hinge design |
| Gate suitability | Useful for many wood, metal, and chain-link retrofits | Well suited to pedestrian gates and tidy installations |
| Main trade-off | More visible and can pull the frame sideways if poorly aligned | Less forgiving if the hinge leaves don't sit flush |
Surface-mounted hardware is often the practical answer for a heavy wood gate because the installer can position the anchor to improve mechanical advantage. On a light chain-link gate, however, excessive spring tension can twist a slender frame. Hinge-mounted hardware avoids that cross-pull, but it demands accurate hinge alignment.
For pool or child-safety gates, choose based on verified self-closing performance, not appearance. The spring must work with the latch and swing direction, and the release hardware must remain accessible without creating a safety defect. A compatible gate brackets kit can help when the post or frame needs a firm mounting surface.
Tools, Materials, and Pre-Install Checks
Gather everything before removing the gate or loosening a hinge. You'll need a drill-driver, bits sized for the fastener diameter, a socket set or adjustable wrench, tape measure, pencil, torpedo level, safety glasses, and gloves. The spring kit should include the mounting hardware, but check before starting rather than discovering that the anchor bolt or washer is missing with the gate held open.
For a wood gate, keep suitable wood screws or lag screws, washers, and lock nuts nearby. Metal frames may require bolts, nuts, and backing washers rather than ordinary screws. Depending on the spring design, you may also need a gate eye, cable anchor, or additional bracket. A small amount of anti-seize can help on exposed threaded hardware, particularly where future adjustment is likely.

Check the gate before choosing tension
Open and close the gate by hand. It should swing without scraping, binding, or lifting away from the post. Hold the torpedo level against the top rail and hinge-side stile, then correct obvious lean before installing the spring. A spring can add closing force, but it can't straighten a twisted frame or compensate for a hinge barrel that's mounted out of line.
Confirm which side carries the hinges and whether the gate swings inward or outward. This determines where the spring body, bracket, and anchor can sit without interfering with the stop or latch. Mark the spring anchor height approximately 8 to 12 inches from the top hinge, then check that the chosen position leaves enough room for the bracket and fastener heads.
Use the tape measure to confirm the latch and catch line up at the same height. If the gate already misses the receiver, solve that first. A misaligned gate will make even a quality spring look defective because the mechanism is forced to pull against friction at the final part of the swing.
- Drill and bits: Match the pilot-hole size to the fastener and the gate material.
- Level and pencil: Mark a straight bracket line and preserve the hinge geometry.
- Washers and lock nuts: Spread the load and reduce the chance of hardware loosening.
- Gloves and safety glasses: Protect your hands and eyes while drilling and tensioning.
Mounting and Tuning the Spring on Your Gate
Start with the gate supported and the hinges carrying it in their normal position. Mark the bracket on the hinge-side post at the height you checked earlier. Pre-drill the pilot holes, especially in timber, because driving lag screws directly into a dense post can split the wood or push the bracket out of alignment.
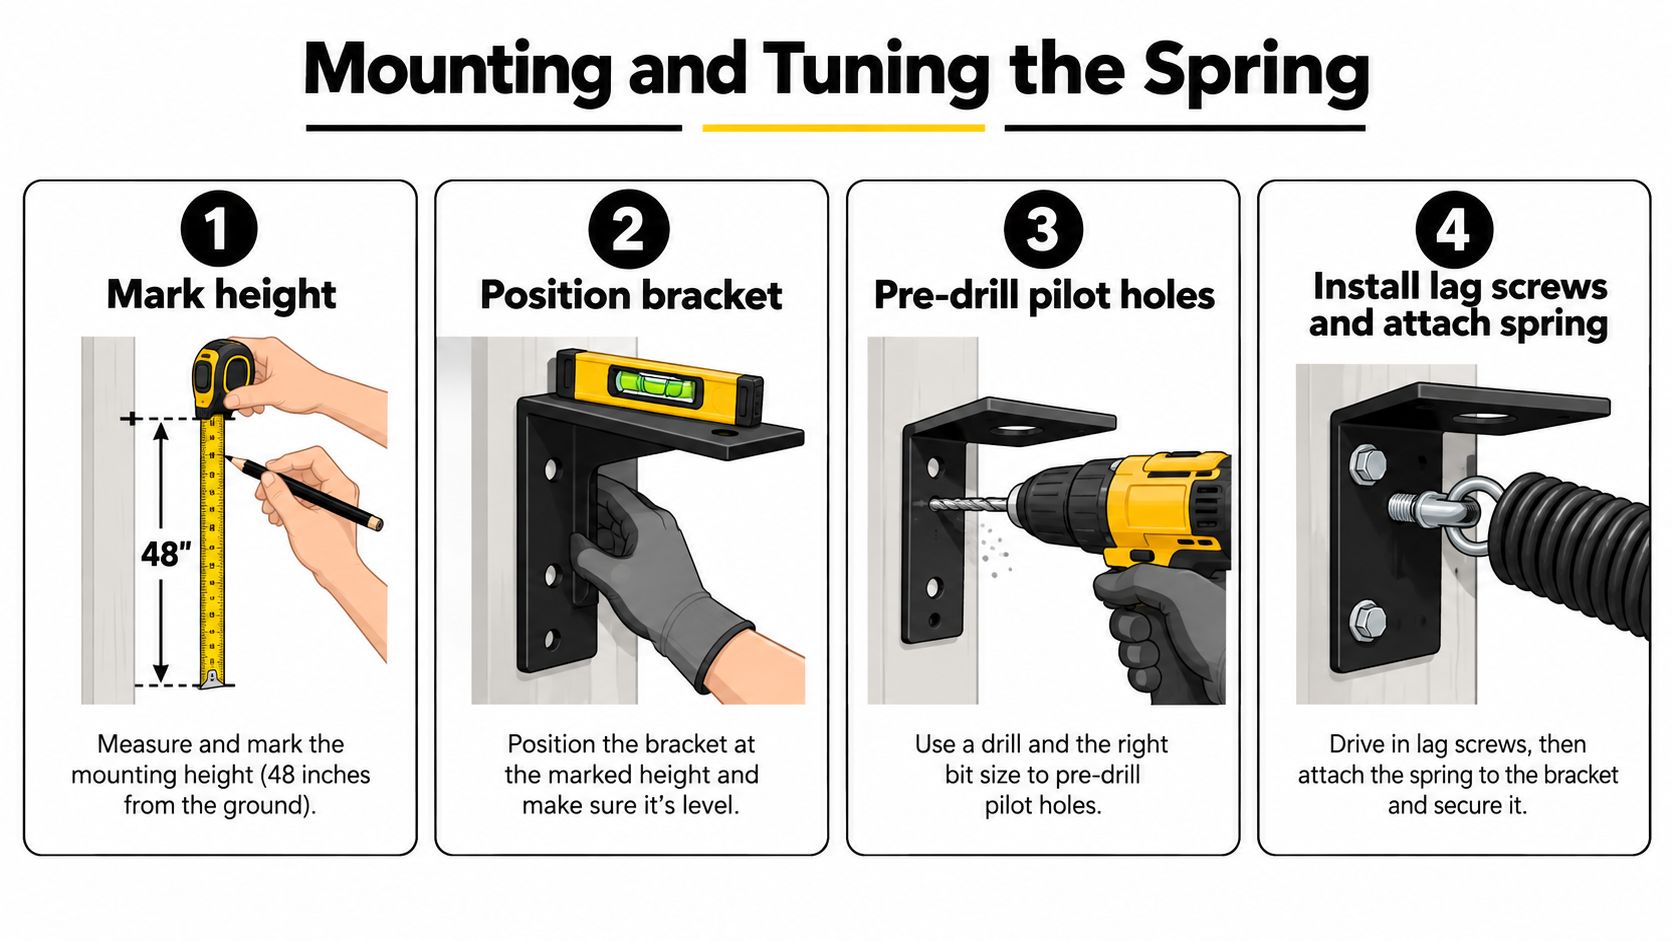
Fit a surface-mounted spring
Clamp or hold the spring body against the inside corner of the gate frame, following the kit's orientation. The pulley or arm should sit level with the latch-side anchor. If the two points are at different heights, the cable will pull diagonally, adding friction and encouraging the bracket to shift.
Feed the cable through the pulley before securing the far-end eyebolt. Keep the cable clear of the latch, gate stop, and frame corners. Tighten the fasteners until the bracket is firm, but don't crush a hollow metal section or strip a timber fixing.
Fit a hinge-mounted spring
If you're installing a spring-loaded hinge, remove the existing top hinge only after supporting the gate. Seat the new hinge leaves flush against the gate and post, then drop the spring-loaded pin into the barrel as the product design requires. The hinge should turn smoothly before any tension is added.
Open the gate to 90 degrees and add tension gradually, using one-half turn at a time where the hinge or spring design permits that adjustment. After each change, let the gate close and inspect the latch contact. Small adjustments are easier to diagnose than several turns made at once.
Use a stopwatch to time the closing arc. For a pool-access gate, aim for approximately 1.5 seconds, while remembering that California guidance specifies closing from 70 degrees in at least 1.5 seconds. Check the closing force at the latch edge with a luggage scale, keeping the pull below 8.5 pounds for an exterior gate, in line with California operating-force guidance.
Set the latch so the gate meets the catch cleanly without needing a shove. Run at least five complete opening and closing cycles. Watch for a changing gap, cable rub, hinge lift, or a latch that catches only when you push the gate by hand.
For a visual reference, this video shows the kind of alignment and tension sequence to observe:
California projects may involve more than spring adjustment. Accessible-route and gate provisions require doors or gates in common-use areas to provide 36 inches of width, 80 inches of height, and a 32-inch clear opening at 90 degrees, with accessible-route rules also specifying a 32-inch clear minimum. The spring, hinge, latch, and closer hardware must preserve that usable opening.
Pool gates have their own requirements. El Dorado County's pool barrier information states that pedestrian access gates through the enclosure must open away from the pool, be self-closing, and use a self-latching device located at least 60 inches from the bottom of the gate. If the release is lower, the guidance specifies a pool-side position at least 3 inches below the top, with a 1/2-inch maximum opening zone within 18 inches of the release.
Troubleshooting Common Gate Spring Problems
A gate rarely tells you the exact failed part, so diagnose the movement rather than immediately increasing tension. Close speed, hinge alignment, latch position, and frame stiffness all affect the final few inches of travel.
| Symptom | Likely Cause | Quick Fix |
|---|---|---|
| Gate closes slowly | Spring is under-tensioned or the hinge side is sagging | Add a small adjustment and restore plumb before testing again |
| Gate slams | Spring is over-tensioned or the latch sits too low | Reduce tension, then reset the catch so it resists just before the stop |
| Latch misses | Receiver or latch bar is laterally misaligned | Loosen the receiver, move it into line, and cycle the gate |
| Gate drifts open | Spring return is weak or a hinge pin is worn | Inspect the pin and replace worn hinge hardware before increasing tension |
| Coil rubs or cable makes noise | Bracket has shifted or the cable path is uneven | Reseat the bracket flush and confirm both fasteners hold solid material |
A sluggish gate may need more spring, but first check whether the bottom hinge has moved or the post has leaned. A small hinge-side correction can restore the swing without loading the spring harder. If the gate slams, backing off the spring is safer than trying to soften the impact with a loose latch.
When the latch refuses to catch even though the speed feels right, inspect the receiver position. A small sideways error is enough to make the latch bar strike the edge instead of entering the pocket. Loosen the receiver, nudge it into line, and test the gate with the same opening angle each time.
A gate that drifts open after appearing to latch may have a worn hinge pin or a spring that has lost return force. Look for a groove on the pin and for movement at the hinge barrel. Replacing the worn pin or upgrading the spring can be more effective than repeated tension changes. For broader diagnosis, keep the hardware troubleshooting guide nearby.
Record each adjustment. Note the spring position, anchor location, latch movement, and what changed after the test. That simple record stops future maintenance from becoming guesswork.
Maintenance Habits That Keep a Gate Spring Working for Years
Treat the spring like brake hardware. It controls movement, so a quick visual check is more valuable than waiting for the gate to fail. Wipe the coil and cable with a dry rag, then apply a silicone-based lubricant to moving parts. Avoid WD-40 on coated springs because it can strip the protective finish.
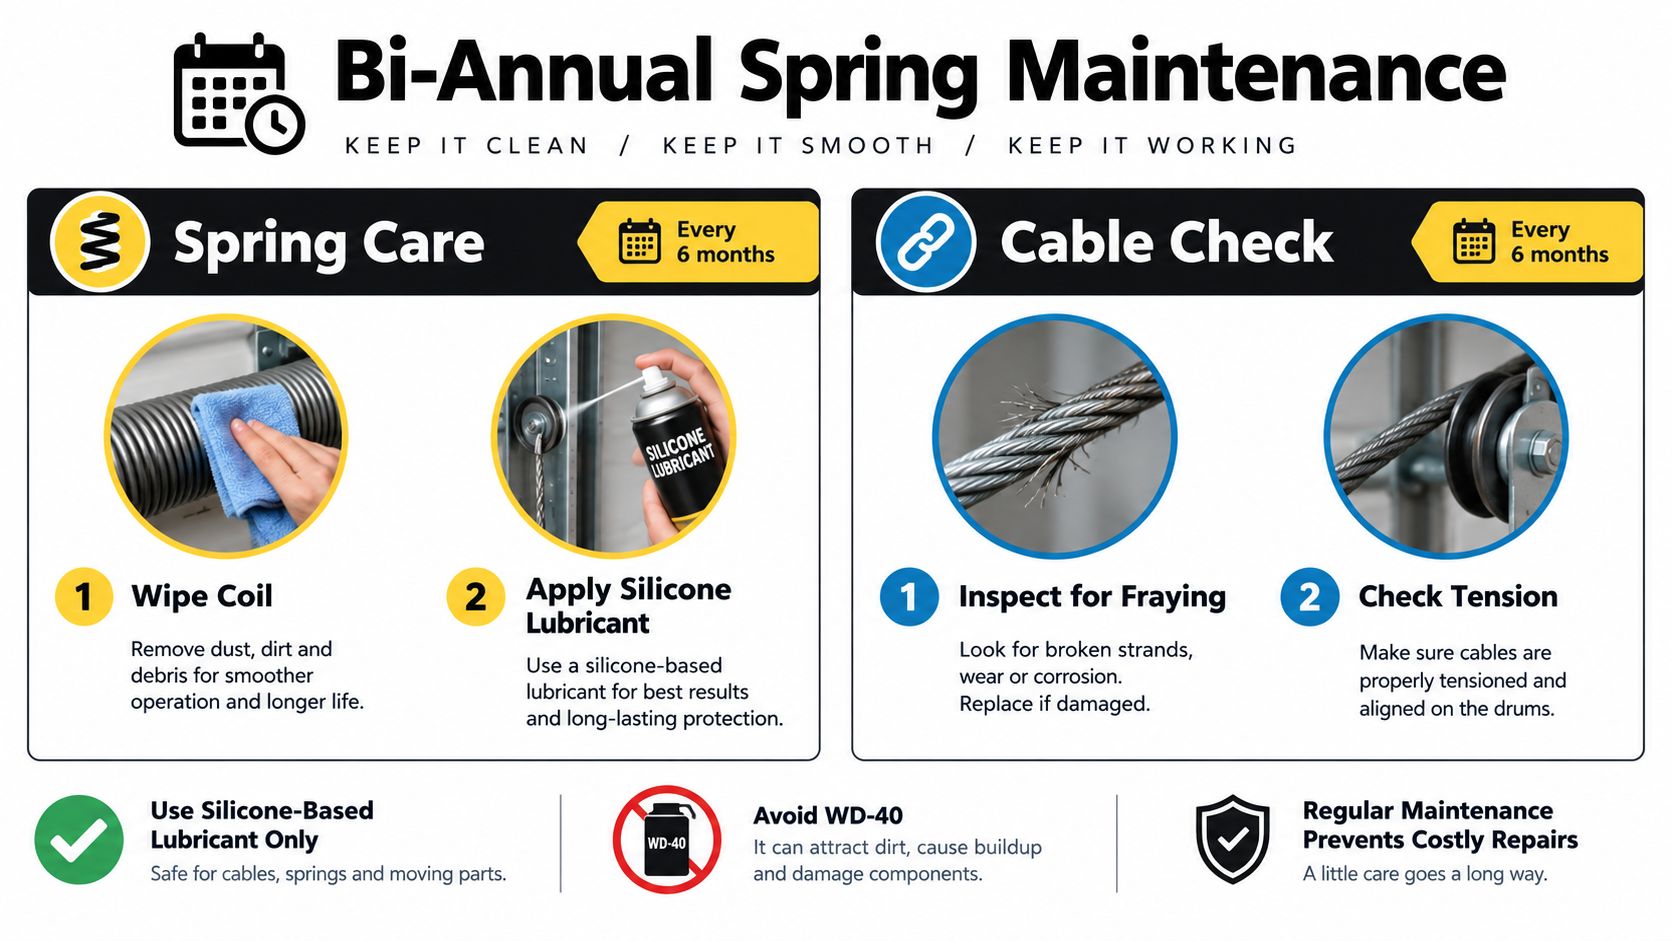
Use a seasonal inspection routine
Check the bracket screws and hinge pins twice a year. Vibration can loosen the bracket gradually, while a worn pin allows the gate to sag and changes the spring's working angle. Inspect the frame as well. If you find a quarter inch of sag over six months, address the hinge side instead of asking the spring to carry the misalignment.
Time the closing speed during each inspection. Cold weather can thicken grease and slow movement, so a gate that worked neatly in warm conditions may need cleaning or a careful adjustment later. Keep vegetation trimmed away from the swing path, and clear dirt from the latch opening so the bar can seat fully.
- Spring care: Wipe away grit and use silicone-based lubricant on moving joints.
- Cable check: Look for fraying, rubbing, kinks, or a shifted anchor.
- Fastener check: Snug loose screws and bolts without crushing the frame.
- Hinge check: Replace pins that show grooves, looseness, or visible wear.
If the spring loses tension faster than you can tune it, or the coils show visible rust, stop patching the same fault. The gate may need a complete hinge and hinge-yard hardware upgrade, not another turn of the adjuster. A sound spring installation should make the gate predictable, quiet, and easy to latch through ordinary daily use.
XTREME EDEALS INC. offers gate hinges, brackets, fasteners, washers, anchors, and other deck and fencing hardware for DIY homeowners and trade professionals working on repairs like this. Browse the gate spring installation supplies at XTREME EDEALS INC., match the hardware to your gate material, and gather the complete fixing set before you start tuning.