
You've probably seen it on a gate you meant to “sort out later”. The latch starts missing, the leaf drags, and the whole thing takes on that tired, hanging look that says the hardware wasn't matched to the job in the first place. In the field, that usually isn't a trim problem or a bad paint job, it's a bracket problem.
A gate brackets kit is the part of the system that transfers load from the gate frame to the post, and if that connection is weak, everything else fights uphill. In California, that matters because gate hardware has to fit within the state's code framework, where the California Building Code is updated on a triennial cycle and the 2022 edition was adopted for use beginning in 2023. That's why bracket choice isn't just “what looks tidy”, it's a structural and compliance decision in a market with codified rules for exterior assemblies. For a practical background on gate reliability in residential work, the residential gate security study is worth a read, and if you're comparing hinge layout at the same time, the install notes at XTREME EDEALS' gate hinge installation guide are a useful companion.
Why Gates Sag and What a Bracket Kit Is For
A gate usually doesn't fail all at once. It starts with a little drop on the latch side, then a rub at the bottom, then a nudge to get the latch to catch, and before long the homeowner is lifting the leaf every time they close it. The first thing many blame is the hinge, but the actual culprit is often the whole bracket-to-post connection losing its hold.
The gate is hanging from a load path, not just a hinge
Think of the gate brackets kit as the gate's load-transfer system. The hinge bracket takes the weight, the post-side bracket keeps that weight anchored, and the fasteners decide whether the assembly stays rigid or slowly works loose under opening, closing, wind, and everyday use. When those pieces are undersized or poorly matched to the post, the gate starts to rack, sag, or twist.
That's why treating brackets as decorative hardware is the fastest way to end up with a gate that needs seasonal rescue work. In California, the code environment pushes contractors and DIY users towards approved fastening and support methods for exterior assemblies, so old habits from “whatever worked last time” don't really cut it anymore. The bracket is not the accessory. It's the structure.
A lot of homeowners only notice the problem when the gate no longer swings freely. By then, the wood has usually started to deform around the fasteners, or the post has moved enough that the latch line is off. A sensible replacement path starts with the right bracket kit, then the right post, then the right fastener pattern.
Practical rule: if the gate's swing feels heavier than it did on day one, don't assume the hinge is the only issue. Check the bracket, the post, and the fasteners together.
What Comes Inside a Gate Brackets Kit
A good kit is less like a box of loose parts and more like the skeleton of the gate. Each piece has a specific job, and if one part is missing or flimsy, the whole frame ends up carrying stress it shouldn't.
The pieces that matter
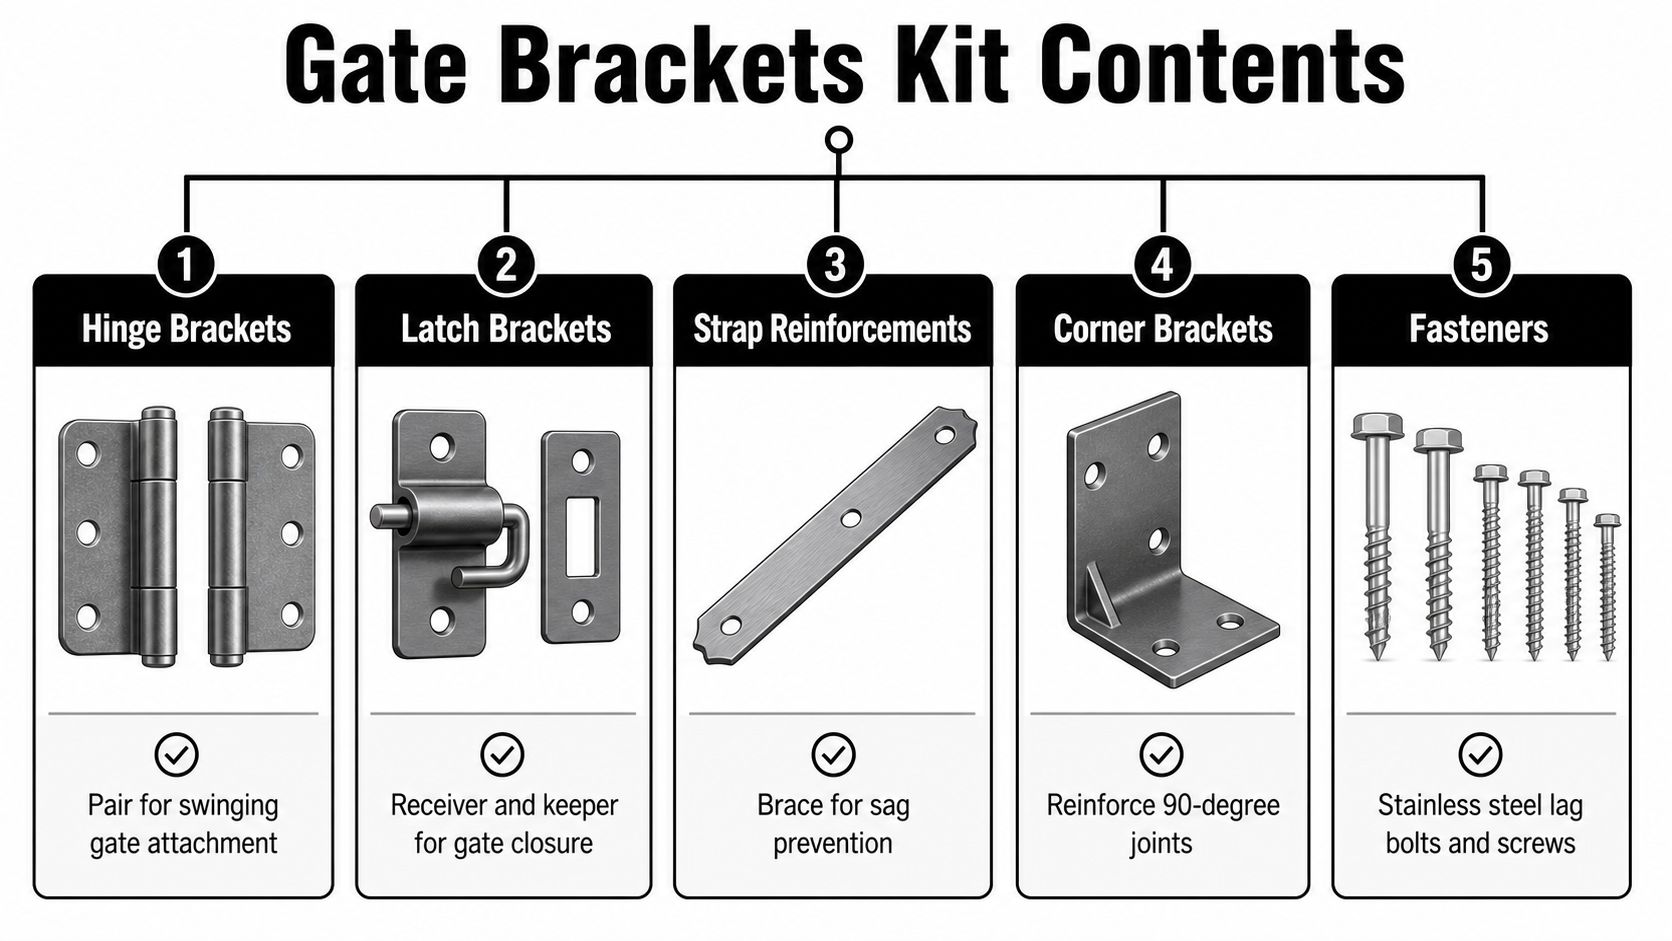
Hinge brackets are the frame-side anchors that let the gate swing. They're the part most users notice first, but they only work properly when the post-side connection is rigid enough to hold alignment.
Latch brackets give the gate a reliable closing point. On many product listings, the latch receiver and keeper are treated as an afterthought, but on site they matter just as much as the hinge side because a sloppy latch setup makes a solid gate feel cheap.
Strap reinforcements help resist sag. On wooden gates especially, they spread load across more of the frame so the gate isn't hanging on a small area of timber.
Corner brackets stiffen the 90-degree joints. They're simple, but they keep the frame square, which is the difference between a gate that tracks true and one that slowly turns into a parallelogram.
Fasteners should be part of the kit, or at least clearly specified. In exterior work, I want stainless steel lag bolts and screws, or equivalent exterior-rated hardware that matches the bracket material.
The product page should make it clear what's included and what isn't. Some kits bundle hinges and latches, then leave you hunting for fasteners. That's annoying on paper and even worse on install day, because it breaks sequencing and leads to mismatched hardware.
If you're buying for a fence or deck project, the listing should tell you whether the kit includes the whole support system or just a couple of brackets and a hope. That distinction affects both cost and the order you can install things in.
Materials and Coatings That Actually Last Outdoors
The finish on a bracket isn't about shine. It's about whether the hardware still clamps tightly after a season of wet weather, temperature swings, and repeated movement. In Canadian conditions, that matters even more because chloride from de-icing salt, humidity changes, and exposure all chip away at exterior hardware over time.
What each material really gives you
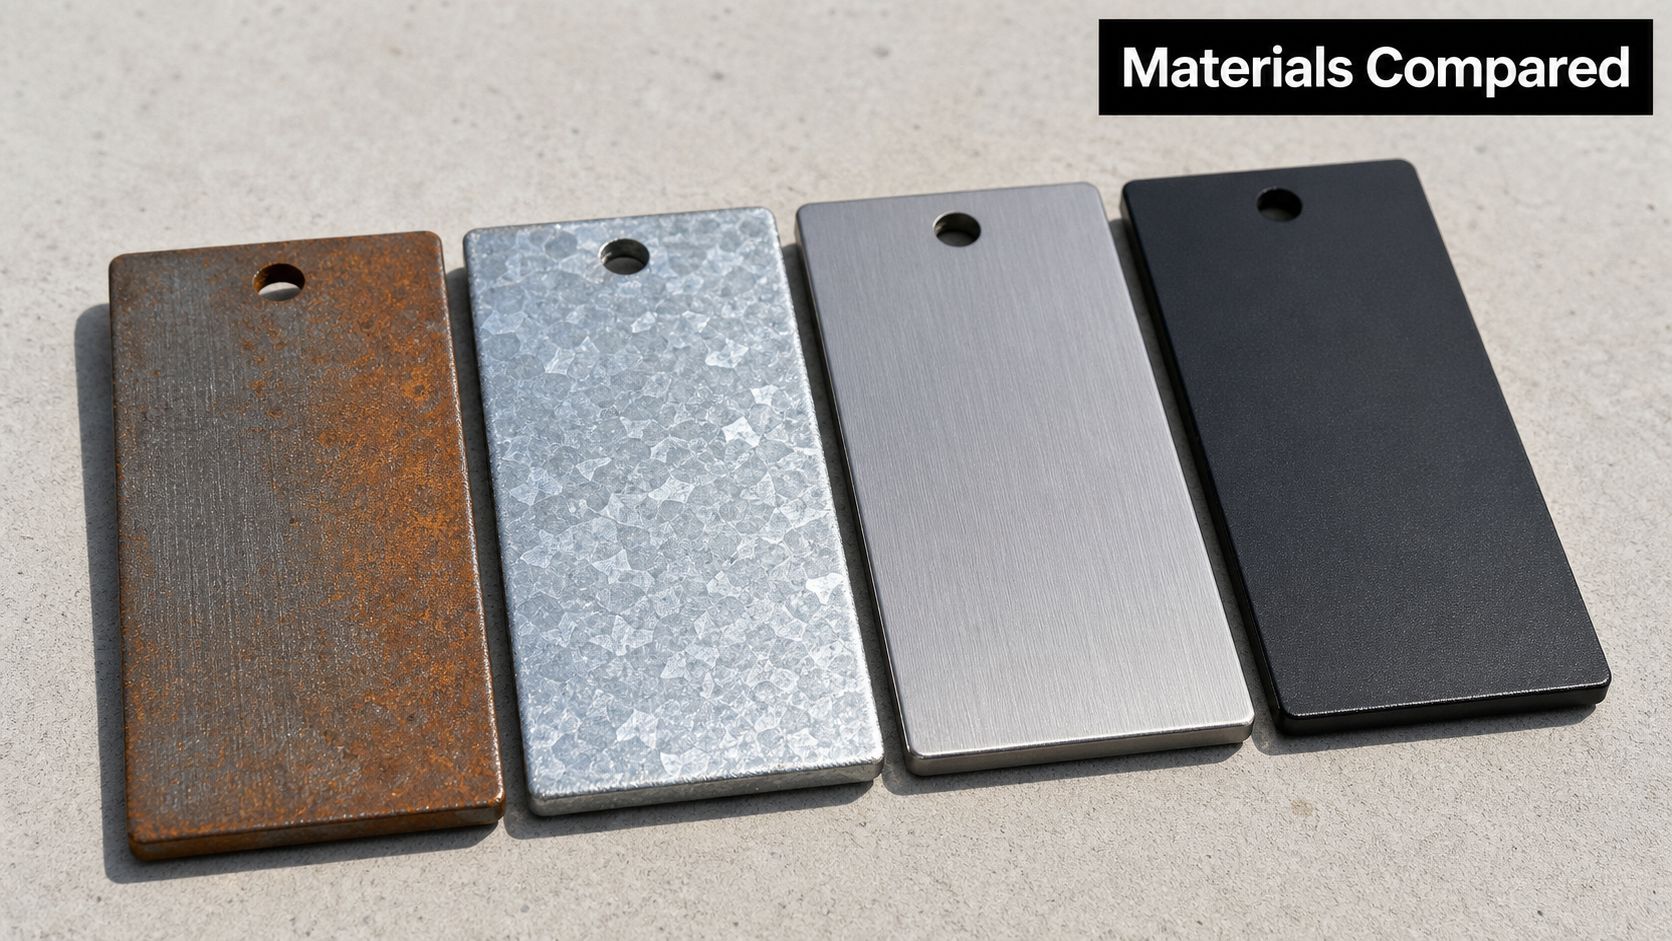
Raw steel is the bargain option, but outdoors it's a short-term play. If it isn't protected well, corrosion starts early, and rust doesn't just look ugly. It reduces the section thickness and the clamp force that holds the bracket tight.
Hot-dip galvanised steel is the sensible middle ground for many exterior jobs. It gives better corrosion resistance than raw steel, and for ordinary fence lines it can be a practical choice if the site isn't especially harsh.
Stainless steel is the material I reach for when the gate is exposed, the maintenance cycle is long, or the property sits near salt. Canadian exterior practice favours hot-dip galvanised or stainless hardware for that reason, and the benefit isn't cosmetic. It's about preserving alignment and slowing down joint loosening.
Powder-coated hardware can look tidy and give decent protection, but the coating only helps if it stays intact. Once the surface is chipped or cut, you've opened the door to corrosion at exactly the point that takes the most stress.
The primary trap is mixing metals carelessly. Pairing stainless brackets with plain-steel screws, or combining incompatible fasteners and coatings, can accelerate galvanic corrosion. That's where the joint ages faster than the rest of the assembly, and the clamp force drops before the gate visibly fails.
If the gate is on a coastal line, a commercial access point, or anywhere de-icing salt lives in the air, paying for better metallurgy is a structural decision, not an upgrade for the sake of it. That's where a properly specified kit earns its keep.
Sizing the Kit to Gate Weight and Post Type
The bracket has to match the gate, but it also has to match the post. I've seen more failures from a strong bracket screwed into a weak post than from a modest bracket used on solid timber. The bracket can't outmuscle a post that flexes, splits, or gives way under load.
Match the hardware to the support
The Ontario Building Code framework treats environmental loads seriously, which is the right way to think about gate hardware too. Wind and snow don't just matter for roofs. They influence the lateral and gravity loads that work on a gate every time it moves, especially on taller leaves where swing forces get amplified.
Here's the practical rule set I use:
| Bracket Class by Gate Weight and Post Size | Gate Weight Range | Typical Post Size | Recommended Bracket Class | Fastener Approach |
|---|---|---|---|---|
| Light residential leaf | Lower-weight wood gate | Nominal wood post in good condition | Standard exterior bracket kit | Exterior-rated screws or bolts with proper embedment |
| Mid-weight gate | Heavier wood or framed composite leaf | Substantial wood post or equivalent rigid support | Heavy-duty bracket kit | Through-bolting preferred, not short screws |
| Large or exposed gate | Tall gate, wind-loaded opening, or commercial access point | Oversized post with strong embedment | Reinforced bracket kit | Through-bolts, backing support, corrosion-resistant fasteners |
That table doesn't replace site judgement, but it keeps people from overspecifying the bracket and underspecifying the post. A heavy-duty bracket on a thin post still fails if the post twists or the screws withdraw.
The most common weak point is short wood screws into undersized timber. They feel solid at first, then the gate starts cycling, and the holes elongate. For a larger post option, the fitting guide at XTREME EDEALS' bracket for 6 x 6 post page is a practical reference when the post has real mass behind it.
A gate doesn't care what the catalogue said. It cares whether the post can hold alignment after a hundred swings and a wet season.
Measuring and Prepping Before You Drill
The install goes better when the measuring is done like a carpenter, not like someone trying to save five minutes. You want the opening, the post faces, and the hinge line checked before any holes are committed, because once the bracket is on crooked, every later adjustment gets harder.
The sequence that saves rework
Start by checking the opening width and confirming the posts are plumb. If the hinge-side post is leaning, the bracket will inherit that error and the gate will fight it from day one. Then dry-fit the gate in place so you can see the actual gap and whether the leaf has enough clearance to swing without scraping.
Next, mark bracket locations with the gate held where it really needs to live, not where it looks centred from ten feet away. That's the point where many DIY installs go wrong. They measure from the wrong edge, drill too early, and end up fixing alignment with shims that only mask the real problem.
Use the time to check what kind of anchor path you've got. If you're dealing with concrete or a hybrid support condition, concrete screw anchors may be part of the fastening plan, but the key is still the same. The post and the bracket need a fastening method that matches the load.
- Measure the opening, then check both posts for plumb.
- Dry-fit the gate, so the bracket position reflects real swing clearance.
- Mark the mounting points, but don't drill until the alignment looks right.
- Pre-drill carefully, using a hole sized for the fastener and the material.
- Through-bolt where possible, especially on larger exterior gates.
- Leave room for tuning, because the first swing usually tells you what the eye missed.
The best prep work is boring. That's a compliment. It means the gate went up without drama.
Installing the Brackets Without Stripping the Post
The install itself is mostly about not forcing the hardware into a position the wood doesn't want to hold. If the pilot holes are wrong, the bolts are too short, or the post face crushes under over-tightening, the bracket loses bite and the gate starts moving again.
The order that prevents damage
Begin with the pilot holes, then attach the hinge brackets loosely enough to allow adjustment. A 1/8" bit for 3/8" lag bolts is a useful reference point shown in the installation guide, and the point of the pilot hole is to keep the wood from splitting while still letting the fastener bite cleanly. When you move to the bracket, use 3/8" x 3" lag bolts where that hardware matches the job and the support.
After the hinge side is on, level and shim before you fully lock it down. Stainless shims are handy because they let you fine-tune the line without creating another corrosion problem at the contact point. Then hang the gate panel, check the swing, and only after that set the latch side.
The mistake I see most often is over-tightening carriage bolts until the wood crushes around the bracket. Once the fibres compress, the hole opens up and the bracket starts creeping. Leave the fasteners slightly adjustable for the first swing, because a gate that drops a few millimetres can often be corrected without drilling new holes.
Quick troubleshooting on install day
- Sag appears immediately, the post is moving or the fasteners aren't bearing properly.
- Racking shows up on the first swing, the frame isn't square or the diagonal support is wrong.
- Latch misses by a small amount, the hinge line needs a shim or a post adjustment.
- Noise or scraping starts right away, the gate is too low or the bottom edge needs clearance.
For shop-level hardware sourcing, XTREME EDEALS INC. carries gate-related components alongside other exterior hardware, including products from brands such as Decorex Hardware. That matters when you want the replacement path to stay within one order instead of chasing pieces from three different suppliers.
Troubleshooting Sag, Racking, and Latch Miss
Once a gate is in service, the symptoms usually tell you what failed first. The trick is not to throw a whole new kit at it before you've isolated the actual cause.
What the symptoms are saying
A gate that sags within a season is usually showing fastener withdrawal or an undersized hinge bracket. The cheapest fix is often a longer or better through-bolted fastener, not a full rebuild.
A gate that racks diagonally is usually losing squareness under load. That can come from a single-corner bracket taking too much stress, or from posts that weren't tied back well enough. In those cases, adding diagonal support or upgrading the tie-in is smarter than replacing the visible hardware first.
A latch that stops catching often points to post movement, not latch failure. The hardware gets blamed because it's the part people touch, but the post has usually shifted enough that the catch line no longer matches.
A gate that drags can be a height issue, an alignment issue, or both. Sometimes the fix is to raise the leaf slightly. Sometimes the bottom edge needs trimming. If the hinge line is off, nothing else will stay stable for long.
For homeowners looking for broader exterior maintenance ideas, find exterior improvement tips is a useful reference point, especially if the gate problem sits alongside fence, deck, or other outdoor repair work.
DIY homeowner checklist
- Check the fasteners first, especially if the gate was installed with short screws.
- Look for wood crushing or elongated holes, because those point to lost clamp force.
- Inspect the post, not just the latch, when the closure is off.
Contractor checklist
- Verify metallurgy, because mixed metals shorten service life in harsh exposure.
- Check the post footing or embedment, not just the bracket face.
- Confirm frame squareness under load, since a gate can look square while hanging and still rack when swung.
The fix with the highest return is the one that restores stiffness at the load path, not the one that makes the gate look straight for a day.
Maintenance, Corrosion Checks, and When to Upgrade
A gate brackets kit isn't something you install and forget. It's a serviceable assembly, and the hardware tells you when it's slipping if you're willing to look closely. Twice-yearly checks are enough for most properties to catch loosened fasteners, early rust, hinge wear, and the little shifts that become bigger jobs later.
What to inspect and when to stop repairing
Start with the obvious. Tighten fasteners that have backed off, look for rust at cut edges, and check whether the hinge leaf still sits flat against the post. On powder-coated parts, re-seal any cut ends or scratches before moisture gets a long-term path into the metal.
Upgrade instead of patching when you see visible pitting, a bent strap, or elongated screw holes. Those are signs the bracket has already lost part of its structural performance. At that point, another round of tightening just delays the same failure.
If you're replacing components, it helps to stay within a catalogue that carries the whole ecosystem. XTREME EDEALS INC. stocks related pieces such as post caps, hinges, fasteners, joist hangers, and gate hardware, including items from brands like Decorex Hardware. That makes it easier to move from a worn bracket to a compatible replacement without mixing parts that don't belong together.
The actual cost question isn't the sticker price of one kit. It's the service life you get from the hardware you chose and the maintenance you're willing to do. A maintained stainless kit can stay in service far longer than an economy kit that gets ignored, and that gap is where the savings live.
A CTA for XTREME EDEALS INC.. If you're ready to replace a worn gate brackets kit or spec one for a new fence or deck opening, browse the current hardware range, compare bracket materials and post-fit options, and pick the parts that match the load and exposure on your site before the next install day.