
You're probably dealing with one of these right now. A gate that used to close with two fingers now needs a shoulder check. A deck light worked last month, then the last rain came through and now half the run is dead. Or a smart lock on the side gate beeps, flashes, and still won't do the one job it's supposed to do.
Splitting these into two buckets is common. Structural hardware over here. Electronics over there. That's a mistake. On an actual property, they fail together. A leaning post throws latch alignment off. A corroded fastener lets water into a fixture mount. A “dead” smart light turns out to be a loose low-voltage splice behind a fence post. Good hardware troubleshooting starts the same way every time. Slow down, isolate the failure, and figure out whether you need a wrench, a meter, or a replacement part before you spend a dollar.
Why Hardware Fails When You Least Expect It
You lean on the fence gate on Saturday morning, hear that metallic groan, and watch the latch side drop just enough that it scrapes. Later that day, you step onto the porch, tap the app for the smart light, and nothing happens. Those don't feel related, but they usually are. Both failures were building for months.
Wood moves. It swells when it takes on moisture and shrinks when it dries. Posts twist a little, rails shift a little, and hinges start carrying loads they weren't lined up to carry in the first place. Then somebody blames the hinge, when the post was the first thing that moved.
Metal has its own ways of quitting. Zinc coatings wear down. Rust starts where water sits longest. Hinge pins wear grooves into plates. Fasteners loosen under vibration. If you mix metals carelessly, galvanic reaction starts chewing at the weaker piece, and the stain on the lumber below it tells on you before the hardware fully fails.
The failure usually starts earlier than you think
Electronics bolted onto decks and fences don't fail out of nowhere either. Low-voltage adapters drift out of spec. Battery compartments collect moisture. Solar caps get shaded by a branch that wasn't there last season. Wire connections behind a post trap water and corrosion starts at the copper long before the fixture goes dark.
Practical rule: The moment of failure is usually the last symptom, not the first one.
That matters because replacing the obvious part is often the wrong move. A new latch won't fix a post that's walking. A new light module won't solve a bad transformer or a wet splice. If you want fewer callbacks to your own project, inspect the whole load path and the whole power path.
There's a reason durability matters so much in outdoor projects. If you want a good baseline for what survives weather, movement, and repeated use, look at product durability testing before you assume all hardware in the same category is interchangeable.
Small clues tell the story
Watch for these early signs before the “sudden” failure arrives:
- Rust streaks under screws: Active corrosion is already travelling past the coating.
- White residue near metal parts: Moisture and metal reaction are at work.
- Sticky battery doors or greenish terminals: Leakage or water ingress is starting.
- A gate that only sags when fully open: The hinge or post is shifting under load, not just sitting crooked.
- Lights that fail after rain, then return later: That's often moisture in a connection, not a dead fixture.
The fix starts getting cheaper the moment you stop treating symptoms as surprises.
Setting Up a Safe Troubleshooting Workflow
Before you touch a screw, set the area up so you can work without getting cut, shocked, or fooled by a moving part. Hardware troubleshooting goes sideways fast when a sagging gate shifts during inspection or when somebody pokes at a live low-voltage system without confirming what's energised.
California construction guidance is blunt on this point. Only qualified persons may work on electrical equipment or systems, and electrical equipment must be deenergized before work is performed on it according to Cal/OSHA construction guidance. For equipment design and maintenance access, Caltrans electrical safety requirements also require protection from sharp edges and prevention of accidental contact with voltages above 30 V rms or DC during normal operation or maintenance.
Start with safety, not curiosity
Do this first:
- Kill the power: Shut off the breaker for add-on electronics and verify the circuit is dead before opening anything.
- Stabilise the structure: Brace a wobbly post before you start pulling hardware off it.
- Control stored force: If a gate spring or self-closing hinge is under tension, secure it before loosening fasteners.
- Protect your hands and eyes: Outdoor hardware has burrs, sharp edges, cracked coatings, and hidden splinters.
Keep the right kit at arm's reach
A decent counter-style troubleshooting kit beats guessing. Mine would include:
- Basic drivers and wrenches: 4-in-1 screwdriver, adjustable wrench, socket set.
- Electrical checks: Multimeter, non-contact tester, spare fuses, spare batteries.
- Inspection tools: Flashlight, awl, wire brush.
- Freeing seized parts: Penetrating oil.
- Recording the problem: Your phone camera.
Take a photo before disassembly. That sounds obvious until you're holding two similar hinge leaves or trying to remember which conductor landed where on a transformer.
Use the eight-step method
A standard troubleshooting workflow in technical repair uses eight steps: identify the problem, research likely causes, establish a theory of probable cause, test the theory, plan the fix, implement the fix, verify full functionality, and document results, as outlined in the CompTIA troubleshooting methodology summary.
Here's the plain version at the workbench:
- Observe: “Gate drags at latch side.” “Deck lights dead on one branch.”
- Reproduce: Open and close the gate. Cycle the switch or timer.
- Isolate: Is it the post, hinge, latch, transformer, wire run, or device?
- Measure: Check plumb, play, continuity, or output voltage.
- Swap: Try a known-good battery, fuse, or fixture.
- Compare: One side working and one side failing tells you plenty.
- Decide: Repair the single failed part or replace the assembly.
- Document: Save photos, part markings, and dimensions.
If you skip measurement and jump to replacement, you're shopping, not diagnosing.
A sagging gate post proves the point. You observe the drag, reproduce it by opening the gate halfway, isolate by lifting the latch side, measure movement at the base, swap nothing yet, compare hinge play to post movement, decide whether the post base or hinge is at fault, then document the hardware size before ordering.
The same routine works on a dead low-voltage transformer. Confirm the breaker, test output, inspect connections, swap a fuse if applicable, compare with a known-good fixture, then decide whether the transformer failed or the fault sits downstream.
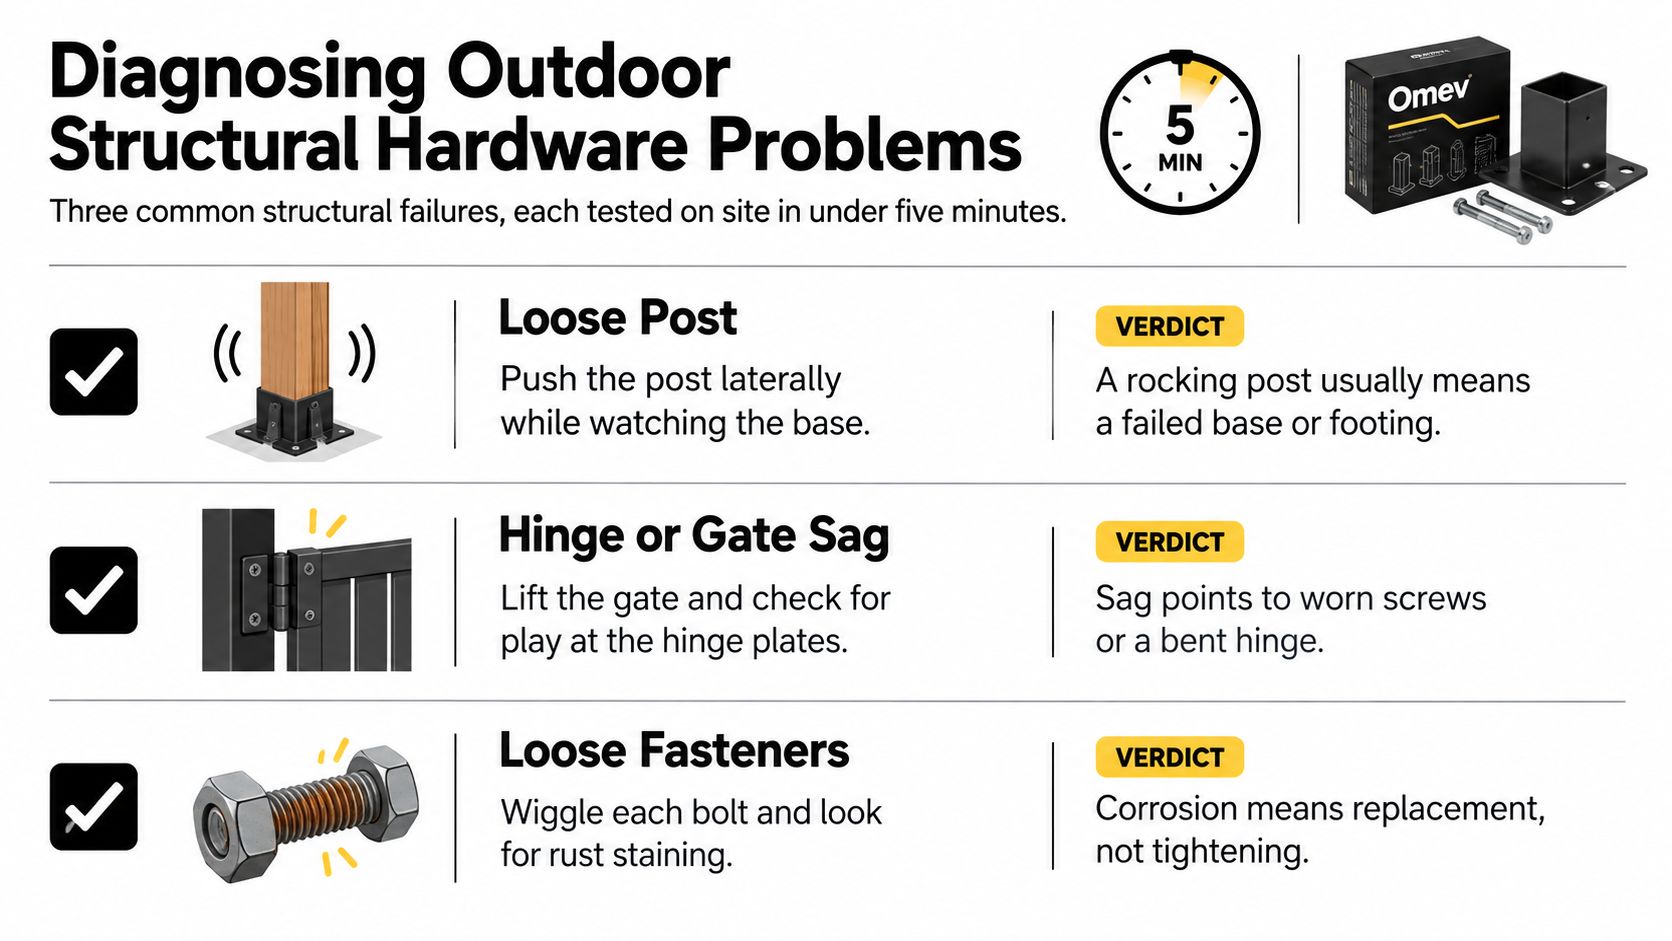
Diagnosing Outdoor Structural Hardware Problems
Most outdoor structural failures give themselves away if you stop staring at the symptom and test the support points. You can sort the common ones in a few minutes on site without taking the whole thing apart.

Loose posts
Grab the post at mid-height and push it laterally. Watch the base, not the top. If the whole post rocks at the footing, the problem is usually down low where water sat, wood rotted, or the base connection loosened.
If the post looks stable at the base but the top twists, inspect for splitting, loose through-bolts, or hardware crushing the wood fibres. Don't just retighten and hope. If fibres are already crushed, the joint won't hold torque for long.
Body-language cues matter here:
- Powdery residue near the base: Moisture has been hanging around.
- Gaps opening around brackets: Movement has been happening for a while.
- Softness at the soil line: Probe carefully. That's often where the post gives up first.
Hinges and gate sag
Lift the free end of the gate slightly. If the sag mostly disappears, the hinge is wearing or the screws have loosened in the mounting point. If the gate stays out of line even while lifted, the post is usually the culprit.
Look closely at the hinge plates. Ovalled screw holes, bent leaves, shiny wear marks, and black soot-like smudging around moving points all mean the hinge has been working out of alignment. A squeak is annoying. Metal dust and visible plate wear are more serious.
A gate doesn't sag because it feels like it. Something in the support chain moved first.
For replacement hardware, match the load path properly. That means checking hinge leaf size, pin diameter, screw pattern, and bracket thickness before you order from a fasteners and fittings collection.
Here's a quick visual walkthrough before you start dismantling parts:
Corroded fasteners
Take an awl or pick and scrape the suspect fastener. Surface rust is one thing. Deep pitting, flaking, or a head that crumbles at the edges means replacement, not tightening.
Check the lumber around it too. Rust streaks running down from screws or bolts mean water is carrying corrosion products out of the joint. That's active. White residue around mixed metals points to a compatibility problem, not just age.
A simple field rule helps:
| Field check | What it usually means |
|---|---|
| Fastener turns but never tightens | Stripped fibres or stripped threads |
| Coating scratched, metal solid | Monitor or replace selectively |
| Head swollen, pitted, or staining wood | Replace the fastener and inspect neighbours |
| One bad fastener in a bracket group | Check the full bracket, not just the obvious one |
Structural hardware fails in patterns. If one screw in a hinge strap has gone, the others in the same load path deserve inspection right away.
Diagnosing Electronics and Add-On Hardware Problems
Outdoor electronics confuse people because the failure often looks dramatic while the cause is ordinary. A dead smart lock, dark deck light, or flaky gate sensor usually falls into one of three buckets. No power, no signal, or weak performance. Figure out which bucket you're in first and the job gets smaller fast.

No power, no signal, or weak performance
No power is the cleanest failure. Nothing lights, nothing beeps, nothing responds. Start at the supply, not the device. Check the breaker, GFCI, transformer output, inline fuse, and low-voltage connections. Corroded wire nuts behind a post fool plenty of people into replacing perfectly good fixtures.
No signal is different. The device powers up but won't respond consistently. Smart locks, sensors, and controllers can lose pairing, sit behind blocked antennas, or struggle because the environment is the problem. In Canadian homes and small offices, practical guidance still comes back to router placement, avoiding enclosed cabinets, elevating the router, and switching between 2.4 GHz and 5 GHz bands as outlined by Canada-oriented networking guidance. That's a useful reminder that many “hardware” complaints are really signal and placement problems.
Weak or declining performance usually points to battery sag, shading on solar caps, or voltage drop on a long run. The device still works, just badly. That distinction matters.
Fast field tests that actually help
Use plain tools and keep it simple:
- Non-contact tester: Confirms whether supply is present where expected.
- Multimeter on the correct low-voltage setting: Checks transformer output and exposed test points.
- Known-good swap: Replace one battery, lamp, module, or sensor with a working one.
- Halving the run: On a string of fixtures, split the circuit mentally and test midpoint sections to narrow the bad leg.
A lot of homeowners jump straight to the fixture because that's what they can see. Don't. Start upstream. If one low-voltage branch is dead, isolate the branch before touching the fixture housing.
Stop troubleshooting and call an electrician when the fault leads you into mains wiring, damaged insulation, overheated conductors, or anything that won't stay deenergised.
When a device is done, recycle it properly instead of tossing it in a bin. If you need a practical example of where to send failed electronics, Beyond Surplus e-waste recycling shows the kind of responsible pathway worth looking for in your own region.
Repair vs Replace Decision Points
People either save money or waste it. Don't decide based on annoyance. Decide based on fault pattern, exposure history, and whether the fix leaves you with something you'd still trust.
A useful benchmark comes from a Canada-wide repair study. Only 18.6% of Canadians had their most recently broken home appliance or electronic repaired, and the average repair cost for the last broken appliance or electronic was $193 according to Équiterre's repair study. That tells you why so many people replace too soon. They never isolate the cheap fault first.
Clear repair signals
Repair usually makes sense when you're looking at one clean failure point:
- An isolated hinge pin is worn, but the hinge leaves and mounting points are still solid.
- A recent installation has one loose bracket, one bad splice, or one failed battery compartment.
- The component is worth saving because the rest of the assembly is high quality.
Clear replace signals
Replace when the damage is systemic:
- Corrosion shows up across multiple fasteners or contact points.
- Threads are stripped and won't hold new hardware.
- The electronics are old enough that matching parts, batteries, or firmware support have become a headache.
California's repair-policy shift is worth noting here because it changes part availability for some covered products. SB 244 took effect on July 1, 2024 and requires manufacturers to provide repair parts, tools, and documentation for covered electronics and appliances under the conditions described in the Consumer Reports California right-to-repair fact sheet. If you're troubleshooting covered gear, better access to parts can tilt the decision back toward repair.
Repair vs Replace Decision Matrix
| Failure Type | Repair If | Replace If | Typical Cost Crossover |
|---|---|---|---|
| Hinge sag | The hinge pin or screws are the only failed parts | The hinge leaf is bent or mounting holes are wallowed out | Use the 30 percent rule |
| Loose post connection | The bracket loosened but post and substrate are sound | The post base, footing, or post fibres have failed | Use the 30 percent rule |
| Corroded fasteners | Corrosion is surface-level and localised | Corrosion is deep or repeated across the group | Use the 30 percent rule |
| Low-voltage transformer issue | Output fault is confirmed and the rest of the run tests clean | Multiple downstream failures suggest broader age or water damage | Use the 30 percent rule |
| Smart add-on device | Batteries, connection, or one accessory module caused the fault | Repeated dropouts and obsolete support make the fix unreliable | Use the 30 percent rule |
My rule is simple. If repair materials, your time, and the chance of doing the same job twice push past 30 percent of a quality replacement, swap it.
Ask yourself the blunt question that matters most. Would you trust this fix on a Saturday night with guests on the deck? If the answer is no, you already know what to do.
Preventive Maintenance and Ordering Replacement Parts
The best hardware troubleshooting job is the one you barely need because you caught the drift early. Outdoor hardware and add-on electronics need a rhythm, not random attention when something sags, flickers, or stops.
A practical seasonal routine
Spring is inspection season. Check fasteners for active corrosion, re-tighten hardware that carries movement loads, and test low-voltage transformers before heavy outdoor use starts. If a gate dragged last autumn, don't wait for the first barbecue to deal with it.
Summer is when load and sun expose weak points. Look for hinge sag under repeated use, UV damage on plastic housings, brittle wire insulation, and fading gaskets around fixtures or keypads.
Fall is prep season. Improve drainage around posts, clear debris that traps moisture, and swap batteries before cold weather punishes marginal power sources. Winter is the time to remove or store removable electronics that don't need to stay outside.

Order parts like someone who doesn't want to reorder
Before you buy anything, write down the details that decide fit.
- Post bracket details: Size, finish, material, mounting hole pattern.
- Hinge details: Gauge, swing direction, pin diameter, leaf dimensions.
- Fastener details: Length, diameter, head type, coating or stainless grade.
- Electrical details: Transformer rating, connector type, exact battery type, visible part numbers.
- Quantity details: Count all matching pieces, not just the failed one.
A short checklist on your phone beats buying a “close enough” hinge that won't line up.
The mistakes that keep repeating
These are the ones I see most often:
- Undersizing transformers: Leave headroom so the supply isn't running on the edge.
- Mixing metals carelessly: That invites galvanic corrosion.
- Buying by appearance: A hinge that looks right can still have the wrong pin or hole spacing.
- Ignoring neighbouring parts: One failed fastener often means the others are close behind.
For contractors, property managers, and even organised homeowners clearing out failed devices during upgrades, a process similar to Reworx Recycling hardware management is a good model. Track what came off, what can be redeployed, and what should be retired instead of letting dead parts pile up in buckets.
If you're ordering matched replacements for outdoor repairs, outdoor equipment parts is the right place to start checking dimensions and compatible categories. In the article body, one practical option is XTREME EDEALS INC., which carries deck and fencing accessories, fasteners, post hardware, and selected low-voltage add-ons, so you can match structural and electronic replacement parts from the same project list instead of guessing across multiple carts.
One more point matters if you're working on covered electronics in California. The state requires repair access for at least 3 years on some lower-tier covered products and 7 years on higher-tier covered products, as summarised in a California right-to-repair overview. Better part access helps, but only if you record the exact model and dimensions before you order.
Buy the exact part once. “Will-fit” is how people end up troubleshooting the replacement instead of the original failure.
Keep the routine simple. Inspect in spring, stress-check in summer, prep in fall, store smart in winter, and write down dimensions before buying anything. That's how you turn hardware troubleshooting from a nuisance into a system.
XTREME EDEALS INC. carries the sort of parts this guide keeps circling back to. Hinges, post brackets, fasteners, deck and fence accessories, and selected electronics add-ons that need to match the job properly the first time. If you're sorting out a sagging gate, a loose post connection, or a failed low-voltage accessory, visit XTREME EDEALS INC. and check the exact dimensions and hardware type before you order.