
You're standing in the lumber aisle with a 4×4 in one hand and a black metal post in the other, trying to decide which one will make your deck feel safe without turning the railing into an eyesore. The post may look like a small part of the project, but it carries the top rail, balusters, infill, cap, and every push the finished guard receives. The material matters, but the connection beneath it matters just as much.
A dependable railing is a continuous structural assembly. The force at the top rail has to travel through the post, fasteners, bracket or blocking, joists and beams, and ultimately the supporting structure. A handsome post with a weak base is still a weak railing. The practical choices below focus on what holds up, what creates trouble, and where appearance has to yield to structure, permitting, and wildfire safety.
Why the Post Choice Shapes the Whole Railing
A homeowner often chooses a post after choosing the deck boards and railing style. That order creates problems. The post determines where the balusters can land, how wide each railing panel can be, how much blocking the frame needs, and whether the finished guard can reach its required height without awkward joints.
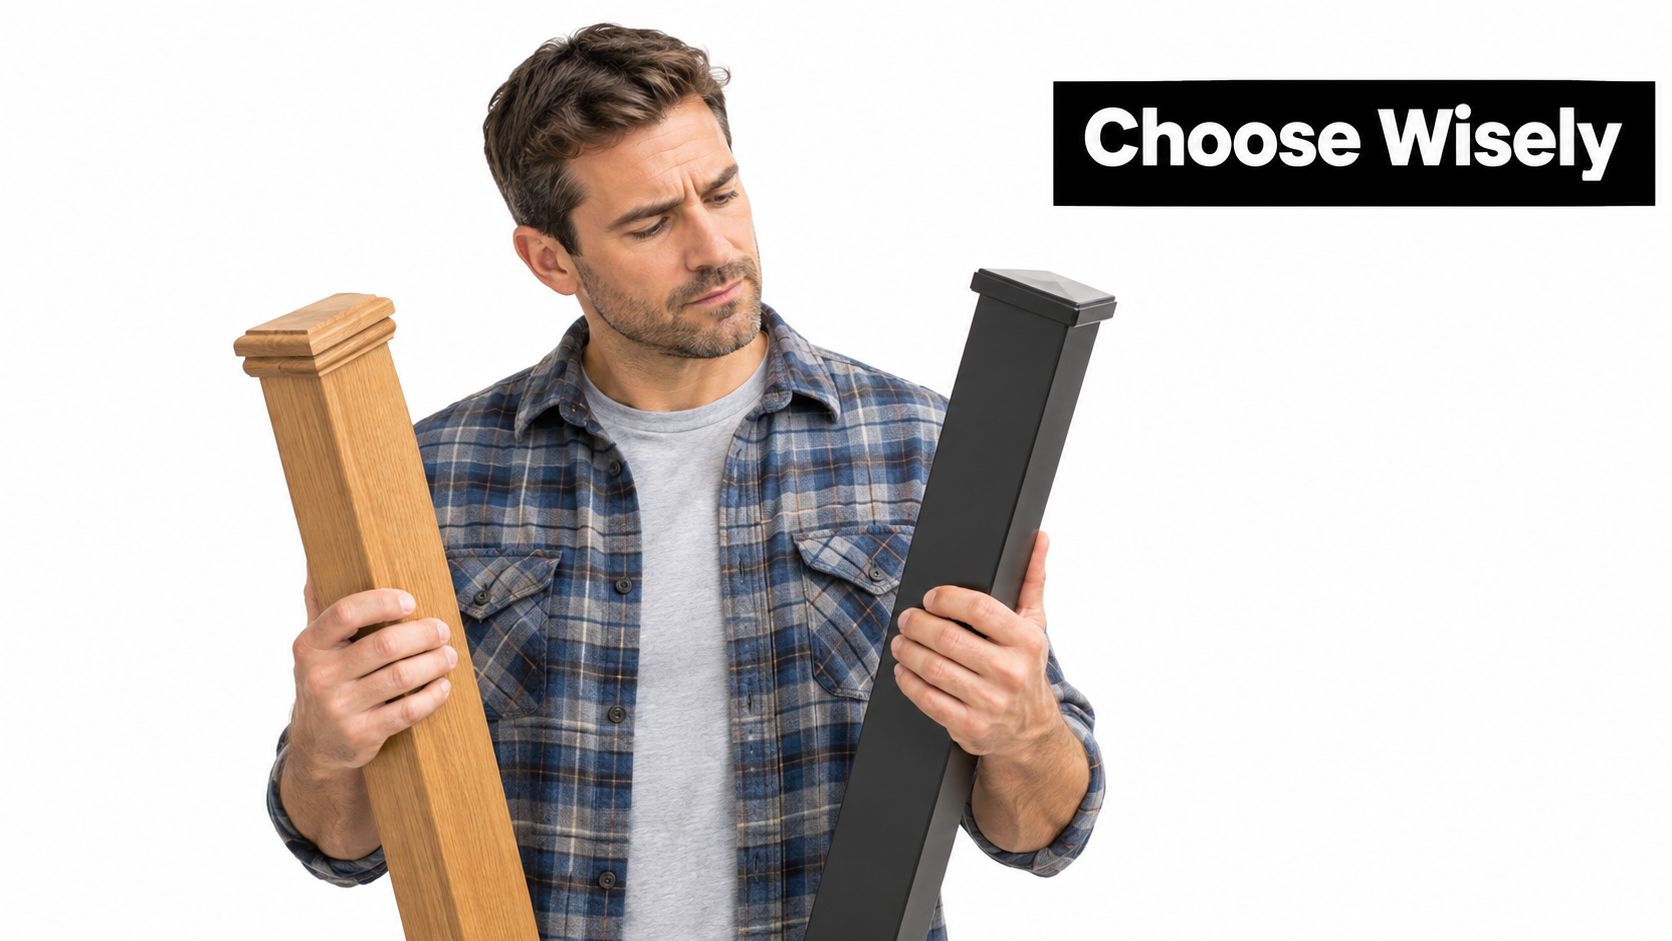
A pressure-treated wood post gives you room to cut, notch for nonstructural trim, and match the rest of the deck. A steel or aluminium post gives you a slimmer profile and can reduce exposed combustible material near a home. A composite post can deliver a consistent finish, but its core, sleeve, bracket, and approved fasteners have to work as one listed system.
The base connection is where many attractive installations lose their strength. A post screwed only into deck boards can feel firm on installation day, then loosen as the boards move. A post attached to the rim without suitable bolts, blocking, or framing can twist under a side load. A post that is sound at the shaft but poorly anchored cannot transfer force into the deck.
Builder's rule: Choose the post and its mounting hardware as a single assembly, not as separate shopping-list items.
That structural decision affects the rest of the design. A taller guard needs a post with suitable stiffness and a connection that resists overturning. A wide glass or privacy panel can place more demand on the post than open balusters. A metal cap may protect the top, but it won't repair a post cut too short or a bracket fastened into unsupported decking.
The same thinking applies to nearby features. If you're planning a fire feature on or beside a deck, review safe deck fireplace options before finalising railing locations, clearances, and material transitions. Heat, embers, and combustible railing components need to be considered together rather than treated as unrelated finish choices.
Anatomy of a Deck Railing Post
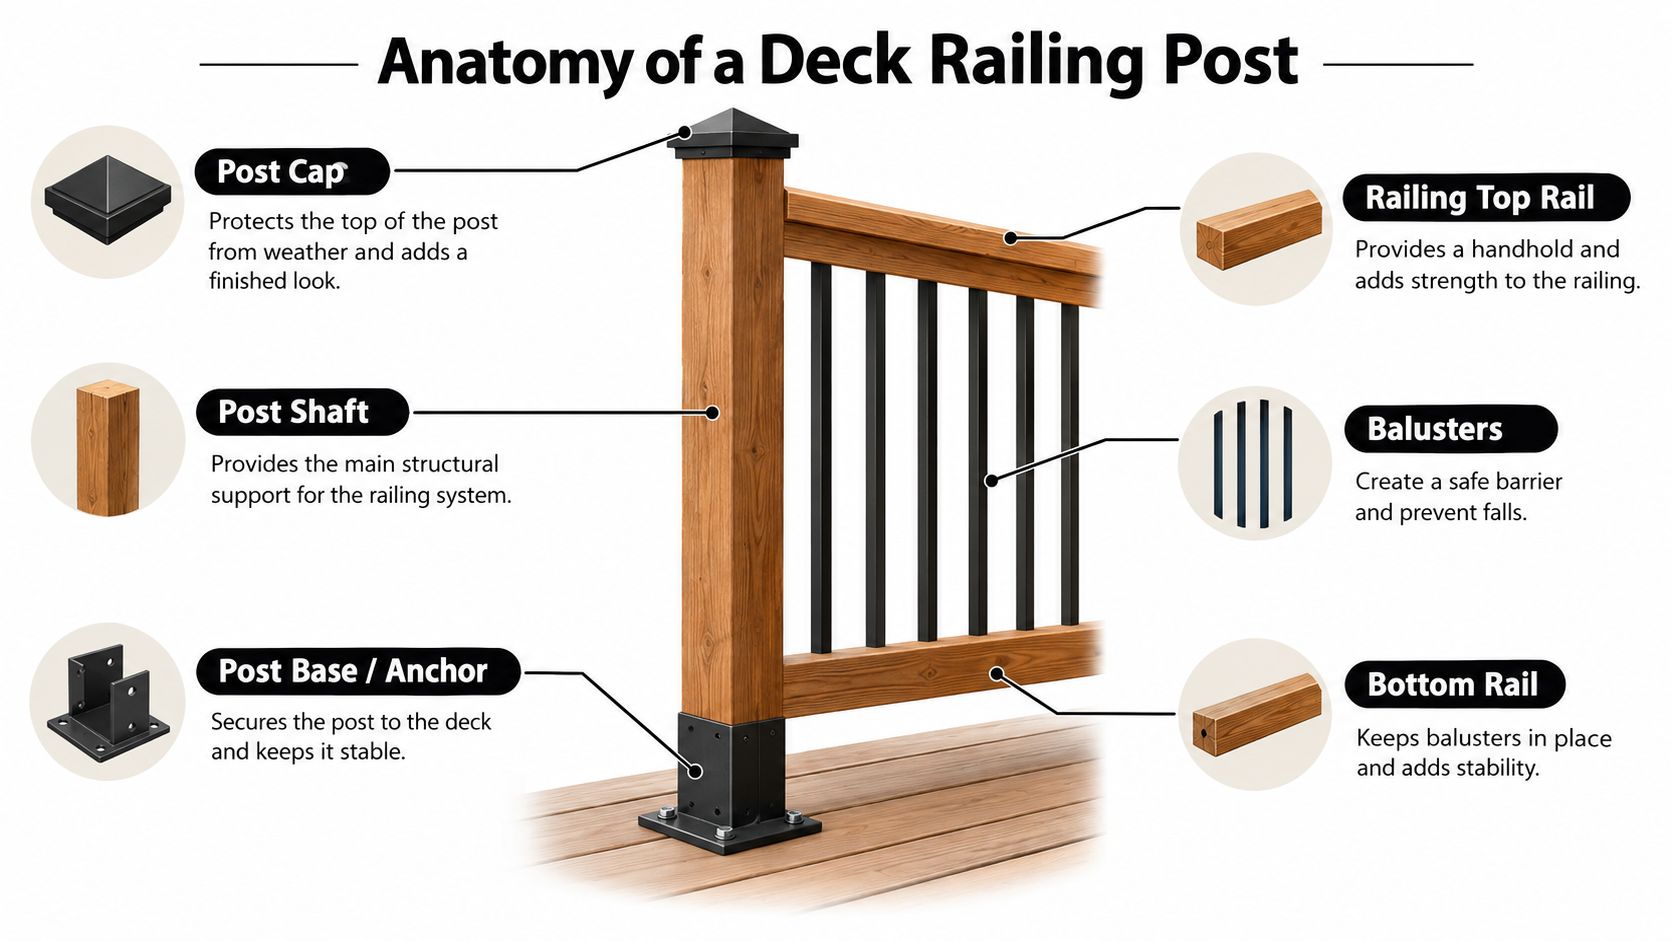
Think of one corner assembly from the supporting frame upward. The post shaft is the vertical member that receives the rail connection and transfers the guard force downward. Its material, cross-section, height, and condition all affect how much the assembly flexes.
At the bottom, the post base or anchor connects the shaft to the deck structure. It may be a surface-mount bracket, a side-mount arrangement, or a through-deck detail. The anchor itself isn't the load path unless it is fastened into framing, blocking, concrete, or another approved structural substrate.
Blocking and framing sit beneath or behind the post location. Blocking fills the space between joists and gives bolts or structural screws enough solid material to engage. The rim joist, beam, or joist must also be capable of receiving and distributing the force. A post base placed over unsupported decking has no structural substitute hidden underneath it.
The top rail attaches near the upper end of the post and carries the guard infill. Structural screws, bolts, brackets, or manufacturer-supplied connectors secure this joint. Decorative trim can conceal hardware, but it shouldn't be mistaken for the hardware that resists movement.
Between the posts, balusters, panels, or other infill close the guard opening. Their spacing and attachment affect safety, but they shouldn't be used to compensate for a post that moves at the base. A bottom rail may support balusters or create a visual frame, while a post cap covers the exposed end grain or metal tube and helps complete the appearance.
Follow the force from top to bottom
A useful inspection method is to point at every joint and ask what resists movement there:
- At the cap: The cap protects and decorates the post end, but it carries little structural responsibility.
- At the rail: The connection must keep the top rail from pulling away or rotating around the post.
- Across the field: Balusters and panels need secure attachment and compliant openings.
- At the base: Bolts, structural screws, brackets, washers, and blocking transfer force into the deck frame.
- Below the frame: Joists, beams, posts, and footings must carry the force without excessive movement.
This vocabulary helps when you read an installation guide or speak with a building official. “The post is a 4×4” describes only the shaft. It says nothing about the base, the blocking, the fastener pattern, or the connection into the joist system.
Comparing Wood, Metal, and Composite Posts
Material choice is really a fastener-assembly decision. Every post, regardless of what it's made from, has to transfer a 200-pound shove at the top rail down through the base connection into the deck frame. Judge each material against that load path and the site conditions, not just against appearance.
Wood posts remain the default on conventional decks because they're easy to source, cut, stain, and integrate with the framing. Cedar, pressure-treated pine, and hardwood can all produce a warm result. The weak points are predictable: cut ends, fastener penetrations, and the post-to-deck transition, where water collects and rot starts. Wood also adds combustible material, which matters in wildfire country.
Metal posts offer a narrow profile and a clean modern line. Powder-coated steel or aluminum can reduce routine refinishing, while cast-iron decorative elements create a heavier traditional appearance. The trade-offs are visible fasteners, potential corrosion where the finish gets damaged, and a surface that can feel hot or cold in direct weather. The base still needs appropriate framing and approved hardware. Metal doesn't make a weak deck edge stronger by itself.
Composite posts can preserve a wood-like appearance with less surface maintenance, but the outer sleeve and internal support shouldn't be treated like a solid timber post. Check the manufacturer's listed post, sleeve, bracket, rail, and fastener combination. A generic screw through a decorative sleeve may not deliver the connection the system requires.

Match the material to the exposure
For an ordinary sheltered deck, wood may win because it is adaptable and easy to repair. For a contemporary deck where sightlines matter, metal can provide a slimmer visual rhythm. For a homeowner who wants a consistent finish without repeated staining, a composite system may be appealing, provided its connection details are approved for the application.
Wildfire exposure changes that comparison. California guidance recommends an ember-resistant zone extending five feet beyond the deck footprint and identifies deck components, including posts and railings, as candidates for noncombustible, ignition-resistant, or compliant fire-retardant materials where applicable. The same home-hardening guidance connects deck protection with reducing combustible material and flame exposure beneath the deck.
A material label alone doesn't establish compliance. Confirm the local requirements, the product listing, the attachment detail, and the location of the post relative to the building. A metal post attached to a combustible wood rail may still need careful detailing where the assembly meets the home.
California's structural benchmark shows why material choice can't be separated from connection design. Title 8 Section 1620 specifies that wood railing posts must be at least 2 inches by 4 inches in cross-section and spaced at 8-foot intervals or closer, with the complete railing system required to withstand at least a 200-pound force applied to the top rail within 2 inches of its upper edge, in any outward or downward direction. That force doesn't care what the post looks like. It cares how the assembly is built.
If you're comparing a composite system, review the composite deck railing selection alongside its installation details rather than comparing only colour and price.
Standard Sizes, Spacing, and Code Numbers
Post layout starts with the walking surface and adjacent grade, not with the length of the lumber in the rack. In California, an open-sided walking surface generally needs a guard when it is more than 30 inches above the floor or grade below at any point within 36 inches horizontally of the open edge. Santa Cruz County guidance applies the same measurement logic to decks, landings, balconies, porches, and stairs. Its deck construction guidance also identifies a 200-pound concentrated load at the top rail.
Once a guard is required, California residential guidance commonly calls for a finished height of at least 42 inches, with openings arranged so a 4-inch sphere can't pass through. Alameda and San Bruno both publish these guard dimensions in their deck guidance. Use Alameda's deck regulations to compare the local wording with your project's permit requirements.
The finished height isn't the same as the post cut length. Account for the deck surface, framing or base bracket, top-rail thickness, post cap, and any manufacturer-specific rail connector. Mark the desired finished rail height on the installed deck, then work downward to the cut line. Cutting first and measuring the assembled profile later is a common way to end up with short posts.
California spacing language needs context
Under California Code of Regulations Title 8 Section 3209, a standard guardrail includes a top rail, midrail or equivalent protection, and posts, with the top rail positioned 42 to 45 inches above the walking surface. For wooden construction, posts must be at least 2 inches by 4 inches nominal and normally spaced no more than 6 feet apart. Spacing up to 8 feet is permitted when the top rail uses a reinforced double-board configuration, with one 1-by-4 board installed flat on top of the posts and another installed edge-up on the inside.
Those figures don't replace the residential code adopted by your jurisdiction. They do show why a post schedule copied from an unrelated deck can be wrong for your rail construction, top rail, occupancy, or permit conditions.
| Nominal size | Actual size | Typical max spacing | Common use |
|---|---|---|---|
| 2-by-4 | 1.5 by 3.5 inches | Confirm the applicable system and code | Guardrail members and approved post configurations |
| 4-by-4 | 3.5 by 3.5 inches | Confirm the applicable system and code | Common residential wood post |
| 6-by-6 | 5.5 by 5.5 inches | Confirm the applicable system and code | Larger custom or premium residential appearance |
| 2-by-2 metal angle | Confirm the listed wall and leg dimensions | Confirm the system listing | Metal guard configurations |
Don't interpret “typical max spacing” in the table as permission to use that span without checking the complete assembly. Rail stiffness, infill, wind exposure, connection type, and local review can change the acceptable layout.
Mounting Options and the Load Path Beneath
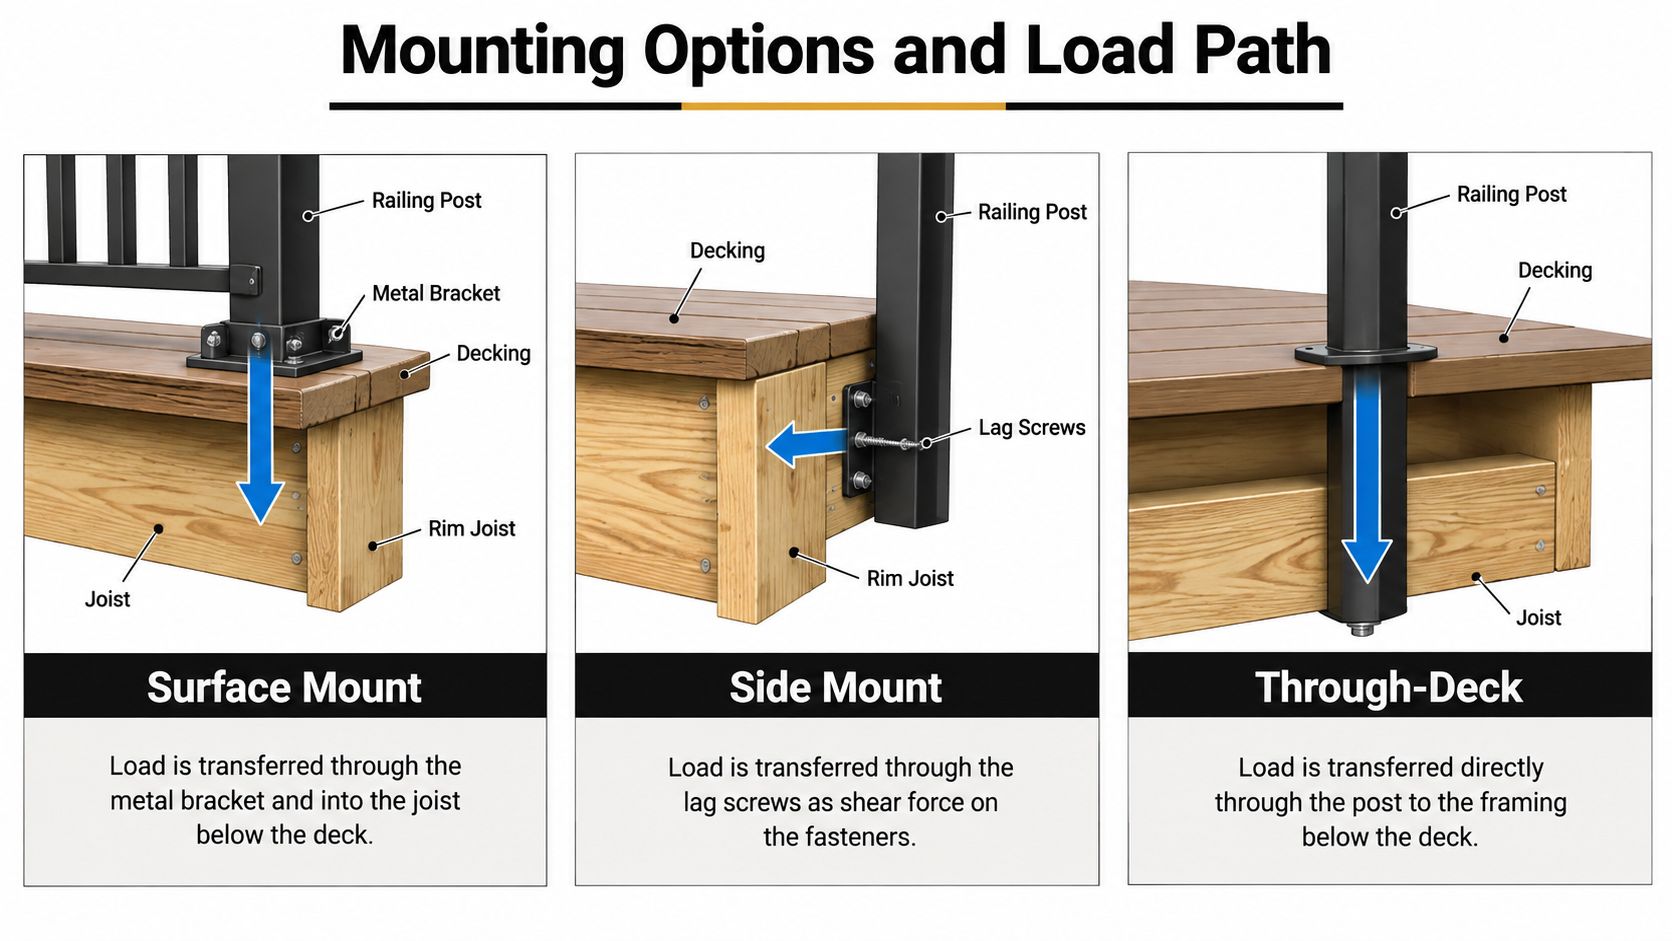
A post can be mounted on top of the deck, against the side of the frame, or through the deck to a supporting member. The best option depends on how the force reaches the joists and whether the existing framing can accept the connection.
A surface-mounted post sits on the decking or a bracket above the frame. It works only when the bracket fastens into structural framing or properly installed blocking beneath the deck boards. The boards provide a finished surface, not the structural depth required for the guard load.
A side-mounted post attaches to the outer face of a rim joist or beam. This can keep the walking surface clear and create a clean deck edge, but the bolts, washers, rim assembly, and blocking must resist shear and rotation. A single thin rim board often doesn't provide the same support as a properly reinforced frame.
A through-deck or embedded arrangement places the post so force transfers more directly into a joist, beam, concrete footing, or other designed support. It can be strong, but it may require more planning, access below the deck, careful waterproofing, and coordination with the footing and framing layout.
Hardware follows the substrate
For a surface mount, a post-base bracket may use structural screws, carriage bolts, lag bolts, or a manufacturer-specified anchor pattern. On concrete, wedge anchors or sleeve anchors may be suitable only when the concrete, embedment, edge distance, hole preparation, and product instructions support that use. Structural washers spread force at the connection and help prevent the fastener head from pulling through the material.
For wood framing, use through-bolts where the design calls for them, with washers and adequate solid framing behind the bolt. Structural screws can be appropriate for listed connectors, but a decorative deck screw isn't a substitute for a rated structural fastener.
Connection check: If you can't identify the joist, beam, blocking, concrete, or approved substrate behind every structural fastener, you haven't confirmed the load path.
Notching is a serious failure point. California guidance prohibits notching a 4-by-4-inch wood post at its connection to the deck structure because the cut removes cross-sectional area and creates a stress concentration at the region with high bending stress. The same California deck permitting handout makes clear that a post mounted on top of decking can't rely on the decking alone. It must connect to structural framing or blocking.
When specifying brackets and fasteners, the post-base bracket range at XTREME EDEALS INC. includes categories such as wedge and sleeve anchors, carriage and lag bolts, and structural washers. Treat the product selection as a compatibility exercise. The bracket, fastener, post material, framing thickness, and installation sequence all need to agree.
Aesthetic Finishing With Caps, Finials, and Balusters
Once the post is structurally right, finishing becomes enjoyable rather than distracting. A pyramid cap suits a traditional timber deck and sheds water from the post end. A flat cap gives a quiet modern edge. A ball cap or finial adds a more formal profile, while a solar cap can provide a small lighting feature without adding a separate fixture.
Caps also cover exposed end grain and help limit direct weathering at the top of a wood post. They don't replace a sealer, proper drainage, or a sound post connection. Fasten them with a method suited to the cap and post material, and leave room for movement where the manufacturer calls for it.
Choose the visual rhythm after the layout
Balusters may be turned wood, square wood, powder-coated aluminium, cable, or glass panels. Each creates a different visual density and maintenance profile. Open metal balusters keep the structure visually light, while broad panels make the railing feel more substantial and may place greater demand on the posts and rails.
The opening rule still governs the design. California residential guidance limits openings so a 4-inch sphere can't pass through, so don't approve a baluster pattern by eye alone. Measure the completed opening, including the space at the deck surface, the underside of the top rail, and any transition around a post.
Finials from lines such as Decorex Hardware can add a deliberate vertical accent, especially on stair or fence-adjacent railings. Nuvo Iron is a useful comparison point for homeowners looking at cast-iron profiles, finish options, and pricing. The right choice depends on the post dimensions, the desired profile, the finish environment, and whether replacement parts will be easy to source later.
Browse metal railing post caps by post shape and finished dimensions, not just by the picture. A cap that looks correct online can still fit poorly if the tube, sleeve, or true timber size differs from the stated nominal size.
Maintenance and Long-Term Performance
A railing inspection starts at the base. Walk the line and push each post gently. Movement, a widening gap around a bracket, rust at a bolt or washer, or soft wood near the post-to-deck transition can signal a failing connection before the rail shows trouble.
Inspect wood at end grain, cut edges, fastener penetrations, and any joint where water can collect. Reseal or recoat it according to the finish manufacturer's requirements. Replace damaged fasteners with compatible exterior structural hardware, and confirm that the replacement supports the existing load path rather than merely matching the head style.
Metal posts need a different check. Repair coating scratches before corrosion spreads, watch for corrosion between dissimilar metals, and clear wet leaves or soil from the base. A post can look sound while moisture attacks the fastener assembly underneath.
In a wildfire-prone area, remove combustible vegetation and debris from beneath and around the deck. San Diego County fire-safety guidance specifies at least six vertical inches of noncombustible material at grade for deck posts and calls for noncombustible railings where they attach to the home. CAL FIRE's home-hardening resource gives broader ignition-zone context, while local officials and adopted requirements control the final detail.
Inspection habit: Check the post, fastener, bracket, and framing as one assembly. A clean cap reveals little about the load path below it.
If the deck has shifted, a post wobbles, or a connector has corroded, do not cover the symptom with trim. Remove enough finish material to find the cause, then repair the framing and connection with hardware approved for that assembly. For a new build or substantial replacement, confirm permit requirements early. Oakland generally requires permits for new decks, expansions, and in-kind repairs or replacements. Its narrow exemption includes several conditions, including a deck area of no more than 200 square feet, a height of no more than 30 inches, no attachment to the dwelling, and no service to a required exit door. Oakland's deck permit guidance explains those conditions.
XTREME EDEALS INC. offers deck railing posts, post caps, post-base brackets, fasteners, balusters, and related hardware for DIY and professional builds. Visit XTREME EDEALS INC. to match the visible finish with the structural connection, then verify product instructions and local requirements before installation.