

You've finished the deck, installed the rail panels, and stood back expecting the job to look complete. Then you notice the open square tubes at the tops of the posts. They collect rain, show unfinished edges, and make an otherwise careful railing look like it's still waiting for the last hardware order.
That small decision affects more than appearance. The right metal railing post caps protect the post opening, complement the railing profile, and avoid creating sharp edges or maintenance problems. The wrong cap can trap water, clash with the finish, loosen on an imperfect post, or interfere with a code-compliant assembly.
Why the Cap on Your Railing Post Is Not Just Decorative
A homeowner once showed me a completed deck with two exposed metal posts beside the stairs. The railing was straight, the boards were neatly installed, and the black finish looked sharp. Yet those open post ends drew the eye immediately. One tube had already collected dirt, and the cut edge felt rough when touched.
That's why a cap deserves attention before you choose a shape. An uncovered hollow post gives rain and condensation a direct route into the tube. Over time, moisture can contribute to corrosion at the post crown and around fasteners. A cap can close that opening, cover a potentially sharp edge, and give the railing a deliberate finished line.
Practical rule: Treat the cap as the final component of the railing assembly, not as jewellery added after the engineering is finished.
A cap also changes how the railing reads from a distance. A low pyramid creates a crisp roofline, a flat cap keeps a contemporary run quiet, and a ball or finial makes a traditional fence feel complete. That visual choice matters if you're trying to boost your home's first impression without replacing the entire fence or deck.
The structural point is just as important. California workplace-safety rules specify a standard guardrail height between 42 and 45 inches, with standard metal pipe top rails and permitted midrails measuring at least 1.5 inches in outside diameter, and metal posts also measuring at least 1.5 inches in outside diameter with spacing no greater than 8 feet. Those requirements apply to covered workplace settings, not every residential project, but they show why post geometry and connections matter. See the California guardrail dimensional requirements before treating a cap as an isolated accessory.
The best cap finishes the post without hiding a weak connection, trapping water, or changing the safe profile of the guard.
What a Metal Railing Post Cap Actually Does
A metal railing post cap is a fitting placed over or into the top of a metal railing post. Its basic job is simple, but buyers usually need it to do several things at once.
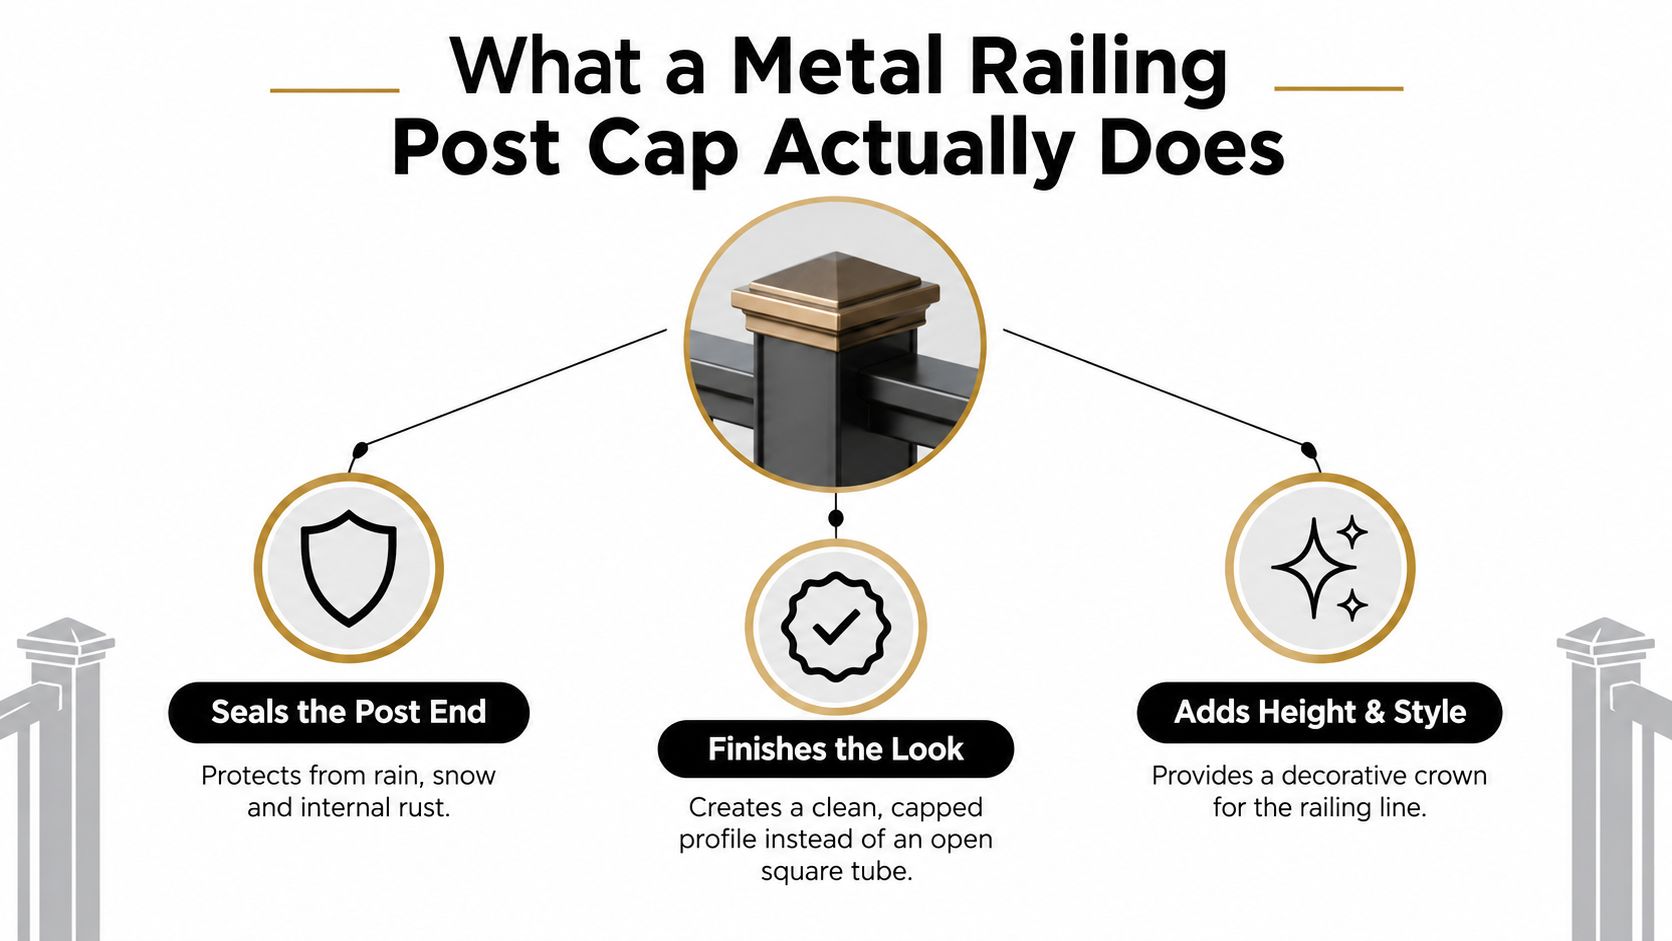
First, it closes the post end. A properly fitted cap helps limit direct entry of rain, dust, and debris into a hollow tube. That's useful on exterior fences, decks, balconies, and stair railings where the post crown is exposed to weather.
Second, it creates a finished silhouette. An open square tube looks like a cut piece of stock. A cap gives the top a defined edge and lets you match the post to the rest of the railing, whether the project is modern, traditional, or ornamental.
Third, it covers the exposed edge. A smooth cap is safer to touch than a rough cut tube and can reduce snag points around a walkway or stair. It won't repair a poorly cut post, but it can complete a cleanly prepared one.
The main cap formats
A slip-on cap slides over the outside of the post. It's quick to install and usually depends on accurate sizing, adhesive, a set screw, or a combination of those methods. A press-fit cap uses friction or internal features to hold against the post wall. It's convenient, but the post must be close to square and within the cap's intended tolerance.
Some models accept a finial above the cap. That gives you a modular way to build a decorative railing without welding an ornament directly to the post. Metal caps differ from plastic, glass, wood, and composite families because the material, coating, wall thickness, and galvanic contact all affect outdoor durability.
Choose a cap as either a protective fitting, a decorative fitting, or both. On an exposed coastal deck, protection and compatibility come first. On an indoor stair, style may carry more weight, but the cap still needs a stable fit and safe edges.
Pyramid, Ball, Flat, and Decorative Styles Compared
The low-profile pyramid cap is the safest starting point for most deck and fence projects. Its sloped top gives water a clear path away from the centre, and its compact outline suits horizontal rails, cable systems, and simple picket layouts. It adds character without making the post look oversized.
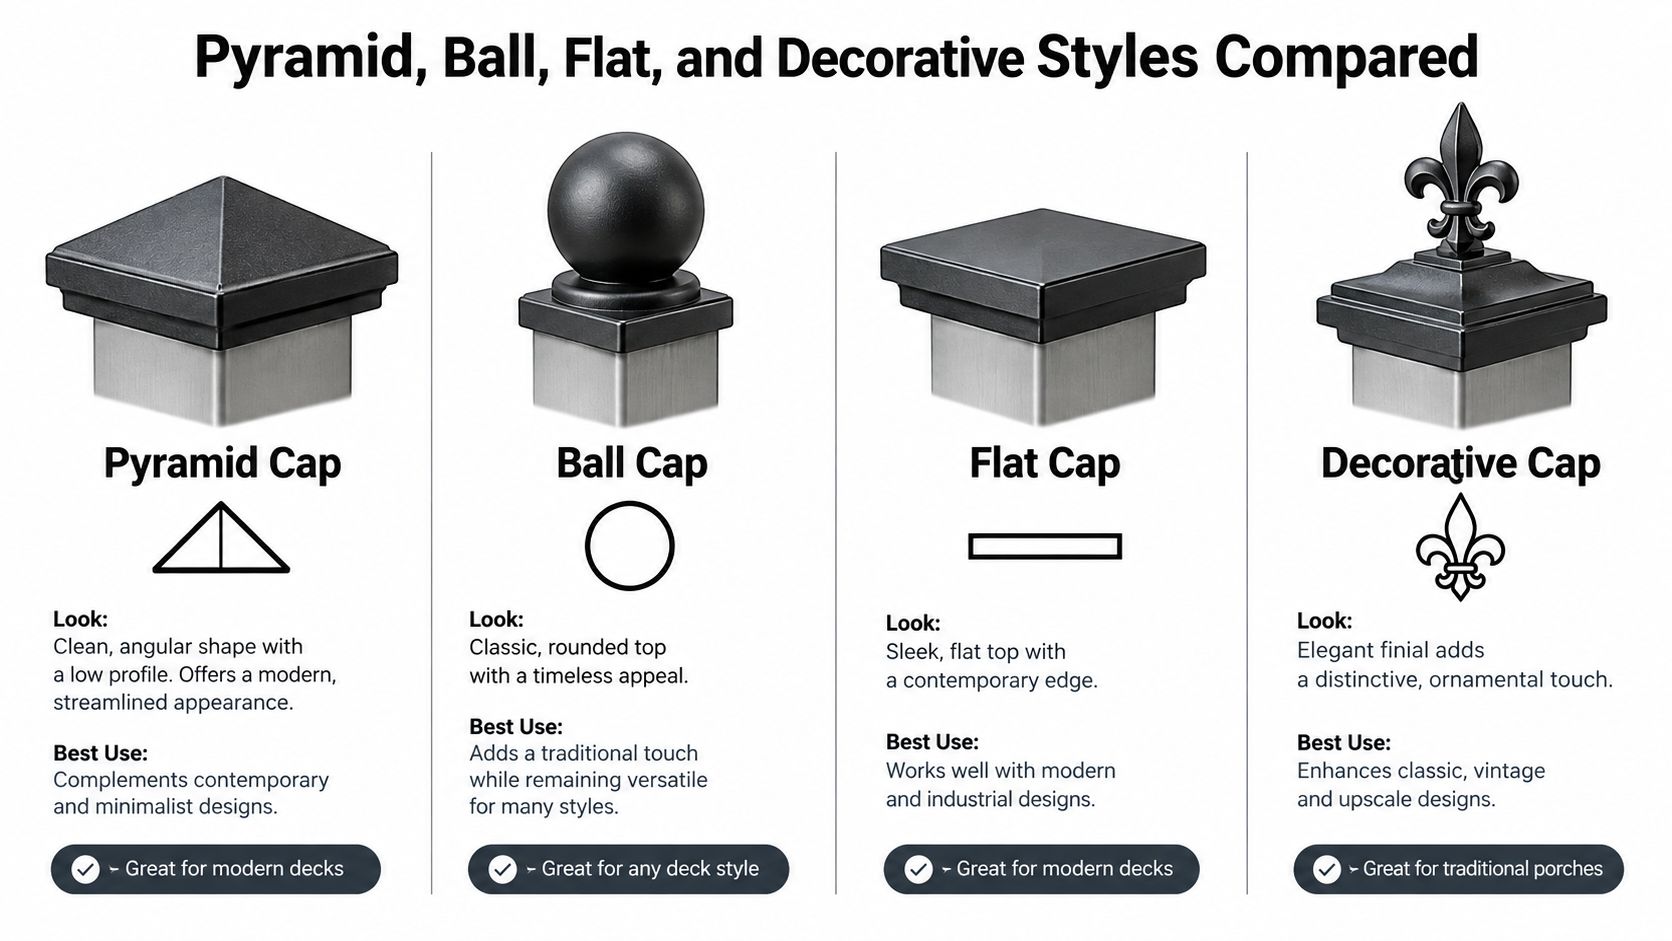
The ball cap is more traditional. It works especially well on wrought-iron-inspired fences, formal gates, and railings with rounded balusters. The rounded crown avoids a sharp point, but it can look visually heavy on a very clean, minimal deck. Make sure the ball doesn't project into a passage or reduce clearance beside a stair handrail.
A flat cap is the most restrained option. It keeps the top rail line visually quiet and pairs well with contemporary architecture, glass infill, and rectangular metal posts. The trade-off is drainage. A completely flat top can hold a film of water or collect grit unless the design includes a slope, edge detail, or a sensible way for moisture to escape.
Decorative caps need a location check
Finial-topped and ornamental caps create a strong focal point. Fleur-style details, spear shapes, and custom crowns can make a long fence feel intentional, especially when matched with gate inserts and balusters. They're less forgiving around stairs, narrow walkways, and areas where clothing or hands pass close to the post.
A decorative cap belongs where people can see it, not where people can catch themselves on it.
Use pyramid caps for practical deck runs, flat caps for modern profiles, ball caps for classic fences, and decorative finials where the surrounding hardware supports the same language. Don't choose a pointed ornament for a stair guard just because it looks impressive in a catalogue photograph.
Sizing and Compatibility with Common Post Dimensions
Most cap returns happen because a buyer orders by the label on the post rather than measuring the post itself. A post described as 2×2 may not measure exactly 2 inches across, and a cap marked for a nominal size may be designed around a specific outside dimension or fit method.
Measure the installed post at the location where the cap will sit. Use a reliable tape measure or calliper, and check both width and depth. A welded tube may be slightly out of square, while a painted or powder-coated post may measure differently from bare stock. Record the outside dimensions, not the inside opening.
A practical fit table
| Nominal Post Size | Typical Actual Outside Dimension | Cap Size to Order |
|---|---|---|
| 2×2 | Measure the installed outside width and depth | Order the cap matched to the measured outside dimensions |
| True 3×3 | Measure the installed outside width and depth | Order the cap matched to the measured outside dimensions |
| True 4×4 | Measure the installed outside width and depth | Order the cap matched to the measured outside dimensions |
This table is intentionally measurement-led. There isn't a universal actual dimension that every manufacturer uses for a nominal post. A cap's internal dimensions need to provide a close, stable fit over the post, while still allowing for the finish thickness and the selected fastening method.
A slip-on cap can tolerate a small amount of clearance if it's secured correctly. A press-fit model needs enough grip to stay seated without distorting the post or damaging the coating. If the post is slightly out of square, an adapter ring or carefully selected shim can solve a borderline fit, but don't use a thick improvised spacer to disguise a badly sized cap.
For a useful second opinion before ordering, consult this guide to choosing the right fence post cap size. The important habit is simple: measure the actual post, check the cap's internal dimensions, and confirm whether the listed size describes the post or the cap opening.
Materials, Finishes, and Corrosion Resistance
The cap and the post work as a pair. A stainless cap on a coated steel post isn't automatically a durable combination, and a beautifully painted cap can develop corrosion if its coating gets scratched or if water stays trapped beneath it.
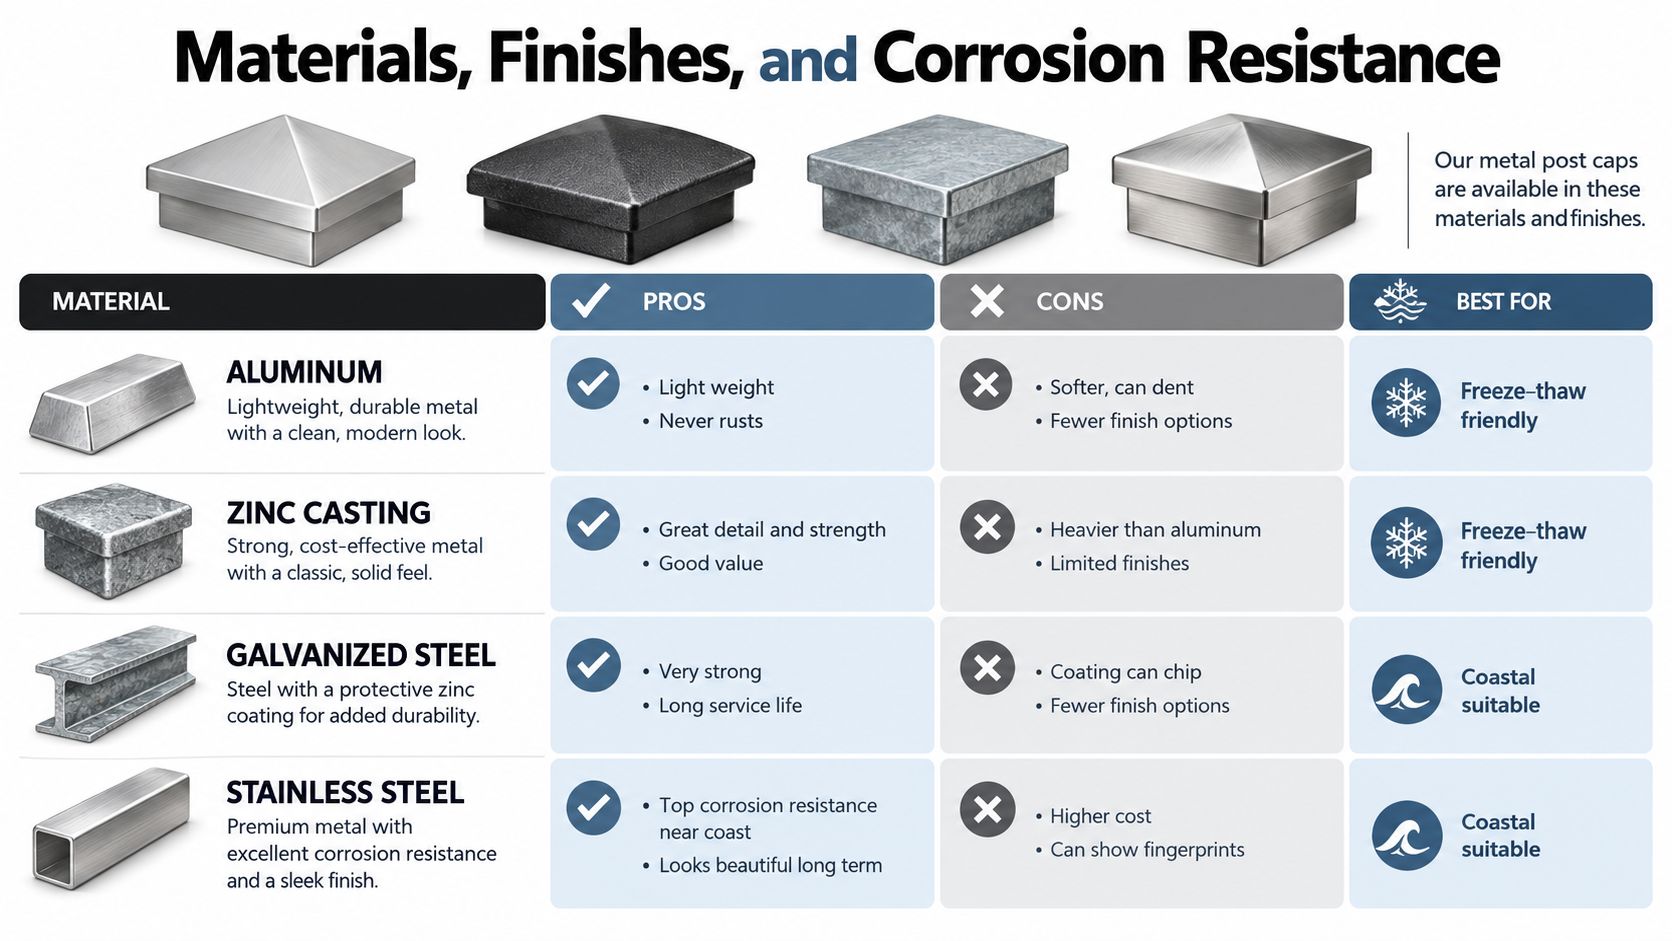
Aluminum caps are light and resist ordinary red rust, which makes them practical for many residential deck and fence applications. They're a sensible choice where you want a coloured powder-coated finish without adding much weight. They can still suffer from surface oxidation, coating damage, and galvanic problems when coupled carelessly to another metal.
Zinc castings offer a substantial feel and can carry detailed decorative shapes. They're useful for traditional profiles, but the finish and the surrounding environment matter. A damaged coating can expose the casting to weather, and the material may not suit every highly exposed coastal installation.
Galvanized steel brings strength and a familiar industrial appearance. Hot-dip galvanized and stainless-steel hardware are identified as acceptable exterior choices in California deck guidance, but the protection on zinc-coated steel is not invulnerable. Scratches, cut edges, standing water, and incompatible fasteners can create local trouble.
Stainless steel is usually the serious coastal choice. A California construction-industry analysis identifies 316 or 316L stainless steel as a common option for coastal metalwork because its approximately 2% to 3% molybdenum content improves corrosion resistance. The same source recommends at least G90 galvanized steel where steel is used and warns that severe exposure can still produce red rust in less than three years. Review the California coastal corrosion guidance when the project sits near saltwater.
Match the finish to the exposure
Powder coat gives a clean colour and protects the base metal, but chips need attention. Baked enamel and black paint can look excellent when maintained, while brushed or polished stainless gives a different visual language and should be kept free from contamination during fabrication and installation.
For more detail on coating choices, use the protective coatings resource. In wet or coastal locations, inspect for white corrosion products, red rust, staining, loose screws, and standing water. Keep unlike metals isolated where necessary, and preserve drainage instead of sealing moisture inside a hollow post.
Installing Metal Post Caps Without Damaging the Finish
Start with a dry fit. Set the cap over the post without adhesive or screws, check that it sits evenly, and look at the alignment from two directions. If the cap rocks, the post may be out of square or the cap may be too large.
Clean the mating surfaces before fastening. Remove loose paint, burrs, dust, and metal filings, but don't aggressively abrade a finished surface. A small amount of exterior-grade construction adhesive can help with a properly sized slip-on cap, especially where the design doesn't provide a mechanical fastener.
Adhesive alone isn't my first choice on an exposed railing. A set screw or hidden mechanical fastener gives you positive retention and makes future inspection or replacement easier. Use corrosion-compatible hardware, and don't drive a long screw into the post just because it's available.
Drill carefully into hollow tubing
If the cap uses a screw, mark the hole after the cap is aligned. Drill a small pilot hole through the cap and into the post wall, using controlled pressure. Thin-wall tubing can strip or deform if you overtighten the screw, so stop when the cap is secure rather than chasing an unneeded clamping force.
Install caps before attaching the rail when a welded panel or top rail would block access. Install them after the rail is secured when the cap needs to align with the completed run. Keep the cap level on a post that isn't perfectly plumb, but don't force the cap to compensate for a post that needs to be reset.
If the cap won't seat with light hand pressure, stop. Cut, square, or correct the post first.
Wipe away adhesive squeeze-out before it cures, protect powder-coated surfaces from metal-on-metal dragging, and leave any intended drainage route open. A cap should finish the post, not turn a small fit problem into a hidden maintenance problem.
Matching Caps to Balusters, Gates, and Finials
A cap looks right when it belongs to a system. A black powder-coated cap beside a zinc-plated hinge creates a patchy result, even if each part looked acceptable on its own. The same problem appears when a modern flat cap sits above ornate balusters and a traditional gate insert.
Match the cap finish to the visible hardware first. That usually means checking the balusters, post base brackets, gate hinges, latch, screws, and finials together. If the project uses black powder coat, keep the major exposed parts in the same colour family. If the gate has a warm bronze tone, a bright silver cap will pull attention in the wrong direction.
Buy the design language together
A coordinating finial can turn a series of ordinary posts into a deliberate fence line. It should repeat a shape or finish already present in the gate or baluster pattern, not introduce a completely unrelated ornament.
For stair and deck work, browse compatible Nuvo Iron balusters alongside the cap rather than waiting until the railing is installed. Ordering caps, finials, balusters, and gate hardware together also makes it easier to compare finishes and choose compatible fasteners.
Multi-pack purchasing makes practical sense on a long fence run. Count every visible post, add the gate posts, and keep a small allowance for damage or future replacement if the product is sold in a suitable pack. A six-post deck and a forty-post fence shouldn't be planned with the same buying method.
Shopping Checklist and Spec Considerations
Before you click add to cart, write down the post dimensions and the conditions around the railing. Most cap problems begin with an assumption, usually that a nominal size, finish name, or product photograph tells the whole story.
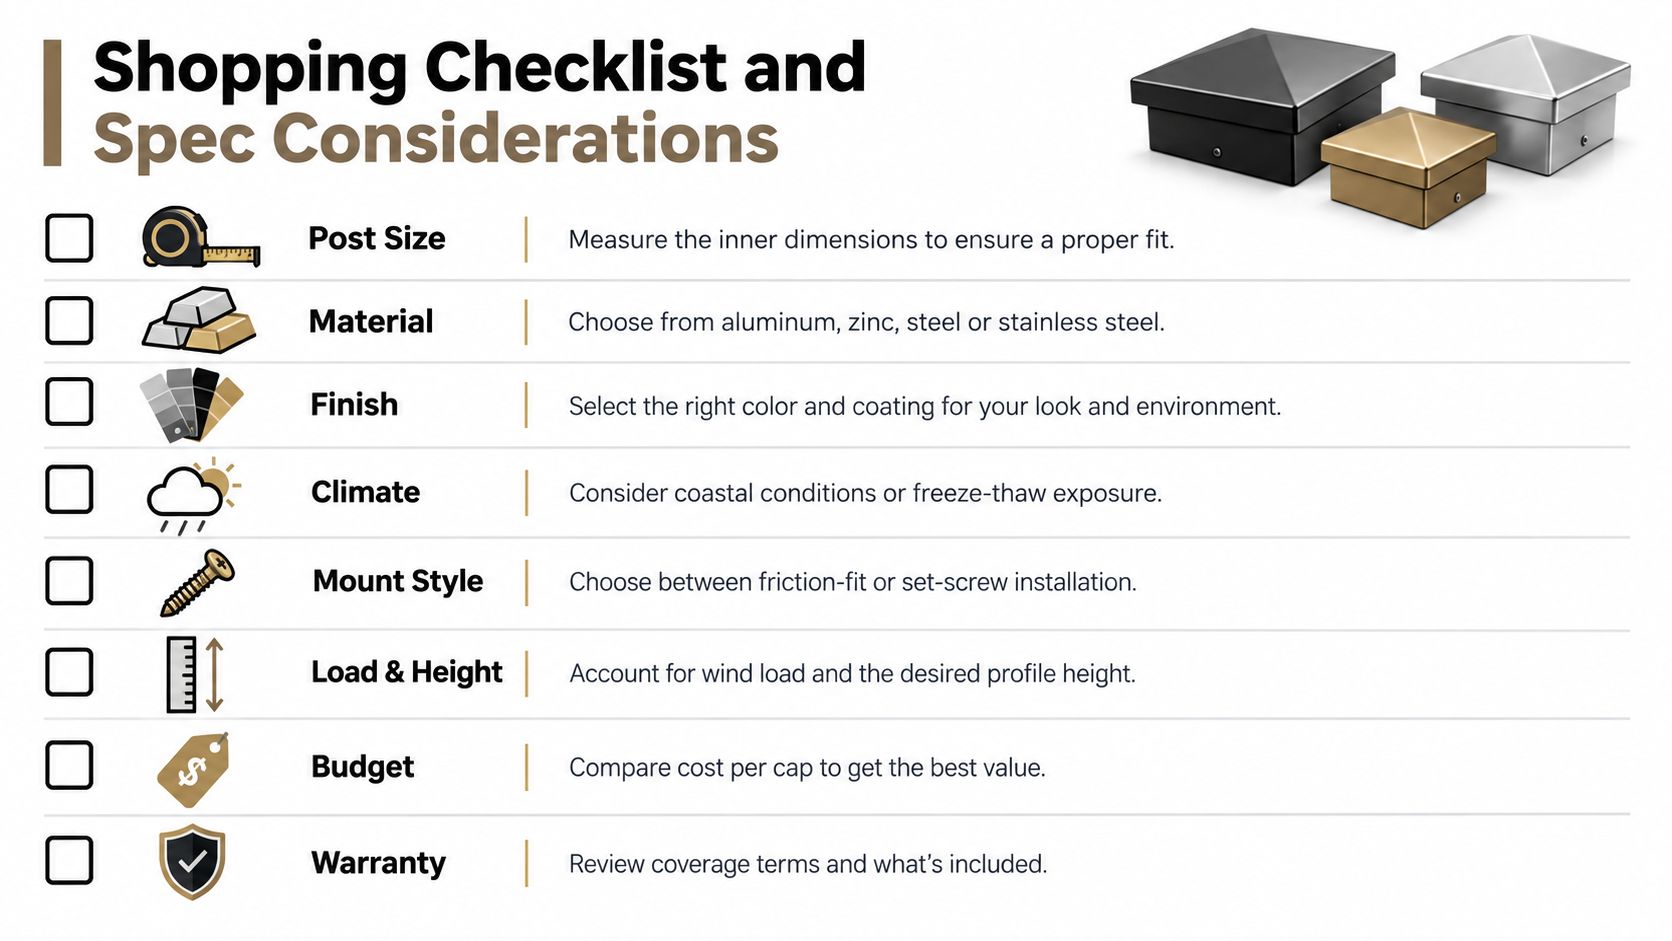
Confirm these specifications
- Post size: Measure the actual outside width and depth at the cap location.
- Material: Choose aluminum, zinc, galvanized steel, or stainless steel based on exposure and compatibility.
- Finish: Match the cap to the post, rail, balusters, brackets, and gate hardware.
- Climate: Account for coastal salt, persistent moisture, freeze-thaw cycling, and drainage.
- Mount style: Decide between pressure fit, slip-on fit, adhesive assistance, set screw, or another mechanical method.
- Profile: Check whether a pyramid, ball, flat, or decorative cap suits the architecture and clearance around stairs.
- Assembly: Make sure the cap won't weaken the post, obstruct inspection, or interfere with the top rail.
- Quantity: Count deck posts, fence posts, corners, gates, and replacement pieces before ordering.
A retailer's product page should show more than a polished lifestyle photograph. Look for the cap's actual intended post size, internal fit, material, finish, fastening details, and whether a matching skirt or finial is available. Product photography helps with colour, but it can't replace dimensional information.
The Xtreme Edeals catalogue includes pyramid, ball, flat, and decorative metal post caps in common sizes, including aluminium pressure-fit options for metal posts and decorative lines from brands such as Decorex Hardware. It also carries related railing hardware, with CAD pricing and multi-pack options that help contractors estimate the full quantity rather than pricing one cap at a time. XTREME EDEALS INC. is one practical source to compare when you're buying caps alongside balusters, finials, gate hardware, and fastening supplies.
Code and wildfire checks
A cap is not a substitute for a compliant guard. California regulations use a 30-inch height threshold for guardrail protection at many high work locations, and related standards generally require a 42-inch rail, subject to exceptions. The California elevated-work guardrail rule also addresses toeboards where a platform, runway, or ramp is 6 feet or more above areas where employees normally work or pass and falling objects could create a hazard.
For residential deck guards, California guidance calls for a 200-pound concentrated load at any point along the top rail and 50 pounds over a 1-square-foot area for guard infill. Review the Santa Cruz County deck construction guidance with the post anchorage, rail connections, cap retention, and drainage treated as one load path.
Opening size matters too. Dublin, California guidance uses a 4-inch sphere test for ordinary guard openings and a 6-inch sphere limit for specified triangular stair openings. Check the Dublin guardrail and handrail guidance before adding a projecting ornament near a stair.
In designated wildfire areas, California's WUI code can apply to new buildings with permit applications submitted on or after July 1, 2008, where the site falls within a covered area. The California WUI guidance explains why the surrounding post, coating, fasteners, and railing assembly matter, not just the cap. CAL FIRE recommends an ember-resistant zone extending 5 feet outward from a deck and advises replacing deck components, including railings, with ignition-resistant or noncombustible materials where appropriate. A metal cap alone doesn't make a railing fire-safe.
Quick answers before ordering
Are metal railing post caps required by code?
Usually, the cap itself isn't the item that establishes guard height, load capacity, or opening limits. It still can create a safety issue if it has sharp projections, changes clearance, weakens a connection, or traps water. Check the complete railing assembly and local requirements.
How should I measure the post?
Measure the actual outside width and depth at the finished top, check both directions, and account for coating thickness and squareness. Don't order solely from a nominal label such as 2×2 or 4×4.
What if the cap is slightly loose?
Don't rely on hope or a thick blob of adhesive. Confirm the manufacturer's fit range, then use a compatible shim, adapter ring, or approved mechanical fastener. If the gap is substantial, order the correct cap.
Can I paint a cap to match existing metalwork?
Yes, if the cap material and coating system accept the preparation and paint you plan to use. Clean and prepare it properly, protect the surrounding finish, and remember that paint won't solve galvanic contact or trapped moisture.
Choose the cap after measuring the post, checking the exposure, and deciding how the complete railing should look. Visit XTREME EDEALS INC. to compare metal post caps, matching finials, balusters, gate hardware, and compatible fasteners for your deck or fence project. Order the cap as part of the assembly, not as an afterthought, and verify the fit before installation.