
You're standing beside a deck that looks fine from above. The boards are straight, the railings feel solid, and the posts appear heavy enough. Then you notice a small gap beneath one post, a rust streak on the bracket, or a beam that's no longer sitting square. Those details often point to a support connection that was chosen for convenience rather than for the soil, height, moisture, and loads on the site.
Decking post supports do more than hold a post upright. The base connection transfers gravity loads, limits lateral movement, manages uplift, and separates vulnerable wood from moisture. In Canada and the United States, the right answer depends less on choosing the biggest piece of lumber and more on building a complete support assembly that matches the footing and beam connection.
Why Decking Post Supports Decide Whether Your Deck Lasts
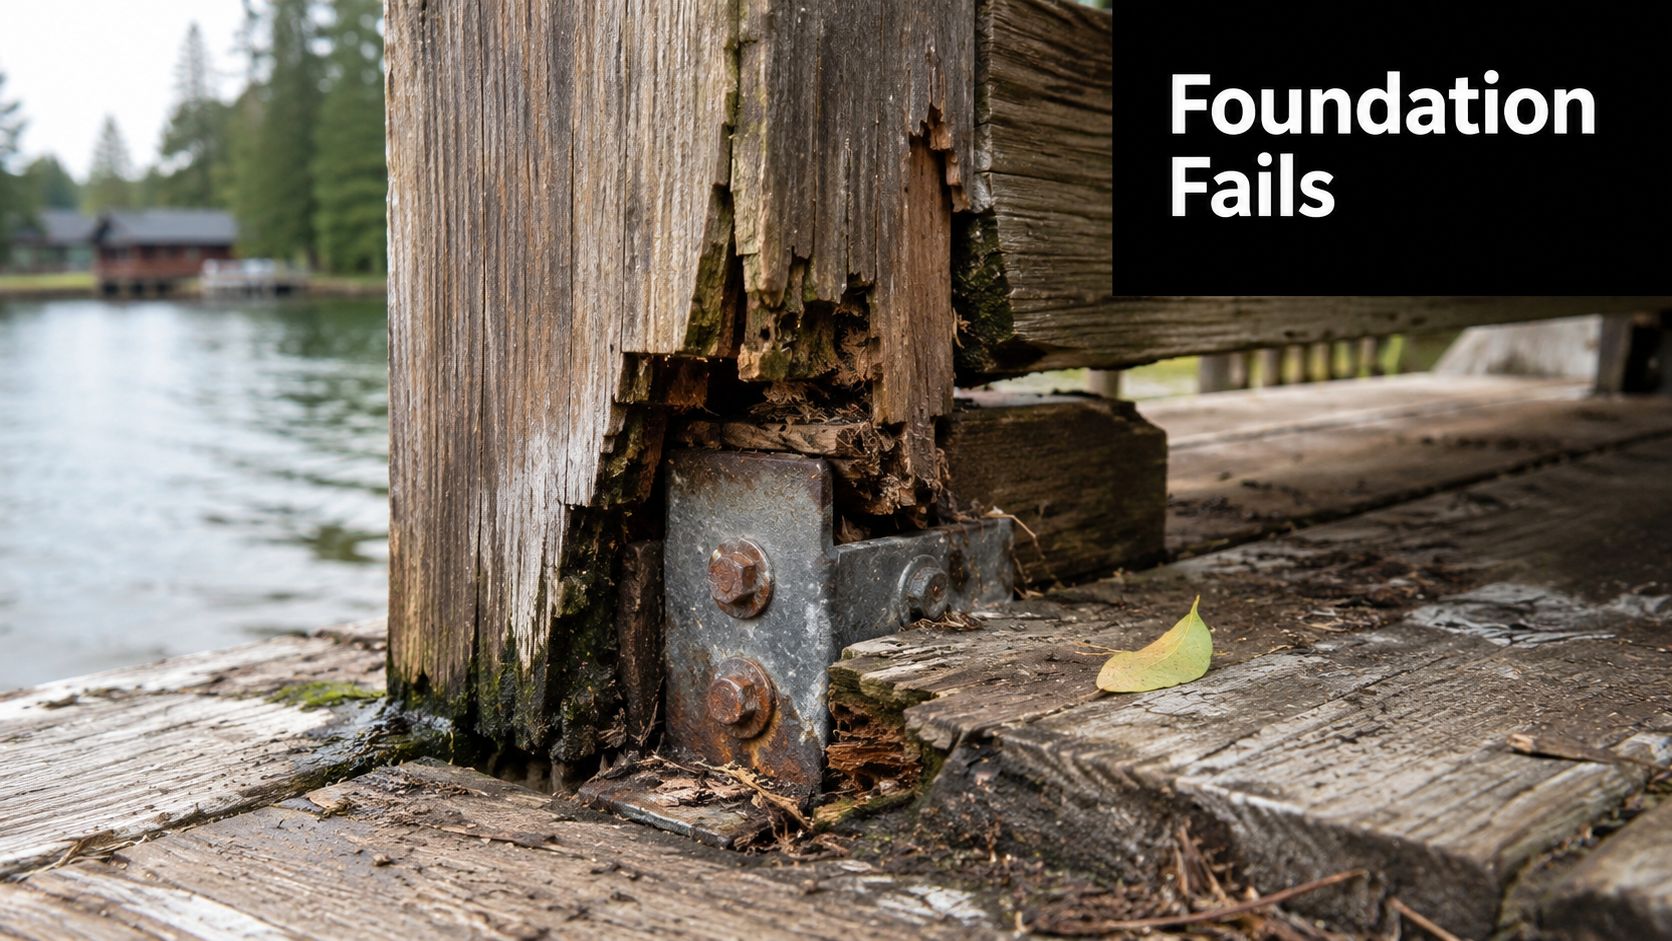
A lakeside cottage deck can pass inspection and still develop problems quickly when the support detail doesn't suit the ground. On one rebuild, a contractor had replaced an embedded concrete pier with a surface-mounted bracket on clay soil. The deck looked acceptable at completion, but freeze-thaw movement shifted the support, and the structure heaved within two winters. The post itself wasn't the first problem. The connection between the footing and the post was.
That base has several jobs at once. It carries vertical load from the beam and joists, resists sideways movement from people and wind, limits uplift, and keeps seasonal ground movement from turning into permanent misalignment. A post with a larger cross-section can't compensate for a footing that moves or a bracket that doesn't provide the required restraint.
The connection carries more than weight
Ontario guidance makes this clear. Clearview's 2025 deck construction guide specifies 6"x6" minimum support posts, limits unsupported post height to 10'-0" from the footing to the underside of the beam, and requires lateral restraint through manufactured connectors or at least 12 inches of embedment in surrounding soil or concrete piers. Windsor's 2026 construction guide allows 6"x6" or 4"x4" posts depending on beam spans, which shows why post size is tied to loading and span rather than selected in isolation.
Another Ontario guideline requires concrete piles or screw piles when a deck is higher than 72 inches, or 1800 mm, above grade, or when it supports a roof. That guidance also requires posts to be at least 6"x6" or 3-ply 2"x6", with 4"x4" posts not allowed in that situation. The message is practical: increasing height or load calls for a larger, better-anchored support assembly.
Practical rule: Choose the base and beam connection before you finalise the post cut. The connector determines how the post transfers forces into the footing and beam.
A downtown restaurant deck provided the useful contrast. It stood about six feet high, used adjustable saddles where the footing elevations varied, and included proper hold-downs at the structural connections. After five winters, the posts remained plumb because the installation addressed movement at the base and uplift at the frame, rather than relying on post size alone.
Before ordering hardware, mark each post location, identify whether the deck is attached or freestanding, check the soil and grade, and confirm the beam arrangement. Resources such as support options for deck construction can help you compare base brackets and related hardware, but the final selection still has to agree with the local permit drawings and code requirements.
Types of Decking Post Supports and When Each One Fits
Four support categories cover most residential deck work. They aren't interchangeable, and the cheapest-looking option can create expensive correction work when the site has frost, standing water, uneven concrete, or a wide beam connection.
Compare the support choices
| Support Type | Best-Use Condition | Watch Out For | Typical Hardware Code |
|---|---|---|---|
| Cast-in-place embedded pier | Frost-prone northern sites where the footing reaches suitable bearing depth | Soil contact, moisture exposure, difficult inspection and replacement | Wet-set anchor bolt with engineered post base |
| Surface-mounted standoff bracket | Concrete pad foundations and low-grade decks | Inadequate restraint on wet or moving soil, poor anchor layout | ABU or PBS style post base |
| Adjustable post saddle | Sloped yards, uneven pads, and settled footing elevations | Threaded hardware must be locked and protected from water and movement | Adjustable saddle or adjustable post base |
| Beam-to-post post cap | Two-ply beam connections and top-of-post load transfer | An undersized cap won't properly capture the beam or accept the specified fasteners | BC or AC style post cap |
Embedded piers suit frost-prone northern work when the concrete support extends below the local frost line and the post connection is detailed correctly. They aren't a licence to bury untreated or poorly protected wood. The footing must bear on undisturbed soil, and the connection must provide the required restraint.
Surface-mounted standoff bases work well on a sound concrete pad. The standoff keeps the post above the concrete and gives water a route away from the end grain. They don't fix a pad that shifts, cracks, or sits on poorly compacted soil. A bracket bolted to an unstable surface is still an unstable support.
Adjustable saddles earn their place on sloped sites and retrofit work. They let the installer bring several posts to a common beam elevation without packing the connection with loose timber. The adjustment needs to be secured after levelling, and the saddle must be rated for the reaction at that post.
At the top, a post cap transfers the beam reaction into the post and helps control movement. A cap designed for a narrow single beam isn't automatically suitable for a two-ply beam. Check the actual post and beam dimensions, fastener schedule, and load direction.
Decode the hardware name
Manufacturers use model codes to identify post size, connector family, adjustment, and coating. Simpson Strong-Tie and USP-style codes often include a base or cap family followed by a dimensional suffix, while a coating suffix can distinguish exterior-rated versions. Don't order from the code alone. Match the physical post dimensions, the beam arrangement, the anchor type, and the evaluation or installation requirements.
For broader planning considerations, homeowners can also consult Twin Cities deck design experts from Task Masters Inc., particularly when a deck layout affects beam spans, stairs, and support locations.
The rule of thumb is simple. Use an embedded or engineered pier system where frost and soil movement govern, a standoff base on stable concrete, an adjustable saddle where elevations vary, and a properly sized post cap wherever the beam meets the post.
Sizing Posts, Footings, and Hardware to Load and Climate
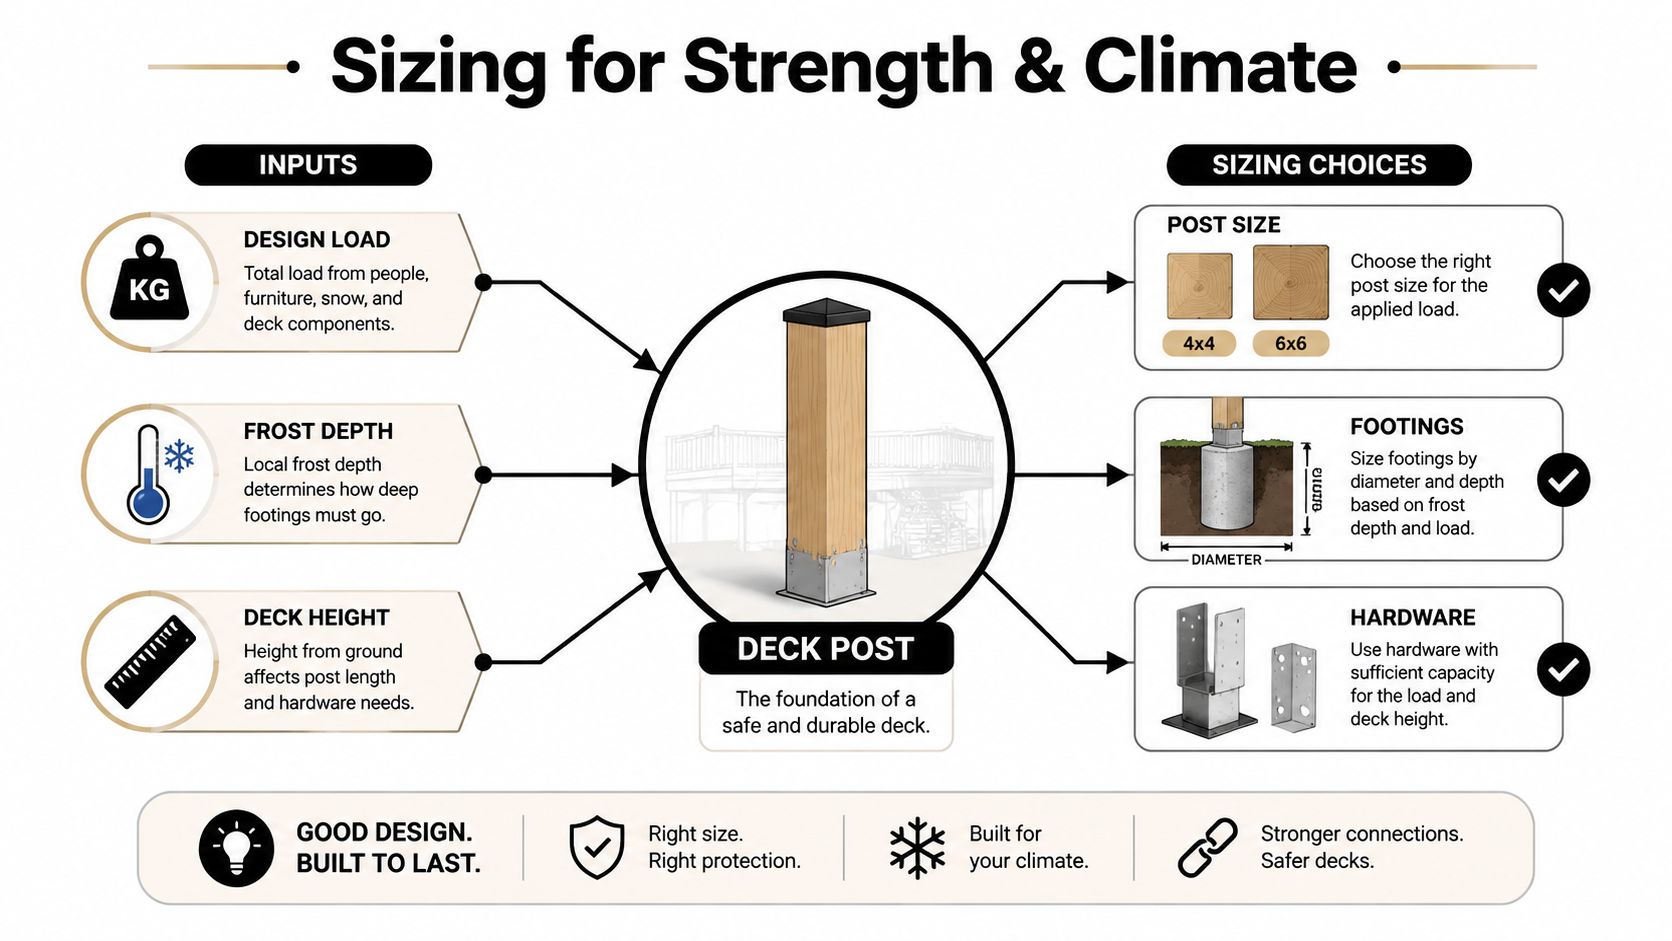
Post sizing starts with three questions: How much load reaches this post? How deep does the footing need to go? How high is the deck above grade? A 4×4 may suit one low, lightly loaded arrangement, while a taller deck or roof-supported structure may require a 6×6 or a built-up post assembly.
Ontario guidance links post size to beam span, height, roof loading, and footing conditions. Clearview limits unsupported post height to 10'-0" and specifies 6"x6" minimum posts in its guide, while Windsor permits 4"x4" or 6"x6" posts depending on beam spans. An Ontario reference also moves roof-supported decks toward 6"x6" or 3-ply 2"x6" posts, excluding 4"x4" posts for those conditions. Review the Ontario deck guideline and your municipality's requirements before you calculate material quantities.
Start with the footing
The footing has to bear on undisturbed soil and extend below the frost line in frost-prone areas. A Canadian guide identifies frost protection as a footing requirement, while the regional height threshold of 72 inches, or 1.8 m, triggers more substantial support systems in Ontario guidance. Don't treat a sonotube diameter as a substitute for adequate depth or bearing.
For concrete-supported posts, the California Residential Code guidance in CRC floor provisions requires lateral restraint through manufactured connectors or at least 12 inches of post embedment in surrounding soil or concrete piers. It also requires the post to be centred on or in the footing and sized for its tributary load using the applicable table method.
Match the connector to the post
A base that fits a nominal 4×4 won't fit a nominal 6×6. A bracket for a 6×6 post also needs enough bearing area and fastener positions for the connection shown in the plans. The same principle applies to caps. A cap that captures only part of a two-ply beam can leave the beam relying on fasteners in a way the manufacturer didn't intend.
Don't assume a familiar product suits every load condition. Confirm the manufacturer's capacity tables, the local code path, and whether the connector handles compression only or also uplift and lateral forces. For owners reviewing timber framing decisions, timber homes advice for owners from Awesim Building Consultants offers useful background on how framing choices affect structural detailing.
Tools and Fasteners You Need Before You Start
Lay the tools beside the work area before digging. A post-hole digger or auger handles excavation, while a 4-foot level, string line, and plumb bob let you transfer elevations and check alignment without guessing. For concrete work, keep a hammer drill and masonry bits ready. For structural connections, use an impact driver, socket set, and torque wrench, not just a cordless drill and a handful of deck screws.
A circular saw with a metal-cutting blade helps trim nonstructural bracket edges where the manufacturer permits it. Don't cut a load-bearing connector or alter its holes because the fit is inconvenient. If the bracket needs modification to fit, select another listed connector or obtain an engineered detail.
Build the fastener kit around the connection
Use hot-dip galvanized or stainless steel fasteners with treated lumber. Plain zinc hardware is not an appropriate default for exposed deck connections. For beam-to-post work, stock 1/2-inch through-bolts with washers and nuts, then use structural screws such as SDWS or an equivalent only where the connector and local code allow them.
Concrete pads may call for wedge anchors or epoxy anchors. The anchor type must match the concrete condition, edge distance, hole size, embedment, and bracket design. Berkeley's deck handout requires ledger fasteners of at least 1/2-inch diameter with washers and hot-dip galvanized or stainless finishes, and it specifies hold-down tension devices in at least two locations per deck, within 24 inches of each end, each providing at least 1,500 pounds allowable design capacity. See the concrete screw anchor selection before choosing a fastener for a retrofit.
| Support Type | Fastener | Corrosion Class | Brand |
|---|---|---|---|
| Surface-mounted base | Wedge anchor or approved concrete anchor, plus specified post fasteners | Hot-dip galvanized or stainless steel | Simpson Strong-Tie ABU or PBS |
| Embedded pier base | Wet-set anchor bolt and listed post fasteners | Hot-dip galvanized or stainless steel | Simpson Strong-Tie |
| Adjustable saddle | Approved threaded rod, nuts, washers, and post fasteners | Exterior-rated galvanized or stainless steel | Listed adjustable support |
| Beam-to-post cap | 1/2-inch through-bolts or specified structural fasteners | Hot-dip galvanized or stainless steel | Simpson Strong-Tie ECCO, BC, or AC style cap |
XTREME EDEALS INC. offers products such as Simpson Strong-Tie ABU bases, PBS post bases, and ECCO post caps alongside anchors, bolts, washers, and other deck hardware. Confirm the bracket gauge, fastener length, hole pattern, and corrosion class before placing the order.
Installing Surface-Mounted, Embedded, and Adjustable Supports
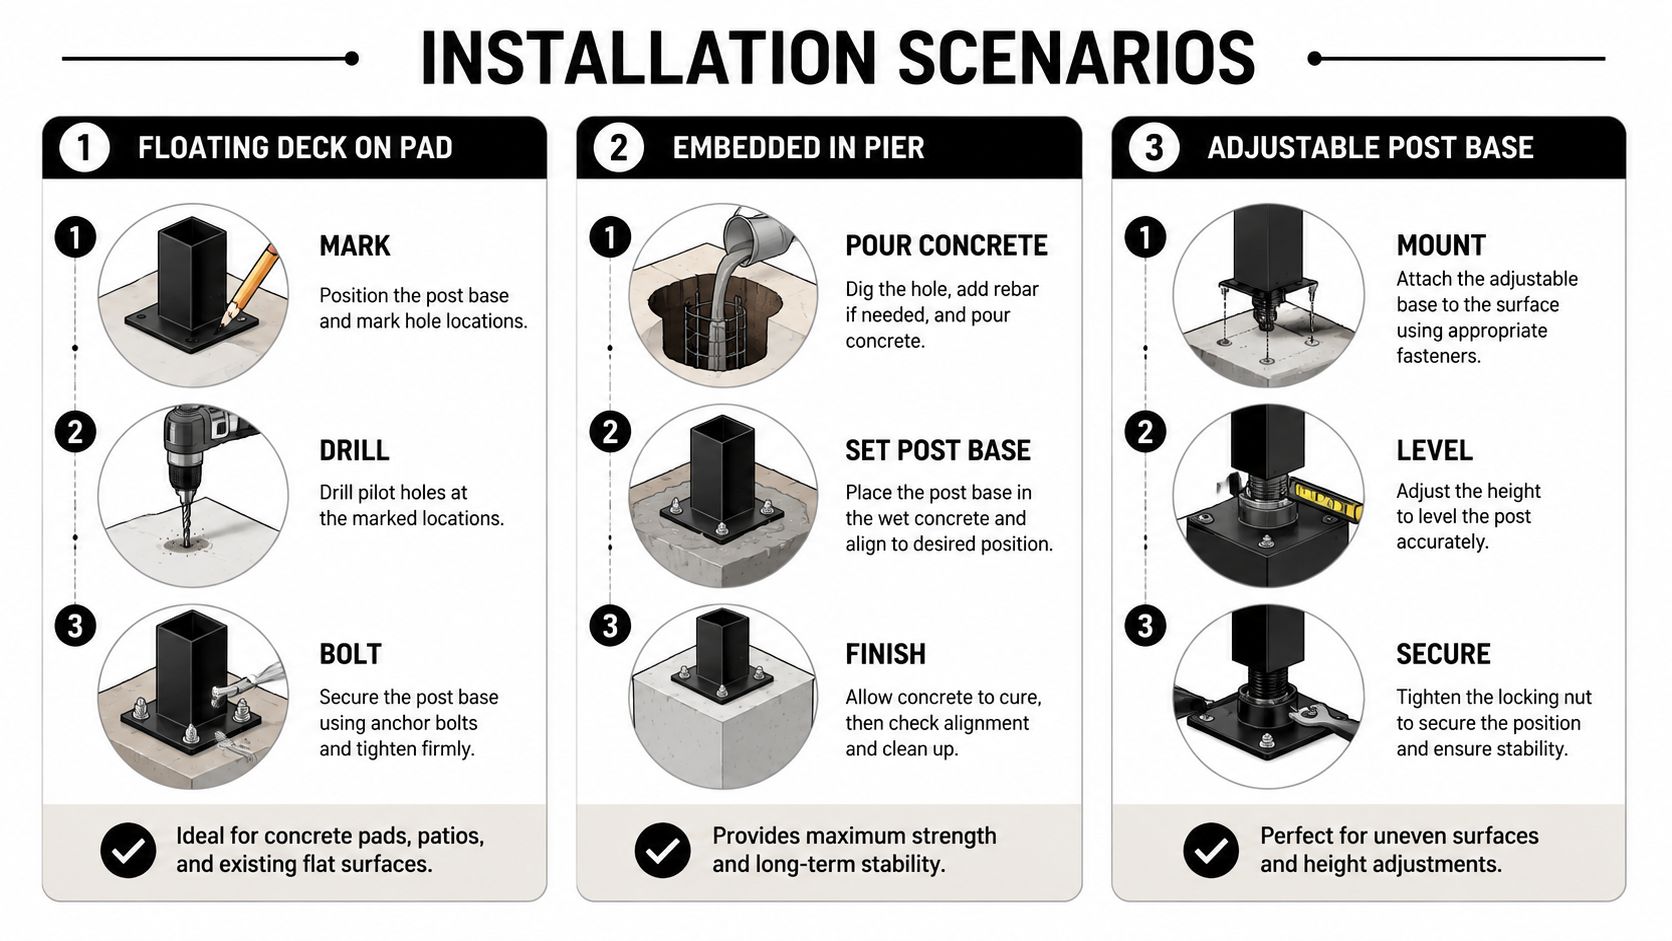
The installation method should follow the footing condition, not the other way around. These three job-site scenarios show how the sequence changes while the final checks remain consistent.
Scenario one, a low-grade deck on a concrete pad
A floating deck on a stable concrete pad usually starts with layout. Snap or mark the post centres, place the surface-mounted base, and check that the anchor holes won't land too close to a slab edge or crack. Drill with the specified hammer-drill bit, clean the holes thoroughly, and set the wedge anchors according to the anchor manufacturer's instructions.
Once the base is anchored, check it for level and plumb before inserting the post. Drive every specified side fastener into the post, keeping the tool aligned so the screw head seats properly instead of stripping or stopping short. The post base deck hardware range can help identify compatible base styles, but the product schedule must still govern the fastener choice.
Finish by checking the post on two faces, confirming the beam line with a string line, and completing the torque check required by the anchor and connector manufacturers. A surface base isn't complete just because the post stands upright. Confirm the lateral restraint and any required hold-down connection.
Scenario two, a frost-country deck on sonotube piers
For a northern deck, verify the local frost requirement before setting the form. The footing needs to bear on undisturbed soil and extend below the frost line, as Canadian guidance requires. Don't pour to a convenient excavation depth and assume the concrete will prevent seasonal movement.
Set the anchor bolt while the concrete is wet, with its location aligned to the post base and its projection checked before the concrete stiffens. After the concrete cures, fit the bracket, leave the designed standoff so air can circulate below the post, and fasten the post using the listed nails or screws. Don't substitute a random bolt or washer because it happens to fit the hole.
California code guidance also requires lateral restraint where posts bear on concrete footings, either through manufactured connectors or 12-inch minimum embedment in surrounding soil or concrete piers, as described in Eureka's deck permitting handout. The exact detail depends on the approved design and jurisdiction.
Scenario three, an uneven-grade deck with adjustable saddles
An adjustable saddle is useful when the footings are sound but the elevations don't line up. Set the threaded rod or adjustment component to the required length, place the levelling nuts and washers in the manufacturer's sequence, and bring the saddle to the beam line. Don't leave the entire load on one loose nut or rely on friction to hold the post after adjustment.
Once the grade is true, lock the adjustment, fasten the post, and check plumb on two faces. Confirm that the saddle hasn't shifted while the beam is being framed. For a related view of hardscape levels and deck transitions, the Austin pool deck paver guide from Modern Yard Landscapes provides useful site-planning context.
Watch the installation video below for a visual reference on post support mechanics.
Every scenario ends with the same closeout: torque check, two-face plumb check, beam-line verification, and lateral hold-down confirmation. If any one of those checks fails, the support isn't ready for framing.
Corrosion, Frost, and the Mistakes That Cause Failures
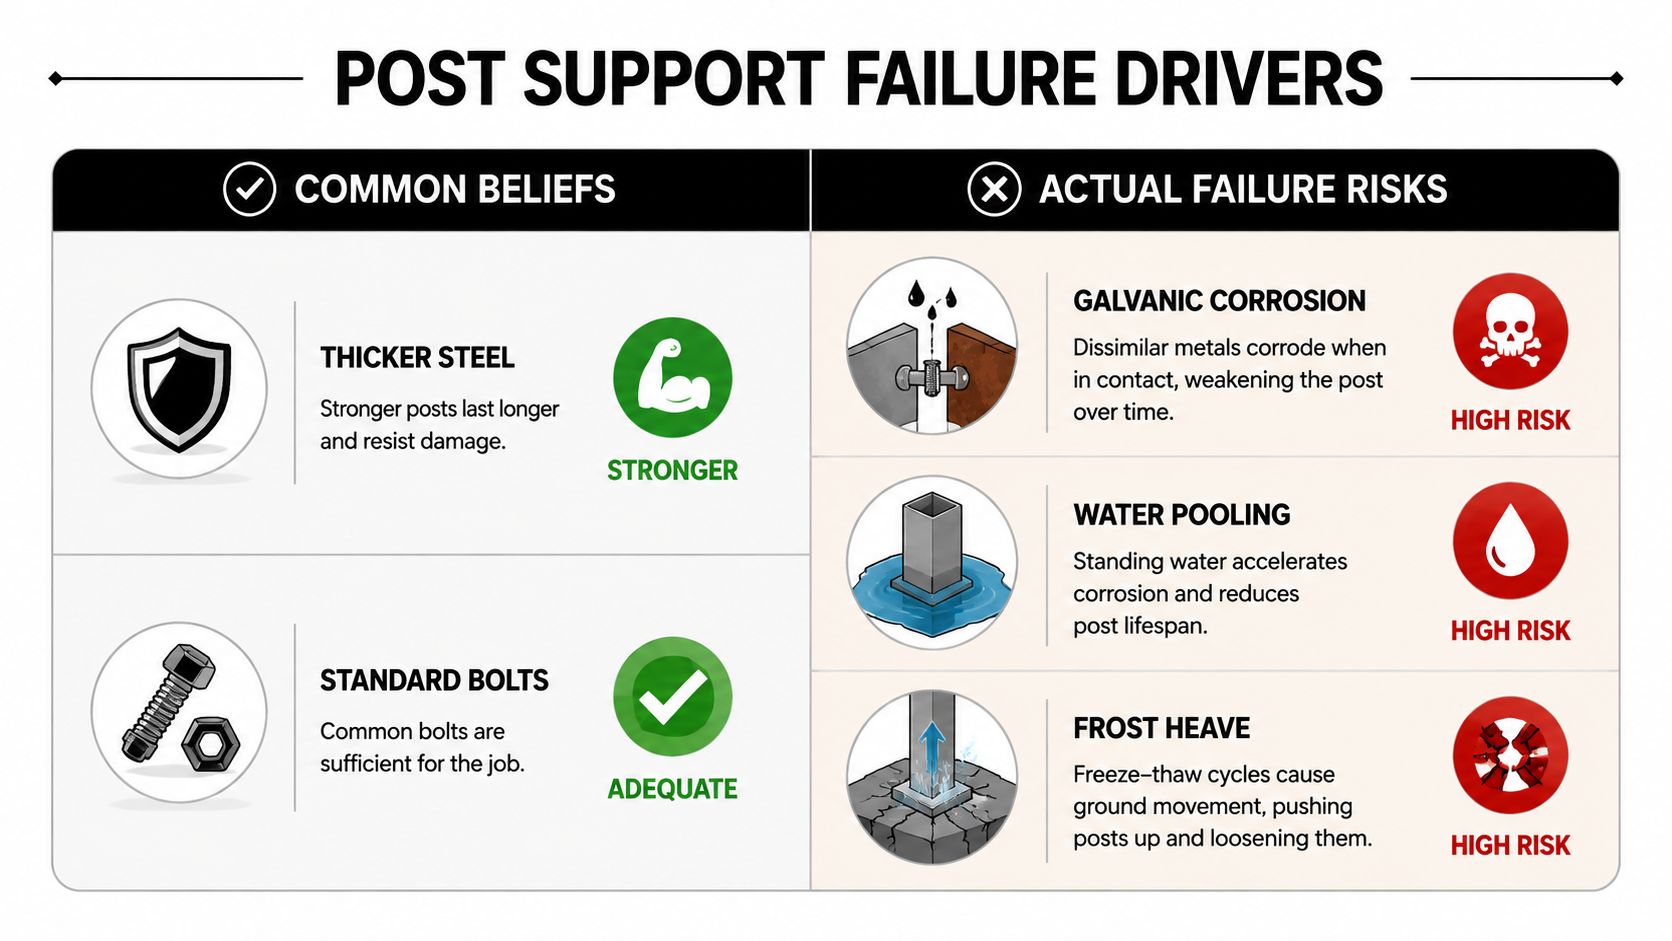
Thicker steel doesn't automatically produce a stronger deck. A heavy bracket can fail when dissimilar metals create galvanic corrosion, water sits against the post end, the footing rises with frost, or the installer misses the hold-down that controls uplift and racking.
California materials require posts or columns supporting permanent structures on concrete or masonry in direct contact with earth to use naturally durable or preservative-treated wood. The exception allows protection where the post is supported by a concrete pier or metal pedestal projecting at least 1 inch above the slab or deck and separated by an impervious moisture barrier, as described in this California post protection document.
What homeowners can spot
Galvanic corrosion often appears as white residue, orange streaks, flaking coating, or a dark line where two metals meet. Use compatible hot-dip galvanized or stainless hardware, especially with treated lumber, and don't mix an unprotected zinc connector with a stainless fastener without checking compatibility.
Water pooling shows up as soft end grain, dark staining, splitting, or a persistent damp ring around the base. A standoff bracket helps, but it won't help if the surrounding grade directs water toward the post or the footing holds a puddle.
Frost heave can reveal itself through a post that rises relative to the beam, a stair connection that pulls away, or a deck surface that slopes after winter. Ontario guidance requires footings to bear on undisturbed soil and extend below the frost line, so shallow support isn't a harmless shortcut.
The avoidable installation errors
- Under-driven screws: The head sits proud, or the fastener hasn't reached the required depth. Remove and replace it according to the connector schedule.
- Mixed connection types: A lag bolt isn't a substitute for a specified through-bolt. Use the fastener system shown for the post and beam detail.
- No standoff: Wood sits directly on concrete and wicks moisture. Check whether the selected base is designed to lift the post clear.
- Missed hold-downs: The deck may feel solid under ordinary use but rack under uplift or lateral force. Berkeley and Placerville guidance both specify hold-down tension devices in at least two locations per deck, each rated for 1,500 pounds, as shown in Placerville's deck submittal instructions.
- Uncentred posts: Auburn's handout requires deck and spa-or-tub posts to be 6×6 nominal minimum and centred on the footing below. An off-centre post can change the load path and complicate inspection, as set out in the Auburn deck handout.
Buying Checklist and Maintenance Routine for Long-Term Performance
Buy the support for the site you have, not the site shown in a product photo. Before ordering, work through this list:
- Mounting condition: Choose a surface base for stable concrete, an embedded system for suitable piers and frost conditions, or an adjustable saddle where footing elevations vary.
- Post compatibility: Confirm the actual post size, the bracket dimensions, and whether the beam is single-ply or built-up.
- Finish: Select hot-dip galvanized or stainless hardware for treated-lumber exposure, and pay closer attention to stainless options in coastal conditions.
- Capacity: Verify that the connector handles the post's compression, uplift, and lateral demands, not just the downward reaction.
- Code acceptance: Use a listed connector and follow the local permit drawings, including restraint, anchorage, and hold-down details.
- Complete system: Match bases, saddles, post caps, bolts, screws, washers, and anchors rather than combining unrelated parts.
Keep a seasonal inspection rhythm
In spring, look for rust streaks, loose nuts, cracked concrete, shifted posts, and wood touching wet surfaces. In mid-summer, inspect adjustable saddles after heavy use and check whether the beam line remains true. Before winter, confirm that drainage is clear and that no soil, mulch, or debris has buried the standoff or directed water toward the footing.
Use a one-page project sheet with three rows: floating deck on pad, frost-country deck on pier, and uneven-grade deck with adjustable support. Beside each row, record the selected base or saddle, post size, anchor type, fastener finish, final torque confirmation, two-face plumb check, and seasonal inspection result. That sheet gives you a practical record for maintenance and makes it easier to identify a change before it becomes a rebuild.
XTREME EDEALS INC. supplies deck and fencing accessories, including post base brackets, post caps, bolts, washers, screws, and concrete anchors for support connections. Visit XTREME EDEALS INC. to compare hardware for your footing condition, post size, and beam connection before you start the build.