

You've got the posts built, the railing looks clean in daylight, and then dusk hits. Now the whole perimeter feels unfinished, and the obvious fix, running wire for lights, means trenching, switches, an electrician, and probably a delay you didn't budget for. That's where solar post cap lights earn their keep, because they finish a deck or fence without turning a tidy project into an electrical job.
Why Solar Post Cap Lights Are the Smartest Deck Upgrade
A lot of outdoor projects reach the same point. The lumber is cut, the caps are on, and someone stands back at sunset and realises the space still needs light. Solar post cap lights solve that moment cleanly, because they sit on top of the post, charge on their own, and switch on automatically when the light fades.
The biggest advantage is simple: no trenching, no line-voltage wiring, and no waiting on utility power for evening use. That makes them a natural fit for retrofits, especially on completed decks and fences where owners want the finished look without ripping anything apart. They're also a good match for California's broader solar-friendly environment, where state policy has pushed homes toward solar and the state remains the largest U.S. solar market by installed capacity, with more than 31 GW in operation in recent years (marketreportanalytics.com).
Practical rule: if a lighting upgrade requires an electrician before it requires a screwdriver, many homeowners stop the project right there.
For contractors, that matters just as much as it does for DIY owners. A solar cap can turn a basic railing into a finished perimeter lighting system in minutes, and it does it without changing the structure of the post. For homeowners comparing options, that's the appeal, a clean install, automatic dusk-to-dawn behaviour, and no ongoing electricity cost to think about.
If you're planning the rest of the outdoor space, this outdoor living ideas guide gives a useful starting point for matching lighting with the broader deck layout.
How Solar Post Cap Lights Function
A solar post cap is small, but the parts inside have to work together precisely. The photovoltaic panel collects sunlight, the charge controller manages that incoming power, the rechargeable battery stores it, the LED array gives you light, and the light sensor decides when the fixture wakes up and shuts down. If one piece is weak, the whole unit feels disappointing by evening. For a product selection shortcut that ties those parts to real fixtures, see XTREME EDEALS INC. solar-powered post lights.
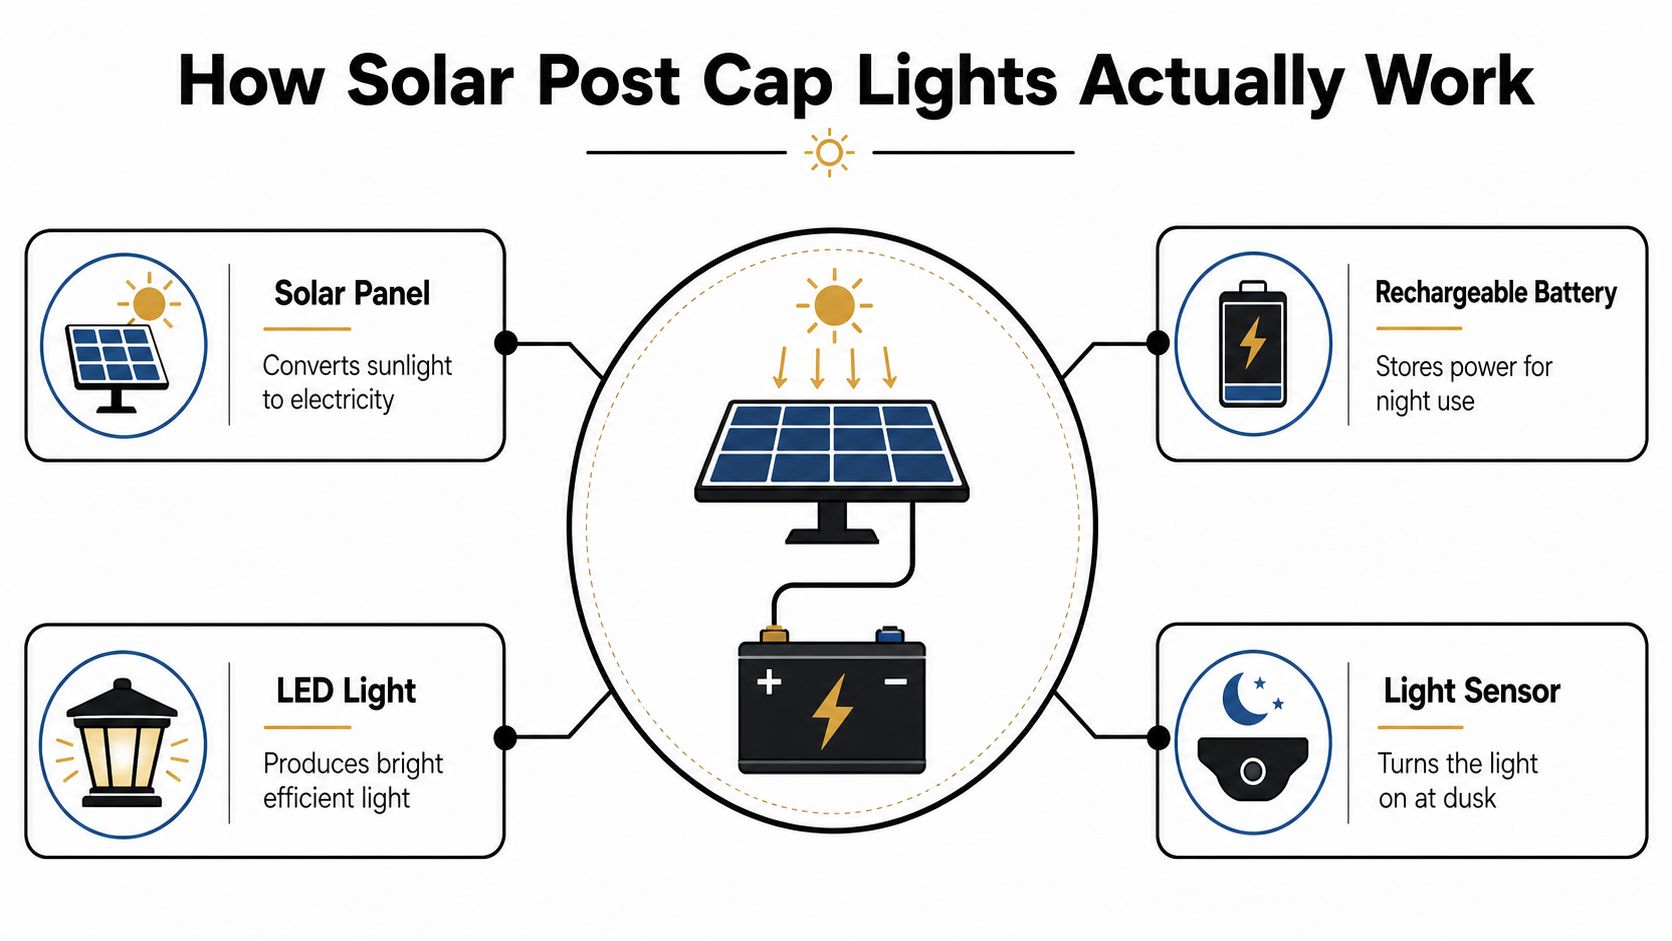
Water management is a fitting analogy. The panel is the pump, the battery is the tank, and the LED is the faucet. If the tank is too small or the pump is too weak, the faucet runs dry before dawn, even if the fixture looked bright when you tested it indoors.
Why battery size matters more than flashy lumen claims
The part most buyers miss is the daily energy balance. In inland and Southern California, small integrated PV fixtures usually recharge well, but marine layer conditions, winter tilt losses, and nearby shade can reduce harvest enough to shorten runtime or cause dimming after only a few hours. That is why a good fixture needs enough reserve to handle multiple low-sun days, not just one bright afternoon. On decks where owners want to stretch battery life, the practical choice is often a model that accepts replaceable cells, and the guide to maximize device performance with 1.5V AAs is useful background on how that battery choice affects runtime and replacement habits.
The best products publish the details that matter, battery capacity, charge-time assumptions for partial sun, and output behaviour over time. Generic lumen numbers do not tell you whether the light will stay useful in December on a shaded fence line. A quality unit can last roughly 5 to 15 years when maintained properly (decks.com), which is exactly why build quality and battery serviceability matter more than a glossy box.
What good performance looks like outdoors
A strong solar cap does not have to be the brightest fixture on the market. It has to charge reliably, turn on consistently, and stay lit long enough to finish an evening without fading too early. That is especially important on coastal properties, shaded back fences, and winter installations where the sun angle does the fixture no favours. Cheap units usually fail because the panel, battery, and LED load were never balanced for actual outdoor conditions.
If a product listing only brags about brightness, treat that as a warning sign. The whole point of a solar cap is steady output with low maintenance, not a short burst of light followed by a dead battery by nightfall. For installers, that distinction is the difference between a repeat callback and a project that disappears into the background, which is exactly what outdoor lighting should do.
Types and Styles for Every Post and Aesthetic
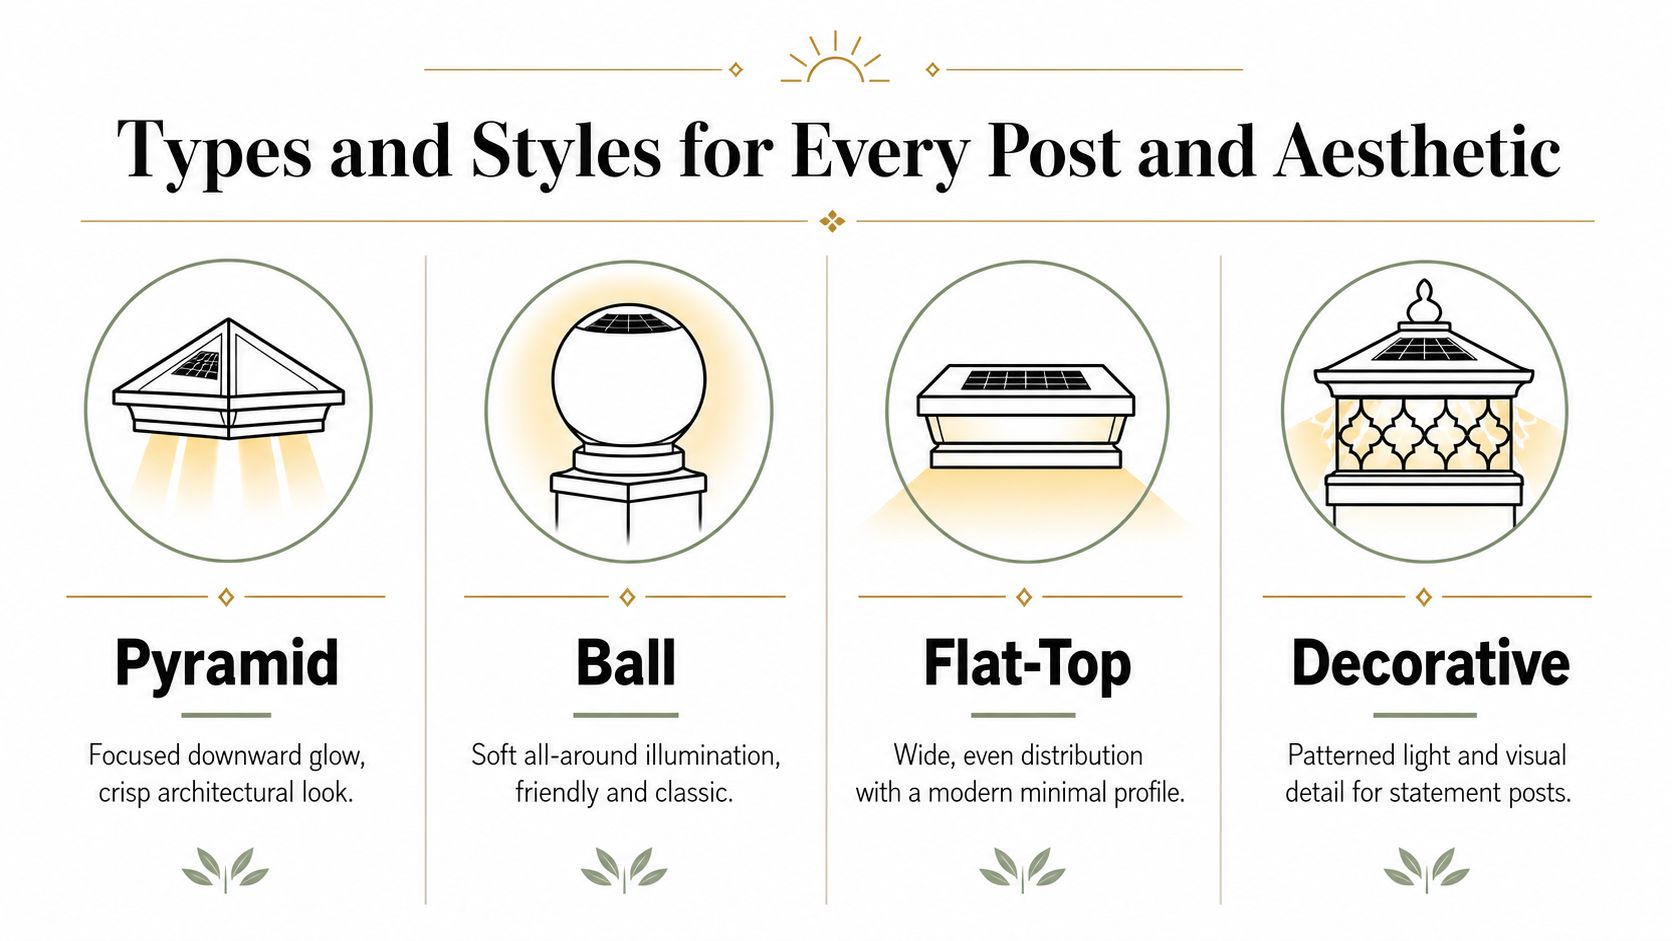
Style matters because a post cap is visible from every angle. On a traditional wood deck, a pyramid cap usually looks deliberate and crisp, while a ball cap softens the line and feels more decorative. On modern fence or gate posts, flat-top and decorative profiles can match the architecture better than a more pointed form.
Choosing shape by light pattern
Pyramid-style caps usually throw a more focused downward glow, which works well when the job is to mark edges and steps without flooding the whole deck. Ball caps give more of a 360-degree ambient feel, which suits fence lines and garden boundaries. Flat-top caps tend to read cleaner and more modern, especially on square posts where the eye already likes straight lines.
Decorative versions can be a good fit when the post itself is part of the visual story, such as a front fence, entry gate, or pergola column. In those cases, the cap isn't just lighting hardware, it's a finishing detail. The wrong shape can look like an afterthought; the right one makes the whole structure feel intentional.
Materials and finishes that hold up
Material choice affects how long the cap looks good. ABS plastic keeps the price down, but it can yellow over time under strong sun. Polycarbonate and aluminum housings usually take weather abuse better, which matters on exposed decks and coastal properties where salt and UV both work against a fixture.
Finishes like brushed nickel, oil-rubbed bronze, and white PVC each suit a different setting. Brushed metal looks at home on newer builds, while oil-rubbed bronze often blends better with warm wood tones. White PVC can disappear neatly on vinyl posts, but it still needs UV resistance if you don't want it to look tired too soon.
If the finish looks right but the housing is flimsy, you'll replace the fixture before you're ready to replace the style.
For readers browsing design options, this fence post cap ideas page is a practical reference point for matching appearance to post material and layout.
Sizing and Compatibility with Common Post Dimensions
Sizing mistakes are the fastest way to ruin a good purchase. A light that's built for a true 4×4 post won't sit right on a post that measures 3.5×3.5 inches, and the wobble shows up immediately. That's not a lighting problem, it's a fit problem, and it's the reason so many returns happen before the first screw goes in.
Nominal size and true size are not the same
Lumber labels can fool first-time buyers, because the printed size isn't the finished measurement. In the field, the cap has to match the actual post top, not the name on the receipt. That's why it pays to measure with a tape before ordering, especially on older decks where posts may have swelled, shrunk, or been trimmed unevenly.
| Post Size Compatibility Guide | |||
|---|---|---|---|
| Nominal Post Size | True Dimensions (inches) | Compatible Cap Base Size | Mounting Method |
| 2×2 | varies by product and material | size-specific cap | surface-mount or sleeve-style |
| 3.5×3.5 | 3.5×3.5 | 3.5×3.5 base | drop-in or surface-mount |
| 4×4 | 3.5×3.5 | 4×4 labelled cap for true 3.5×3.5 post | drop-in, surface-mount, or sleeve-style |
| 5×5 | varies by product and material | size-specific cap | surface-mount or sleeve-style |
| 6×6 | varies by product and material | size-specific cap | surface-mount or sleeve-style |
How the mounting method changes fit
Drop-in caps sit inside a routed recess and give the cleanest finish when the post is cut square. Surface-mount caps sit on top and screw down, which is common for retrofit jobs where the post top isn't perfect. Sleeve-style caps slide over the end, which helps when you want a tighter visual transition around the top edge.
Adapter bases and shims can bridge small mismatches, but they're not a cure for a badly sized product. If the cap was engineered for the wrong post, it'll still look wrong after the shim goes in. The best choice is always the one built for the actual post dimension, especially on jobs where the cap is visible from the street or from every seat on the deck.
For installers, the lesson is this: measure once, order once, and don't trust the box photo. If the dimensions don't line up, the light can't sit flat, the seal won't stay tight, and water will find the gap.
Installation Steps and Weatherproofing Best Practices
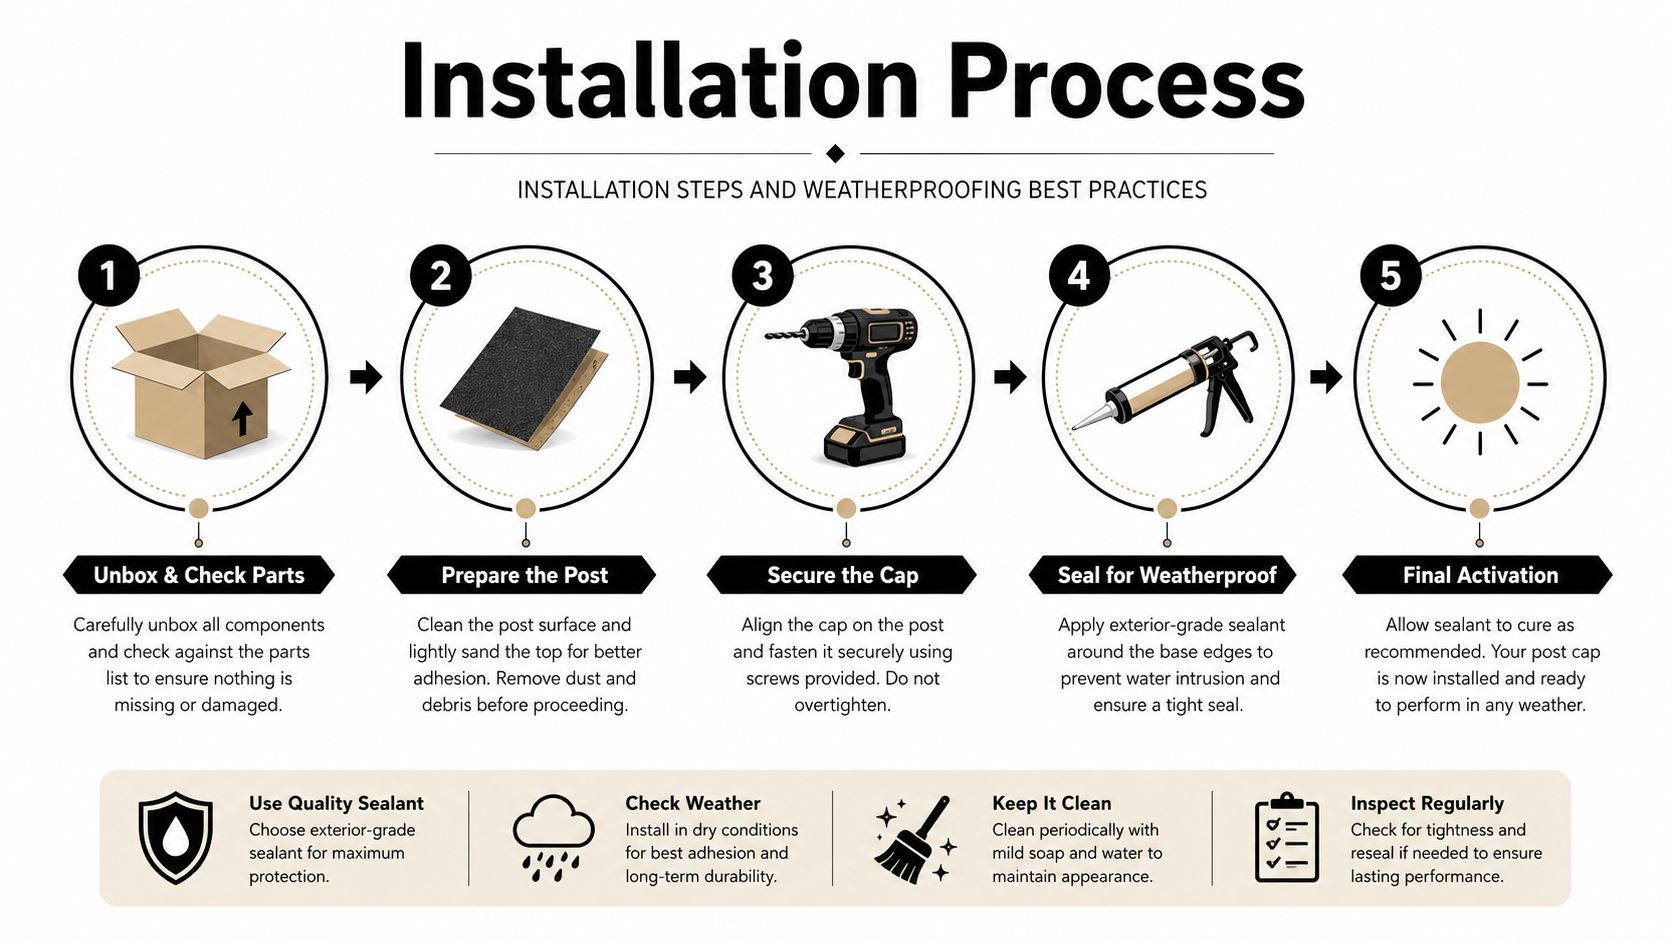
Solar caps are easy to install when the post is prepared properly and the fixture is given a dry, stable seat. The trouble starts when someone rushes the mounting, ignores the seal, or puts the panel where the sun never reaches it. A careful install saves more headaches than any brand name on the box.
Tools and checks that prevent callbacks
A drill, screwdriver, level, and silicone sealant are the basics. Before fastening anything, check the post top for debris, old adhesive, and uneven edges, because a clean seating surface matters more than most buyers realise. If the cap rocks even slightly, rainwater will work into the joint and shorten battery life.
Panel orientation matters too. In the Northern Hemisphere, the panel should face south with no overhead obstruction, and the location should be tested for sun exposure before the cap is fixed in place. A deck can look bright at noon and still underperform if a nearby wall or tree blocks the charging window.
Common mistakes that damage good fixtures
Overtightening screws cracks plastic housings faster than many homeowners anticipate. Failing to remove the battery isolation tab leaves the light dead on arrival, which looks like a product failure but is just a missed step. Installing under eaves, dense branches, or deep porch overhangs often turns a solar fixture into decorative dead weight.
The control side matters too, because California's outdoor lighting rules under Title 24 require automatic shutoff or dimming controls for many outdoor luminaires so they don't stay fully on all night. For solar caps, that means the sensor logic has to behave like a compliant outdoor luminaire, switching cleanly with ambient light and avoiding unnecessary all-night full-power output.
Keep the panel clear, keep the seal intact, and don't force the housing to do what the post shape won't allow.
A thoughtful install doesn't look complicated from the outside. That's the point. The fixture should disappear into the architecture during the day and work after dark without inviting moisture, glare, or code headaches.
Troubleshooting Dim or Dead Solar Post Cap Lights
A dead solar cap isn't always a dead product. In the field, the fastest fix is usually to separate the problem into three parts, battery, panel, and charging circuit, instead of guessing and replacing the whole fixture too early. That's the habit that saves time and money on service calls.
Start with the battery, not the housing
Many post caps use a 3.2V LiFePO4 battery, and a healthy cell may read roughly 2.5V to 3.65V (YouTube troubleshooting guide). If the battery tests weak, the light may still turn on briefly, but it won't hold output through the night. That's why a dim fixture is often a battery problem first, not a panel problem.
Check the panel exposure next. Even in sunny climates, shade from a fence rail, tree, wall, or seasonal sun angle can reduce charging enough to make the light seem faulty. If the panel is dirty or clouded, clean it and re-test before assuming the battery is bad.
Know which failures are cheap and which aren't
Corrosion on charging contacts can stop the battery from taking a charge. A stuck photocell can leave the unit in day mode, which means it never behaves like a night light at all. Panel clouding from UV exposure is another common failure, and once the surface degrades enough, output falls off no matter how new the battery is.
A useful maintenance habit is to keep the panel clean and accessible, and this solar panel lifespan checklist is a sensible reference for the kind of cleaning and inspection routine that helps outdoor PV surfaces keep working well.
A dim solar cap is often telling you exactly where the failure is, if you're willing to test instead of guess.
Some dead lights are worth repairing with a battery swap. Others are better replaced because the panel or charging electronics have failed together. That's the core service decision: fix the cheap part when the fixture body is sound, replace the unit when the electronics are no longer worth chasing.
Placement Strategies for Ambiance and Performance
A solar cap can look perfect and still perform badly if it's placed in the wrong spot. The trick is balancing visual rhythm with charging access, because the prettiest layout on paper won't matter if half the fixtures sit under shade or under an overhang. Good placement is part design, part sun study.
Spacing often looks best when the lights create a steady perimeter rather than isolated bright spots. On a deck or fence line, even spacing helps the eye read the run as intentional, while warmer light softens seating areas and cooler light can make pathways feel more defined. The goal isn't maximum brightness everywhere, it's consistent visibility where people walk and gather.
Prioritise sun before symmetry
If you have to choose between perfect symmetry and reliable charging, choose charging. A slightly offset cap that gets sunlight all day is better than a perfectly aligned one that dies after a few hours in winter. Seasonal sun angle makes that trade-off even more important on north-facing fences, narrow side yards, and properties with mature landscaping.
Avoid overhangs, dense tree canopies, and any spot that gets only a few hours of direct light. On the right post, a solar cap becomes part of the architecture. On the wrong one, it becomes a maintenance annoyance that never quite earns its place.
Use the fixture outside the deck too
These lights aren't limited to railings. They work well on mailbox posts, garden pillars, and pergola columns when the top surface gives the panel a clear sky view. That broader use can tie the whole property together visually without introducing a second lighting language.
Good placement makes the lighting feel built in, not added on.
For a clean result, keep the style consistent across similar posts and only break the pattern where the site demands it. That way the lighting reads as one system, not a collection of separate purchases.
Your Purchase Decision Checklist and Product Recommendations
The right purchase comes down to details most listings skim over. If the product page doesn't clearly state post size compatibility, battery type, housing material, and control behaviour, you're buying on hope instead of specification. For solar caps, hope is a bad procurement strategy.
What to verify before you buy
- Exact post fit: Measure the post yourself and match the actual size, not just the nominal label.
- Battery information: Look for the battery type and whether it's replaceable.
- Weather resistance: Choose housings that are built for outdoor exposure, especially if the fixture will see strong UV or coastal air.
- Light behaviour: Check that the unit turns on automatically and doesn't waste power by staying bright all night.
- Style match: Pick pyramid, ball, flat-top, or decorative profiles that suit the deck or fence, not just the product photo.
- Support and replacement parts: Favour products with straightforward support and clear product details.
The best buying decisions happen when the seller understands deck and fence hardware, not just generic lighting. For buyers comparing perimeter lighting with broader outdoor lighting options, this Peoria yard lighting ideas guide can help frame how post caps fit into a full outdoor lighting plan.

XTREME EDEALS INC. is a practical place to start if you want pyramid, ball, and decorative post caps for common wood and metal post sizes, including popular dimensions from 2×2 to true 6×6. Their catalogue is built for people who need hardware that fits the post, not a vague lighting gadget that looks good in a cart and fails on site. If you're finishing a deck, fence, or pergola and want the job done cleanly, shop the right caps first and the rest of the project gets easier.
For reliable solar post cap lights that fit common posts and finish the job neatly, visit XTREME EDEALS INC. and browse the post cap options that suit your deck, fence, or outdoor build. You'll find practical choices for the sizes and styles covered here, plus the hardware support that makes installation less of a gamble.