

You're standing on a finished deck on Saturday morning, admiring the new composite boards, when someone leans on the railing and the assembly flexes under their elbow. The posts look substantial, but the movement exposes the part most projects overlook: the railing is only as dependable as the outdoor handrail hardware, brackets, connectors, anchors, and screws holding it together.
A railing system has to suit the rail profile, framing, climate, treated lumber, and local code. California installations make that especially clear. Stair handrails generally sit 34 to 38 inches above the stair nosing, while guards on decks and open-sided walking surfaces are commonly 42 inches in many jurisdictions (California Division of Occupational Safety and Health, Imperial Beach guidance). Choosing hardware as a coordinated system saves you from the classic outcome, a good-looking railing that loosens, stains, or fails inspection.
Why Outdoor Handrail Hardware Deserves More Thought
You can finish a deck with straight boards, clean stain, and well-spaced balusters, then feel the railing move under one firm push. The weak point is often hidden in the connections. A bracket, anchor, or screw that looks adequate in the package may not transfer force into the framing or tolerate wet wood, treated lumber, and outdoor exposure.
A deck-post bracket or standoff base transfers vertical and lateral forces into the structure. A rail-to-post bracket keeps the rail from pulling away or twisting. Baluster fittings hold the infill in position, while the fasteners keep those connections tight as wood swells and shrinks. These parts must be selected as one system, based on the rail profile, supporting material, climate, and connection loads.
Code starts with the hand you need to grip
California requires stair handrails on stairs with four or more risers, or where the rise exceeds 30 inches, under California Code of Regulations section 1504. The same regulation addresses graspability. A circular handrail must have an outside diameter between 1.25 and 2.0 inches. A non-circular rail must have a perimeter between 4 and 6.25 inches, along with requirements for its cross-section and edges.
That eliminates some oversized rails and decorative shapes before hardware enters the discussion. A bracket can fit the rail and still interfere with a continuous handhold. It can also force the rail into a position that looks acceptable but does not provide a comfortable, code-compliant grip.
Practical rule: Choose the rail profile first. Then select brackets, connectors, and fasteners made for that profile and its mounting surface.
A railing can be attractive and still be structurally wrong
A loose post is a structural warning, not a cosmetic defect. California guard and handrail assemblies must resist a 200-pound concentrated load and 50 pounds per linear foot applied in any direction at the top, as summarised by San Diego County's exterior stair and guard guidance. Guards and graspable handrails may also require different heights on the same deck or stair project.
Moisture, repeated leaning, and seasonal movement expose weak joints quickly. A surface bracket screwed only into decking may feel solid during installation, then loosen as the deck boards and framing move. A fixed-angle bracket can be economical and clean on a known stair slope, while an adjustable fitting costs more but handles variations in pitch and rail alignment.
The working principle is straightforward: Outdoor handrail hardware is a load path. Match each component to the force it carries, the material it touches, and the conditions it must withstand. Cost matters, but replacing corroded fasteners or rebuilding a moving rail costs more than pairing the bracket and fastener correctly at the start.
The Four Hardware Families You Will Actually Use
A complete exterior railing normally relies on four hardware families. Each one solves a different connection problem, so the right shopping list comes from understanding the load path rather than counting boxes.
| Family | Job | Typical Size/Format | Where It Goes |
|---|---|---|---|
| Post brackets | Anchor posts and transfer loads into framing or a structural substrate | Surface-mount plates, standoff bases, deck-post anchors | Deck edges, landings, stair posts |
| Rail-to-post brackets | Secure the rail to each supporting post | Flat, L-shaped, angled, or adjustable connectors | Top rails, stair handrails, intermediate rail joints |
| Baluster fittings | Hold pickets or balusters in position | Shoes, knuckles, inserts, hidden connectors | Between deck rails, stair rails, and base rails |
| Fasteners | Tie every component to the structure | Structural screws, lags, through-bolts, anchors, hidden clips | All brackets, posts, rails, and infill connections |
Post brackets carry the responsibility most often underestimated. A Simpson EPB or ABA-style post base can connect a post to framing while providing separation from wet surfaces. Surface-mount options suit some deck layouts, but the fasteners still need to reach structural framing, not merely the decking skin.
Rail-to-post brackets determine how much the rail resists movement. Fixed-angle fittings are useful on stairs with a known slope. Adjustable pivot brackets offer more tolerance during retrofits, but they need to be locked securely and checked for rotation after installation.
Baluster fittings must match the actual infill. Square metal balusters, round pickets, wood spindles, and composite systems each use different shoes, inserts, or hidden fasteners. A square-baluster insert that fits one profile won't automatically suit another, even if both products are described as railing hardware.
Fasteners are the quiet category. The bracket can be well designed, but a short screw, incompatible coating, or stripped end-grain connection will still fail. For project planning, fasteners and fittings are best treated as part of the structural design rather than an accessory added at the end.
If you're also selecting a protective finish for exposed wood, a practical guide to decks can help you coordinate the surface treatment with the hardware system. Stain won't strengthen a loose connection, but it can affect how often you inspect areas that trap moisture.
Measuring Your Run Before You Buy a Single Bracket
Treat each railing run as its own hardware system. A deck edge, corner return, and stair flight can require different post locations, bracket angles, rail profiles, and fastener quantities. Combining them into one total length often leaves you with the wrong fittings or poorly placed connections.
Start with the structure
Walk the complete route with a tape measure and notebook. Record every straight section between corners, posts, and landings. Mark the point where the stair run starts and ends, then place post centres on the framing plan before ordering rail sections. The available span must stay within the rail and bracket manufacturer's approved range, with fasteners reaching structural framing rather than only decking.
For stairs, record total rise, total run, and riser count. California measurements start at the stair nosing or tread surface, and handrail height follows the riser-face line at the tread's forward edge, as specified by the California Division of Occupational Safety and Health. This affects the rail profile and bracket geometry, especially where a sloped handrail meets a level guard.
Let the measurements determine the parts
Use this order:
- Mark post centres. Place supports at corners, ends, landings, and intermediate locations required by the railing manufacturer or structural design.
- Measure rail lengths. Measure each section separately. Account for bracket width, post caps, returns, and required extensions.
- Plan baluster positions. Check the applicable guard opening limits. Santa Cruz County deck construction guidance identifies a 4-inch maximum sphere opening for guards and a 4 3/8-inch limit in certain stair conditions.
- Choose stair bracket geometry. Use a fixed-angle bracket when its design matches the stair slope. Choose an adjustable pivot when an existing stair does not align with a standard fitting, then secure it against rotation.
A rail's approximate length is only the starting point. The final hardware count depends on corners, transitions, post centres, baluster profile, and whether the project includes both a guard and a graspable handrail. A measured layout makes deck railing installation more predictable, because each bracket, post, and fastener has a planned location before drilling begins.
Matching Materials to Climate and Treatment
Fastener selection has to account for both the wood and the weather. Pressure-treated lumber contains copper-based preservatives, and that chemistry can attack unsuitable coatings. Coastal air adds salt and persistent moisture, while sheltered inland decks face a different exposure pattern.
Choose the metal before choosing the screw
Hot-dip galvanised fasteners are a practical inland option when the coating and fastener are approved for the treated wood. G185 hardware performed substantially better than mild steel in ACQ-treated lumber in the deck-hardware research reported by Professional Deck Builder, though the provided source data specifically reports that G185 hardware in ground contact corroded about 3.3 to 3.8 times faster in ACQ-treated lumber than in CCA-treated lumber, while mild steel corroded about 6.4 times faster. The linked URL contains a typo in the supplied research reference, so verify the trade source before relying on it for procurement.
For demanding exterior work, stainless steel is the safer route. 305 stainless is a common baseline for treated-lumber exposure, while 316 stainless offers a stronger choice near saltwater, including coastal projects within 10 miles of the shoreline. Stainless brackets and stainless fasteners should generally remain within the same material family.
Zinc-plated screws and ceramic-coated screws belong on compatible untreated cedar or hardwood applications, not as a default answer for every exterior deck. Powder-coated steel can provide a clean finish, but inspect every cut edge and damaged area because the coating is the corrosion barrier.
| Exposure | Treated Lumber (ACQ) | Untreated Cedar/Hardwood | Near Saltwater (within 10 mi) |
|---|---|---|---|
| Brackets | Hot-dip galvanised or stainless systems approved for the wood | Coated steel or stainless, matched to the species | Prefer 316 stainless |
| Fasteners | Corrosion-resistant structural screws, lags, or bolts | Zinc-plated or ceramic-coated only when compatible | 316 stainless fasteners |
| Mixed metals | Isolate dissimilar metals with a suitable washer or barrier | Avoid unnecessary metal mixing | Keep brackets, screws, and washers within one stainless system |
Aluminium connectors need isolation from treated lumber, and brass or silicone bronze may suit historic restorations where appearance matters. For projects involving exposed treated wood, stainless steel fasteners are worth evaluating before the rail is assembled.
Near the coast or around copper-treated lumber, spending more on compatible stainless hardware is usually cheaper than opening every connection for replacement.
Installing Posts, Brackets, and Rails in the Right Order
The installation sequence controls alignment. Set the posts first, establish a stable reference, then attach brackets and rails while every joint remains accessible.
Set and support the posts
Start by locating structural framing. A post base such as a Simpson EPB or ABA-style connector can engage blocking or the rim-joist zone. A surface-mounted standoff can lift the post 1 inch above the decking to shed water, but the base still needs an approved connection into framing. A lag screwed only into a deck board isn't a structural post attachment.
Shim each post in both axes until it is plumb. Use 1/2-inch through-bolts or structural screws rated for the selected post base, rather than generic deck screws. Tighten the connection without crushing the wood, and confirm that the post remains straight after the final pass.
For projects involving stairs and guardrails for patios, pay close attention to the transition between level guard sections and sloped handrails. That junction often exposes whether the post layout and bracket selection were planned as one system.
Attach brackets before committing to the rail
Slip the bracket onto the post before fixing the rail. Check whether the fitting faces the correct direction, clears the post cap, and supports the rail without narrowing the graspable surface. On a stair, set both end brackets to the intended rise, then mark the intermediate positions from those references.
Drill pilot holes sized for the solid shank of the screw, not the narrower thread diameter. This reduces splitting and lets the screw develop a firm hold in the wood. Where the manufacturer specifies a torque value, use a calibrated driver. Top-mount brackets commonly call for 25 to 35 inch-pounds, but the bracket maker's specification controls.
The required image URL must appear only once, so the installation sequence should be represented by the supplied visual followed by the physical checks. On stairs, snap a chalk line between the two end bracket centres. Check every intermediate post for plumb before fastening, not after the rail has already forced it out of alignment.
The accessibility guidance for ramps and stairs also requires continuous, unobstructed handrails, extensions beyond landings, and fittings that don't allow the rail to rotate (UpCodes ramp handrails). Seal exposed fastener heads on horizontal rails, keep the gripping surface clear, and verify the finished assembly against the applicable permit documents.
Troubleshooting the Problems That Show Up After the First Winter
The first winter doesn't create every railing problem. It reveals shortcuts that were hidden when the project was new. Start with the connection, not the symptom.
A post that moves at the base
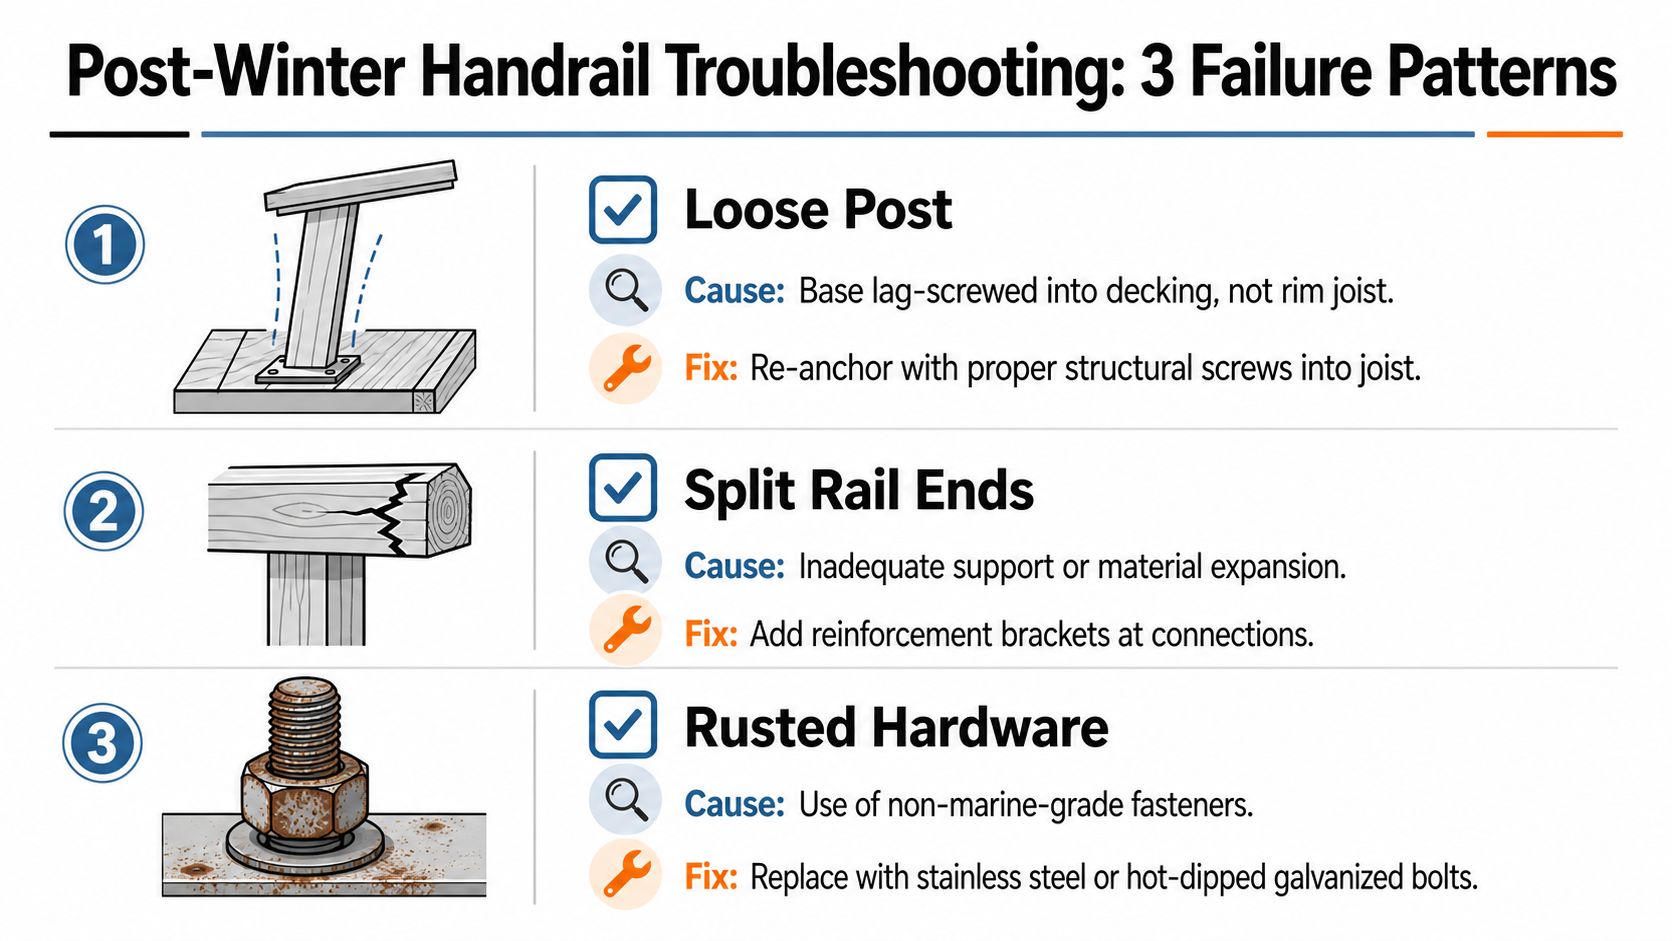
If the post rocks, inspect where the base fasteners terminate. Lag screws driven into decking, or screws too short to reach the rim joist, leave the post relying on thin boards instead of the frame. Remove the weak attachment and re-anchor through structural framing with through-bolts or a Simpson EPB44, or an equivalent standoff base approved for the application.
Don't add more screws beside the old ones. A cluster of short fasteners can damage the surrounding wood without creating a reliable load path.
A rail bracket that loosens
Rail brackets often fail when installers drive screws into end grain or skip pilot holes. The threads strip, the wood splits, and the bracket has little solid material left to grip. Back the bracket out, fill the damaged hole with epoxy and wood plugs, then re-fasten into side grain with longer compatible screws. Where the rail design permits, add a backing block behind the connection.
A bouncy top rail on a long run points to missing intermediate support or undersized baluster fittings. Add a 2×4 block between the rail and post at the weak span where the design allows it, then re-tighten the baluster connectors.
Rust stains tell you about the pairing
Rusted screw heads bleeding down the wood usually mean the fastener didn't suit the treatment or exposure. Replace the affected screws with 316 stainless hardware, selecting the next available size when the original holes have lost their grip. Before rebuilding around a damaged masonry landing or support, consult a specialist who handles residential masonry damage, because a sound bracket can't compensate for a deteriorated substrate.
Maintenance Habits That Keep Outdoor Handrail Hardware Solid
A reliable railing still needs inspection. Outdoor wood moves, coatings wear, and fasteners can loosen at interfaces that looked perfect during installation.
Use a seasonal inspection rhythm
In spring, check every post bracket and rail connector with a calibrated torque driver, not a drill. Test the rail by hand for movement, inspect baluster fittings for wobble, and re-tension set screws on aluminium or brass connectors where the product allows it.
Wash cedar and ACQ-treated surfaces to remove dirt and debris that hold moisture against stainless or hot-dip galvanised hardware. Look for dark staining, white corrosion residue, cracked coatings, and movement around copper-based flashing or pressure-treated posts.
Protect the connection, not just the finish
A corrosion-inhibiting paste such as CRC or Boeshield T-9 can help protect exposed threads when it is compatible with the hardware and surrounding finish. Don't coat a fitting that needs to remain clean and non-slipping, and don't use a lubricant as a substitute for correct fastener material.
Re-seal the end grain on wood post caps each year so water can't migrate into the rail-to-post joint. Confirm that the handrail remains continuous and unobstructed, and check that guard openings and heights haven't changed after repairs. California guidance commonly places stair handrails at 34 to 38 inches, and local guard requirements can place guards at 42 inches, so maintenance is part of continued compliance, not merely appearance (Sonoma County handrail bulletin).
A loose guard is a code concern just as an undersized guard is. The climate and treatment choices made during procurement determine how much upkeep the system needs, but every outdoor handrail hardware system benefits from regular checks.
XTREME EDEALS INC. offers handrail brackets, baluster inserts, stair accessories, post base brackets, anchors, lag bolts, washers, and other deck and fencing hardware for DIY and professional builds. Review the available options, match the materials to your rail profile and exposure, and visit XTREME EDEALS INC. to source the components before installation begins.