
You’re probably standing on your deck with a tape measure in one hand and too many tabs open in your browser. One guide says your railing can be one height. Another shows a fastening method that would never pass inspection where you live. A video makes the whole job look easy, right up until you realise nobody mentioned seismic anchoring, fascia blocking, or wildfire rules near the house.
That’s where most deck railing installation projects go sideways. The visible part looks simple. The hidden decisions do the heavy lifting.
A good railing has to do three things at once. It has to look right, feel solid when someone leans on it, and satisfy the code your local inspector enforces. If you’re building in California, that means paying attention to seismic fastening and, in some areas, fire-resistant material choices. If you’re in Ontario, the height, spacing, and post layout matter just as much, especially once snow, freeze-thaw movement, and seasonal moisture get involved.
Planning Your Project and Understanding Codes
A railing job usually goes wrong before the first cut. The mistake happens at the planning table, when the layout looks clean on paper but ignores framing, local code, or the actual hardware needed to make the assembly pass inspection.
Start with a measured sketch of the deck. Record each guard run separately, then subtract stair openings and gates. Mark corners, outside edges, house walls, and any spots where the framing below limits where a post can land. That sketch saves time later because it forces key decisions early, before you order a boxed kit that only works on a perfectly square deck.

Start with layout, not the catalogue
Post layout drives the whole build. It affects strength, sightlines, panel widths, stair transitions, and whether your fasteners hit framing where they should.
I lay out corners first, then stair entries, then long field runs. On a simple rectangle, that often gives balanced sections without much adjustment. On older decks, it rarely works out that neatly. Rim joists may be doubled in one area, patched in another, or out of line enough that a pre-engineered panel system becomes more trouble than it is worth.
Check these items before you buy materials:
- Corner and end post locations: These points take more load and usually need the clearest framing support.
- Backing below each planned post: Surface-mount bases, fascia brackets, and through-bolted wood posts all need solid structure, not just decking.
- Traffic and usable deck space: Fascia-mounted systems keep more walking surface. Top-mounted posts are often easier to brace correctly when framing access is good.
- Top rail design: A drink rail, wide cap, or metal graspable rail changes post height, bracket location, and clearances.
- Regional exposure: California builds may need closer attention to wildfire-resistant materials and hardware corrosion near the coast. Ontario builds need room for seasonal movement, snow accumulation, and moisture cycling.
Good planning looks a little slow at the start. It saves a lot of rework.
Choose materials based on the deck you have
Material choice is not just a style decision. It changes how precise the layout must be, what hardware you need, and how forgiving the install will be if the existing deck is slightly out of square.
Wood is still the easiest material to adapt in the field. You can scribe it, trim it, and adjust details as you go. That makes wood a practical option on older decks where dimensions drift and framing is not perfectly consistent. The trade-off is upkeep. If you build a wood railing, plan for sealing, end-grain protection, and periodic maintenance from the start.
Composite systems are cleaner to order and easier to match visually because the rails, brackets, sleeves, and infill are designed to work together. They also cut down on finishing time. The downside is rigidity. If your post spacing misses the manufacturer’s panel range by even a little, the fix is often more expensive than it would be with wood.
Metal systems, especially aluminum, stay popular for a reason. They hold up well, need less routine maintenance, and can make sense in California locations where noncombustible components are a safer choice near the house. They also show mistakes quickly. If post centers are off, if the deck edge waves, or if one bracket sits out of plumb, metal makes it obvious.
Here’s the practical comparison:
| Material | Avg. Cost/Linear Foot (Materials) | Pros | Cons | Best For |
|---|---|---|---|---|
| Wood | Varies by species and design | Easy to customise, easy to trim on site, classic look | Needs sanding, sealing, and more upkeep | Older decks, custom layouts, budget-conscious DIY work |
| Composite | Varies by brand and kit components | Low maintenance, coordinated parts, clean finish | Less forgiving on odd framing, system-specific parts | Homeowners who want a matched system |
| Metal | Varies by style and finish | Durable, crisp appearance, good for non-combustible applications | Requires more precise layout, exposed fastener mistakes stand out | Modern decks, low-maintenance builds, WUI-conscious projects |
Practical rule: Inspect the framing first, then choose the railing system. The structure decides what will install cleanly and what will fight you the whole way.
The code details that deserve a direct check
Generic railing tutorials often gloss over the part that matters most. Your local code office does not inspect a generic railing. It inspects the one on your deck, in your climate, under your province, state, and municipal rules.
In Ontario, guard requirements change with deck height, and the minimum guard height increases once the walking surface is more than 600 mm above grade. The Ontario government’s deck and balcony guard guidance is a better starting point than a general blog summary because it points back to the current code framework and local enforcement.
California creates a different set of checks. The California Residential Code is built on the IRC, but local jurisdictions may add stricter requirements for wildfire zones, attachment details, and inspections. The California Building Standards Commission publishes the current code cycle and adopted standards, which is where I tell DIY builders to start before they assume a standard online detail will pass.
That matters in real builds. A railing height that is common in one area may not satisfy the inspector in another. The same goes for infill spacing, graspability at stairs, and the type of connectors accepted for surface-mounted systems.
One rule shows up almost everywhere. Openings in the guard infill cannot allow a 4-inch sphere to pass through. In practice, that affects baluster spacing, the gap under the bottom rail, and how carefully you hold layout on decks where the board line is not perfectly straight.
What your AHJ usually wants answered up front
Call the permit office before you order the railing package, not after it arrives.
Ask direct questions and write down the answers:
- What guard height applies to this deck height and location?
- Are there local amendments beyond the base residential code?
- Is the proposed post attachment method acceptable for this deck framing?
- Do wildfire, snow, corrosion, or seismic conditions affect the material or hardware choice?
- Will the inspector need to see blocking, anchors, or backing before it is covered?
California owners should ask about seismic and fire-zone considerations specifically. Ontario owners should ask how local enforcement treats guard height, stair details, and weather exposure. Snow load does not act on a guard the same way it acts on a roof, but snow and ice do affect durability, drainage, and how rails and post bases hold up through freeze-thaw cycles.
Inspectors appreciate clear drawings, manufacturer instructions, and visible hardware specs. If you plan to use a system with proprietary brackets or surface-mount post bases, have the installation documents ready.
Tools and hardware that actually matter
Deck railing work does not require a shop full of specialty tools. It does require accuracy. Bring a level, layout square, tape, clamps, drill, impact driver, sharp bits, and a saw that cuts cleanly without wandering. A set of spacing blocks helps more than people expect, especially when you are keeping infill gaps consistent across several sections.
Hardware selection deserves the same attention as material selection. For wood posts, through-bolts with washers usually beat casual lag-screw installs. For metal and composite systems, use the manufacturer’s brackets and fasteners unless the engineer or local inspector approves an alternative. Mixing systems is a common way to lose both strength and warranty coverage.
Organize the hardware list by function:
- Structural connectors: through-bolts, structural screws, post bases, hold-downs, anchors, washers
- System connectors: rail brackets, swivel brackets for stairs, hidden panel connectors
- Corrosion-resistant fasteners: exterior-rated screws and bolts matched to the material and environment
- Finish components: caps, trim skirts, cover plates, touch-up paint or sealant
If the deck sits near salt air, use hardware rated for that exposure. If the house is in a California wildfire-prone area, confirm the railing material and any adjacent trim choices fit local fire requirements. If the project is in Ontario, leave room in your plan for drainage, snow clearing, and the small seasonal movement that loosens cheap fasteners over time.
Buy the structural hardware first. Decorative parts can wait.
Installing the Foundation with Secure Deck Posts
If a railing feels weak, the problem usually starts at the posts. Rails and balusters don’t rescue a bad post connection. They just hide it until someone leans hard on the top rail.
That’s why I treat post installation as the structural core of the whole project. A person pushes on the top of the railing, not at deck level. That creates an intensified strain, and this strain punishes weak fasteners fast.
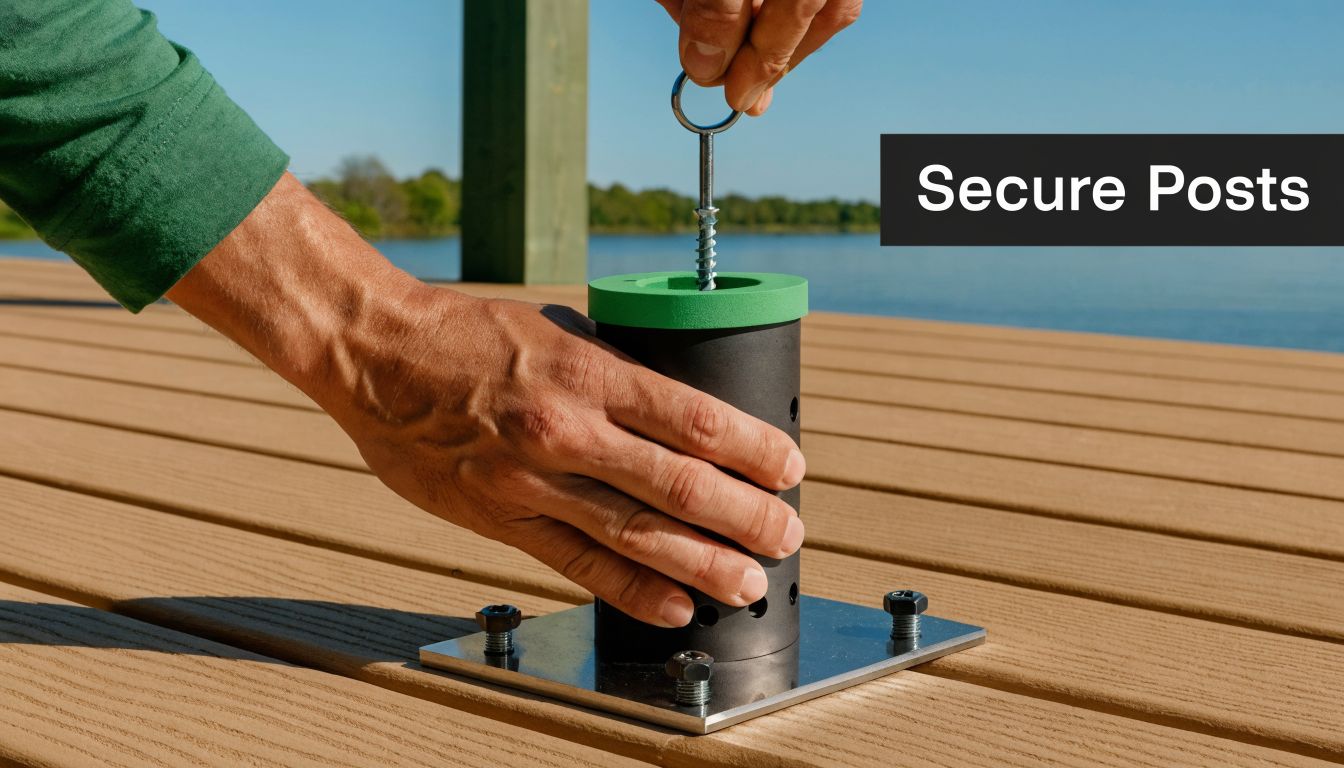
Surface mount versus fascia mount
A surface-mounted post sits on top of the deck structure. This method works well when you can fasten into solid framing and add proper blocking underneath. It’s often the simpler route on standard rectangular decks.
A fascia-mounted post attaches to the outer rim area. Done properly, it saves deck space and gives a clean edge. Done poorly, it’s one of the easiest ways to build a railing that looks nice and fails early.
According to this fascia-mount railing installation reference, over-tightening lag screws causes 20% of fascia cracks, and proper technique calls for lag screws of at least 5/16-inch diameter into the deck framing. That same source notes that insufficient shear strength is a primary cause of railing collapse.
Blocking is what stops the wobble
A post attached only to a rim board or deck board won’t stay rigid for long. The fix is internal blocking that ties the post load back into the framing. On a top-mount install, that often means solid backing beneath the post base. On a fascia install, it means reinforcing the rim area so the bolts or lags aren’t working alone.
Use blocking that fits tightly and fastens securely into the surrounding framing. Sloppy blocking is almost as bad as none at all. If the backing can move, the post can move.
A sound post install usually follows this sequence:
- Dry-fit each post location: Confirm framing support before drilling anything.
- Add blocking where the framing needs help: Don’t rely on sheathing, trim, or deck boards.
- Drill clean holes: Pilot holes reduce splitting and help the fastener track straight.
- Use washers and proper hardware: Spread the load and avoid crushing the wood fibres.
- Check plumb before final tightening: A slightly leaning post becomes a very obvious railing problem later.
How to set posts so the rest of the job gets easier
Cut all structural posts consistently, but don’t assume the deck surface is perfectly level from one side to the other. Set one reference post, confirm height from the walking surface, then carry that reference through the rest of the run.
Clamp the post in place before final fastening. A clamp acts like an extra pair of hands and lets you adjust plumb without fighting the hardware. Once the post is fixed, check it from two directions with a level.
This walk-through gives a useful visual for post and rail fitting in the field:
A railing post shouldn’t just feel tight when you install it. It should still feel tight after the first wet season and the first busy gathering on the deck.
Where builders get into trouble
The most common mistakes aren’t dramatic. They’re small shortcuts that stack up.
- Bolting into weak material: Rim boards, trim pieces, or unsupported edges aren’t enough on their own.
- Skipping pilot holes: That invites splitting and can throw the fastener off line.
- Over-tightening hardware: Tight isn’t the same as crushed. Over-driven lags can damage the wood and weaken the connection.
- Trusting deck boards as structure: They are not structure.
- Ignoring post alignment: If posts wander, rail sections become custom fixes instead of repeatable installs.
If you’re working with post base brackets, follow the bracket manufacturer’s hole pattern exactly and make sure the base lands over framing that can accept the load. Decorative wraps and sleeves come later. Strength comes first.
Assembling Your Rails and Balusters
Once the posts are solid and plumb, the work changes from structural to precision-based. At this point, the project starts to look finished, but it’s also where sloppiness shows up fastest. Uneven reveals, wandering rail lines, and inconsistent baluster spacing can make a strong railing look amateur.
The good news is that rail assembly rewards repeatable habits. Measure carefully, cut deliberately, and use spacers instead of trusting your eye.

Fit each rail section to the actual opening
Don’t cut every rail to the same assumed length. Measure each space between posts individually. Even on a new deck, openings can vary slightly because wood moves, framing crowns, and posts can land a touch differently.
For each section, take the opening measurement, confirm the bracket or connector allowance, and mark the rail from the same reference edge every time. That keeps your cuts consistent.
A reliable sequence looks like this:
- Measure low and high: Check the bottom rail span and top rail span if posts are wrapped or shaped.
- Cut one test piece first: Dry-fit it before cutting the rest of the batch.
- Label sections: Front run, side run, stair opening, and so on. This avoids mix-ups when several rails are close in length.
- Pre-finish hidden faces when needed: On wood systems, this can save awkward brush work later.
Connection style affects both strength and appearance
A basic wood install may use direct screw fastening. That can work well if the joint is laid out neatly and the fasteners are placed with care. For a cleaner finish, rail connectors or hidden brackets usually produce straighter, more repeatable sections.
Pre-assembled metal panels make the process faster when the post spacing suits the panel dimensions. They also reduce small layout errors because the infill arrives already fixed in place. Composite kits sit somewhere in the middle. They’re more guided than a full site-built wood rail, but they still require accurate post spacing.
If the posts are even and the rail cuts are square, assembly feels easy. If the posts drift, every section becomes a one-off problem.
Baluster spacing is where discipline matters
Balusters are repetitive work. That’s exactly why mistakes creep in. A small spacing error on the first few pieces becomes a visible problem by the end of the run.
Use a spacer block. It can be a simple scrap cut to your target gap. Place it, fasten the baluster, move it, repeat. That gives you consistency and keeps the spacing within the code intent behind the 4-inch sphere rule already discussed earlier.
Three habits make baluster work cleaner:
- Start from a layout centre or consistent edge. Don’t drift across the section.
- Pre-drill when the material calls for it. This matters with hardwoods, some composites, and slim metal attachment points.
- Check the final opening, not just the repeating gap. The last baluster often reveals whether the layout was planned or improvised.
Different systems need different tactics
A wood baluster system gives you freedom. You can trim each piece, adjust to small deck irregularities, and repair individual parts later. The downside is time. Every spindle adds another chance to get slightly off line.
Metal panel systems are cleaner to install when the layout matches the product dimensions. They’re especially useful if you want a modern finish without building each infill section from scratch. Keep the post spacing accurate from the start or you’ll lose the benefit.
Composite rail kits often include matched brackets, bottom rail supports, and caps. Follow the system order closely. Mixing the sequence can force you to backtrack, especially when the top cap or bracket covers need to slide on before final fastening.
Keep the lines straight from a distance
A railing gets judged from across the yard before anyone inspects it up close. Step back every few sections. Look down the top rail. Check the bottom rail height visually. Stand at the corner and see whether the balusters track evenly.
Use these field checks before calling a section done:
| Check | What you’re looking for | Fix if needed |
|---|---|---|
| Top rail line | Smooth, continuous visual run | Loosen and re-align brackets before final tightening |
| Bottom rail reveal | Even clearance above deck | Shim or recut the rail if the deck surface varies |
| Baluster spacing | Consistent openings across the panel | Reset layout before finishing the full run |
| Fastener placement | Straight and symmetrical appearance | Reposition on the next section, don’t let errors repeat |
A professional-looking railing usually comes from simple discipline, not fancy tricks. Use one spacer. Use one measuring method. Use one reference line. Repeat that process section after section.
Finishing Touches and Long-Term Maintenance
A railing can be structurally correct and still feel unfinished. The final details are what pull it together and help it hold up through weather, movement, and regular use.
That starts with the top cap. A well-installed cap rail hides joints, gives the hand a smoother surface, and can visually tie the whole deck together. On some builds, a wider top cap also makes the railing more useful day to day.
Finish for durability, not just looks
Wood needs protection where it absorbs moisture fastest. That includes end grain, cut edges, and the tops of posts. Sand rough areas, clean the surface, and apply your chosen exterior finish according to the product instructions. Don’t rush that stage just because the structure is already standing.
Decorative post caps aren’t only cosmetic. They help protect vulnerable post tops from direct water exposure. That matters more than many DIYers realise, because the top of a post is one of the first places weather starts to work its way in.

Regional choices matter at the finishing stage
If the home sits in a California Wildland-Urban Interface zone, the finishing choices can’t be treated as decoration alone. According to this California metal deck railing guidance, post-2025 California building codes require non-combustible railing materials like aluminum or steel within 5 feet of the structure in WUI zones.
That changes the recommendation near the house. A wood railing that might be acceptable elsewhere may not be the right solution close to the structure in that setting. Metal rails, metal balusters, and non-combustible post accessories become the practical route.
A finish detail should solve a problem. It should shed water, protect the post, smooth the hand contact, or suit the fire exposure. If it only adds decoration, it’s optional.
A maintenance routine that catches problems early
Most railing failures don’t begin with a dramatic break. They begin with small movement, loose hardware, finish wear, or trapped moisture.
A simple seasonal check should include:
- Grip and push test: Put firm pressure on posts and top rails. Anything that moves needs attention.
- Fastener review: Look for backing-out screws, loosened bolts, or corrosion.
- Finish inspection: Recoat or touch up exposed wood before water gets in.
- Debris cleanup: Leaves and dirt trapped at rail bases or around post sleeves hold moisture where you don’t want it.
- Cap and trim check: Make sure decorative pieces still fit snugly and aren’t trapping water.
The best-looking railing after several seasons is usually the one that got small maintenance at the right time, not the one that got the fanciest first-day finish.
Troubleshooting Common Issues and Advanced Scenarios
Most deck railing installation guides assume the deck is square, level, and uncomplicated. Real decks rarely cooperate that neatly. Stairs change the angle. Old framing creates surprises. Concrete edges need different anchors. In California, seismic demands can rule out the casual fastening methods you see in generic tutorials.
The first assumption to challenge is this one. If the railing feels mostly solid, it’s fine. It isn’t. Slight movement at a post or connection tends to get worse, not better.
Fixing a wobbly post without pretending it’s normal
A wobbly post usually means one of three things. The framing below is weak, the hardware is undersized or misplaced, or the connection was never properly backed with blocking.
Start by exposing what you can. Look under the deck if possible. If the post lands near a rim area with little reinforcement, add blocking tied into the adjacent framing. If the fasteners are in poor positions, you may need to remove the post and reset it rather than trying to tighten your way out of the problem.
For retrofit work, think structurally:
- Add backing where the load is travelling
- Replace weak or inappropriate fasteners
- Re-check plumb after the repair
- Test the post before reinstalling the rail section
Stairs need layout, not guesswork
Stair railing is where many careful builders suddenly start freehanding. That’s a mistake. The angle has to stay consistent from rail to baluster to bracket.
Measure the stair angle from the actual stringer or use a template from the stair run itself. Transfer that angle to the rails and, if needed, to the baluster ends or connectors. Dry-fit the section before driving all the fasteners.
The cleanest stair work usually comes from making one accurate template piece and reusing that angle through the whole assembly.
On stairs, one bad angle cut can throw off everything above and below it. Slow down there.
Corners and odd layouts
Not every corner is a perfect right angle. When the deck has a bump-out, a chamfer, or a custom footprint, choose the approach that suits the material. Site-built wood rails can often be mitred to match the angle cleanly. Some manufactured systems do better with dedicated corner connectors.
The key is consistency. If one corner is cut and the next is bracketed with a different visual language, the railing can look patched together even when the workmanship is sound.
Concrete mounts and seismic fastening
Mounting posts to concrete or to a deck with concrete transitions needs the right anchor strategy. Generic screws and light-duty anchors don’t belong in structural railing work.
In California’s high-risk seismic zones, standard fasteners may not be enough. This California seismic deck railing reference notes that 28% of deck failures in recent LA and Bay Area inspections were due to inadequate anchoring, and that code compliance requires seismic-rated hardware like heavy-duty hold-downs and post-base anchors.
That matters well beyond new construction. If you’re rebuilding railing on an older raised deck, don’t assume the original attachment method is acceptable now just because it’s been there for years.
Use advanced anchoring when the structure demands it:
| Scenario | Better approach | Avoid |
|---|---|---|
| Concrete edge or slab transition | Structural wedge anchors or engineered post-base hardware | Light-duty masonry screws for primary post loads |
| Elevated CA deck in seismic area | Seismic-rated hold-downs and post bases | Generic brackets with no structural rating |
| Fascia post with limited backing | Added blocking and properly sized lag fastening | Bolting only through thin outer material |
| Older deck retrofit | Open up the framing and verify support before reusing attachment points | Assuming old holes are still the best locations |
A tough layout doesn’t mean the job has to look improvised. It just means the hidden support work matters more.
Frequently Asked Questions About Deck Railings
Can I mix materials, like wood posts with metal balusters
Yes, if the system is planned as one assembly instead of a style choice made halfway through the build. Wood posts and metal balusters are a common combination because they keep the structure familiar while giving the railing a cleaner look.
The catch is fit and corrosion. Use connectors and screws rated for the metals in the kit, especially near the coast in California where salt air is hard on finishes. In Ontario, freeze-thaw cycles can open up small gaps around poorly fitted brackets and fasteners. Order the baluster hardware to match the actual rail thickness and post size, not the nominal lumber size printed on the tag.
Are cable railings a good DIY project
They can be, but I only recommend them to DIYers who are comfortable laying out holes accurately and reading the manufacturer’s instructions closely. Cable rail looks simple after it is finished. The build is less forgiving than wood or standard metal pickets.
End posts need enough stiffness to resist cable tension, and local inspectors may look at these systems more closely because spacing and deflection matter. In California, check wildfire rules if the deck is in a WUI area, because material choice can affect approval. In Ontario, confirm the finished guard height and opening limits before ordering parts, especially on second-storey decks where guard requirements are often stricter than homeowners expect.
How do I plan for a gate in the railing
Plan the gate first, then build the railing around it. A gate changes post spacing, latch clearance, swing direction, and stair or landing access.
I like to set the hinge post and latch post as their own problem to solve, with heavier framing and very careful plumbing. Sag starts there. Self-closing hinges and code-rated latches are worth the money if the gate protects stairs or a pool-adjacent area.
Is DIY worth it compared with hiring a pro
It can be, especially if you already own the tools and you’re comfortable drilling accurate holes, trimming parts cleanly, and correcting framing that is slightly out of square. Material ordering, code research, and inspection scheduling take real time, though. Those hours count too.
A pro usually earns the money on awkward details, stairs, and repairs hidden behind an old railing removal. If your deck is in a California seismic zone, a high-fire area, or an Ontario location with tall guards and heavy snow exposure, paying for an hour of local code review before you start is often money well spent, even if you do the labor yourself.
How long will the project take
For a straightforward rectangular deck, a careful DIYer can usually handle layout, post fitting, rail assembly, and cleanup over a weekend or two. Stairs, gates, fascia-mounted posts, and retrofit work add time fast.
Leave room for delays. Parts show up short, framing is rarely perfect, and inspection corrections are easier to handle when you are not rushing to finish before dark.
What’s the one mistake that causes the most trouble
Skipping the code check at the start.
I see plenty of railings built neatly but rejected because the height is wrong, the baluster spacing is too wide, or the hardware was never approved for that use. California and Ontario are both strict in different ways. California can force closer attention to seismic attachment and fire-related material choices. Ontario often catches people on guard height, stair geometry, and winter exposure. A clean install does not help if it fails inspection.
If you’re gathering hardware for a deck railing installation, XTREME EDEALS INC. carries the practical parts that make these projects come together properly, including post base brackets, balusters, decorative post caps, deck screws, carriage and lag bolts, washers, wedge anchors, and other deck and fencing accessories for both DIY builds and professional jobs.