
You're standing beside a half-framed deck, holding a nominal 2×6 joist against a ledger or beam. The board looks as though it should rest on the metal connector, but the question is more important: will this connection carry the joist's load, resist movement, and remain reliable outdoors?
A joist hanger 2 x 6 isn't selected by label alone. The joist's actual dimensions, the supporting beam or ledger, fastener schedule, corrosion class, span, spacing, and local California requirements all work together. Treat the hanger as one part of the framing system, not as a universal bracket that makes every 2×6 connection acceptable.
What a 2×6 Joist Hanger Does on a Deck
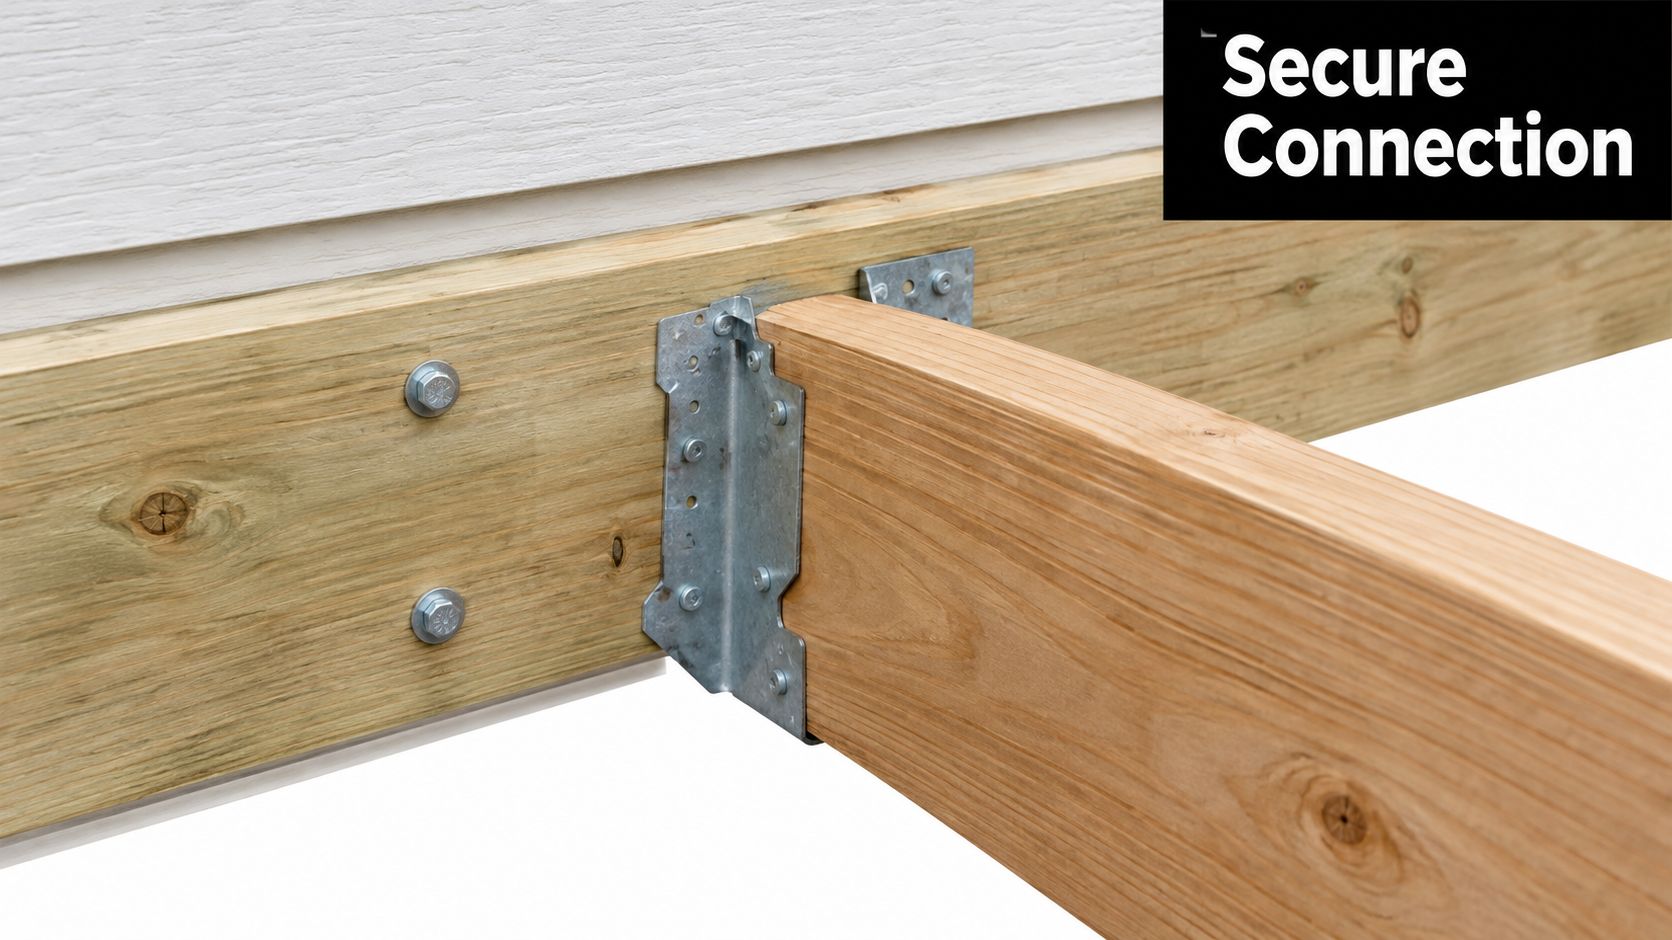
Suppose a deck joist runs from the outer beam back to a ledger attached to the building. At the ledger, the joist ends against the side of the supporting board instead of sitting on top of it. Without a proper connector, the end of the joist has no dependable shelf beneath it. The hanger creates that shelf and transfers the joist reaction into the ledger or beam.
Think of the hanger as a shoe holding the joist's foot. The seat supports the bottom of the timber, while the side flanges connect the hanger to the supporting member. Together, those parts keep the joist in position instead of asking a few angled nails to perform a structural job they weren't designed to handle.
In California exterior-deck construction, a 2×6 joist framed into the side of a beam or ledger must be supported by an approved joist hanger rather than relying on toe-nails, clip angles, or an improvised bracket. The California deck construction guide also emphasises selecting the hanger for the actual supported member and using the manufacturer's approved fasteners.
Three jobs happen at the connection
- Vertical support: The hanger seat receives the joist end and transfers downward reaction into the ledger or beam.
- Lateral restraint: The side portions of the connector help keep the joist from shifting or rolling at its support.
- Connection security: The specified fasteners hold the hanger to the header and the joist to the hanger, creating the tested load path.
A side-framed joist connection differs from a joist that bears directly on top of a beam. If the joist sits on top, the beam provides the bearing surface. If the joist meets the beam's side, the hanger has to provide the support that the beam top would otherwise supply.
That's why a few toe-nails aren't an equivalent substitute. Toe-nails may help position a member during framing, but they don't automatically provide the tested capacity, bearing, restraint, or corrosion protection required for an exterior deck.
Jobsite safety matters while you're laying out and fastening these connections. Keep access clear, wear suitable eye and hand protection, and make sure everyone understands the hazards around the work area. A construction first aid course NSW can also help construction workers build practical emergency-response knowledge for jobsite injuries.
Getting 2×6 Sizing and Fit Right
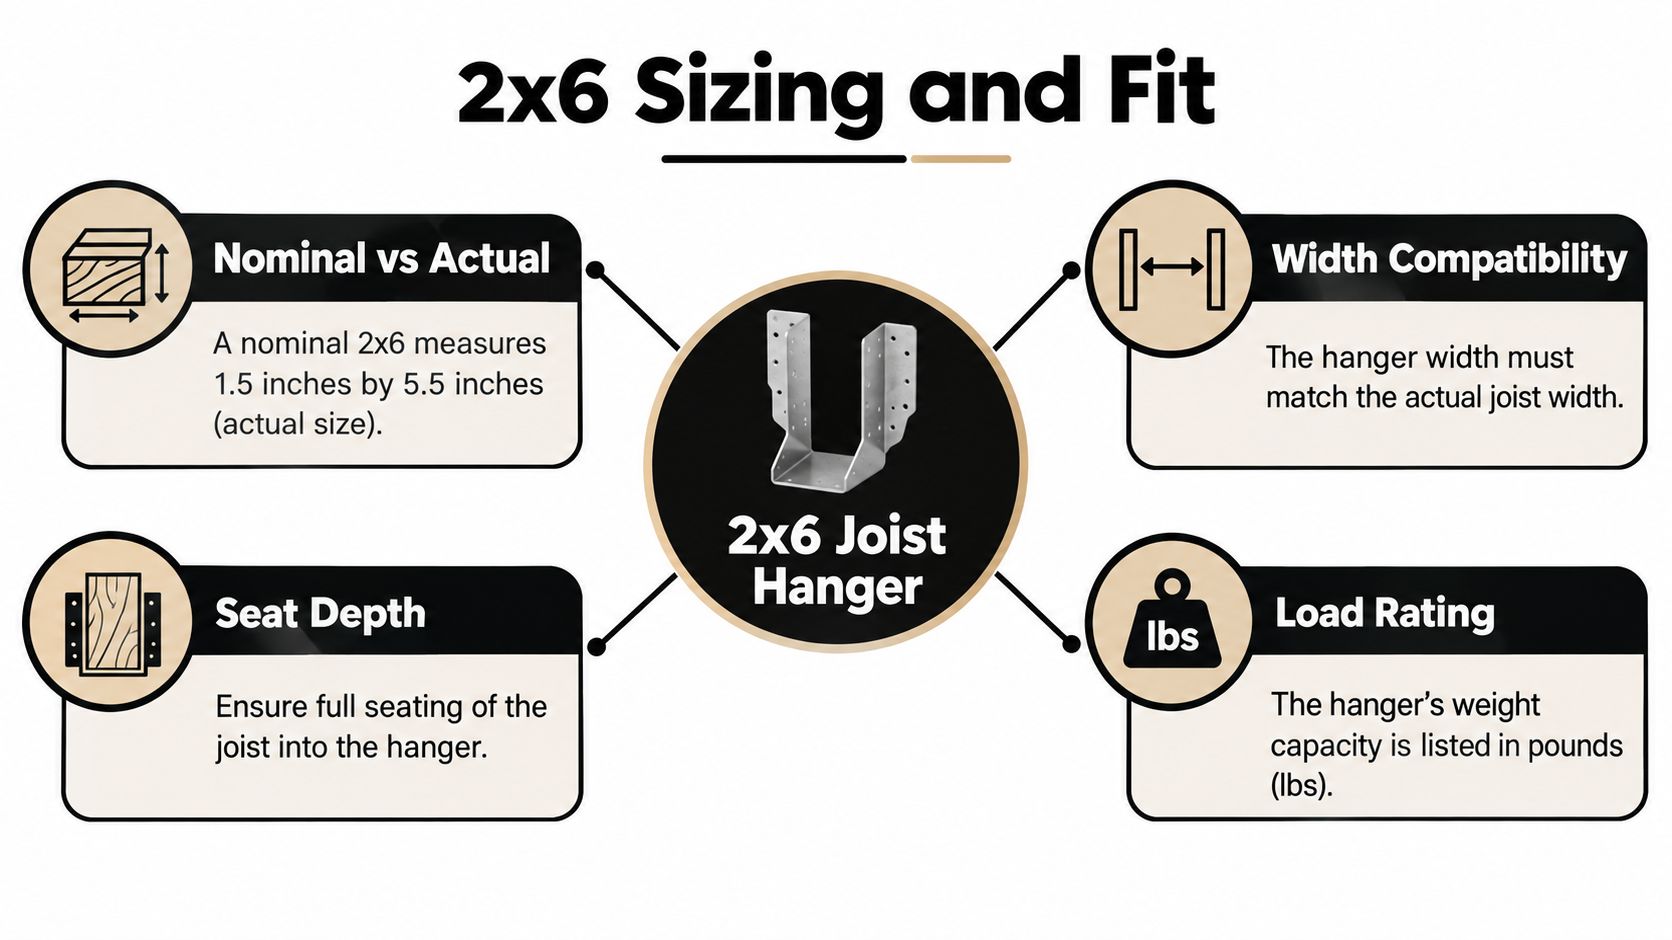
The label 2×6 describes a nominal lumber size, not necessarily the board's measured size after milling and drying. A nominal 2×6 is commonly about 1.5 inches wide and 5.5 inches deep, but the hanger still has to be checked against the actual joist, the supporting member, and the manufacturer's model data.
Start with the joist. Measure its width and depth, then compare those measurements with the hanger's product information. A hanger that's too narrow can pinch the board or prevent it from seating. One that's too wide may leave unwanted movement. A connector that's too shallow may fail to engage enough of the joist's depth.
Fit rule: The hanger must match the actual joist width and depth, fully receive the joist, and be approved for the supporting ledger or beam.
Check the connection before fastening
Dry-fit the joist in the hanger before driving a fastener. The bottom of the joist should sit firmly on the hanger seat, and the end should meet the supporting member as intended. The side flanges should lie flat against the ledger or beam, not float over gaps, debris, flashing folds, or a twisted board.
California Residential Code Section R507.6.1 requires a joist end to have at least 1.5 inches of bearing on wood or metal across the joist's full width, while bearing on concrete or masonry must be at least 3 inches. Those bearing rules apply to the support arrangement, so don't assume that a hanger with the words “2×6” on its packaging automatically solves every bearing condition. The California Residential Code floor provisions should be checked alongside the hanger's evaluation data.
A too-tall hanger can conflict with the supporting member or surrounding framing. A too-short hanger may not provide the intended side engagement. A hanger that accepts the joist but leaves it sitting above the planned elevation can also create problems with decking, rim joists, and stair transitions.
Never swap a 2×6 hanger with a 2×8 or 2×10 model because the larger connector appears stronger. The larger hanger may have a different geometry, fastener schedule, header requirement, or tested application. Confirm the model marking, supported member, supporting member, approved fasteners, and load table before installation.
Materials Coatings and Corrosion Protection
A connector can fit perfectly and still be the wrong choice for an exterior deck if its corrosion protection doesn't match the exposure. Moisture attacks thin steel over time, and preservative-treated lumber can create a more demanding chemical environment around the hanger and fasteners.
California public-building guidance requires prefabricated wood connectors, including joist hangers, to use corrosion-resistant steel or a protective coating. The cited 2025 interpretation gives post-fabrication hot-dipped galvanizing at G90 minimum as an example. Review the California connector corrosion guidance for the project's exposure and treatment conditions.
Comparing common protection choices
Hot-dip galvanised steel is a common exterior option. The zinc coating protects the steel from moisture, but the required coating level depends on the product, environment, and lumber treatment. A connector described only as “galvanised” may not provide enough information for a demanding application.
ZMAX-style or comparable enhanced coatings may be specified for exterior deck work and treated-lumber contact. These products should still be checked against the manufacturer's compatibility guidance rather than selected from colour or appearance.
Stainless steel is often considered for severe exposure, coastal conditions, or demanding treated-lumber applications. It costs more in many product ranges, but the relevant choice is the approved material and corrosion class, not the cheapest finish on the shelf.
Paint has a limited role. The cited California guidance allows paint to substitute for galvanisation only where the connector isn't exposed to weather or corrosive elements. That condition generally doesn't describe an exposed deck connection, so a painted interior connector shouldn't be treated as an exterior solution.
Match the hanger to the lumber treatment
Preservative-treated and fire-retardant-treated lumber can affect the required connector material. The guidance gives G185 for certain dry-service ACZA conditions and Type 316L stainless steel for severe conditions, but those references don't replace the product manufacturer's compatibility instructions.
Use the same discipline for fasteners. The nails or screws must be approved for the hanger and compatible with the wood treatment. A corrosion-resistant hanger paired with ordinary interior fasteners leaves a weak link in the connection.
For product comparisons and compatible exterior framing options, galvanised joist hangers for outdoor projects provide a useful starting point. Confirm the listed coating, model dimensions, approved fasteners, and intended exposure before ordering.
Loads Spans and Code Notes That Shape Choice
A hanger doesn't determine whether the whole deck frame is adequate. The joist size, species or grade, spacing, span, beam arrangement, ledger attachment, decking, occupancy, and local design conditions all influence the connection.
The 2025 California residential deck requirements published by the City of San Bruno list a maximum span of 9 feet 9 inches for No. 2 2×6 lumber at 16-inch-on-centre spacing, and 8 feet 1 inch when spacing increases to 24 inches on centre. These are planning benchmarks for the cited conditions, not universal ratings for every 2×6 joist or hanger. See the 2025 San Bruno residential deck requirements for the table and assumptions.
| Joist spacing | Example maximum span | Planning takeaway |
|---|---|---|
| 16 inches on centre | 9 feet 9 inches | A relatively short residential span under the cited conditions |
| 24 inches on centre | 8 feet 1 inch | Wider spacing reduces the cited allowable span |
A project beyond those limits may need closer spacing, a larger joist, an additional beam, or engineered design. Don't respond to a longer span by buying a heavier hanger alone. The hanger transfers the reaction, but it doesn't make an undersized joist, beam, ledger, or footing adequate.
Read restraint as well as vertical capacity
California Residential Code Section R507.6.2 states that when lateral restraint comes from joist hangers or blocking, the restraint depth must equal at least 60 percent of the joist depth. For a nominal 2×6 with an actual depth commonly about 5.5 inches, that works out to approximately 3.3 inches. The California deck code provisions explain why the connector must help control movement, not merely hold the joist vertically.
Top-bearing and side-framed connections also work differently. A joist bearing on a beam top has a direct bearing surface, while a side-framed joist needs an approved mechanical hanger. For unusual loads, concentrated reactions, cantilevers, or engineered lumber, follow the project engineer's connector schedule and evaluation report.
Local jurisdictions may amend or interpret requirements differently. Before ordering a full materials list, confirm the current requirements with the building department and keep the hanger documentation available for inspection.
Choosing Hangers for Common Framing Scenarios
The best hanger style depends on how the joist meets its support. Start by tracing the load path, then choose the connector that fits that geometry. Don't begin with the product bin and work backwards.
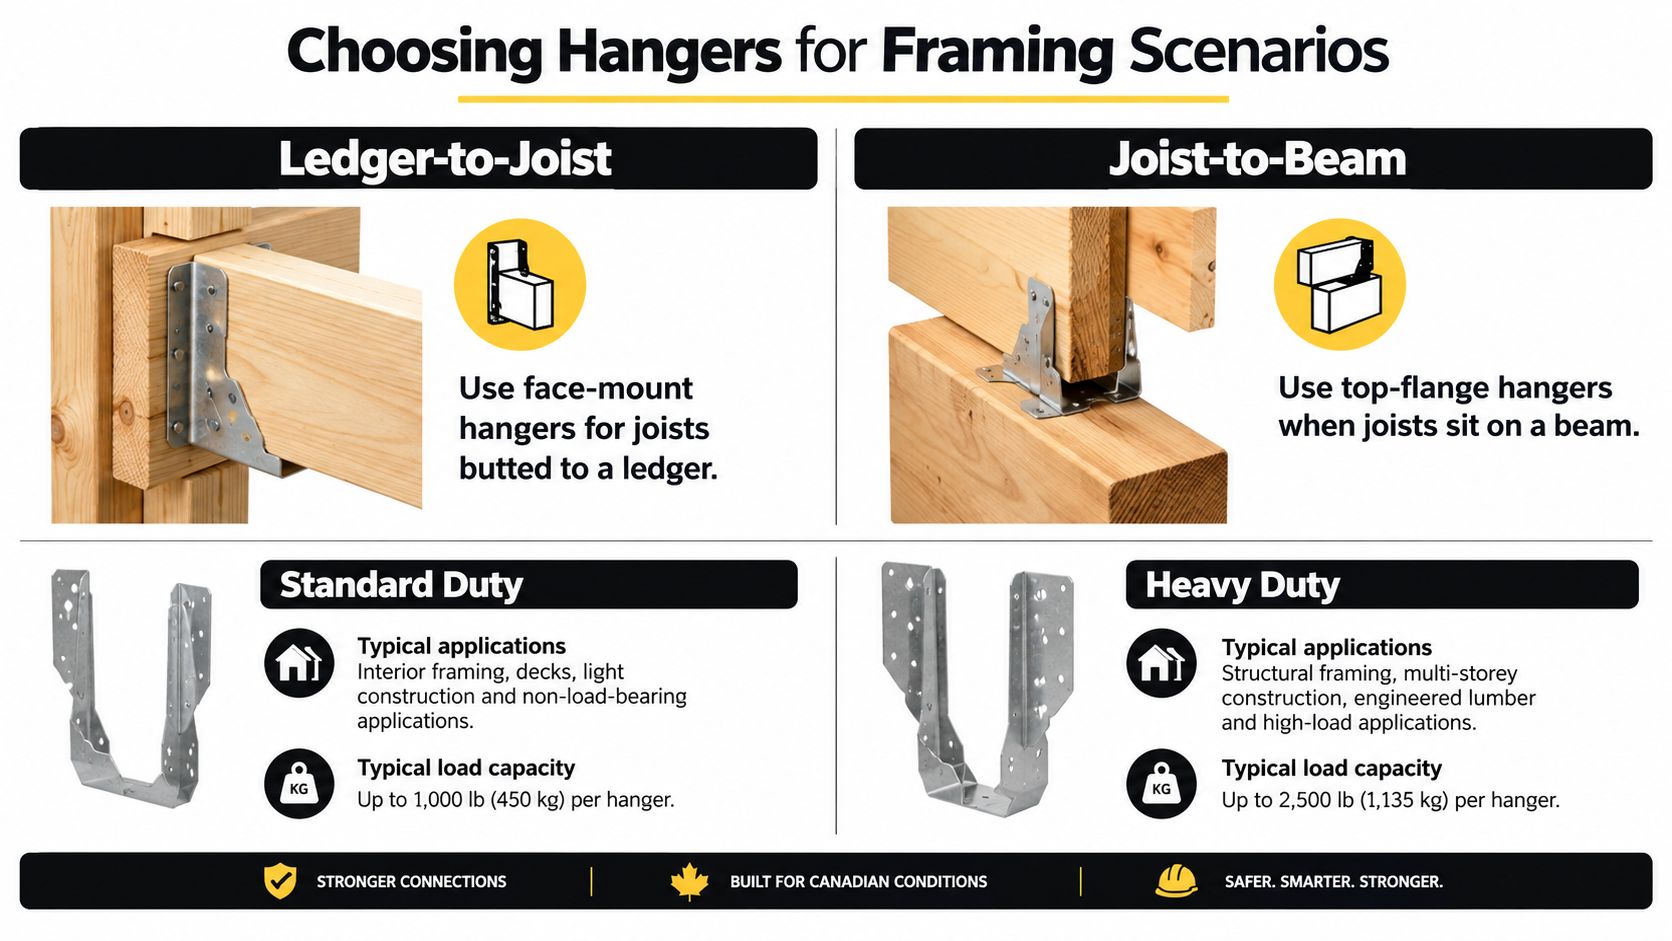
A joist butted against a ledger typically uses a face-mount hanger. The hanger sits on the ledger face, and the joist fits into the connector. This arrangement works well when the ledger face is accessible and the framing elevation is already established.
A joist supported from the top of a beam may use a top-flange hanger or another approved top-bearing connector, depending on the framing design. The flange arrangement must match the beam and joist layout. A top-flange product isn't automatically suitable for a joist framed into the side of a ledger.
Match the connector to the layout
- Ledger to joist: Check face access, ledger dimensions, flashing, and the joist's finished elevation.
- Joist to beam: Determine whether the joist bears on top or frames into the beam side. The two arrangements have different load paths.
- Rim or end framing: Confirm whether the connector must handle an angled, skewed, or tightly constrained approach.
- Inside corners: Look for flange conflicts, limited tool access, and the way adjoining members affect the hanger's seating.
Skewed hangers help when a joist approaches at an angle, but only an approved model for the required angle should be used. Concealed-flange products may suit finished or visually sensitive framing, while face-mount products can be easier to inspect and fasten. Heavy-duty options belong where the approved design calls for their capacity, not where the metal looks more substantial.
Wildfire exposure adds another selection check. CAL FIRE recommends an ember-resistant zone extending 5 feet beyond the deck footprint and accepts deck components only when they use ignition-resistant, noncombustible, fire-retardant-treated, or otherwise tested materials. Review the CAL FIRE home-hardening guidance and ask the local building department whether Chapter 7A or additional local requirements apply.
A hanger sized for a nominal 2×6 doesn't make the entire deck wildfire compliant. Joist-top protection, drainage, decking, fasteners, coatings, and the underlying structural assembly may all affect the approved detail. UC ANR guidance also notes that California Chapter 7A focuses primarily on deck surfaces and doesn't fully regulate every underlying structural member, so don't infer approval from one connector label.
For a practical comparison of side-framed connections and top-bearing layouts, joist hangers versus resting on a beam can help you sort the framing arrangement before you prepare a shopping list.
Installation Overview and Mistakes to Avoid
Good installation starts before the first nail. Set the hanger in position, check the framing line, and make sure the joist can enter fully without forcing the connector out of square.
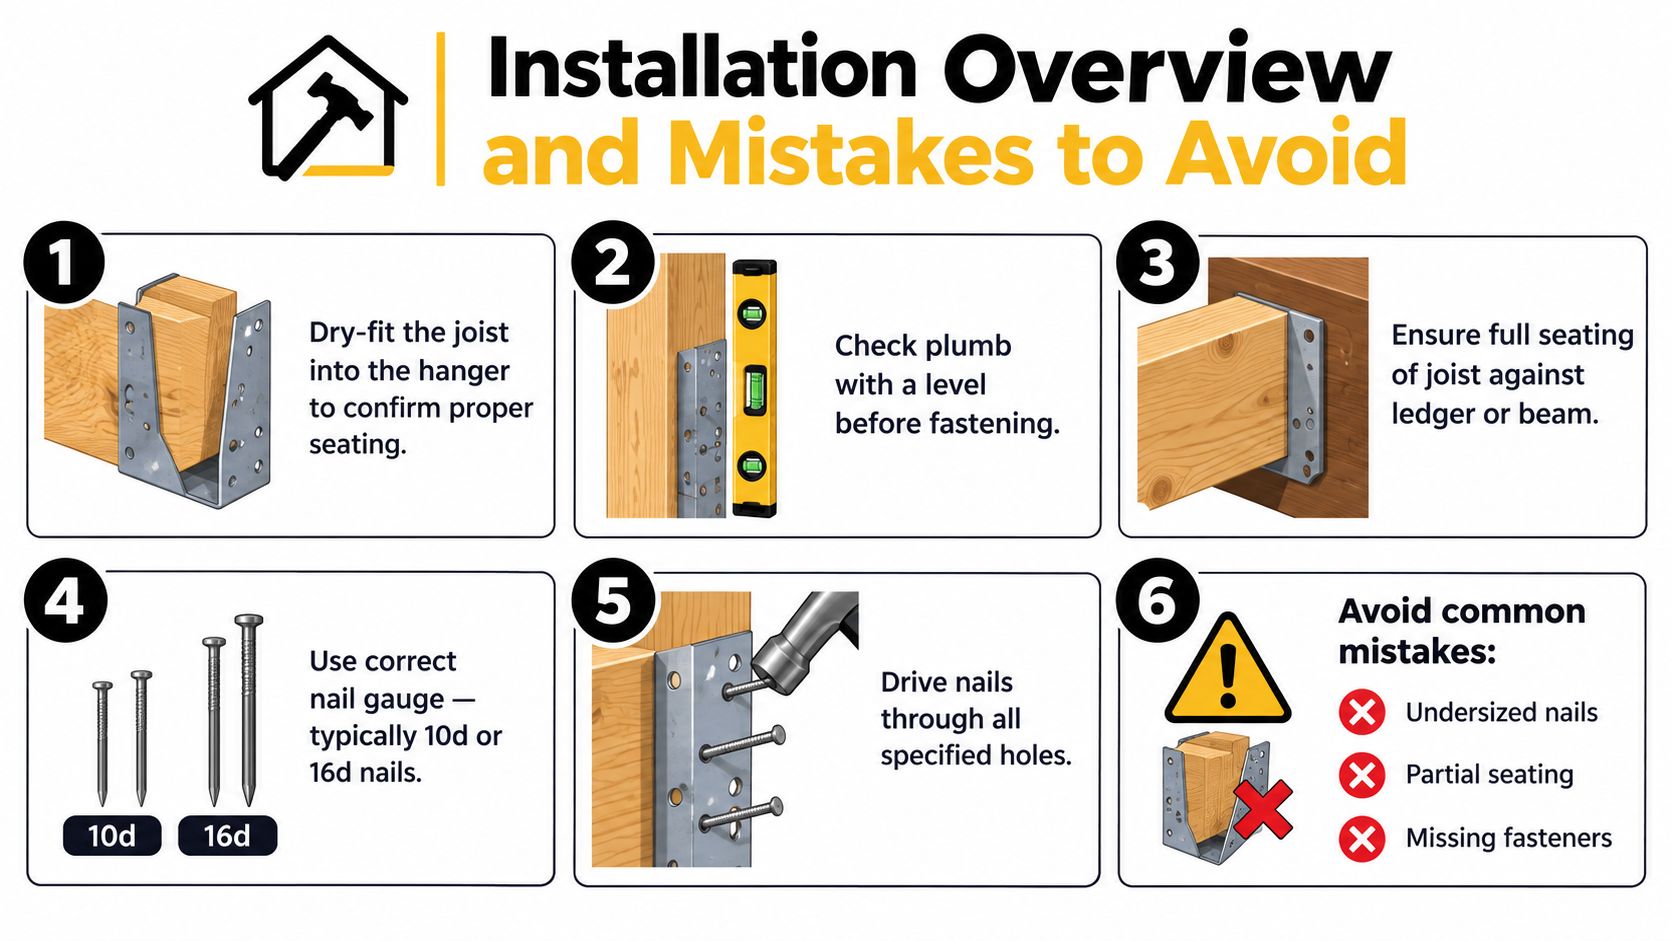
Follow a repeatable jobsite sequence
- Dry-fit the joist: Slide the 2×6 into the hanger and check that it reaches the intended seat.
- Check plumb and level: Use a level before fastening so the joist doesn't leave the deck frame twisted.
- Seat the joist fully: Push the joist firmly against the ledger or beam as the approved installation requires.
- Confirm the fastener schedule: Read the model's installation instructions for nail gauge, length, coating, and quantity.
- Fill the specified holes: Drive the required fasteners through the required holes without skipping awkward locations.
- Inspect the finished connection: Look for bent flanges, gaps, lifted seats, split timber, or heads that haven't seated correctly.
California authorities require hanger installation to follow the connector manufacturer's fastener requirements, including nail gauge, length, and corrosion-resistant coating. The Auburn deck handout also specifies corrosion-resistant deck fasteners, hangers, plates, and nails.
Mistakes that compromise the load path
Substituting deck screws is a common error. A generic screw may look stronger than a nail, but it isn't automatically approved for the hanger's tested connection. Use only the fastener type identified by the connector manufacturer and evaluation report.
Leaving holes empty changes the tested installation. If the instructions require a particular pattern, follow it. Don't assume that a few fasteners in the lower flange are enough because the hanger feels tight.
Using short or undersized nails may prevent the fastener from developing the intended connection. The same problem occurs when a worker uses interior fasteners on an exterior hanger.
Accepting partial seating creates a visible warning. If the joist sits high, leans, or leaves a gap at the supporting member, remove the obstruction and correct the framing before loading the deck.
For a field-friendly sequence with additional installation checks, use this guide to installing joist hangers. Have the connection inspected before covering it with decking or finishes where local approval requires inspection.
Shop Smart and Wrap Up Your 2×6 Project
A clean purchase list begins with the framing, not the product photograph. Write down the actual joist size, supporting member size, hanger orientation, required coating, approved fastener, and quantity before you compare listings.
Look for a product description that identifies the 2-inch by 6-inch application, model number, material or coating, compatible wood treatment, and manufacturer's fastener schedule. If the listing doesn't show those details, pause and obtain the technical information before checkout.
Build the materials list around the connection
- Hangers: Select the approved model for the nominal and actual joist dimensions.
- Fasteners: Buy the specified corrosion-resistant nails or connector screws with the hanger.
- Framing hardware: Add post bases, brackets, bolts, washers, anchors, and related hardware only after confirming their role in the engineered or prescriptive layout.
- Protection materials: Check flashing, joist-top tape, and wildfire-related materials where the project requires them.
- Documentation: Save product instructions, evaluation information, receipts, and the local approval details for inspection.
XTREME EDEALS INC. offers 2-inch by 6-inch joist hangers alongside deck screws, nails, bolts, washers, anchors, brackets, and other deck and fencing hardware. Its catalogue includes CAD-priced multi-pack options and support resources such as FAQs, shipping information, returns information, and practical hardware guides.
Before buying, confirm the corrosion class rather than relying on a generic word such as “galvanised”. Check that the fasteners are approved for the specific hanger, especially when the joists are preservative-treated or fire-retardant-treated. If the deck is in a wildfire-prone area, ask the local building department whether the selected assembly and connector details satisfy the applicable fire requirements.
For unusual loads, long or irregular framing, cantilevers, concentrated reactions, engineered lumber, or a design outside the prescriptive tables, obtain engineered connector details. A larger-looking hanger won't replace a proper design review.
The final check is simple: fit, bearing, restraint, corrosion protection, approved fasteners, and installation must all agree. When those pieces line up, the 2×6 hanger becomes part of a dependable deck system instead of an isolated piece of metal.
XTREME EDEALS INC. offers 2-inch by 6-inch joist hangers and related fasteners, brackets, anchors, and deck hardware for organised project purchasing. Visit XTREME EDEALS INC. to compare compatible options, check product details, and prepare your California deck materials list before installation.