
You've positioned a fence-post base or railing bracket on concrete, and the fixing holes look straightforward. Then you open the anchor listings: different lengths, stainless grades, embedment requirements and approval references, all for hardware that looks almost identical.
The right stainless wedge anchor is the one that suits the concrete, the load and the exposure. A more corrosion-resistant alloy won't rescue an oversized hole or a base plate too close to an edge. Just as critical, the grade you choose needs to work with the nut, washer, bracket and contaminants around it.
Stainless Wedge Anchor Sizes and Embedment Values
Check these label values before buying a stainless wedge anchor.
| Spec on the label | Why it matters | Example from a product listing |
|---|---|---|
| Grade | Sets corrosion resistance and matching hardware | 316 stainless in the smaller-diameter example; 18-8 stainless in the larger-diameter example |
| Diameter and drill bit | Hole must match the anchor or grip fails | Match each anchor to its manufacturer-specified bit size |
| Overall length | Provides room for embedment, fixture thickness and exposed threads | The 316 example has its overall length stated separately from diameter |
| Minimum embedment | Establishes the approved depth of anchor engagement | Use the minimum for the exact model and installation configuration |
| Included hardware | Nut and washer must match the anchor's alloy group | Nut and washer supplied with both example listings |
| Finish | Bright uncoated stainless is not a protective coating | Bright uncoated in both listings |
| Referenced standards | Identifies evaluation and inspection references to investigate | ACI 355.2, ICC-ES AC19, UL, FM, A-A-1923A Type 4 and IBC |
A Grainger Canada seismic wedge-anchor listing specifies 316 stainless steel, a 3/8-inch diameter and a 5-inch overall length, with a nut, washer and bright uncoated finish. It also references the standards shown in the table. Treat each as a separate specification, not interchangeable descriptions of the same property.
Start with diameter and drill bit. Use the bit specified for the exact anchor, and inspect its cutting head before drilling. A worn, damaged or incorrect bit can produce a hole that fails installation requirements, even if the marking on its shank looks right.
Separate overall length from embedment
Overall length is not the portion that grips the concrete. The fixture, washer, nut and required thread engagement all use some of the length above the concrete surface.
Minimum embedment is a separate dimension. Do not subtract the protruding length and assume the remainder is sufficient. Check how the manufacturer defines installation depth and effective embedment, since those terms are not automatically interchangeable.
Grade deserves equal care. 18-8 is a stainless designation, not proof of every property associated with a specifically identified alloy. Listings often associate it with Type 304, but request explicit material identification when the specification requires it.
Ordering rule: Take diameter, length and embedment from the same product configuration. Do not combine convenient values from different listings to create an anchor specification.
For a load-bearing application, check the evaluation report before buying. Standards listed on a sales page do not establish that every diameter, material and installation arrangement has the same approval.
How a Wedge Anchor Grips Concrete
A wedge driven into a split log holds because it pushes sideways against the wood. A wedge anchor uses a related principle, but the aim is to grip the surrounding concrete without splitting it.
The diagram shows the relationship between the tapered part and the material around it.
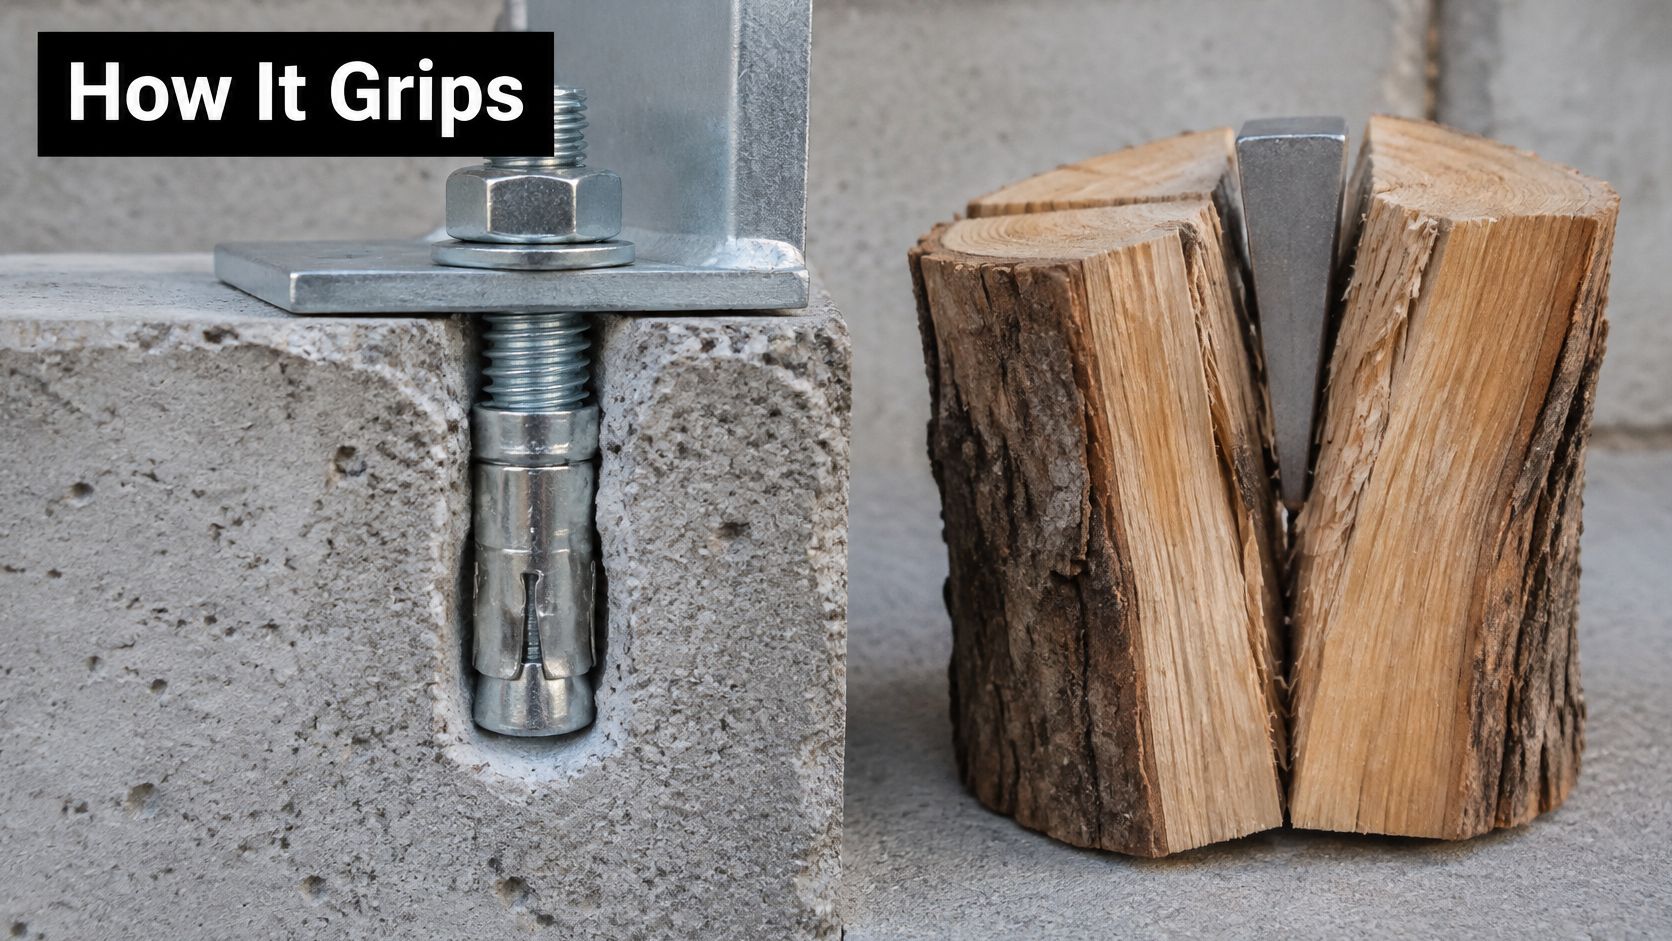
Say you're fastening an equipment bracket to a concrete pad. You drill the specified hole, insert the anchor and tighten the nut. Tightening draws the tapered end into the expansion clip, pressing that clip against the hole wall.
Friction and bearing transfer the load into the surrounding concrete. This is why a wedge anchor is not just a bolt sitting in a hole. Its performance depends on the expansion mechanism developing the intended contact pressure.
What happens around the clip
Loose drilling dust interferes with that contact. Insufficient embedment leaves less concrete available to resist the connection forces, while excessive tightening can damage threads or crush concrete locally.
Cracks complicate the connection because the hole can open across the expansion zone. An anchor qualified for cracked concrete has been evaluated for conditions that an ordinary uncracked-concrete anchor may not accommodate.
For a broader explanation of mechanical fixing choices, the guide to expansion anchors for concrete helps distinguish the mechanisms before you choose hardware.
Watch how the components move during setting.
Better stainless steel can improve durability. It cannot make damaged concrete, a poor hole or an unsuitable expansion mechanism structurally sound.
Don't assume steel strength is the limiting factor. Concrete breakout, splitting and pull-through can govern the connection before the anchor shaft reaches its own limit.
304 or 316 for Your Exposure
Choose 304 for ordinary outdoor concrete with limited chloride exposure. Choose 316 more conservatively for coastal air, pool surroundings and locations exposed to de-icing salts or chemicals. Neither choice removes the need to check the project specification.
Choosing 304 or 316 by site exposure
| Factor | 304 stainless | 316 stainless |
|---|---|---|
| Common designation | Type 304; often listed as 18-8, but verify the alloy | Type 316 |
| Typical use | Ordinary outdoor concrete with limited chloride | Coastal air, pools, de-icing salt and chemical exposure |
| Corrosion behaviour | Good where chloride is limited; salt increases pitting risk | Greater chloride resistance, but suitability still needs confirmation |
| California code example | Type 304 appears among permitted grades | Type 316 appears among permitted grades; severe-exposure specifications may identify 316L |
| Matching nuts and washers | Use specified 304-compatible hardware | Use specified 316-compatible hardware |
The exposure choice is easier to make when you consider where water comes from and where it collects.
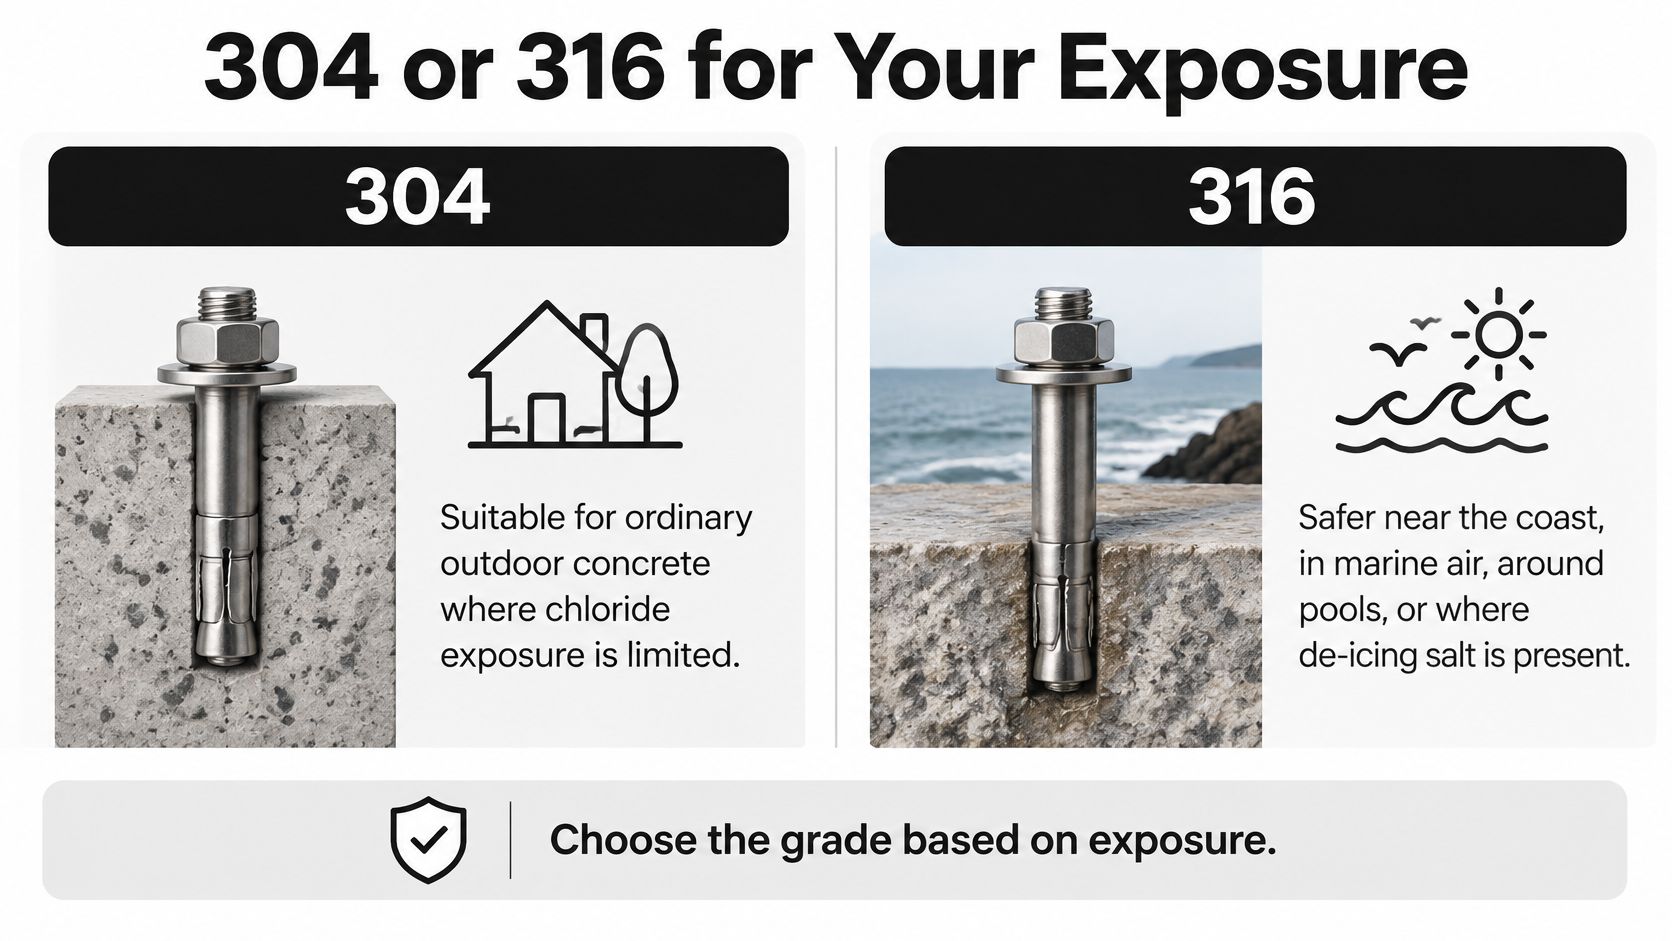
An inland fence base washed by rain isn't the same environment as a railing base beside a salted walkway. A sheltered base plate can also retain salty moisture even when the surrounding installation looks relatively dry.
For railing projects, Binks Balustrades' discussion of weather-resistant steel for outdoor railings provides useful context for considering the exposed assembly rather than the anchor alone.
Specifications outrank a premium-sounding grade
California's Title 8 section 3283 identifies Types 303, 304 and 316 stainless steel for the anchors and fittings within that regulation's scope. It isn't a blanket approval for every concrete anchor or a Canadian design rule.
Severe-condition guidance may identify a low-carbon stainless grade, but don't treat a material example as permission to substitute products. The anchor's evaluation and the project's exposure specification still govern.
A Cal Poly concrete construction specification cautions against Type 316 where pitting corrosion is a concern. That project-specific caution is a useful check against the assumption that a higher grade designation is universally suitable.
Verify the complete assembly
Choose matching nuts and washers rather than replacing supplied stainless hardware with whatever's in the toolbox. The guide to stainless-steel fasteners can help you distinguish the components you need to coordinate.
Read available grade markings on the anchor, nut and washer, then reconcile them with packaging and manufacturer documentation. Small components aren't always marked clearly, so absent markings call for traceability, not guesswork.
Choose by exposure first, then confirm alloy compatibility and product approval. Paying for a different grade without checking those details can leave the actual weak point unchanged.
Corrosion Traps With Treated Wood, Metals and Dust
Chloride ions can disrupt stainless steel's passive surface film and initiate pitting or crevice corrosion. Threads, washer interfaces and tight gaps around a base plate deserve attention because moisture can remain there after exposed surfaces dry.
Contact materials matter just as much as the word stainless on the box. A corrosion-resistant anchor paired with an unsuitable connector is still an unsuitable assembly.
Treated wood and dissimilar metals
The City of Vancouver's pressure-treated-wood guidance identifies ACQ preservative as highly corrosive to ordinary steel hardware, recommends stainless components of matching material type, and names the common stainless grades used for this work. For the anchor itself, confirm the material and supplied hardware against the stainless wedge-anchor product description, rather than assuming every component at the connection is compatible.
The same wood-treatment guidance warns against direct aluminum contact with ACQ. If your post base, trim or bracket combines different metals, have the isolation detail specified without compromising bearing or the structural load path.
Before selecting the connection hardware, establish what pressure-treated wood is and identify the treatment used in the actual timber. Don't infer preservative chemistry from colour alone.
Carbon-steel contamination
A National Research Council Canada study on stainless steel in concrete warns that attached carbon-steel rust can increase galvanic corrosion. Grinding debris, shared wire brushes and rusty storage bins can therefore undermine an otherwise sensible material selection.
Use a simple site routine:
- Store separately. Keep stainless anchors in clean packaging away from carbon-steel swarf and rusty fasteners.
- Use a dedicated hole brush. Choose the manufacturer-specified brush and don't use one contaminated by other metalwork.
- Keep hardware coordinated. Retain the specified nuts and washers with their anchors.
- Resolve metal contact. Isolate aluminum or galvanized components where the design requires it, using an approved detail.
- Inspect after wet exposure. Check for rust streaks, trapped debris and standing water after the first wet season.
Don't immediately diagnose orange staining as failure of the stainless alloy. Identify whether the rust comes from surface contamination, adjacent hardware or actual pitting before deciding on a repair.
Load, Cracked Concrete and Code Checks
A stainless wedge anchor can still be the wrong choice for a thin slab or a hole near a concrete edge. Capacity depends on concrete strength and condition, cracking, embedment, edge distance, spacing, and the combination of tension and shear. A tall fence post can also apply overturning forces that a simple downward-load comparison misses.
Canadian design requirements
A Canadian evaluation listing for undercut anchors states conformity with CSA A23.3-19, Annex D. That establishes a Canadian design reference for the listed undercut anchors, not approval of a different wedge-anchor product.
Anchor mechanisms and materials matter when comparing reports. An undercut anchor and a wedge anchor work differently, and approval for a carbon-steel version does not automatically apply to a stainless version with a similar appearance.
For an uncomplicated, nonstructural attachment, a homeowner may be able to use the manufacturer's selection information, provided the concrete and installation limits match. Diameter alone does not establish suitability.
Guardrails, deck ledgers, load-bearing railings and structural connections need a qualified design check. A headline pull-out value is not enough when failure could injure someone.
Check both sides of the connection
A DEWALT anchor evaluation report distinguishes anchor-to-concrete values from the capacity of the connected member. The post, bracket, base plate or weld must also transfer the load.
For seismic applications, ICC-evaluated stainless wedge-anchor information identifies cracked-concrete and seismic uses under specified conditions. Check the exact stainless model, diameter, embedment, spacing, edge distance and installation torque against its evaluation report.
Record the design inputs before installation:
- Concrete details: strength, condition, thickness and expected cracking.
- Anchor configuration: exact model, material and approved installation arrangement.
- Connection geometry: hole layout, edge distances and fixture thickness.
- Design responsibility: who has checked the anchor group and attached member.
Surface upkeep can help extend your concrete driveway's lifespan, but it does not establish structural anchorage capacity. Find the applicable report and involve a qualified designer when failure could have serious consequences.
How to Install a Stainless Wedge Anchor Step by Step
Set out the installation before drilling: anchor packaging, hammer drill, specified masonry bit, depth stop, hole-cleaning equipment and a calibrated torque wrench. Check for concealed services and reinforcement, and use appropriate eye, hearing and silica-dust protection.
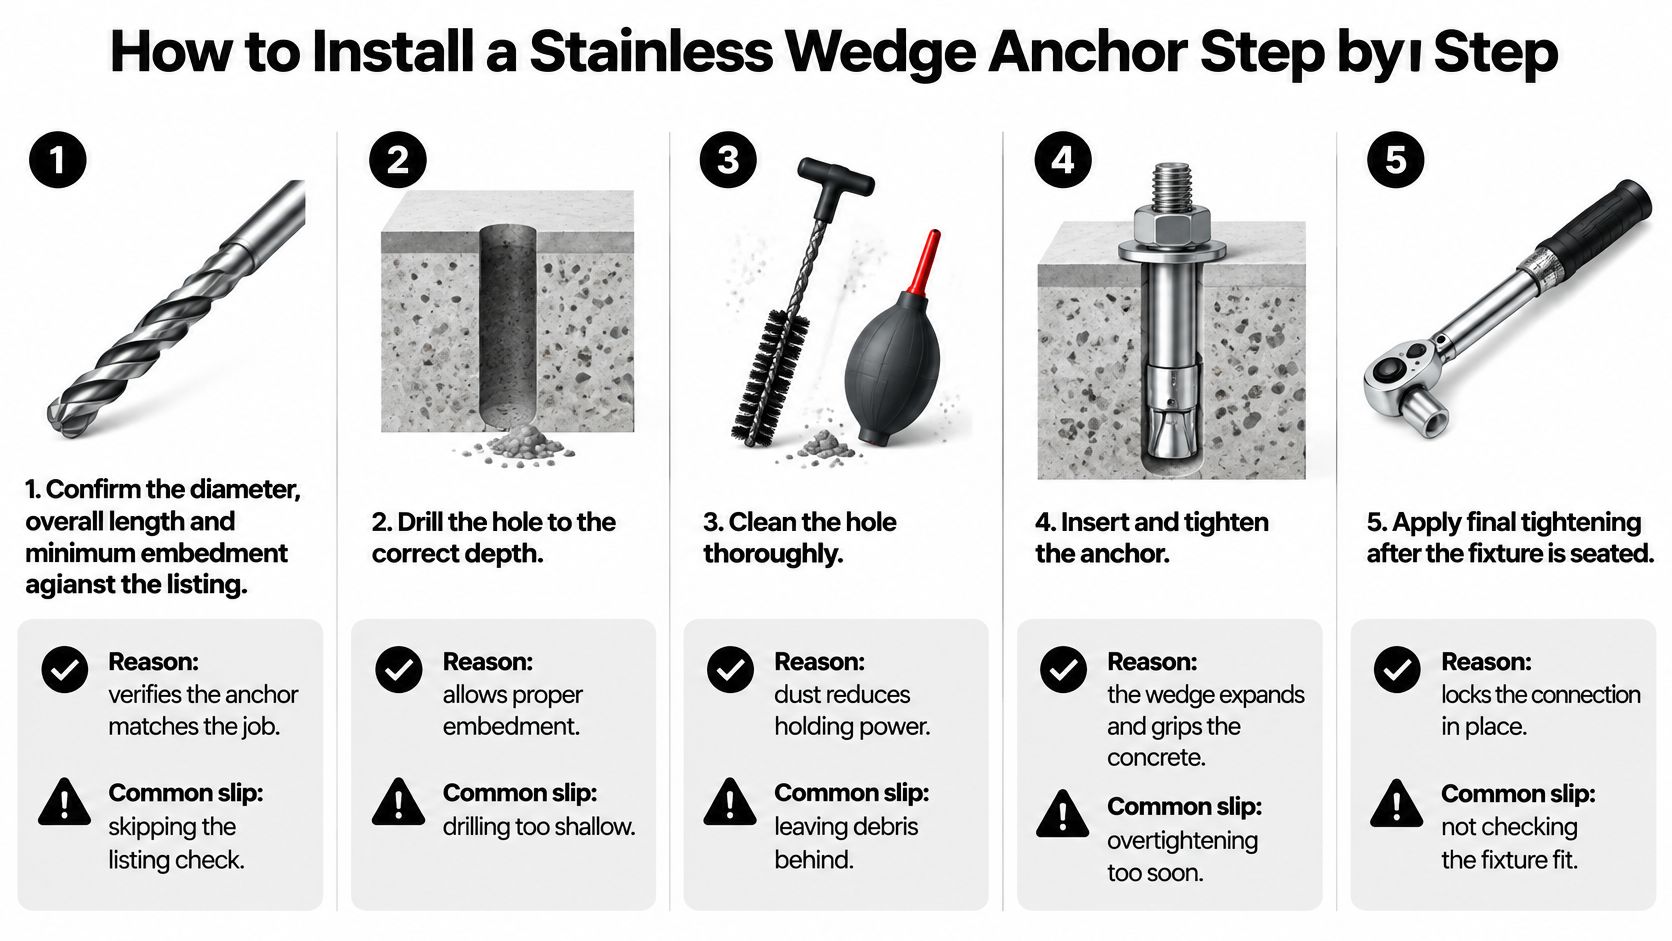
The installation sequence below keeps product verification separate from final tightening.
Drill and prepare
Confirm the complete specification. The Grainger Canada expansion wedge-anchor listing specifies an 18-8 stainless, 3/4-inch-diameter anchor with a 3.5-inch minimum installation depth, supplied with a nut and washer. A shorter product with matching threads isn't automatically an acceptable substitute; verify its own approved configuration.
Drill the specified hole. Set the depth stop to the manufacturer's required hole depth, allowing the specified clearance below the anchor rather than inventing an extra allowance. Keep the drill aligned, and don't enlarge the hole by rocking the bit to make insertion easier.
Clean using the prescribed sequence. Remove debris with the specified blow-out pump or suitable oil-free compressed air, brush with the correct hole brush, and repeat as directed. Control the discharged dust, and check that the product permits the actual hole condition, including any moisture present.
Seat and tighten
Insert through the fixture where permitted. Assemble the supplied nut and washer as directed, protect the threads and tap the anchor into position without damaging it. Confirm that the required embedment remains available after accounting for the fixture and any approved levelling detail.
Apply the specified installation torque. Seat the fixture and use the calibrated torque wrench to reach the manufacturer's value. Don't stop merely because you feel resistance, and don't keep tightening beyond the specified value to make the connection feel stronger.
Inspect the set connection. Check that the fixture is snug, the nut and washer bear correctly, and the threads show no damage. A spinning assembly, lifting base plate or inability to reach torque calls for investigation, not extra force.
Installation record: Keep the product identification, hole and embedment details, torque requirement and any inspection notes together with the job documents.
An anchor that fails to set needs a manufacturer-approved remedial decision, usually replacement in a suitable new location. Don't reuse a failed expansion anchor or move the replacement slightly sideways without checking spacing and edge-distance requirements.
Failure Modes and Their Fixes
An anchor pulling out under load is a stop-work condition. Unload or secure the connection safely, keep people clear and have the concrete and design assessed before attempting a repair.
Stainless wedge anchor failures, causes and fixes
| Symptom | Likely cause | Fix |
|---|---|---|
| Anchor pulls out under load | Weak or cracked concrete, short embedment or insufficient edge distance | Stop loading, check the evaluation report and involve a designer |
| Nut spins before torque is reached | Anchor rotation from an oversized or dirty hole, inadequate embedment, or damaged threads | Identify what's rotating, verify the hole and replace the failed anchor |
| Stripped threads or crushed washer | Over-torque or unsuitable hardware | Replace damaged components and use the specified torque with a calibrated wrench |
| Rust streaks or pitting | Carbon-steel contamination or chloride exposure | Remove the contamination source; specify 316 with matching hardware where suitable for salt exposure |
| Galvanic staining at contact | Stainless touching galvanized steel or aluminum in a wet connection | Use an approved isolation detail or compatible hardware |
Repair the cause, not just the fixing
For rust and staining, apply the contact and contamination routine before changing alloy. For load failures, don't assume a larger anchor will solve weak concrete or inadequate edge distance.
When the substrate needs assessment or rebuilding, home masonry repair by Atlanta Concrete Solutions illustrates the type of concrete-and-masonry repair service to consider. Structural anchorage still needs its own design decision.
A failed anchor isn't reusable. Repeat failure in the same area points towards the substrate, geometry or connection design rather than a reason to tighten harder.
Confirm Your Anchor Spec Before You Order
A complete wedge-anchor specification includes the exposure, dimensions, materials and load requirements. Confirm these details before ordering, not after the hole is drilled.
- Choose the exposure grade. Use 304 for limited-chloride outdoor conditions. Consider 316 for coastal, pool, salt or chemical exposure, subject to the project specification.
- Match the installation dimensions. Confirm the diameter, bit size, overall length and minimum embedment for the exact product.
- Verify the hardware. Check the alloy markings, packaging and documentation for the anchor, nut and washer.
- Resolve safety-critical loads. For structural, guardrail, deck-ledger or seismic work, obtain the evaluation report and have a qualified professional check both the anchorage and the connected member.
- Protect the materials. Keep anchors dry, clean and separate from carbon-steel debris until installation.
The Fasteners category includes carriage bolts, construction screws, deck screws, drywall screws, flat washers, hex nuts, lag bolts, nails, sleeve anchors and wedge anchors. These are different connection components, not substitutes for one another. Check the listed grade and applicable evaluation before selecting an anchor for a load-bearing connection.
XTREME EDEALS INC. offers wedge anchors alongside deck, fencing and fastening hardware. Visit XTREME EDEALS INC. to review the available fasteners, then confirm the exact anchor's grade, evaluation report and installation requirements before ordering for a load-bearing connection.