
You've probably seen the failure already. The deck post felt solid when you bolted the base down, the fence bracket looked tight on day one, and then a season later something starts to move. Not a dramatic collapse. Just a little wiggle that gets worse every time the gate slams or the railing takes a side load.
That usually isn't bad luck. It's usually an anchoring problem.
A lot of people treat concrete fastening like wood fastening. Drill a hole, put something in it, tighten it up, done. Concrete doesn't forgive that mindset. Sleeve anchors for concrete work well when they match the base material, the fixture thickness, the hole, and the conditions around the hole. They also sit in a grey area where retail hardware advice is often too simple, while actual code rules in places like California and updated CSA guidance in Canada are much more specific.
Why Your Deck Posts Keep Loosening
The common job goes like this. A post base gets fastened to an older pad, a porch slab, or a fresh footing. It looks fine. Then the wood shrinks a bit, the bracket takes movement, the anchor was set too close to a crack or edge, and now the whole base starts telegraphing motion.

When that happens, many homeowners blame the bracket or the post. Often the issue is the anchor choice, or the way it was installed into the concrete. If you're fastening post bases, handrail brackets, or fence hardware into a slab or footing, a proper mechanical anchor gives you a very different result than a plastic plug and lag.
A sleeve anchor works by expanding inside the drilled hole and gripping the concrete wall all the way around the sleeve. That matters on projects that see vibration, side load, or repeated movement from use. A gate opening and closing, for example, keeps testing the anchor whether you planned for it or not.
If you're dealing specifically with post hardware, this guide on anchoring posts to concrete is useful because it connects the anchor to the bracket and footing as one assembly, not just as a loose fastener choice.
Field note: A loose post base rarely gets tighter with time. Once movement starts, the concrete around the hole usually gets punished too.
The expensive mistake is assuming all anchors fail the same way. They don't. Some spin, some loosen, some crack the surrounding concrete, and some hold fine until the slab condition changes. Sleeve anchors stay popular because they're practical, available, and well suited to a lot of deck and fence hardware. But they only earn that reputation when the details are right.
How Sleeve Anchors Work in Concrete
A sleeve anchor is simple hardware, but the holding action is easy to misunderstand. You have a threaded bolt, an expansion sleeve, and a nut. As the nut is tightened, the assembly pulls in a way that forces the sleeve to expand against the drilled hole.

That expansion is the whole game. California public specifications describe sleeve anchors as using a single-piece steel expansion sleeve that provides 360-degree contact with the base material, and identify them as non-bottom-bearing anchors in that context, which is a useful practical distinction when you're choosing among concrete fasteners (California project manual specification).
What makes them different from wedge anchors
A lot of newer installers mix up sleeve anchors and wedge anchors because both go into drilled holes and both tighten with a nut. They aren't the same tool.
A sleeve anchor expands through the sleeve along the hole wall. A wedge anchor relies on a wedge clip action at the embedded end. In the field, that changes how forgiving the anchor is, what base material it likes, and how sensitive it is to installation geometry. If you're comparing both styles for a job, this breakdown of concrete screw anchors can also help frame where expansion anchors fit against other concrete fastening options.
Why California treats anchor behaviour seriously
In California, this isn't just a hardware-store discussion. The code framework treats concrete anchorage as a structural issue. The California Building Code and HCAI guidance state that installation of mechanical anchors subjected to wind or seismic forces must be based on a seismic qualification test in concrete, and when those anchors are subjected to wind or seismic forces, the test must be on cracked concrete (HCAI anchor qualification guidance).
That tells you something important. The concrete condition isn't a side note. It's part of the anchor's real behaviour.
Anchors installed in perfect concrete in a brochure don't tell you enough about anchors installed in real slabs with cracks, edges, and movement.
If you're only hanging a light fixture, that may not change your buying decision much. If you're fastening a post base, railing support, or bracket that carries load, it should.
Types and Sizes of Sleeve Anchors
A lot of bad anchor choices happen at the shelf, not at the drill. Someone grabs a box based on diameter alone, then finds out on site that the anchor is too short once the post base, washer, and stand-off are stacked up, or the finish is wrong for an exposed coastal job. By the time inspection comes around, fixing that mistake usually means pulling hardware and starting over.
Sleeve anchors are sold in a range that looks simple. In practice, four details decide whether they fit the job: diameter, length, head style, and corrosion resistance. For deck and fence work, that last one matters more than many DIYers expect. A zinc-plated anchor in a dry garage is one thing. An anchor holding exterior hardware in wet concrete, treated lumber, or marine air is a different decision.
What actually changes from one sleeve anchor to another
Diameter affects how the connection behaves under load.
A 1/4 inch sleeve anchor can work for light brackets and non-structural attachments. Once you get into post bases, rail supports, and heavier fence hardware, 3/8 inch and 1/2 inch sizes are usually where the conversation starts. Bigger is not automatically better, though. Larger anchors need larger holes, more sound concrete around them, and more care near slab edges.
Length has to cover the fixture first, then the concrete.
People get burned here. The anchor does not get full value just because the box says 4 inches or 5 inches. Part of that length disappears into the hardware you are fastening. Thick base plates, leveling shims, washers, and stand-off brackets all eat into usable embedment.
Head style affects access and installation speed.
Hex-head sleeve anchors are common because they are easy to set with standard sockets and wrenches. Flat-head versions have their place where the fastener needs to finish flush, but they are less common in deck and fence hardware.
Finish decides whether the anchor will last outdoors.
For exterior work, the anchor has to make sense with the rest of the assembly. Hot-dip galvanized hardware is common around pressure-treated lumber and exposed post bases. In harsher conditions, stainless may be the better call, but only if the rest of the connector package is compatible too. Mixing finishes without thinking it through is how you end up with corrosion showing up long before the concrete connection wears out.
Code reality changes the buying decision too. In California, inspectors and engineers do not look at anchors as generic fasteners once the connection carries meaningful wind or seismic load. They want the installed anchor, the spacing, the edge distances, and the hardware condition to match a defensible layout, not a guess from the bin at the home center. CSA-minded work follows the same practical rule. Use hardware with published application limits and install it in a way that can be checked in the field.
Here is a simple planning table for common sleeve anchor sizes used in residential concrete work:
| Common Sleeve Anchor Specifications | ||
|---|---|---|
| Diameter | Typical Length | Best Use Case |
| 1/4 inch | Short to medium | Light brackets, smaller fixtures, non-structural attachments |
| 3/8 inch | Medium | General railing brackets, lighter post hardware |
| 1/2 inch | Medium to long | Heavier post bases, deck and fence hardware into sound concrete |
If you are deciding between expansion anchor styles, this guide on sleeve anchor vs wedge anchor for concrete fastening is a useful side-by-side comparison. Sleeve anchors are often the better fit where fixture thickness varies and a little more installation forgiveness helps. Wedge anchors usually make more sense where higher loads and consistent base material justify the tighter setup.
Later in the buying process, seeing the hardware in context helps. This clip does a decent job of showing the form factor and handling:
XTREME EDEALS INC. carries sleeve anchors in practical deck-and-fence-friendly sizes, including hot dip galvanized options such as 1/2 inch x 4 inch, 1/2 inch x 5 inch, and 1/2 inch x 6 inch. Those are the lengths people usually end up needing once real bracket thickness is part of the layout.
Calculating Embedment Depth and Spacing
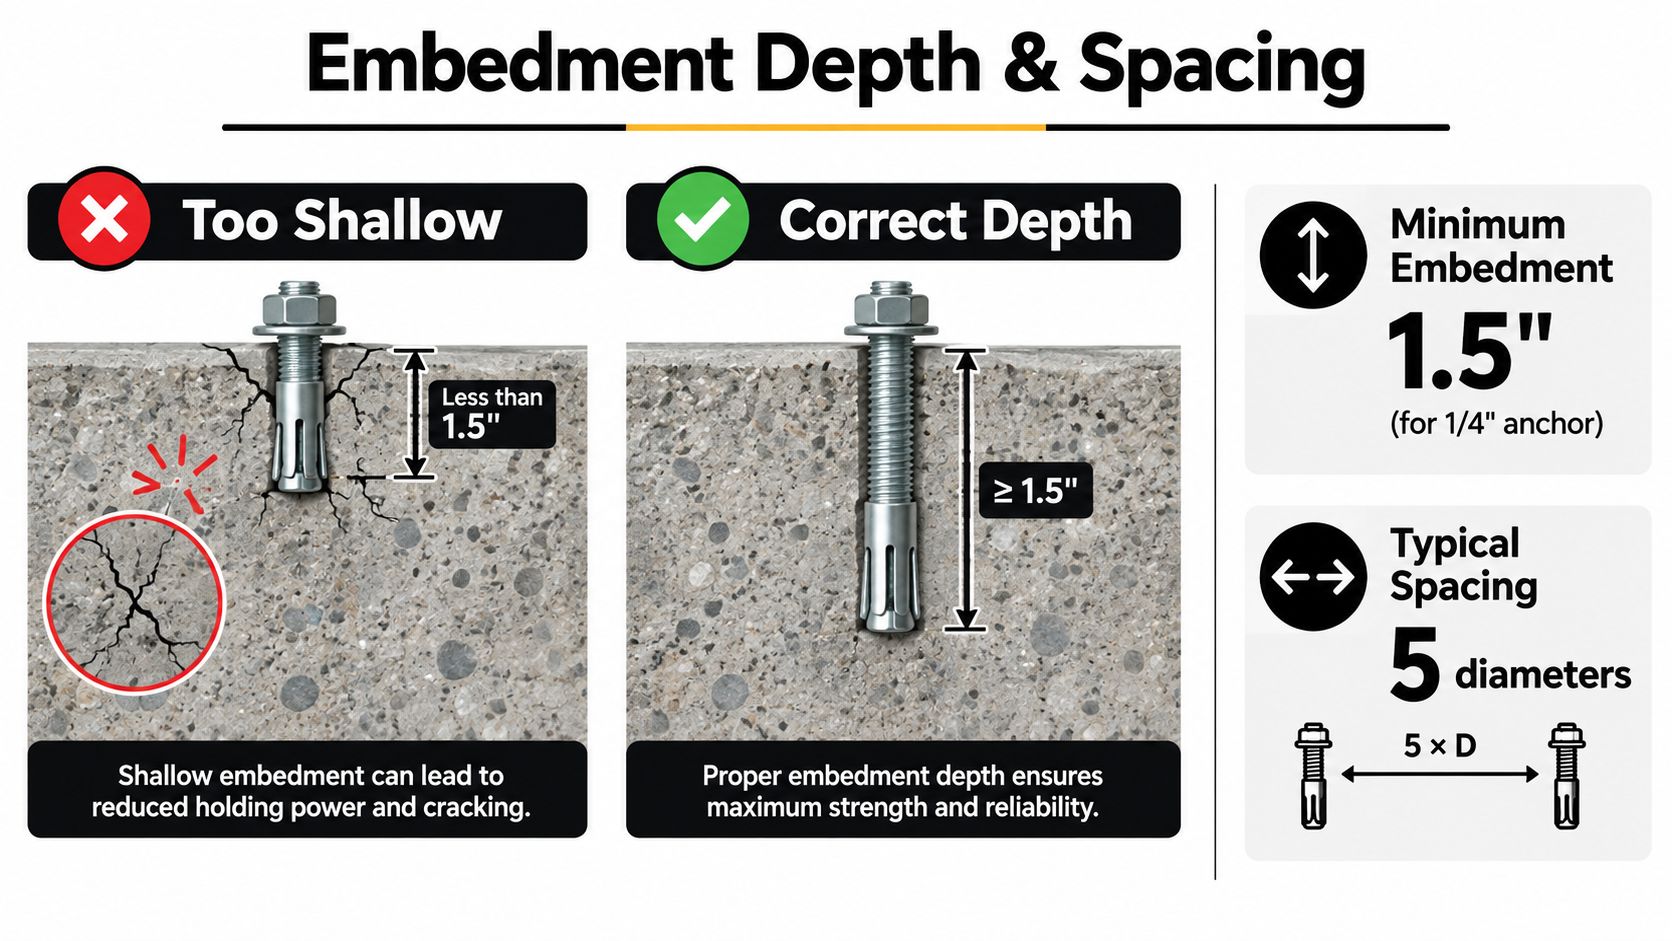
You set a post base on a clean slab, tighten everything down, and six months later the connection starts to move. In a lot of cases, the anchor did not fail because the steel was weak. The layout failed because the anchor never had enough concrete around it to develop its rated grip.
Start with the concrete you actually have
Embedment depth is the part of the anchor buried in sound concrete after you subtract the bracket, base plate, washer, and nut. That is the number that matters. Buying a longer anchor does not help if the slab is thin, the edge is close, or the hole location pushes you into weak concrete.
On residential deck and fence work, that usually means measuring the slab or footing first, then checking where the hardware holes land. A post base can look fine on top and still force the anchors too close to an edge or too close to each other underneath.
California guidance is a good reminder that anchor geometry gets strict fast once the connection is treated as structural. In one retrofit condition, California existing building guidance limits anchor lines perpendicular to loading to a maximum of 4 feet apart, keeps spacing within each line to 18 inches maximum, and sets embedment at wall thickness minus 2 inches, up to 6 inches. That rule does not apply to every backyard bracket, but it shows how quickly spacing and embedment become code issues in seismic work.
Published anchor values depend on spacing and edge distance
Manufacturer load tables are not blanket permission to drill anywhere the bracket happens to fit. Those values are usually based on minimum spacing and minimum edge distance assumptions. As noted earlier, the technical data for sleeve anchors assumes generous separation between anchors and enough concrete cover at the edge. If you crowd the pattern, published values no longer describe your installation.
The risks break down like this:
- Too close to the edge and the concrete can crack, spall, or break out under load.
- Too close to another anchor and the expansion zones overlap, which reduces holding power.
- Too shallow and the sleeve does not expand over enough concrete to hold as intended.
- Too deep without checking first and you can hit reinforcing steel or discover the slab is thinner than expected.
That last one matters more in California than many DIY guides admit. On work that falls under plan review or inspection, especially in higher seismic categories, inspectors and engineers care about cracked concrete assumptions, anchor interaction, and actual field placement, not just what was printed on the box.
A quick planning table
| Spacing and Embedment Rules | |
|---|---|
| Parameter | Minimum Requirement |
| Anchor line spacing in one California retrofit guidance condition | Maximum 4 feet apart |
| Spacing in each line in that same guidance | Not exceeding 18 inches |
| Embedment in that same guidance | Wall thickness minus 2 inches up to 6 inches |
| Published spacing assumption for tabulated values | As noted earlier, follow the manufacturer minimums exactly |
| Published edge distance assumption for tabulated values | As noted earlier, follow the manufacturer minimums exactly |
For code-driven work, there is another layer. DSA interpretation on anchorage design points designers to ACI 318 Chapter 17 as adopted by California for anchor rod design. In plain jobsite terms, cracked concrete, edge distance, and combined forces are part of the design. They are not cleanup items after the holes are drilled.
My rule on small exterior jobs is simple. Lay out the bracket first, then judge the concrete, not the other way around. If the hole pattern leaves skinny concrete at the edge, lands over a crack, or bunches anchors into a small pad, change the hardware or the base size before you drill. That is a lot cheaper than replacing a loose post after inspection or after the first season of movement.
Step-by-Step Installation Process
A sleeve anchor install isn't hard. It just punishes sloppy work. Most bad installs come from rushing the hole or guessing at the final set.

The sequence that actually works
Lay out the holes carefully. Put the bracket or base exactly where it belongs and mark every hole. Check edges, cracks, and nearby anchors before drilling.
Drill to the proper diameter and enough depth. The hole has to suit the anchor and leave room for full seating. If the hole is too shallow, the anchor may look installed while never fully setting.
Clean the hole. Brush it, blow it out, and get the dust out of there. Concrete dust inside the hole interferes with proper expansion contact.
Insert the anchor through the fixture. On jobs with a post base or bracket, place the anchor so the sleeve is fully engaged where it needs to be, not hung up halfway in the hardware stack.
Tighten with the correct tool and torque. Don't guess. Tighten the nut to the required value from the manufacturer documentation.
What the specs actually say
California agency guidance on post-installed anchors says that, in DSA- or OSHPD-regulated construction, installation must be verified by a tension or torque testing programme, and torque testing is allowed for torque-controlled anchors such as wedge anchors, screw anchors, and sleeve anchors. That same guidance says testing frequency can range from 100% down to 10% depending on anchor use, and the torque-test load must equal the required installation torque in the research report and printed manufacturer instructions (SEAONC anchor testing FAQ).
That level of verification may be beyond a backyard fence repair, but the lesson carries over directly. Torque is not “good and tight.” Torque is a specified installation condition.
One practical installation detail people miss
Cal Poly construction specifications require heavy-duty sleeve anchors to be installed with the sleeve fully engaged in the part being fastened and set to the manufacturer's recommended torque using a torque wrench. The same specification groups sleeve anchors with wedge anchors and undercut anchors and calls for protection of the threads during installation (Cal Poly standard specifications).
If you tighten a sleeve anchor with the sleeve in the wrong position relative to the fixture, you can end up “setting” the anchor without actually building the connection you thought you had.
For small jobs, I keep the tool list short: rotary hammer or hammer drill, the correct masonry bit, a blow-out bulb or compressed-air alternative, a hole brush, a wrench, and a torque wrench for the final set. That last tool is the one most often skipped, and it's the one that separates a guess from an installation.
Common Applications for Deck and Fence
Sleeve anchors earn their keep on exterior projects because they connect the hardware system to the concrete system. Without that connection, the rest of the assembly is just sitting there looking organised.
On decks, the most common use is fastening metal post bases to concrete footings, pads, and piers. The post base may be carrying a guard post, a privacy screen post, or a structural-looking support that still sees real side load in use. In each case, the anchor has to work with the bracket, not just fit through it.
Where they make sense
- Post bases on cured footings where you need a mechanical connection for wood or metal posts.
- Fence brackets and gate hardware mounted into concrete curbs, walls, or pads.
- Railing attachments where a bracket bears against a slab or stair landing.
- Ledger-related accessory hardware attached to concrete where the anchoring condition suits an expansion anchor.
A sleeve anchor is often chosen because it's versatile and familiar. It can suit many deck and fence accessory connections without moving into more specialised anchor types. That's especially helpful for small contractors and property managers who stock a limited but useful range of hardware.
How it fits into the broader hardware package
Real jobs don't stop at the anchor. You're usually buying post base brackets, joist hangers, washers, carriage bolts, screws, hinges, balusters, or gate inserts at the same time. That's why sleeve anchors often show up in the same order as finishing and framing hardware rather than as a standalone item.
For fence and deck work, the anchor choice should also match the environment. Exterior brackets, post caps, and exposed fasteners should make sense as one corrosion strategy. Mixing finishes carelessly is a good way to build a future maintenance problem into a project that looked clean on install day.
The practical use case is straightforward. If the hardware lands on solid concrete and the load is in the wheelhouse of an expansion anchor, sleeve anchors are often a sensible option. If the slab is cracked badly, the edge is too tight, or the application is more structural than it first appears, that's when you stop treating it like simple hardware and reassess the anchor type.
Common Mistakes to Avoid
The most expensive anchor mistakes don't look dramatic in the moment. They look fast. Someone drills, taps the anchor in, tightens it, and moves on without checking whether the concrete, hole, and hardware stack suit the fastener.
The mistakes that keep showing up
- Dirty holes: Drilling dust left in the hole can reduce proper sleeve contact.
- Wrong anchor length: If the fixture is thicker than expected, useful embedment disappears fast.
- Installing near damaged concrete: Cracks, weak edges, and old spalled pads change the whole connection.
- Reusing removed anchors: Once the sleeve has expanded and been worked, it shouldn't be trusted like new hardware.
- Treating all concrete anchors the same: Sleeve anchors, screw anchors, wedge anchors, and adhesive systems each have their place.
Another mistake is ignoring updated code thinking in Canada. Construction Canada notes that CSA A23.3-24 added screw anchors as a recognised post-installed mechanical anchor type and tightened rules on installation, spacing, and no-resetting of post-installed mechanical anchors, which is a sign that anchor selection is getting more specific, not less (Construction Canada on CSA A23.3-24 Annex D updates).
That matters because a lot of retail advice still treats “concrete anchor” as one big category. It isn't.
If you're finishing or protecting the surrounding slab after the hardware work is done, it's also worth understanding how to apply floor sealer so you don't trap moisture issues or create a slippery mess around posts, pads, or entry areas.
Don't confuse a tight nut with a sound installation. An anchor can feel tight and still be wrong for the concrete it's in.
Ensuring Long-Lasting Concrete Attachments
Good concrete fastening is mostly disciplined decision-making. Pick the anchor for the base material and exposure. Respect the geometry. Install it like the manufacturer and the governing rules expect. The hardware usually does its job when the installer does theirs.
What's changed in recent years is that code-aware anchoring has become more explicit. In Canada, Construction Canada notes that CSA A23.3 Annex D requires qualified installation and a 10-second proof-load test tied to published bond stress capacity or steel yield, while City of Toronto footing specs treat anchors and sleeves as precise components rather than casual site hardware (Construction Canada digital edition). That's useful even if you never touch a commercial job, because it reinforces the same lesson small projects teach the hard way: anchor performance lives or dies on details.
What holds up over time
A long-lasting sleeve-anchor connection usually comes down to a short checklist:
- Sound concrete: not just present, but suitable around the hole.
- Enough room: edge distance and anchor spacing that let the concrete work.
- Correct embedment: actual buried engagement, not nominal anchor length.
- Proper tightening: installed to the required torque, not by feel.
- Matching hardware: anchor, bracket, washer, and finish chosen as one system.
That's what separates a repair from a callback. A deck post base, gate bracket, or railing anchor doesn't need mystery. It needs the right fastener in the right place, installed the right way.
If you treat sleeve anchors for concrete as part of the structure instead of as a last-minute accessory, they'll usually repay that respect with a connection that stays quiet and solid.
XTREME EDEALS INC. carries sleeve anchors, wedge anchors, post base brackets, deck screws, joist hangers, hinges, balusters, and the other hardware that usually gets bought together on deck and fence jobs. If you're lining up materials for a concrete-to-hardware connection and want compatible options in one place, take a look at XTREME EDEALS INC..