
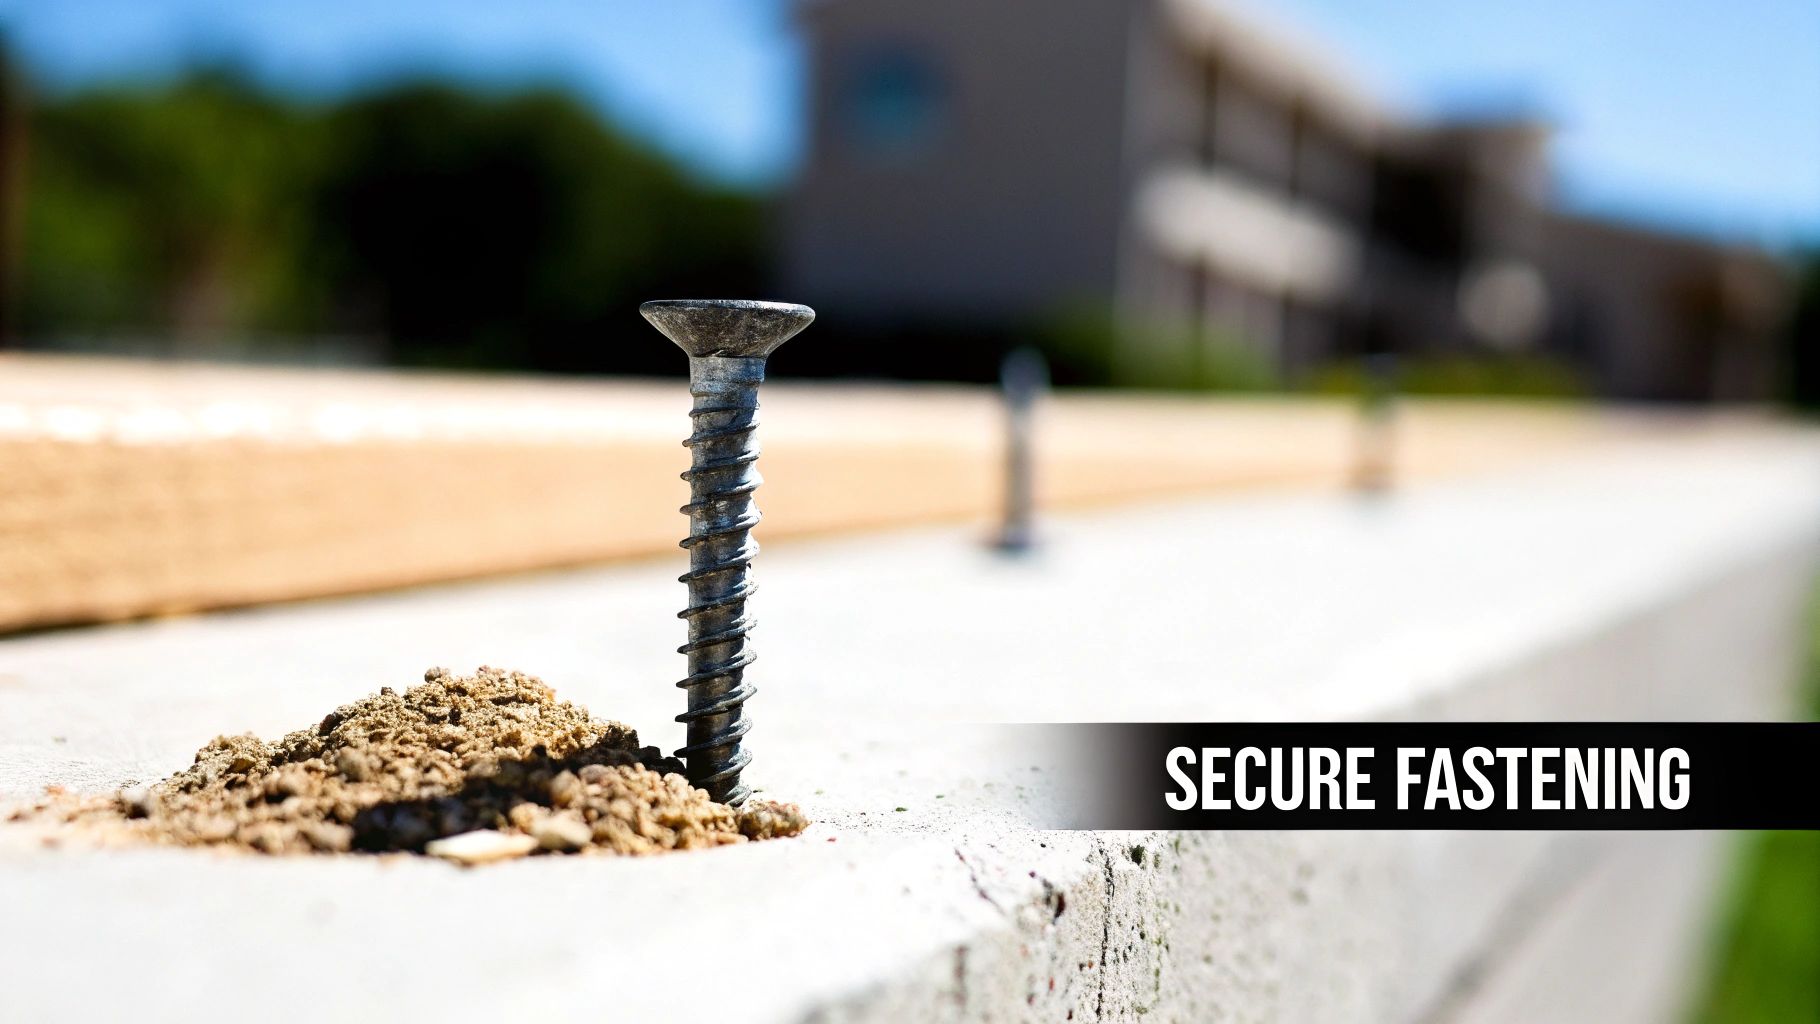
If you've ever tried to drive a regular wood screw into concrete, you know it's a losing battle. That's where concrete screw anchors come in. Think of them as specialized, heavy-duty screws built specifically to bite into tough materials like concrete, brick, and block. Their magic lies in their ability to cut their own threads right into the material, creating an incredibly strong mechanical grip that's also reversible.
This unique design makes them a go-to for all sorts of projects, from locking down deck posts to securing fence brackets with absolute confidence.
What Are Concrete Screw Anchors and Why They Matter
So how do they pull it off? These fasteners are made from hardened steel and have sharp, specialized threads designed to carve a path into a pre-drilled pilot hole.
This self-threading action is what really sets them apart. While traditional expansion anchors work by pushing outwards against the concrete (like a wedge), a screw anchor forms a tight, secure connection without creating that immense outward pressure. For certain jobs, that's a complete game-changer.
The Advantage of a Stress-Free Connection
The biggest win here is the reduced risk of cracking or blowing out the concrete. If you've ever tried to install an anchor too close to the edge of a slab, you know the heartbreak of seeing the concrete splinter from the force of an expansion anchor. It can compromise the entire connection.
Concrete screw anchors almost eliminate this problem.
Because they don't rely on expansion, concrete screw anchors can often be installed closer to edges and nearer to each other than other anchor types. This gives you way more flexibility on the job site.
This makes them the perfect choice for critical tasks like:
- Attaching ledger boards for decks: You need a rock-solid connection to the foundation wall that won’t risk damaging the concrete it’s holding onto.
- Mounting post bases: Whether you're building a fence or a pergola, screw anchors give you a solid footing without putting the concrete pad under stress.
- Securing railing systems: For safety-critical components like handrails, their clean installation and powerful grip are exactly what you need.
Simplicity and Reliability for Every Skill Level
Another reason everyone loves them is just how simple they are. It's a one-piece design with a straightforward installation process—no fumbling with separate nuts, sleeves, or washers.
For a seasoned contractor, that means a faster, more predictable job. For the weekend DIYer, it means less chance of making a mistake.
At Xtreme eDeals, we stock a huge selection of these fasteners because we know they just work. Whether you’re building a brand-new deck from the ground up or just mounting a heavy shelf in your garage, our concrete screw anchors deliver the strength and simplicity you need to get it done right the first time.
Picking the right concrete screw anchor is more than just grabbing a box off the shelf. It’s a decision that has a real impact on the safety, strength, and lifespan of your project. To get it right, you need to look at four things: diameter, length, head style, and coating. Each one plays a critical role.
Sizing Up Your Anchor Diameter and Length
Think of the anchor’s diameter as its muscle. A thicker anchor means more strength and a higher load capacity. For lighter jobs like fastening down electrical conduit or small brackets, a 1/4-inch diameter screw is usually plenty. But when you’re stepping up to structural work—like attaching a deck ledger board or heavy-duty post bases—you need the serious holding power of a 3/8-inch or 1/2-inch anchor to handle the much greater forces involved.
Once you’ve got the diameter sorted, figuring out the length is straightforward. It’s all based on a simple formula:
Fixture Thickness + Minimum Embedment Depth = Required Anchor Length
The minimum embedment depth isn't a guess; it's a specific measurement provided by the manufacturer that tells you how deep the anchor needs to go into the concrete to hit its full strength. For example, if you're attaching a standard 1.5-inch thick piece of lumber and the anchor needs at least 1.75 inches of embedment, you'll need an anchor that's a minimum of 3.25 inches long.
Always round up. Picking an anchor that’s a little longer is fine, but one that’s too short won’t grip the concrete properly. That’s a major safety risk you don’t want to take.
Matching Head Style and Coating to Your Project
The head style is all about function and finish. In our Xtreme eDeals fasteners collection, you'll primarily see two types: hex and flat head.
- Hex Head: This is your go-to workhorse. The hex shape gives you a solid grip with an impact driver or socket wrench, making it perfect for most jobs, especially when you need to apply a lot of torque to drive it home. Our Blue Climaseal Hex Head anchors are the most popular choice for outdoor structural work.
- Flat Head (Countersunk): When you need a clean, smooth finish, the flat head is your best bet. It sits flush with the surface of whatever you're fastening, so there are no snags. It’s ideal for things like railings or any finished surface where looks matter. You'll find these in both zinc and blue-coated finishes in our shop.
Finally, the anchor’s coating is what protects your work from the elements. For indoor projects in dry spots, a standard zinc coating will do the job. But if your project is outdoors, like a deck or fence, or in a damp area like a basement, you absolutely need better corrosion resistance.
Look for anchors with a specialized blue coating or ones that are mechanically galvanized. These are built to stand up to moisture and keep rust at bay, which is non-negotiable for outdoor structures. This is especially true in harsh climates. For example, our hex-head concrete screw anchors boast embedment depths of 2-3/4 inches for 3/8-inch diameters, giving them enough strength to hold up to 1,500 lbs of shear force in 4,000 psi concrete. That's the kind of performance needed for coastal properties getting hammered by winds up to 100 mph. For a deeper dive into these industry trends, you can check out this detailed report on anchoring fasteners from Grand View Research.
Your Step-by-Step Installation Guide
Getting a professional-grade installation with concrete screw anchors is much simpler than you might think. It really just comes down to following a few key steps in the right order. Nailing this process ensures every single anchor gives you its maximum holding power for a connection you can trust.
Let’s walk through it, step-by-step. The whole thing starts with the most critical tool choice you’ll make: the drill bit.
Step 1: Select the Correct Drill Bit
The foundation of a rock-solid anchor is a pilot hole drilled to the perfect size. For this, you absolutely must use an ANSI-standard carbide drill bit. I can't stress this enough—it's not a suggestion, it's a requirement for the anchor to work as engineered.
The rule is simple: the diameter of your drill bit must exactly match the diameter of the concrete screw. A 3/8-inch anchor demands a 3/8-inch bit. No wiggle room here. If the hole is too big, the threads have nothing to bite into. Too small, and you’ll never get the screw in without it binding or snapping.
Step 2: Drill the Pilot Hole
With the right bit locked into your hammer drill, you’re ready to make the hole. The depth of the hole is just as important as the diameter. A good rule of thumb is to drill the hole at least 1/2-inch deeper than the anchor's final embedment depth.
Why the extra space? This little trick creates a reservoir at the bottom of the hole for dust and debris to fall into. It's a simple step that prevents that grit from getting in the way and stopping the anchor from seating fully.
This quick flowchart breaks down how to pick your anchor before you even touch the drill.
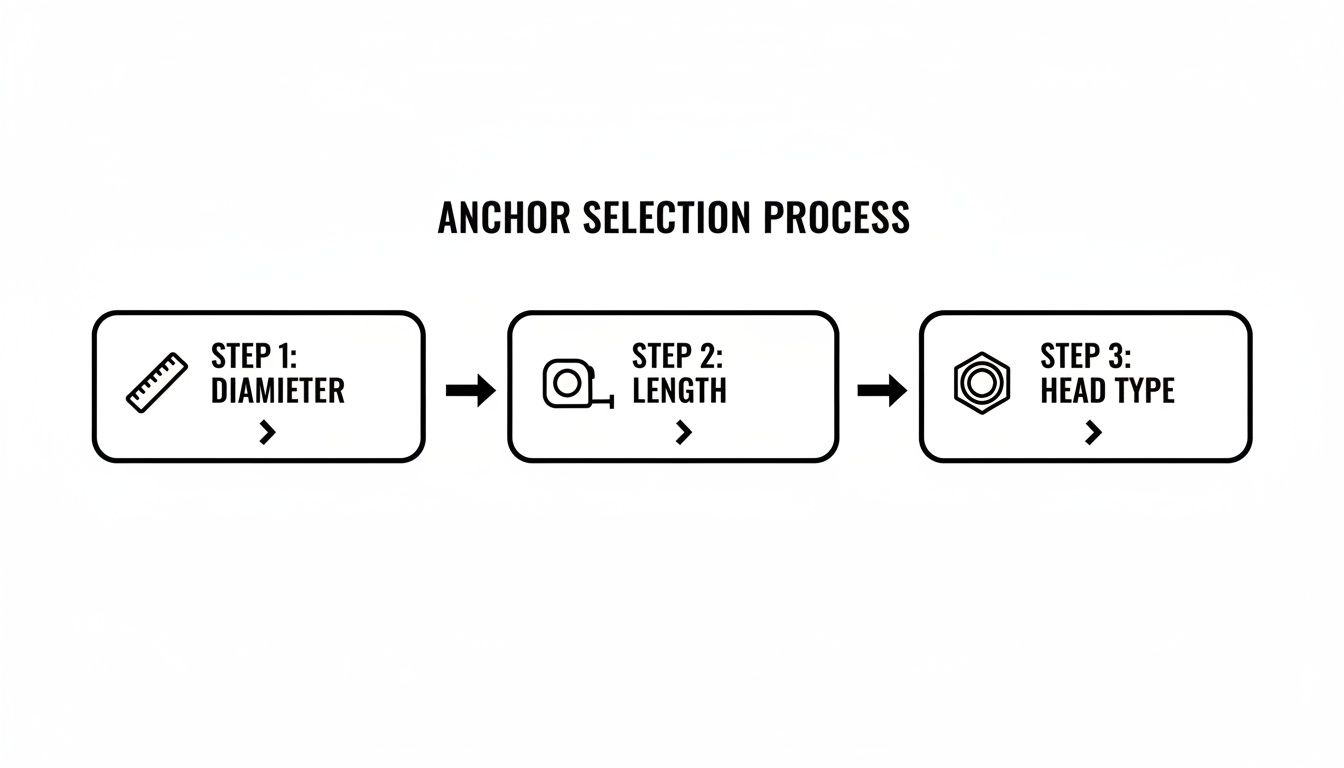
As you can see, it’s a logical flow: pick the diameter for the strength you need, the length for proper embedment, and the head style for the job at hand.
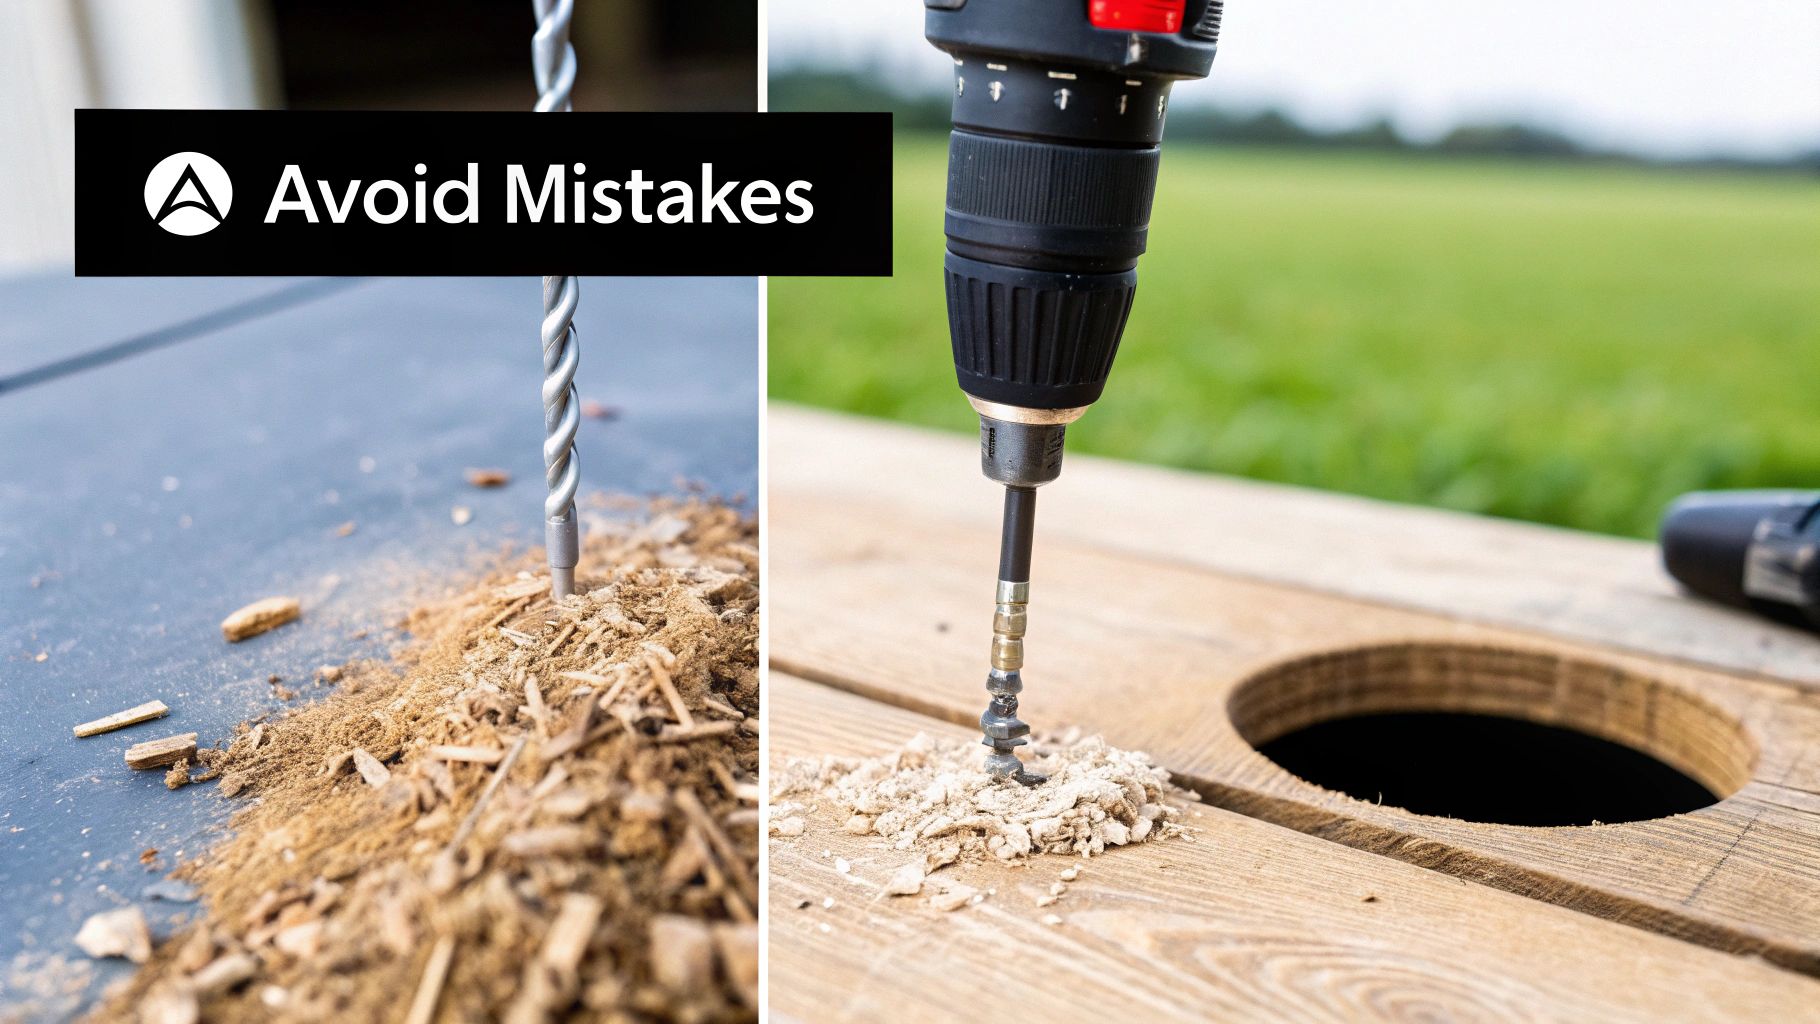
Step 3: Clean the Hole Thoroughly
Once you’ve drilled the hole, it's going to be full of fine concrete dust. Skipping the cleanup is probably the single most common mistake people make, and it can seriously weaken the anchor’s grip. The threads need to bite into clean, solid concrete to create that powerful mechanical lock.
A clean hole is a strong hole. Taking just 30 seconds to clean out the dust can be the difference between a connection that holds for decades and one that fails under load.
Grab a wire brush and give the inside of the hole a good scrub to loosen up any packed-in dust. Right after, use compressed air or a hand pump to blow everything out. I always recommend doing this brush-and-blow cycle at least twice to be sure it's spotless.
Step 4: Drive the Anchor Securely
Time for the final step. Place your fixture over the clean pilot hole, pop the concrete screw anchor through it, and start driving it in with an impact driver or a socket wrench. The key is to use a steady, smooth motion.
Drive the screw until the head sits down firmly against your fixture. But be careful not to over-torque it. If you go too far, you can strip out the very threads you just cut into the concrete, ruining the connection. You’re looking for a snug, solid fit—not brute force.
For those tackling bigger jobs like decks, you can find more specialized advice in our guide to support for deck construction.
Common Installation Mistakes and How to Avoid Them
Even a tiny mistake during installation can slash the holding power of a concrete screw anchor, turning what should be a rock-solid connection into a serious weak point. The good news? These slip-ups are almost always preventable. Once you know what to watch for, you can make sure your project is built to last.
Honestly, the integrity of your whole project hinges on getting these details right. Whether you're building decks, fences, or structural supports, every single anchor needs to perform exactly as it's designed to. For DIYers and pros building these projects—the kind of folks who shop at XTREME EDEALS INC.—these anchors are what keep post bases and joist hangers from ever budging.
It’s no surprise that concrete is the foundation of choice. The U.S. anchoring fasteners market hit USD 668.3 million, and concrete applications made up a whopping 41.12% of that. You can dig into more stats about the construction anchor industry from Future Market Insights if you're curious.
Let’s walk through the most common installation blunders and, more importantly, how to sidestep them.
Using the Wrong Drill Bit Size
This is, without a doubt, the number one mistake people make. A concrete screw works by carving its own threads directly into the concrete, creating a powerful mechanical grip.
- What Went Wrong: If your drill bit is too big, the screw’s threads have nothing to bite into. It’ll just spin uselessly in the hole. If the bit is too small, the anchor will jam up, forcing you to use way too much muscle. You risk either snapping the screw clean off or cracking the concrete around it.
- How to Fix It: This one’s simple: always use an ANSI-standard carbide drill bit with a diameter that exactly matches the anchor’s specified size. A 3/8-inch anchor demands a 3/8-inch bit. There’s no wiggle room here—this step is non-negotiable for getting that perfect thread engagement.
Failing to Clean the Drilled Hole
After you drill, the hole is choked with fine concrete dust and grit. Leaving that stuff in there is a surefire way to get a weak connection.
Research shows that a dirty hole can reduce an anchor's pull-out strength by as much as 50%. The screw's threads need to engage with solid concrete, not a layer of loose dust.
- What Went Wrong: All that dust acts like a barrier, preventing the threads from properly cutting into and locking with the base material. The anchor might feel tight when you first drive it in, but it won't have the real holding power it needs and could easily fail under load.
- How to Fix It: After drilling, grab a wire brush and give the inside of the hole a good scrub. Follow that up with compressed air or a hand pump to blow every last bit of debris out. Repeat the brush-and-blow cycle at least twice to make sure that hole is spotless.
Over-Tightening the Anchor
It’s so tempting to just keep cranking on that impact driver until the screw won't move another millimetre, but more torque isn't always a good thing.
- What Went Wrong: Applying too much force can actually strip the very threads the anchor just worked so hard to cut into the concrete. Once those threads are stripped, the connection is shot. You can't trust it.
- How to Fix It: Drive the screw in smoothly until the head sits down firmly against your fixture. You're aiming for a snug fit, not maximum torque. If you suddenly feel the screw spin freely or lose resistance, you’ve gone too far. Stop immediately, back the anchor out, and install a new one in a fresh hole.
Comparing Screw Anchors to Other Fasteners
Walk into any hardware store, and the wall of fasteners can be a bit overwhelming. You've got options. While concrete screw anchors are incredibly versatile, it helps to know how they stack up against the old guard—like traditional wedge anchors and sleeve anchors—to make the right call for your project.
Each type has its own personality, its own strengths, and its own ideal job site. The right choice comes down to what you value most: pure speed, raw holding power, the ability to undo a mistake, or how close you can safely work to a concrete edge.
Speed, Removability, and Stress
Here’s where concrete screw anchors really pull away from the pack: they’re fast and they’re forgiving. Think about it—they cut their own threads into the concrete. Zip one in with an impact driver, and you’re done. But the real game-changer is that you can just as easily back it out. If a fixture needs adjusting or you're setting up something temporary, this is a massive advantage you just don't get with other types.
On the flip side, wedge anchors and sleeve anchors are a one-and-done deal. Once you hammer them into place and tighten the nut, they are in there for good.
Wedge and sleeve anchors get their bite by expanding outward, creating an immense outward force against the walls of the hole. This creates a powerful friction hold, but it also puts a ton of stress on the concrete, which is a big no-no if you're working near an unsupported edge.
This difference is everything. The fact that a concrete screw anchor doesn't expand makes it the clear winner when you need to fasten something close to the edge of a slab without worrying about blowing out a chunk of concrete.
A Head-to-Head Comparison
To put it all in perspective, let's break down the key differences. This handy table gives you a quick snapshot of where each anchor shines.
Anchor Type Feature Comparison
| Feature | Concrete Screw Anchors | Wedge Anchors | Sleeve Anchors |
|---|---|---|---|
| Installation Speed | Very Fast | Moderate | Moderate to Slow |
| Removability | Yes, easily removable | No, permanent installation | No, permanent installation |
| Suitability Near Edges | Excellent, low stress | Poor, high expansion stress | Fair, moderate expansion |
| Hole Size Sensitivity | High, requires precise bit | Moderate | Moderate |
| Common Use Cases | Deck ledgers, railings, temporary fixtures | Structural columns, heavy machinery | Handrails, window frames, brick |
As you can see, concrete screw anchors truly own the categories of flexibility and low-impact installation. They give you holding power without the high stress.
For a closer look at how the traditional expansion anchors do their job, our guide on using wedge anchors in concrete is a great resource. But for most modern deck, fence, and general-purpose projects where you need speed, precision, and peace of mind, it’s tough to argue against the smart design of a concrete screw anchor.
Your Concrete Screw Anchor Questions Answered
Even the best-laid plans run into questions on the job site. We get asked about concrete screws all the time, so we've pulled together the most common ones our customers have. Let's get you some clear, straightforward answers so you can build with confidence.
Can I Reuse a Concrete Screw Anchor?
This is easily the most frequent question we hear, and the answer is a hard no. You should never reuse a concrete screw anchor.
Think of it this way: the first time you drive that screw, its specialized threads cut a brand-new, custom path into the concrete. This creates a perfect mechanical interlock, which is where the anchor gets its incredible holding power. When you back it out and try to drive it in again—even in the same hole—those threads can't bite into fresh material. They just slide back into the old grooves, resulting in a much weaker grip and a serious drop in performance. For safety and a rock-solid connection, always grab a new anchor for every single installation.
What Is the Difference Between Blue and Silver Anchors?
The colour of an anchor isn't just for show; it's a quick visual cue for its level of protection against the elements. The real difference is the coating that’s applied to the steel.
- Silver Anchors: These typically have a standard zinc plating. This gives them a basic layer of rust protection, making them perfectly fine for dry, indoor projects where moisture isn't a problem.
- Blue Anchors: Our blue concrete screw anchors feature a high-performance Climaseal® coating. This is a much more advanced finish designed for serious corrosion resistance. It's the go-to choice for any outdoor project like a deck or fence, or for damp environments like basements.
Opting for the blue-coated anchor for any exterior work is a small choice that ensures your project stays secure and rust-free for the long haul.
How Close to a Concrete Edge Can I Install an Anchor?
One of the great things about concrete screw anchors is their ability to get closer to an edge than traditional expansion anchors without causing a disaster. That said, you can't just install them anywhere. Pushing the limits too far can crack or "blow out" the concrete.
As a solid rule of thumb, aim to keep a minimum edge distance of five anchor diameters and a minimum spacing between anchors of ten anchor diameters. For a common 3/8-inch anchor, that means staying at least 1-7/8 inches away from any unsupported edge.
Always double-check the manufacturer's technical data sheets for specific guidelines, as these distances can change based on the anchor's size and the strength of your concrete. Following these spacing rules is absolutely critical for preventing a blowout, which is when the concrete fractures and the anchor completely loses its grip.
Do I Need a Special Drill for Installation?
You don't need a truck full of specialized gear, but you definitely need the right tool for the job. A standard hammer drill is a must for creating the pilot hole in concrete, brick, or block. A regular cordless drill just doesn't have the percussive action needed to get through masonry without burning out.
Just as important is the drill bit itself. You need a high-quality, ANSI-standard carbide-tipped bit that is the exact diameter specified for the anchor you're using. A hole that's too big or too small will prevent the threads from getting the aggressive bite they need for maximum holding power.
At XTREME EDEALS INC., we stock the high-quality fasteners and hardware you need to get the job done right. Explore our full selection and build your next project with confidence by visiting us at https://www.xtremeedeals.ca.