
You're standing in front of a brick wall with a drill in one hand and a packet of sleeve anchors in the other. The fixture looks straightforward, but the wall may be solid brick, hollow masonry, or brick veneer over a separate structural frame. Choosing the anchor before identifying that construction is how a tidy installation turns into a spinning fastener, cracked brick, or a fixture that never had a reliable load path.
Sleeve anchors for brick can work very well in solid masonry under moderate loads. They're less forgiving when the hole lands near an edge, inside a mortar joint, or in a thin veneer. The practical decision comes down to the wall's construction, the anchor's tested installation requirements, the load direction, the environment, and the space available around each hole.
Why Brick Changes the Anchor Decision
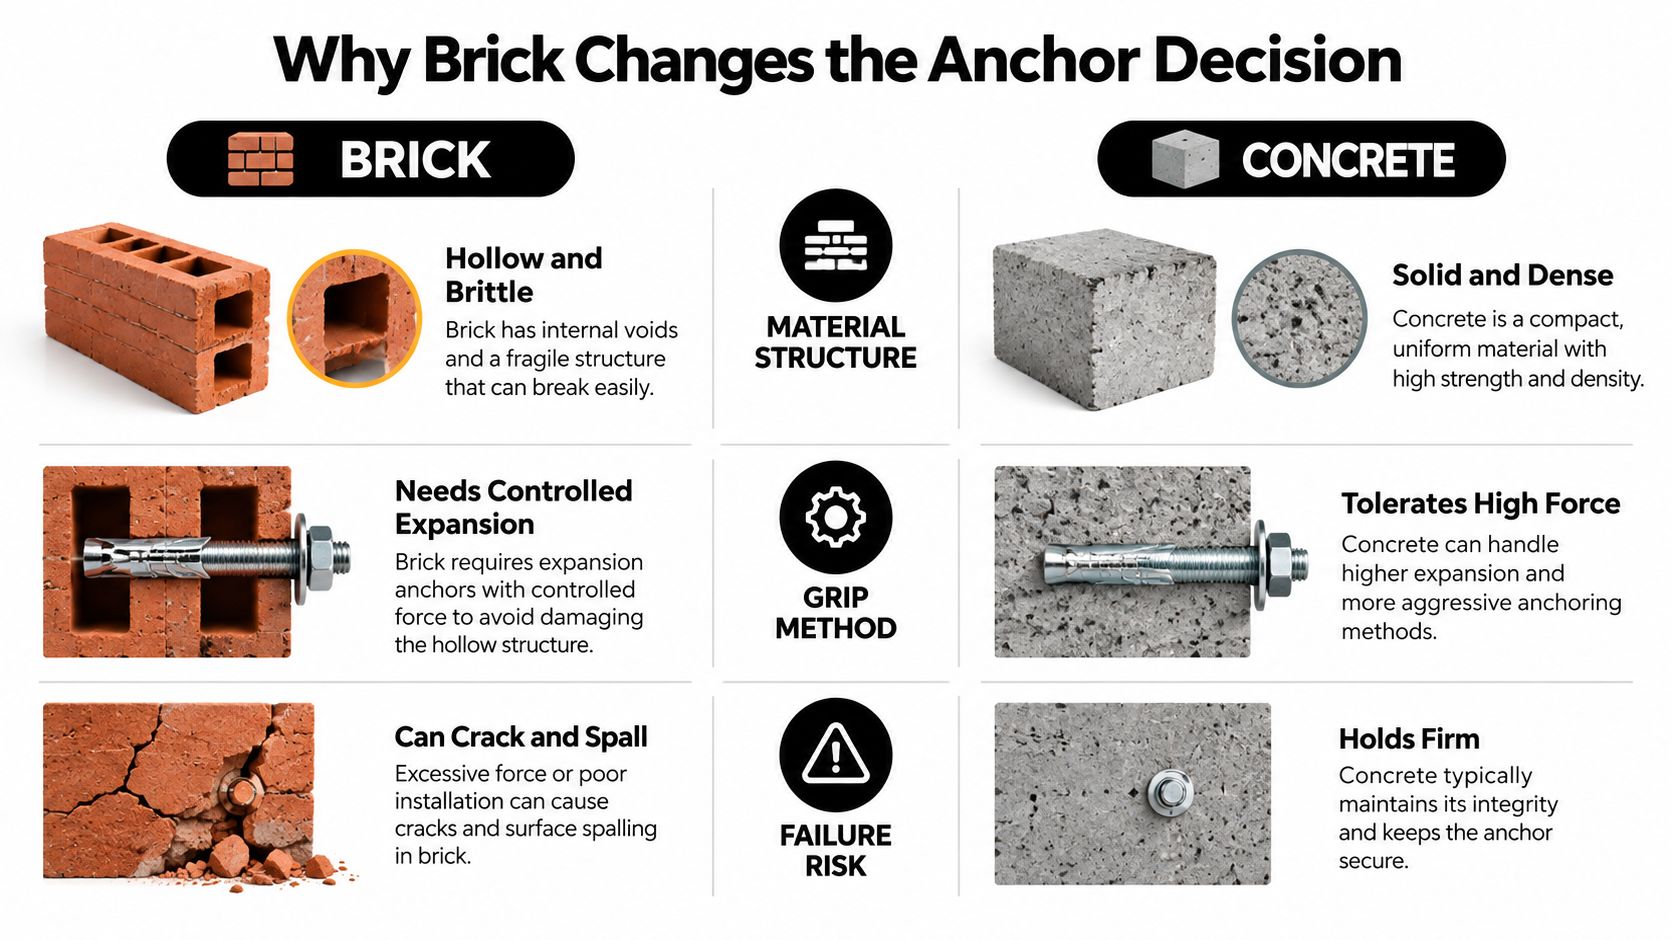
A drill hole does not reveal the whole wall. Before selecting sleeve anchors for brick, identify whether the support is solid brick, hollow masonry, or brick veneer over a separate structural frame. Solid brick provides substantial material for expansion. Veneer may be only a facing layer over a cavity, so expansion can crack the face without creating a dependable load path.
Brick condition changes the risk. Hard, dense units generally tolerate controlled expansion better than soft, weathered brick, which can fracture around the hole. Mortar joints are weaker still. An anchor placed in mortar may feel tight while the surrounding material provides far less resistance than the centre of an intact brick. Check the layout, avoid damaged areas, and do not treat veneer as solid structural masonry.
Where sleeve anchors fit
A sleeve anchor distributes expansion along a sleeve instead of concentrating it at one small point. That makes it a practical medium-duty option for solid brick, block, and concrete, when the manufacturer's requirements match the substrate and the hole is drilled accurately. Canadian product documentation describes a sleeve-and-cone assembly that locks into the drilled hole as the bolt is tightened. Performance depends on the specified drill diameter, embedment, and torque, so those values must come from the selected product rather than guesswork (Canadian sleeve anchor product documentation).
Material selection follows exposure. Zinc-plated anchors suit many indoor installations, while stainless steel is the safer choice for outdoor or damp conditions where corrosion can reduce service life.
Sleeve anchors are not a universal replacement for through-bolts, adhesive anchors, or engineered connections. For a frame or decorative fixture, consult this picture hanging on brick guide. For heavier or safety-critical loads, confirm the wall construction and use a connection designed for that load path.
How a Sleeve Anchor Actually Grips
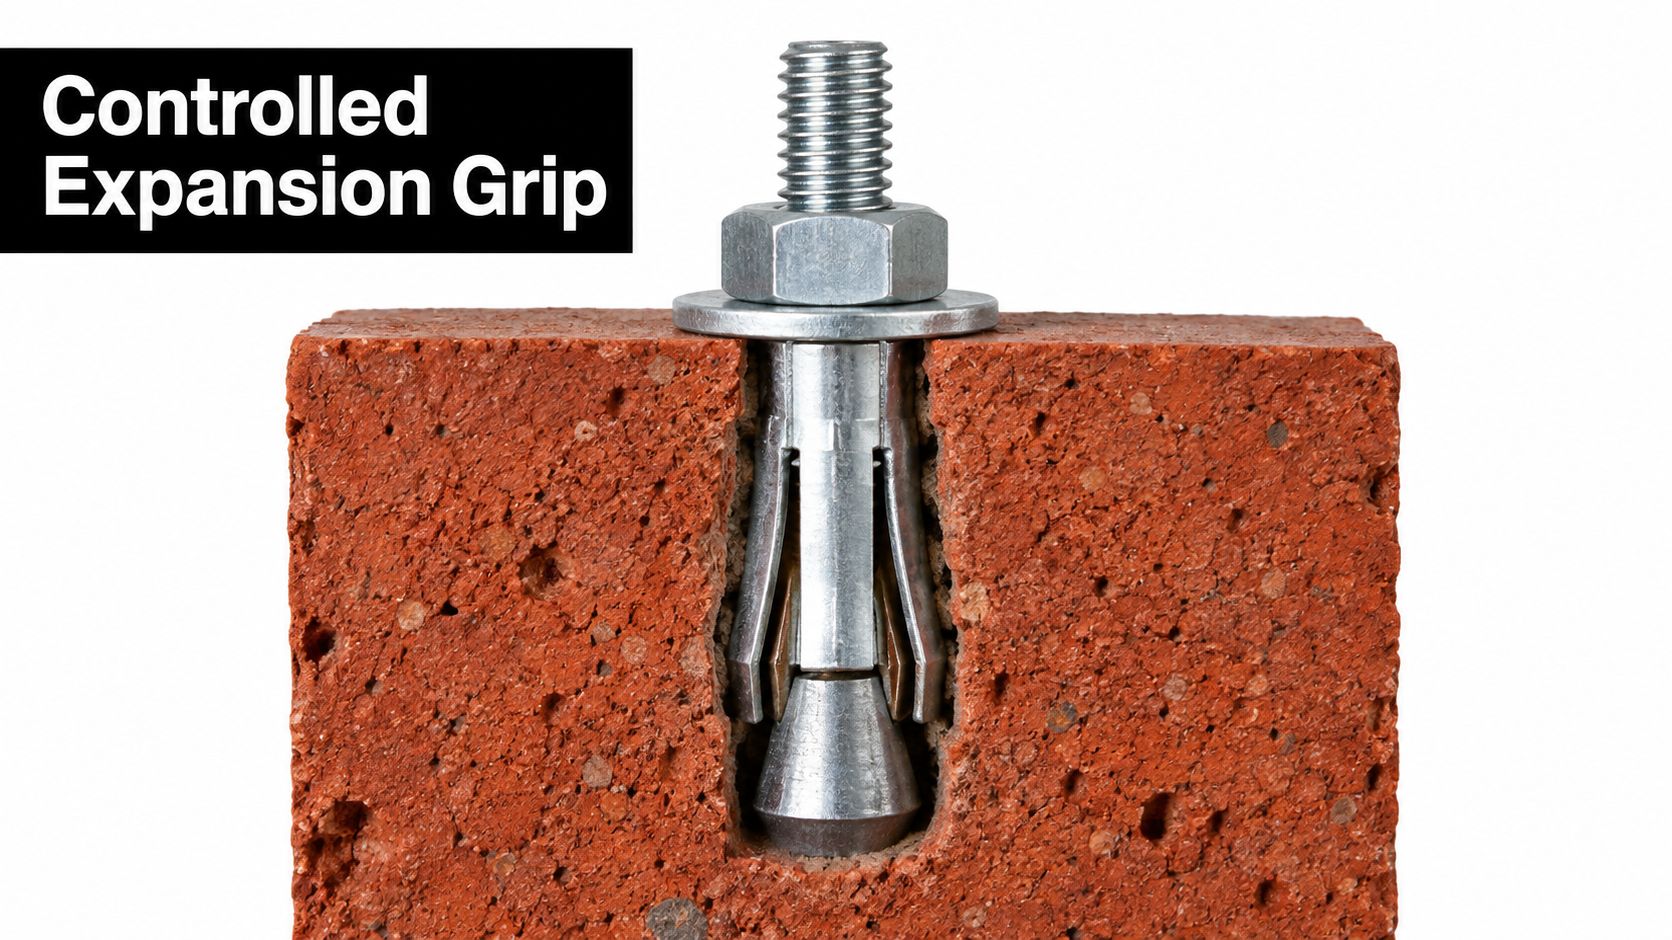
A sleeve anchor has four working parts: the threaded stud or bolt, the expansion sleeve, the tapered cone, and the washer and nut. The sleeve surrounds the lower part of the stud. The cone sits at the end, and tightening the nut draws the cone into the sleeve.
As the cone rises, the split sleeve pushes outward against the wall of the drilled hole. Think of squeezing a soft lead pencil inside a steel tube. The pencil presses outward against your fingers, but the sleeve anchor does that with a steel sleeve and a tapered metal cone. The resulting grip comes from contact and friction along the sleeve's expanded surface, not from one isolated point.
What each part contributes
The stud and thread carry the fixture load into the anchor assembly. The thread also allows the nut to pull the cone into the sleeve during tightening. The grade and material matter, particularly where corrosion or sustained loading is involved.
The sleeve length and split pattern control how the anchor expands inside the masonry. A sleeve that's too short for the hole or fixture may not develop the specified contact area. A sleeve that reaches into a void or sits partly in a mortar joint can't transfer load as the catalogue assumes.
The washer spreads the nut's clamping force across the fixture. Without the right washer, a soft bracket can deform before the sleeve is properly expanded.
The nut, often hex or acorn style, supplies the tightening action. The correct torque is part of the anchor's tested system. Tightening by feel is unreliable because a hard brick unit and a friable brick unit can respond very differently to the same wrench effort.
Practical rule: The anchor only performs as a system. Diameter, hole size, embedment, cleaning, and torque must come from the same product specification.
That distributed expansion is why sleeve anchors can suit variable solid masonry better than fasteners that demand a highly consistent, deep concrete base. It still relies on good brick around the full sleeve, so it won't rescue veneer or hollow construction.
Sizing Diameter, Length, and Embedment
A 3/8 in sleeve anchor provides a useful North American reference, but its specifications apply to a matched anchor system, not to every brick installation. One Canadian product listing specifies a 3/8 in drill bit, 1 1/2 in minimum installation depth, and 14 ft-lb installation torque. Its published ultimate strengths are 3,100 lb in tension and 3,040 lb in shear in 4,000 psi concrete (Grainger Canada sleeve anchor specifications).
Those figures should be read as a set. Match the drill diameter, hole depth, sleeve geometry, cone, and torque to the same manufacturer's instructions. Concrete values also do not automatically represent capacity in solid brick, where unit strength, condition, and placement affect performance.
| 3/8 in Sleeve Anchor Sizing Reference | Specification | Practical meaning |
|---|---|---|
| Drill bit size | 3/8 in | Use the diameter listed for that anchor model |
| Minimum embedment or installation depth | 1 1/2 in | Confirm the manufacturer's depth definition and allow for fixture thickness |
| Tightening torque | 14 ft-lb | Use a torque wrench where controlled tightening is specified |
| Use case | Brick, block, or concrete where approved | Confirm that the base is solid masonry suitable for expansion |
Length is not the same as embedment
Overall anchor length must cover the fixture, washer, nut engagement, and the required portion inside sound masonry. Extra length does not create useful capacity if the sleeve ends in a void, a weak joint, or material outside the structural brick.
Measure the fixture before drilling. Then identify where the sleeve will sit once the anchor passes through the bracket. The specified embedment must remain in the base material, not somewhere inside the wall assembly. In a thick solid-brick wall, that depth is usually straightforward to establish. In brick veneer, the same calculation can produce a misleading result because the anchor may pass through the veneer without reaching a reliable structural backup.
Anchor diameter also has to suit the masonry. California masonry provisions list maximum anchor diameters by nominal masonry size, including 1/2 in for 6 in masonry, 3/4 in for 8 in, 7/8 in for 10 in, and 1 in for 12 in masonry (California masonry provisions on anchor diameter). These limits do not replace the product specification, but they show why a larger anchor is not automatically a better choice. Select the diameter, length, embedment, and torque as one installation package, then confirm that the hole will sit fully in sound brick.
Edge Distance, Spacing, and Centering in Brick
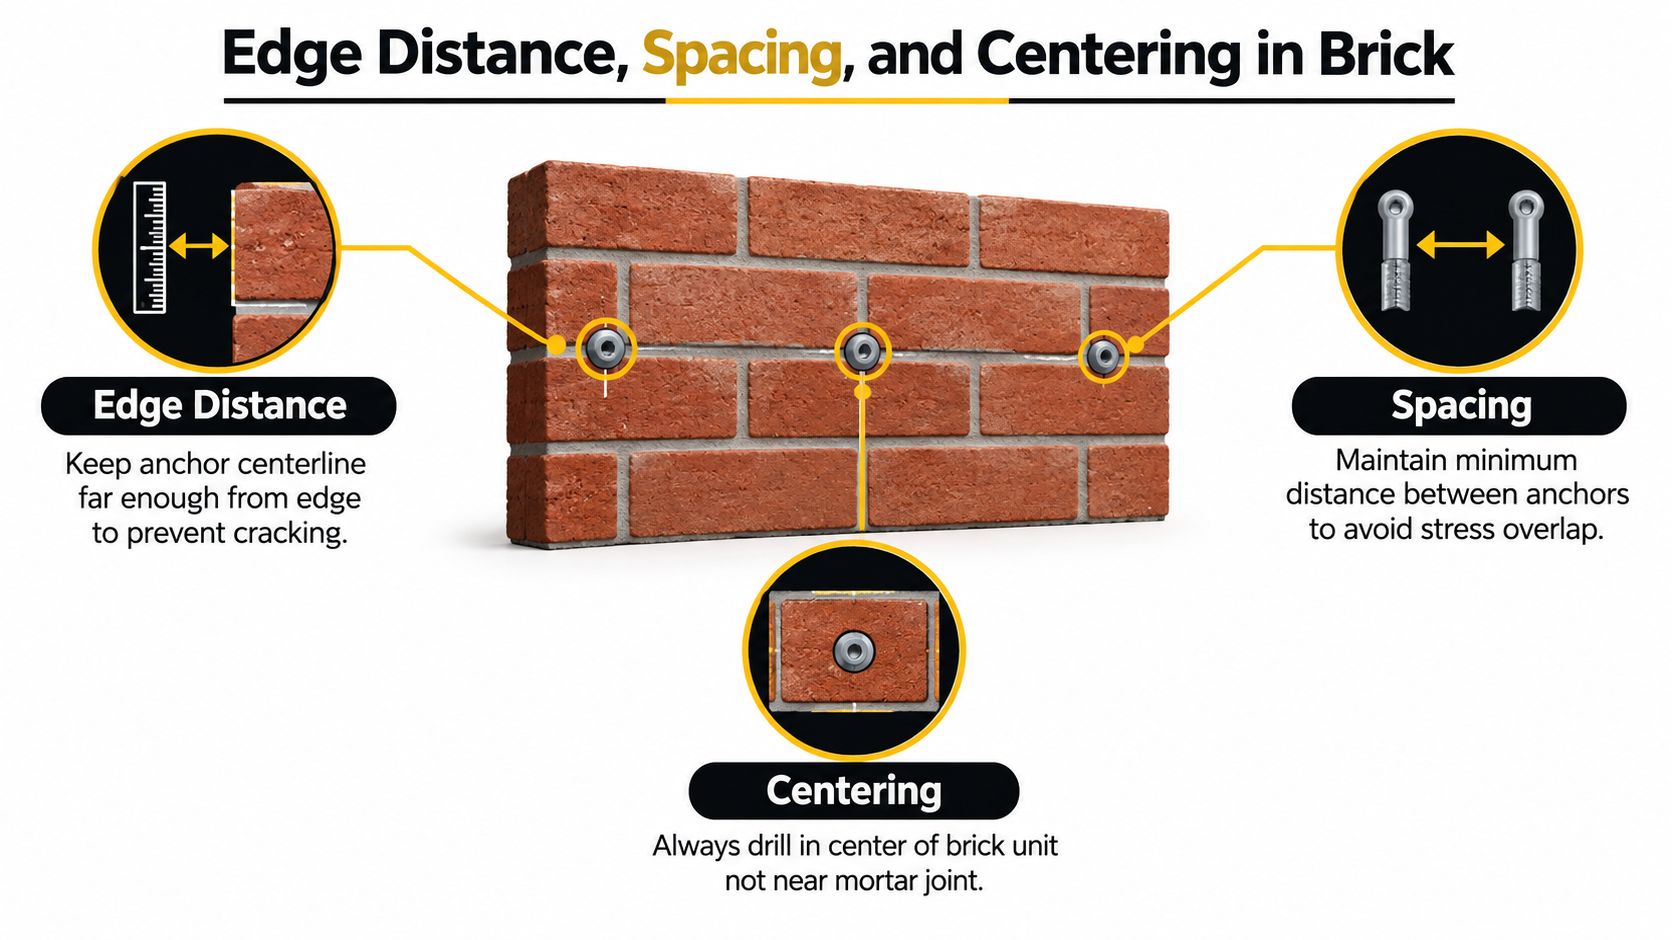
A sleeve anchor can fail even with the correct diameter and torque if the hole is poorly located. Edge distance runs from the anchor centreline to the nearest edge of the brick unit. Spacing is the distance between adjacent anchor centrelines. Centering places the hole in the body of the masonry unit, away from a mortar joint or corner.
Solid brick needs surrounding material to contain the expanding sleeve. A hole too close to an edge can split the brick face or break a cone of masonry from the surface. The anchor may still look secure while its holding capacity has dropped. Treat visible movement, cracking, or a hole that breaks into a joint as a layout failure, not a torque problem.
Mark the masonry before you drill
Find the centre of the brick first, then check whether the fixture holes can reach that location. If a bracket slot lands over a joint or near an edge, move the bracket or revise the layout. For several anchors, mark every hole before drilling. This prevents adjacent holes from crowding each other and keeps the final anchor out of a mortar joint.
The ESA guidance on expanding anchors in brick and block separates structural, solid masonry from brick veneer and stresses intimate contact between the expanding anchor surface and the masonry. In practice, the sleeve needs sound brick around its full expansion zone. A veneer wall may have a narrow face shell, a cavity, and a separate backup wall, so the apparent centre of the brick does not automatically provide a suitable anchor location.
California retrofit guidance shows how layout changes with the application. In unreinforced masonry walls, anchors are installed at roof and floor levels with a maximum spacing of 6 feet on centre, must resist at least 200 pounds per linear foot or 0.9 times the seismic design force, whichever is greater, and must be placed within 2 feet of wall corners (California seismic retrofit guidance). These provisions address a specific seismic retrofit, not a general shelf or bracket, but they show that spacing and corner placement require design judgment.
Avoid corner drilling unless the manufacturer or engineer approves the arrangement. The same caution applies to hollow units. California provisions require anchor bolts in grouted cells to maintain specified grout clearances and to be solidly embedded in grout (California hollow masonry anchor requirements). If the hole cannot stay within sound, fully supported masonry, choose a fastening method rated for that wall construction instead of relying on a sleeve anchor designed for solid brick.
Real Load Ratings and What They Mean in Brick
Catalogue ratings are reference points, not field guarantees. The Canadian listing reports 3,100 lb tension and 3,040 lb shear in 4,000 psi concrete for a 3/8 in sleeve anchor, approximately 1,406 kg and 1,379 kg. Those figures describe ultimate performance in controlled concrete, not a working load for every brick wall.
Mounting direction can also change the result. A Canadian listing gives one sleeve anchor a rating of 192 kg ceiling-mounted and 227 kg wall-mounted in concrete, block, or brick. A larger 5/8 in SKU is listed at 667 kg ceiling-mounted and 1,143 kg wall-mounted for concrete or block (Canadian sleeve anchor orientation and capacity listings). The approximate pound values are 423 lb and 500 lb, followed by 1,470 lb and 2,520 lb.
| 3/8 in Sleeve Anchor Capacity Comparison | Tension | Shear |
|---|---|---|
| Published 4,000 psi concrete rating | 1,406 kg / 3,100 lb | 1,379 kg / 3,040 lb |
| Solid brick project assumption | Use a manufacturer or engineer-approved masonry value | Use a manufacturer or engineer-approved masonry value |
| Hollow brick or veneer | Do not apply concrete rating | Do not apply concrete rating |
Brick changes the calculation
Concrete is commonly used for published anchor testing because its properties are controlled. Sound solid clay brick can have different strength and failure modes, while hollow brick and brick veneer may provide much less dependable support. Pull direction, fixture stiffness, edge distance, spacing, hole quality, and the condition of the mortar or brick all affect capacity.
Material and exposure matter too. Zinc-plated anchors may suit dry indoor work, but exterior moisture can call for stainless steel or another finish approved for the site conditions. That choice affects corrosion resistance, not a concrete load rating.
For sustained loads, vibration, overhead fixtures, or public-facing installations, treat the published ultimate value as test data. Set the allowable working load using approved product information or a qualified designer. A concrete anchor bolts selection page can help compare fastener families, but a concrete rating still does not become a brick rating.
Installation Steps That Prevent Failures
On a brick wall, a tight nut does not prove a sound installation. The usual failures start earlier, with the wrong bit, dust in the hole, inadequate embedment, or an anchor placed in weak material. Each step below addresses one of those problems.
Drill, clean, and seat
Match the carbide-tipped masonry bit. For the documented 3/8 in example, use a 3/8 in bit. An oversized hole can let the sleeve spin instead of pressing against the brick. An undersized hole can stop the anchor before the sleeve and cone reach their working position.
Drill to the specified depth. The listed 3/8 in anchor requires 1 1/2 in minimum installation depth, as noted in the product data. Drill slightly beyond the sleeve depth where the instructions permit, leaving room for dust and the cone without allowing either to bottom out before the fixture is tight.
Clean the hole fully. Brush the hole with the correct wire brush, then use compressed air or a vacuum. Brick dust left on the wall can reduce contact between the expanded sleeve and the masonry. In softer or weathered brick, inspect the hole after cleaning rather than assuming the surrounding material is sound.
Insert the anchor through the fixture. Centre it in the brick unit, away from a mortar joint where the design calls for solid brick. Tap it only as needed. If the sleeve does not enter smoothly, stop and check the hole. Forcing it can damage the sleeve or fracture the brick around the opening.
Tighten to the catalogue torque. The documented 3/8 in example specifies 14 ft-lb. Use a torque wrench when the installation matters. Too much torque can spall the face or crush softer brick. Too little leaves the cone partly engaged and may allow movement under load.
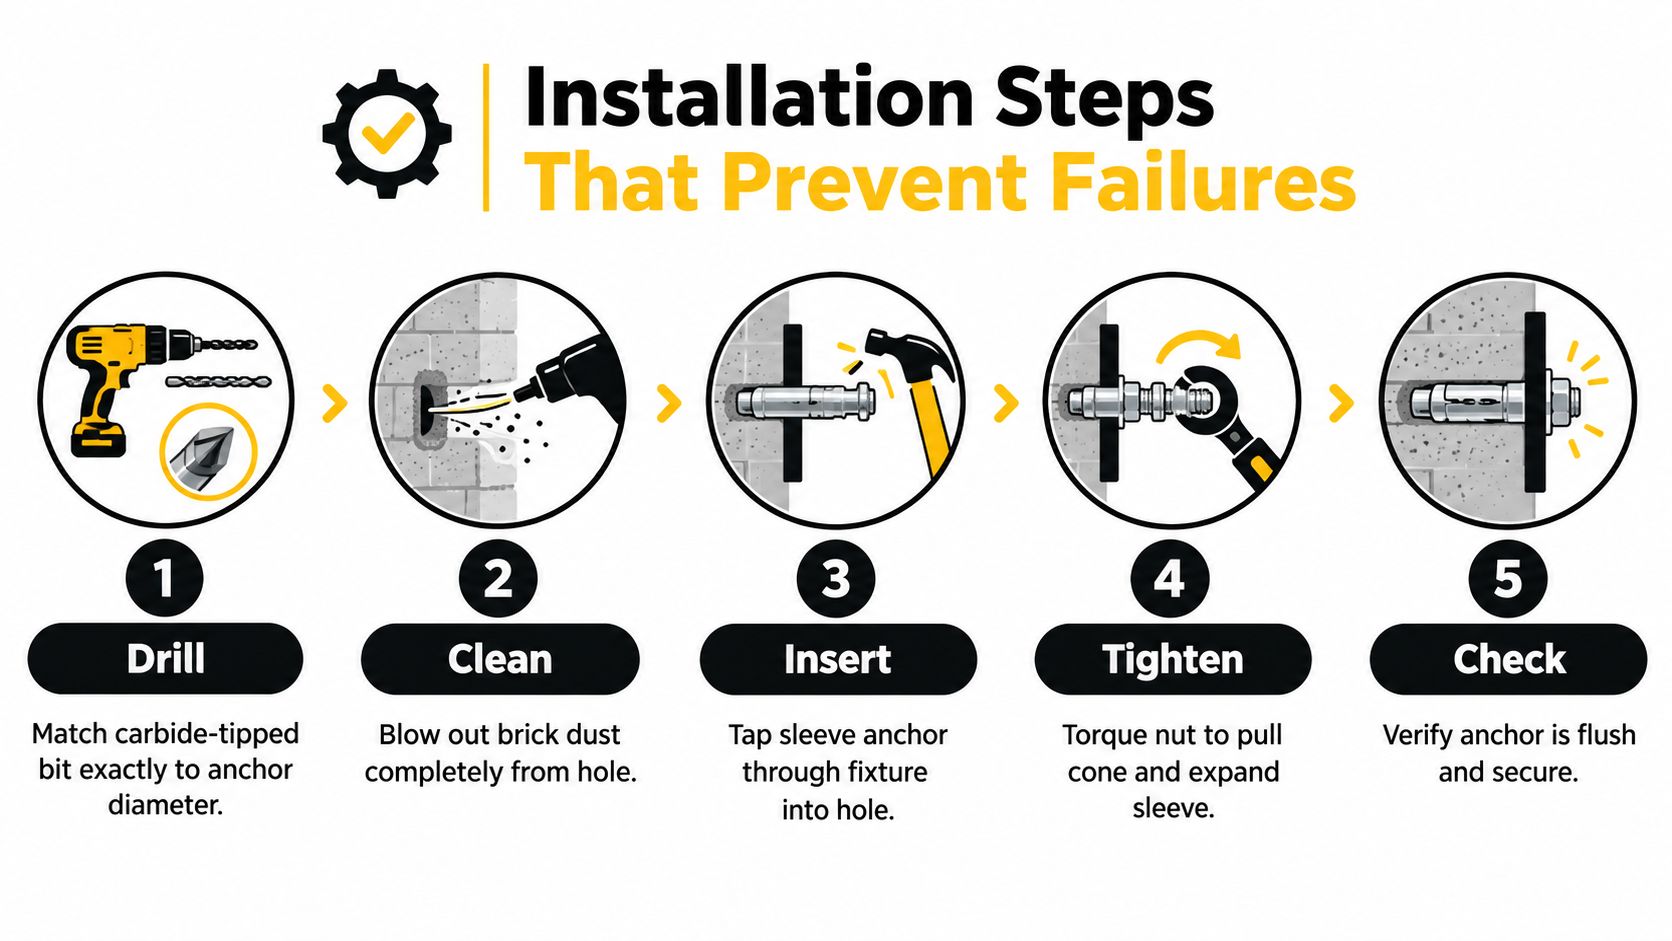
A spinning anchor usually indicates the wrong hole size, insufficient surrounding material, or a damaged sleeve. Poor holding power often follows from dust or short embedment. Brick spalling around the washer points to excessive expansion force or inadequate edge distance.
The following video shows the installation technique:
When Sleeve Anchors Are the Wrong Choice
A sleeve anchor can tighten firmly in a hollow brick unit while offering little reliable pull-out resistance. The sleeve may expand into a void instead of gripping continuous masonry. The same problem occurs in clay tile, large-cell units, and brick that is friable or badly weathered. If you cannot confirm solid material around the expansion zone, do not approve the anchor based only on a tight nut.
Brick veneer requires a different decision. Veneer is not structural in the same way as solid brick or block, and an anchor installed only in the facing may not transfer the load to the building structure. For a fixture that must be supported by the wall behind the veneer, select a system long enough and approved for that connection, or fasten directly to the structural backing. An expansion anchor that relies on a thin facing is the wrong detail.
Choose the alternative by the problem:
- Hollow or friable brick: Consider a listed adhesive or hybrid adhesive system, but only if its approval covers the masonry type, hole condition, load, and installation method.
- Solid poured concrete: A wedge anchor may suit higher-load work in concrete. The wedge anchors in concrete selection guide explains why concrete-only expansion systems should not be treated as masonry-capable fasteners.
- Light decorative loads: A masonry screw or light-duty plastic anchor can avoid the expansion pressure that may damage soft brick. It still needs suitable embedment and a sound substrate.
- Wet or corrosive exposure: Zinc-plated carbon steel is generally intended for dry indoor conditions. Outdoor, damp, or corrosive locations call for stainless steel or another approved corrosion-resistant material, with the connector selected for the actual exposure.
- Structural, seismic, guardrail, or ledger work: Use the fastening system, testing, and engineering documentation required for that application. California requirements call for seismic prequalification of post-installed masonry anchors under ICC-ES AC01, AC58, or AC106 (California masonry anchor requirements).
Sleeve anchors remain a practical choice for suitable solid brick and moderate, non-structural loads. Reject them when the wall is hollow, the veneer is being asked to carry the connection, the environment exceeds the anchor's corrosion protection, or failure could injure someone or damage the structure. In those cases, change the fastening system rather than trying to compensate with a longer anchor or extra torque.
Choosing the Right Sleeve Anchor for Your Project
Make the decision in this order, before opening the package.
Identify the substrate first. Solid brick is the normal starting point for a sleeve anchor. Hollow brick needs a system designed for hollow masonry, and brick veneer needs a connection to the structural backing or a purpose-built veneer attachment.
Set the working load from approved data. Don't use a concrete ultimate rating as a brick working load. Account for tension, shear, orientation, edge distance, spacing, vibration, and the consequence of failure. A qualified designer should review structural or safety-critical applications.
Match the diameter and length. Choose the smallest diameter that satisfies the approved load requirement and fits the fixture. The 3/8 in example is a common medium-duty reference, but larger is not automatically better in a thin or fragile masonry unit.
Choose the material for the environment. Zinc-plated anchors suit many dry indoor jobs. Damp locations may call for hot-dip galvanized hardware, while outdoor or corrosive conditions may require stainless steel or another approved corrosion-resistant option. California exterior-wall provisions also require corrosion-resistant anchor ties in specified masonry-backed applications (California exterior-wall anchor-tie provisions).
Check the geometry. Confirm that every hole can sit in sound brick with adequate separation from edges, corners, joints, and neighbouring anchors. If it can't, change the fixture layout or fastening method.
For purchasing, XTREME EDEALS INC.’s sleeve anchor category lists sleeve anchors for brick, block, and concrete applications, including options such as a 1/2 in x 4 in hot-dip galvanized hex-head sleeve anchor. Compare the product specification with your substrate and environment rather than selecting by price alone.
XTREME EDEALS INC. offers sleeve anchors and related fasteners in sizes and finishes suited to brick, block, concrete, deck, and fencing work. Visit XTREME EDEALS INC. to compare the available hardware, confirm the product details, and choose the anchor that matches your wall construction and installation conditions.