
Buying the thickest joist hanger on the shelf isn't a safe shortcut. A substantial bracket can still leave a ledger connection unsafe if someone squeezed a doubled joist into it, bent a flange for clearance, or drove deck screws through holes intended for connector nails.
The useful question isn't how heavy the bracket feels. It's whether that exact hanger, supporting member and fastener pattern suit the joint you're building.
Why Heavy Duty Is Not a Hanger Spec
A joist hanger is a formed-steel saddle that transfers a joist's end reaction into a ledger, beam or header. Its seat supports the timber, while its sides help locate the joist and, where the design provides for it, restrain movement. Those functions rely on the connector fitting properly.
Heavy duty is catalogue language, not an Ontario code class. It commonly describes thicker steel, a deeper seat or greater published capacity, but it doesn't identify the connection that was tested. A bigger saddle doesn't fix the wrong horse or a broken cinch.
Start with the joint
Before comparing products, write down these details:
- Joist dimensions and plies: Measure the actual timber and identify whether it's single, doubled or built up.
- Supporting member: Name the ledger, beam or header material and check its thickness and condition.
- Required geometry: Decide whether exposed face flanges will fit, or whether the connection needs a concealed, skewed or sloped model.
- Fastener schedule: Find the exact connector nails or approved screws before putting the hanger in the cart.
A search for joist hanger heavy duty can help you find a product category. It can't answer those questions.
Buying rule: Choose the connection type first. Compare steel thickness only among hangers that already fit the joint.
Gauge is useful after you know the model family, available fastening area and required capacity. Before that, it's just one property of a piece of steel. A thinner listed connector with the correct installation can be the right part where a heavier, poorly matched bracket isn't.
Match the Hanger to the Connection
Which hanger fits the joint
| Connection | Hanger style | Fastener rule | Stop and get design help |
|---|---|---|---|
| Single 2x joist to ledger or beam face | Face-mount, seat width matched to the joist | Every hole in the listed nail or screw schedule | Reaction or span is not in the product table |
| Joist end hidden in a rim or beam | Concealed flange, not a bent face-mount | Only the fasteners named for that concealed model | The hanger would have to be cut or re-bent |
| Doubled joist, trimmer or header | Double-width seat or a listed two-ply connector | Fill both plies as the listing shows | Stair opening, flush beam or unknown header reaction |
| Joist at the end of a beam | Face-mount plus separate lateral restraint | No toenails in place of the hanger nails | Cantilever, tall drop or separation risk |
| Prefabricated wood I-joist | Hanger tested for that I-joist series and torsion | Fasteners and header from the evaluation report | Report has vertical load only and no torsional data |
| Skewed or sloped joist | Field-adjustable model only if the maker allows it | Follow the skewed nailing diagram | A standard hanger is the only one on the truck |
Pick the row before comparing price. A face-mount connector needs usable timber behind its flanges, while a concealed-flange model solves a different access and appearance problem. Folding a face flange behind the joist doesn't turn it into a concealed connector.
Seat width matters just as much. A doubled member needs a connector intended for the assembled width and loading, not a single hanger spread with pliers. Two single hangers placed beside each other aren't an automatic substitute either.
Ordinary framing versus concentrated reactions
A regular run of deck joists is a different selection problem from a stair opening. At the opening, the header collects loads from interrupted joists and delivers them into the trimmers. That concentrated reaction can make an otherwise familiar-looking joint the critical connection.
Consider these job scenarios:
- Straight deck framing: Say the drawings call for 2×10 joists at 16 inches on centre. Keep the specified face-mount arrangement, exterior-compatible coating and complete listed fastening pattern; the ledger attachment remains a separate connection.
- Stair opening: Change the trimmer connection to the specified double-width seat or listed built-up-member connector. Stop if the header reaction isn't covered by the selected product's capacity information.
- Damp treated-lumber deck near road salt: Keep the seat geometry that fits the framing, but change the corrosion specification for the hanger and fasteners together.
- Interior I-joists into a flush beam: Select a series-compatible hanger with the required torsional performance, rather than substituting a general solid-sawn-lumber saddle.
Each scenario changes a particular selection criterion. None calls for blindly replacing every connector with the thickest version available.
Check access before ordering
Concealed flanges can clean up an exposed edge, but they may require an installation sequence that becomes impossible after adjacent framing is fixed. Check where the hammer, connector nailer or driver will fit. Allow room to install angled fasteners without striking the timber beside them.
The same planning habit applies to smaller bracket jobs. Value Tools Co.’s guide to installing 12-inch shelf supports is useful context for thinking about support position and fastening access, although shelf hardware isn't a substitute for structural framing connectors.
Skewed and sloped joints need particular attention. An adjustable hanger is useful only within the adjustment directions and fastening arrangements its manufacturer permits. A carpenter's ability to bend steel neatly isn't evidence that the altered connector retains its rating.
Before checkout, match the seat, ply count, supporting material and fasteners against the same product documentation. Check whether required web stiffeners, backing blocks or blocking are also part of the assembly. If a cantilever, unusual loading or missing reaction prevents that match, ask the permit office or a structural engineer before committing to the hardware.
Steel Gauge Finish and Corrosion
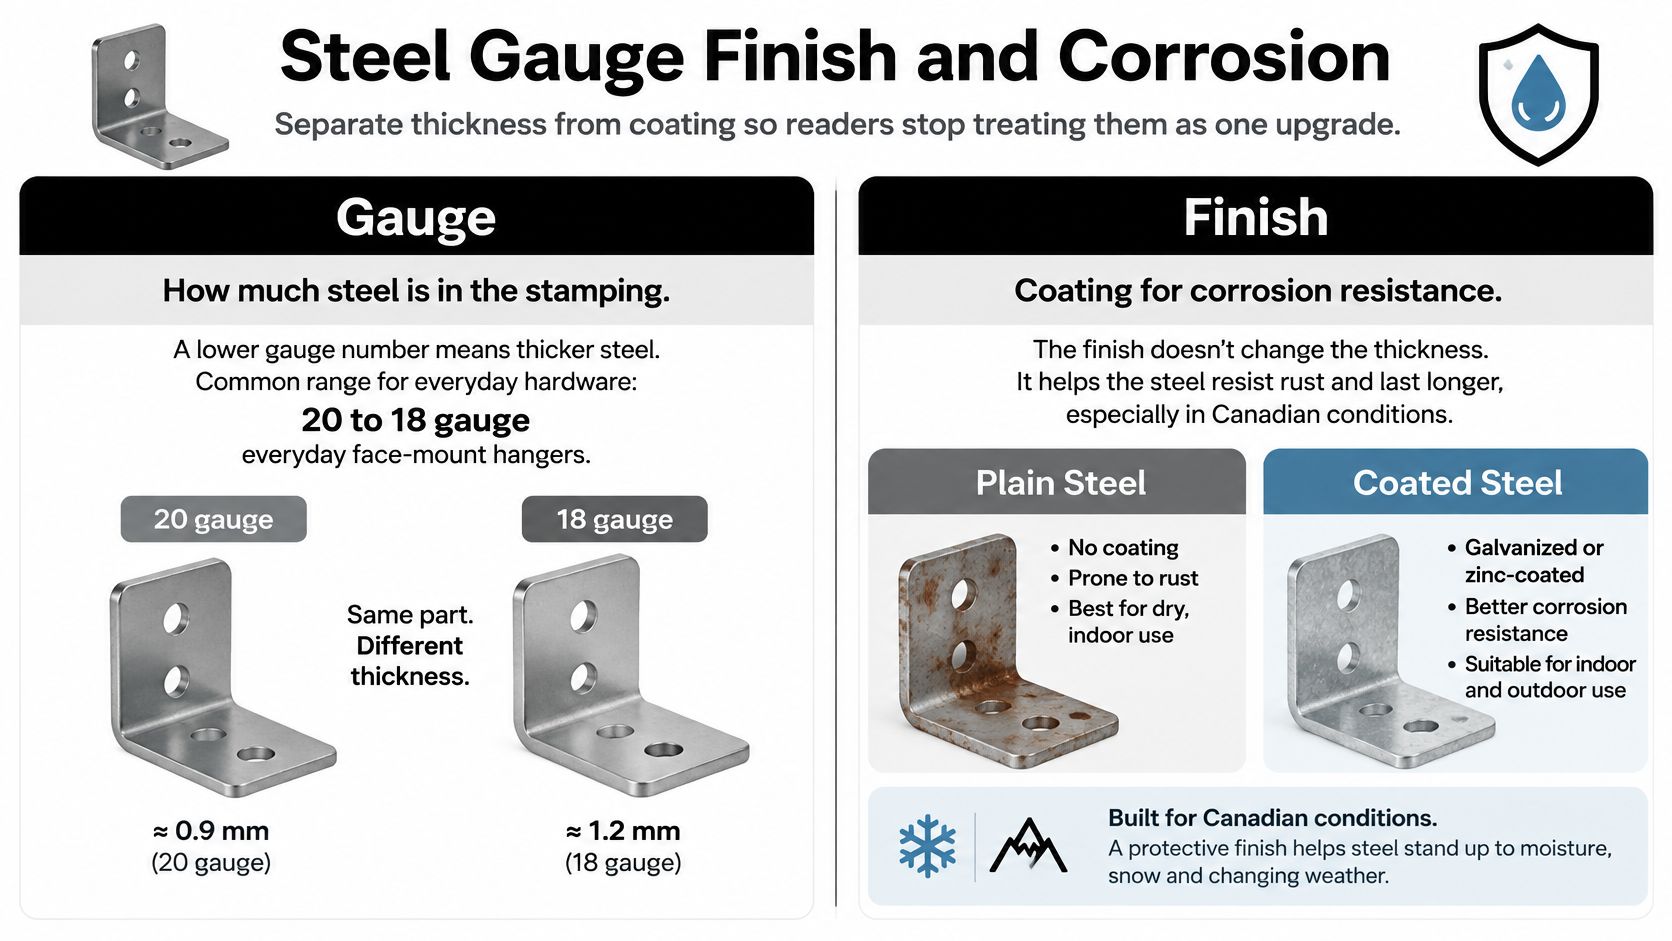
Gauge and finish solve different problems. Gauge describes the steel thickness; finish describes its protection against corrosion. A heavy stamping with unsuitable protection can deteriorate in a wet treated-wood joint.
Use this distinction when reading a product label.
Read thickness separately from exposure
Lower gauge numbers generally indicate thicker sheet steel within the same gauge system. More steel can improve the connector's resistance to deformation, but it doesn't strengthen split timber, increase fastener penetration or protect a damaged coating.
Don't assign a hanger a capacity from its gauge alone. Seat shape, flange geometry, hole arrangement and the tested installation all matter.
Coating choices for joist hangers
| Finish | Use it here | Do not pair it with |
|---|---|---|
| Hot-dip galvanized | Exterior decks and pressure-treated wood where approved for the exposure | Stainless nails in the same holes |
| Thick galvanized such as ZMAX | Harsh treated-wood or long-wet exposure where the product is approved | Uncoated or electro-plated nails |
| Stainless steel | Pools, road salt and persistent wetting, with grade selected for exposure | Galvanized nails or screws |
Copper-based timber treatments and persistent moisture make connector protection especially important. Dry-interior hardware shouldn't migrate outdoors because it fits the joist.
The California DGS connector guidance treats fastener gauge, length and corrosion-resistant coating as manufacturer and evaluation-report requirements. For an Ontario project, use the locally accepted product documentation rather than treating California guidance as the governing specification.
Buy compatible metals together
Mixing stainless and galvanized components can encourage galvanic corrosion in a wet connection. The safest purchasing habit is to select the hanger and its listed fasteners as a compatible system, not as separate bargains.
Browse galvanized joist hanger options with the exposure written on your materials sheet. Check the actual coating designation and treatment compatibility, rather than relying on a photograph of silver-coloured steel.
The video below provides another visual reference when reviewing connector hardware.
Avoid scratching through protective coatings while forcing a tight connector onto swollen timber. If installation damages the finish, use the manufacturer's repair direction or replace the part.
Choose coating for the yard conditions. Choose gauge only after the connection itself makes sense.
Capacity Is Only as Strong as the Weakest Part
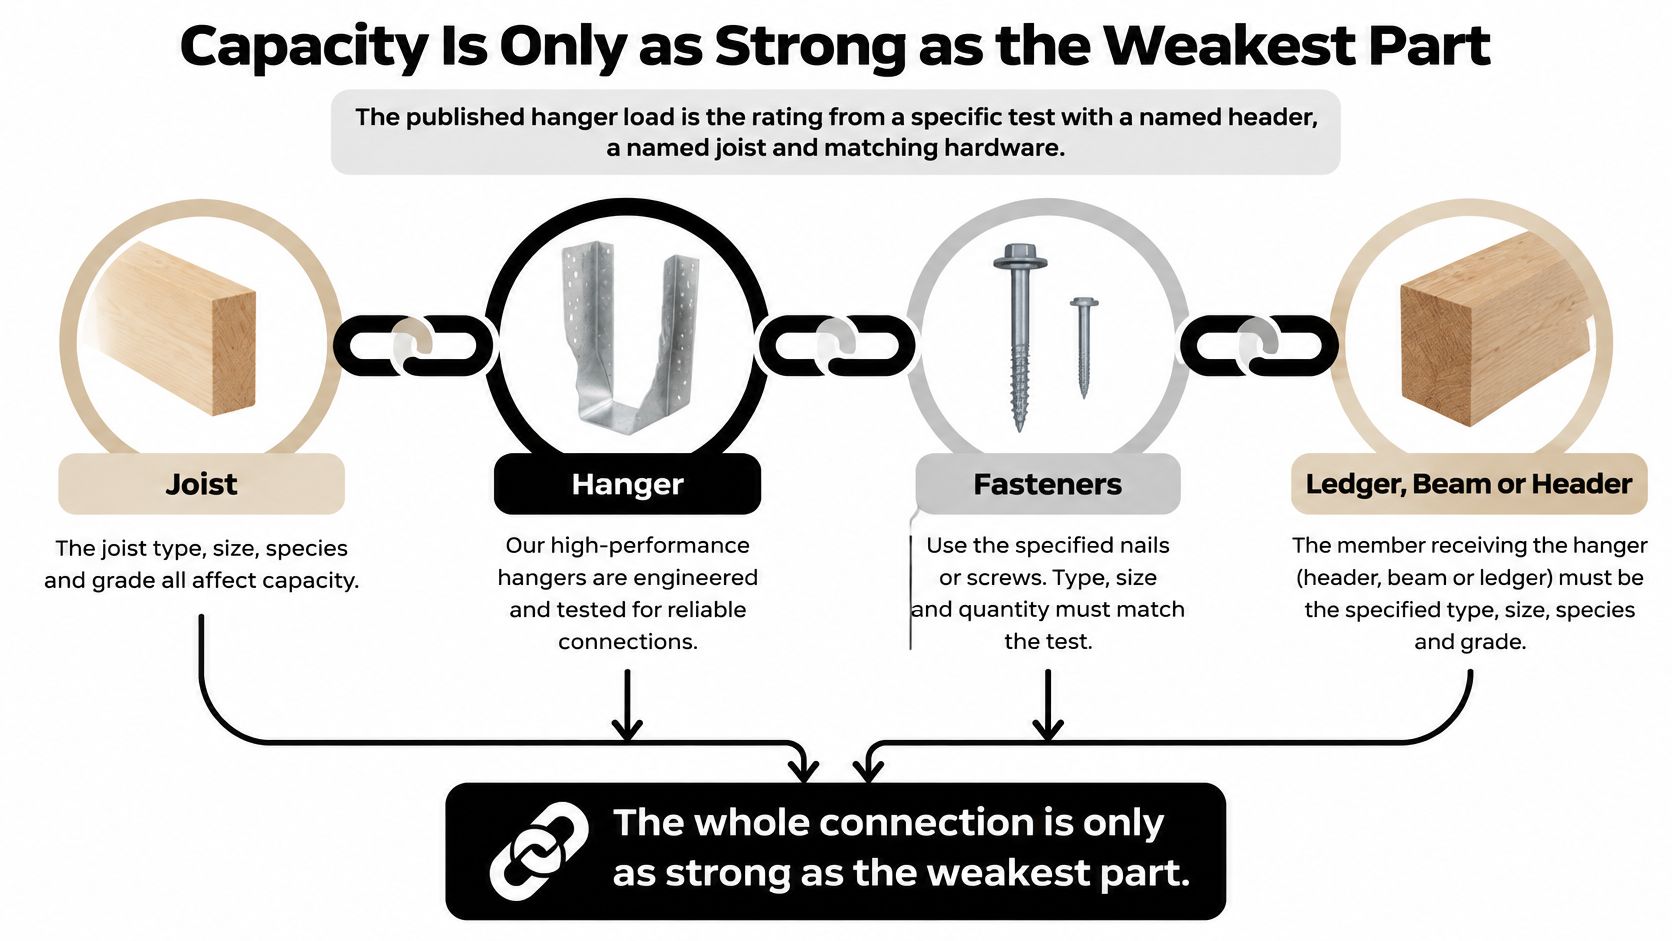
The structural assembly includes the joist, hanger, fasteners and supporting ledger, beam or header. The published hanger load belongs to a particular installation, not to the bracket independently of everything around it.
The Carleton Place Part 9 deck guideline requires manufactured connectors to use the manufacturer's specified fastener type and quantity, prohibits unapproved modifications, and identifies concealed hangers where required by the joint. Its Ontario framework recognises hanger support without establishing a universal heavy-duty category.
The weakest of the timber, fasteners, hanger or supporting member controls the connection.
This diagram shows the parts that must work together.
Separate load from reaction
For a uniformly loaded joist, tributary width multiplied by loaded span and design area load gives the total load carried by that joist. It does not automatically give the reaction at a particular hanger. Support arrangement, overhangs and concentrated loads determine how that load divides between supports.
Don't size a stair-header hanger using an ordinary joist calculation. Get the actual reaction and compare it with the applicable allowable load, including the timber species, supporting member and fastening pattern.
Keep reference figures in their jurisdiction
These are California reference checks, not an Ontario deck design schedule. Their value is showing how much a heavy-duty label leaves unanswered.
Code figures beside hanger capacity
| Check | Figure | What it does not replace |
|---|---|---|
| Residential deck live load | The San Bruno residential-deck requirements specify 40 pounds per square foot, with the ledger and layout provisions below | Local permit load or snow |
| Common joist layout | 16 inches or 24 inches on centre | A hanger chosen only by gauge |
| Deck ledger | At least 2 × 8 inches, naturally durable or pressure-treated wood | Nails used in place of an approved hanger |
| Joists at the ledger | Approved hanger required | Beam-end joists left without lateral restraint |
| Lateral hold-down option | California deck provisions discussed alongside the California Building Code structural-design guidance identify two devices within 24 inches of the deck ends, or the alternate arrangement below | The joist hanger itself as lateral anchorage |
| Alternate hold-down option | Four devices, each with an allowable stress-design capacity of at least 750 pounds (3,336 newtons) | A thicker bracket with no listed tension capacity |
| Wood I-joist hanger | California DGS I-joist guidance specifies ASTM D7147 and ICC-ES AC13, together with the restraint provision below | A vertical-only rating with no torsional test |
| Rotational restraint | Within 12 inches of the bearing point | A high vertical allowable load alone |
| Exterior fasteners | Hot-dip galvanized, ZMAX, or stainless per the listing and exposure | Generic screws or mixed galvanized and stainless |
Vertical support and deck-to-house lateral anchorage are separate checks. Ledger bolts, blocking and hold-downs perform jobs that an ordinary hanger's vertical load table doesn't establish.
For another common support decision, compare joist hangers versus resting joists on a beam against the actual framing arrangement. Direct bearing still needs appropriate restraint and a complete load path.
How to Install a Joist Hanger
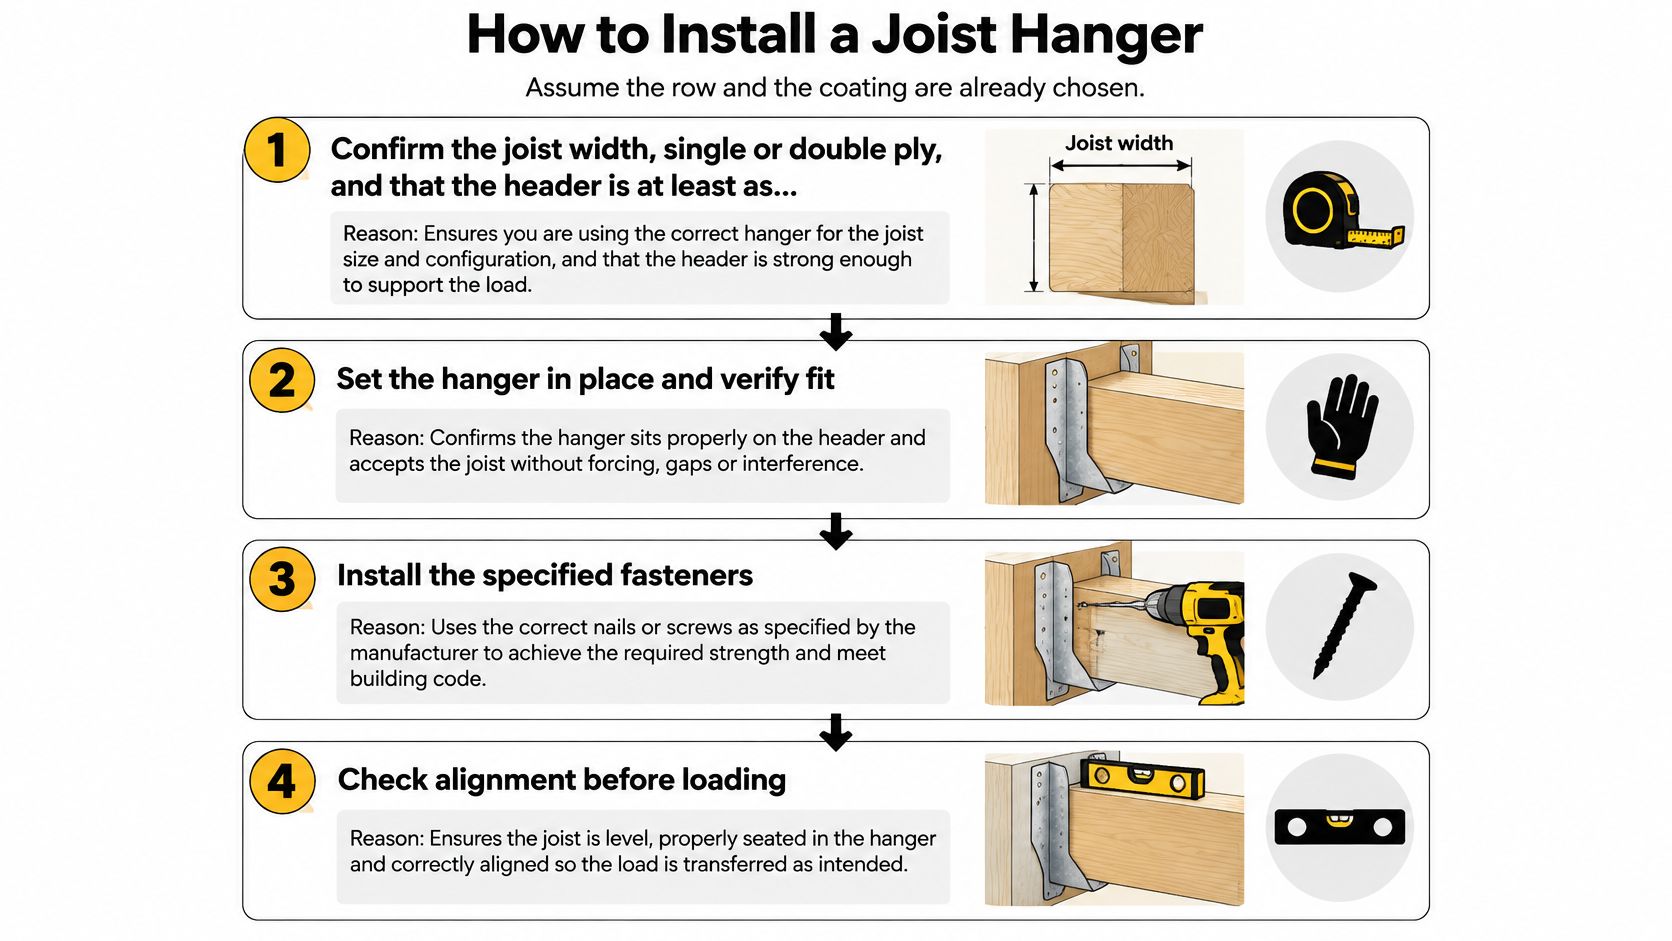
Assume the connector style, capacity and corrosion protection have already been selected. Have the installation sheet, labelled fasteners, tape measure, square, level and suitable hammer or connector nailer beside the work.
Use the visual as a fit-and-fastening reminder, then follow the model-specific sequence.
Fit and locate the connector
Confirm the timber and supporting member. Check actual joist width, ply count and the header thickness assumed by the listing. Reject rotten, badly split or crushed attachment areas; new hardware doesn't repair unsound timber.
Mark the finished joist elevation and work back to the hanger seat position. Use a square and a short timber offcut to check the fit where appropriate. The joist bottom must bear fully on the seat rather than hang above it from its side fasteners.
Secure the header side in the prescribed order. Hold the hanger tight to the supporting face and use the specified fasteners. Where the installation sheet permits, fixing the upper locating holes first helps prevent the saddle slipping down while you work.
Set the joist fully into the saddle, with end clearance and back contact arranged as the manufacturer specifies. Install the scheduled joist-side fasteners, including any angled nails that pass through the joist into the supporting member. Don't assume every hole takes the same nail length or driving angle.
Finish without improvising
Stop at an unapproved alteration. A flange that needs bending, an enlarged hole or a proposed generic screw substitution means the selected assembly no longer matches the documented installation. Resolve the fit with the correct model, not with pliers or a larger drill bit.
Install the separate ledger attachment, blocking, and hold-down hardware shown on the drawings. Check that those components remain accessible before closing the framing. The hanger doesn't acquire lateral anchorage capacity just because it sits near a ledger bolt.
Complete engineered-joist restraint. Install the specified blocking, web stiffeners, backing and rotational restraint for the I-joist system. Check the report's location requirements before surrounding framing hides the bearing area.
A long screw driven aggressively can distort a flange or damage the timber behind it. Likewise, a connector nailer that won't reach the lower holes is an access problem, not permission to omit them. Use a suitable hand tool or change the assembly sequence.
The joist hanger nail selection guide can help you organise the fastener purchase, but the selected connector's schedule remains the installation reference. Keep different nail lengths in labelled containers so they don't get mixed on the deck.
Before loading: Inspect the seat contact, fastening pattern and supporting timber while every connection is still visible.
Count against the installation sheet, not against a vague memory of how many nails usually go into a hanger. If a required fastener is missing when you walk away, the installation isn't finished.
Pick the Hardware Before You Cut Joists
A useful buying list starts on the bench, not in a search filter. Record the joist dimensions and spacing, ply count, supporting member, face-mount or concealed arrangement, skew and exposure. Add the design reaction or the approved framing schedule that establishes the connection demand.
That sheet lets you select a particular listed model and then purchase the fastener gauge, length, quantity and coating named for it. It also exposes missing information while changing the layout is still cheap.
Price the complete joint
- Connector package: Include the matched hanger and its approved nails or connector screws.
- Supporting connections: Add the ledger fasteners and washers, post bases and hold-downs shown on the drawings.
- Installation access: Allow for the right driver bits, hand hammer or connector nailer, rather than planning to omit difficult fasteners.
- Documentation: Save the product label, evaluation information and fastening schedule with the permit records.
Our Decorex Hardware joist hangers are one option alongside other documented connector systems. Xtreme eDeals also carries structural nails, deck screws, lag bolts, washers and post bases with CAD pricing. Those products perform different jobs: a deck screw sold beside a hanger isn't automatically approved for its holes.
Photograph the hanger label and fastener box before opening everything. Keep the model identification legible, especially when similar-looking connectors are used at different locations. For replacement work, document the exposed supporting timber before the new connector conceals it.
Make the cut decision definite
A cheap bracket plus incompatible fasteners is an expensive joint to reopen. Compare the complete assembly price and availability, including the separate restraint hardware, rather than comparing bracket prices alone.
Use the Xtreme eDeals product selection and matched fastener list to make a yes-or-no decision. Yes: the model fits the timber, the documentation covers the connection, and every scheduled fastener is on hand. No: the carton only says heavy duty, the reaction is unresolved, or you're planning to make the flange fit later.
Cut the joists only after that decision is yes.
XTREME EDEALS INC. offers joist hangers, fasteners and deck hardware, including Decorex Hardware options for planning a complete connection purchase. Visit XTREME EDEALS INC. with your joist dimensions, exposure requirements and connector schedule to find the hardware for your project.