
You've picked up a stack of attractive pre-built fence panels, measured the property line, and assumed the installation will be straightforward. Then the first panel meets a gate post, the final bay leaves an awkward gap, or the ground drops enough to make the top edge look uneven. The materials are already on the driveway, so every correction now means extra cutting, new hardware, or another trip to the supplier.
Fence panel dimensions aren't just the height and width printed on a product label. They affect post locations, gate clearances, finished grade, setbacks, fastener selection, and the amount of panel that remains after the posts take up space. A professional-looking fence starts with the actual footprint of the complete system, not the nominal size of an individual panel.
Why Nominal Fence Panel Dimensions Cause Installation Headaches
A nominal panel dimension is a useful starting point, but it isn't always the space the installed fence will occupy. A timber panel may be described by its overall width, while the completed bay also includes posts, brackets, rails, caps, and any intentional movement joint. Composite systems can use boards that slide into rails and posts, so the finished width depends on the manufacturer's channels rather than the visible board face alone.
A common DIY mistake is to measure the property line, divide it by the advertised panel width, and order the result without drawing the post centres. That calculation ignores corner posts, end posts, gate hardware, and the small adjustments needed where a boundary changes direction. The final panel often becomes a narrow improvised section, or the installer moves a post onto a neighbouring property without realising it.
Measure the complete bay
Before ordering, mark these points on a simple site sketch:
- Boundary line: Confirm where the fence can legally sit, rather than assuming an existing fence is on the property line.
- Post centres: Draw every corner, end, line, and gate post. Measure from centre to centre only after accounting for the post and connector system.
- Gate openings: Treat gates as their own structural bays. Hinges, latches, stops, and swing clearance change the layout.
- Panel footprint: Ask whether the stated width is the board size, the rail size, or the finished post-to-post dimension.
- Closing bay: Plan the final section before you buy. A narrow custom panel can look intentional, but a field-cut panel with exposed edges usually doesn't.
Practical rule: Never order panels from the linear property measurement alone. Draw the posts first, then fit the panels into the spaces between them.
The same discipline applies to replacement work. A new panel may look compatible with an older fence but fail to fit because the existing posts are not plumb, the rails use a different channel, or the old bay was shortened around a tree or utility feature. Measure the opening at the top, middle, and bottom, then compare those measurements with the supplier's actual installation dimensions.
Standard Panel Sizes and Imperial to Metric Conversions
The familiar residential privacy format is a 6-foot by 8-foot panel, which is a practical reference for many California fence layouts. That doesn't make it a universal legal size or guarantee that it will fit every property. A local front-yard limit, a corner-lot sightline rule, or a sloped finished grade can require a shorter panel or a stepped installation.
California's public-agency standards also show why fixed height bands matter. Caltrans identifies chain-link fence types at 48 inches and 72 inches, and specifies 6 feet for chain-link fences along the right-of-way line and in the outer separation, while allowing a 4-foot option in some locations. Those specifications apply to infrastructure work, not automatically to a private residential fence, but they demonstrate how a fence system is selected by use and height rather than by appearance alone. Caltrans' fence specifications are a useful reminder to separate a product's nominal dimensions from the rules governing its application.
Use one measurement system on the site
Imperial-to-metric confusion causes avoidable ordering errors. A blueprint may show metric dimensions while the panel catalogue, post caps, and fasteners use imperial descriptions. Converting a panel height is only part of the job. You also need to convert the finished bay width, post centre spacing, rail length, gate opening, and the gap at the closing panel.
Use this workflow:
- Choose the controlling system. If the supplier sells panels and hardware in imperial sizes, keep the installation worksheet in imperial. If the project is designed in metric, keep the drawing in metric and request supplier-confirmed metric dimensions.
- Separate nominal from actual. Record the advertised panel size in one column and the manufacturer's finished post-to-post dimension in another.
- Record tolerances. Note whether rails slide into posts, whether boards require expansion room, and whether caps or brackets project beyond the post.
- Check the last bay. Calculate the remaining opening only after all full bays, corners, and gates are placed.
- Order the closing solution. The final section may need a rip cut, a purpose-made infill, a narrower gate-side panel, or a site-built frame.
| Nominal Size (Imperial) | Actual Size (Metric) | Primary Use Case |
|---|---|---|
| 6 ft × 8 ft privacy panel | Confirm the supplier's metric specification before ordering | Residential privacy runs |
| 72-inch chain-link type | Confirm the supplier's metric specification before ordering | Standard chain-link applications in relevant California infrastructure settings |
| 48-inch chain-link type | Confirm the supplier's metric specification before ordering | Lower chain-link applications where permitted |
| 6 ft privacy height | Confirm the supplier's metric specification before ordering | Side and rear residential screening where local rules allow it |
The table is deliberately conservative. A conversion printed on a general website may not match the panel's manufactured size, and a rounded conversion can cause a cumulative error across a long run. Ask for the actual board, rail, and assembled-bay dimensions before translating the order into another measurement system.
A panel's width also affects the material count. Count complete bays, not just panels, and reserve a separate allowance for posts, gate hardware, end conditions, and the closing section. That approach costs a little planning time and prevents the more expensive mistake of discovering that the last panel must be cut through a structural rail or a decorative face.
Post-to-Post Spacing and Ground Clearance Rules
Posts carry the load that panels distribute. If the post centres don't match the panel or rail system, the installer has to force components into alignment, which can twist the frame, stress fasteners, and leave the panel unsupported at an end. A panel should fit the bay it was designed for, not be pulled into place with carriage bolts.
For a timber system, measure from the centre of one post to the centre of the next only after confirming the post's actual size. A post sold under a nominal label may occupy less space than that label suggests, and a metal sleeve or composite channel can change the finished opening again. With a prefabricated system, the supplier's assembled post-to-post dimension is more useful than the board width printed on the front of the packaging.
Set the layout from fixed points
Start at corners, changes in direction, and gate posts. Stretch a string line between those points, check the boundary independently, and place line posts to suit the available panel bays. If the final opening is short, don't hide the error by moving every post. Decide whether the closing bay should be custom-built, narrowed symmetrically, or incorporated into a gate-side transition.
Ground clearance deserves the same attention. Soil, mulch, and irrigation water can keep the lower edge wet, while string trimmers and mowers can damage a panel installed too close to the ground. A gravel board, kickboard, or masonry edge can protect the panel, but it also changes the effective height and may affect how the local authority measures the completed fence.
Match the hardware to the connection
A wood panel fastened directly to a wood post behaves differently from boards retained in an aluminium rail system. In the first arrangement, the fasteners carry more of the panel connection. In the second, rails and brackets distribute the load, while the boards need room to sit correctly inside the channels.
Before pouring concrete, verify:
- Post plumb: A small lean at one post becomes a visible misalignment across the bay.
- Rail seating: Rails should be fully engaged with the posts rather than held by partially driven screws.
- Fastener edge distance: Screws and bolts need enough material around them to avoid splitting or pull-out.
- Bottom protection: Use a compatible kickboard or base detail where the site needs separation from soil and work.
- Cap fit: The post cap must match the actual finished post size and shape.
The fence post spacing guide can help compare layout approaches before you mark the holes. For a visual installation sequence, review the following walkthrough after you've checked the supplier's own assembly instructions.
Don't use a generic spacing rule as a substitute for the panel manufacturer's drawing. Wind exposure, panel weight, post material, soil conditions, and gate loads can all require a different support arrangement. The durable solution is the one where the panel, rail, post, and fastener dimensions agree before installation, not the one that merely fits after force is applied.
Handling Slopes and Custom Panel Sizing
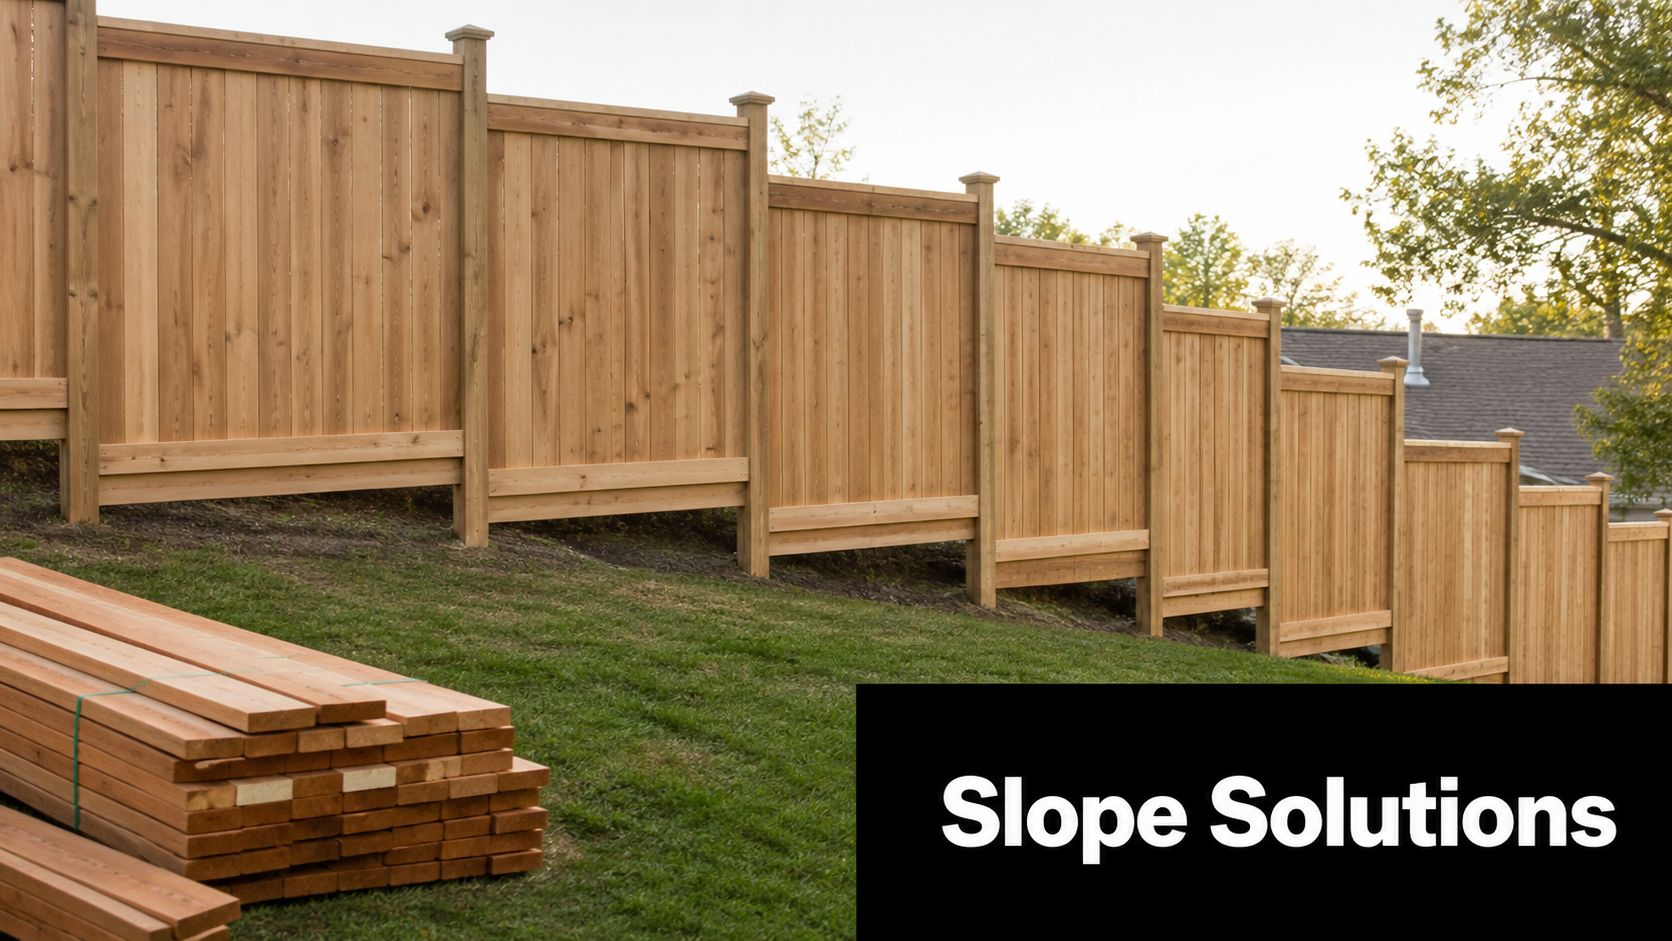
A sloped lot gives you two separate design decisions. You must decide how the fence follows the ground, and you must decide how the top edge looks from the street, yard, and neighbouring property. Standard rigid panels can work on a slope, but they won't naturally follow a changing grade without either stepping or modifying the panel system.
Stepping rigid panels
Stepping keeps each panel level while the fence changes elevation from bay to bay. It works well when the grade changes in manageable sections and the owner accepts a staircase effect along the top. Each step needs enough post exposure to support the panel, and the lower gaps may need treated filler boards, gravel boards, or site-built infill.
Lay out the slope before digging. Mark the high and low points, identify where each panel will sit, and calculate the change in elevation between adjacent bays. Don't bury an extra portion of a standard panel to hide the difference. That can reduce clearance from the soil, trap moisture, and leave the finished height difficult to assess.
Racking and custom sections
Racking angles each panel so the top and bottom follow the slope. This produces a smoother line, but not every rigid panel or rail system can rack. Timber pickets and flexible board systems are more adaptable than a framed panel with fixed horizontal rails. Forcing an inflexible panel to rack can open joints, twist rails, or create triangular gaps that are difficult to close.
Order a custom panel or build the section on site when the slope changes too sharply for standard bays. A site-built frame lets you measure each opening, keep the fasteners in sound material, and adjust the infill to the actual grade. It also gives you more control over the end condition, where an off-the-shelf panel often leaves an irregular gap.
Use these field checks before choosing a method:
- Top-line priority: Choose stepping when every panel must remain level and a stepped top is acceptable.
- Ground-following priority: Choose racking when a continuous relationship with the slope matters and the system is designed to rack.
- Privacy priority: Add a properly supported lower infill rather than allowing a large triangular opening beneath a panel.
- Code priority: Measure the finished height at the grade and location used by the local authority. A stepped fence can be compliant in one bay and too tall in another if the ground changes.
The best-looking installation usually comes from accepting the terrain early. Extra posts, custom rails, or a site-built closing section are cheaper than trying to conceal a grade mistake with loose boards after the concrete has set.
Local Code Considerations and Height Limits
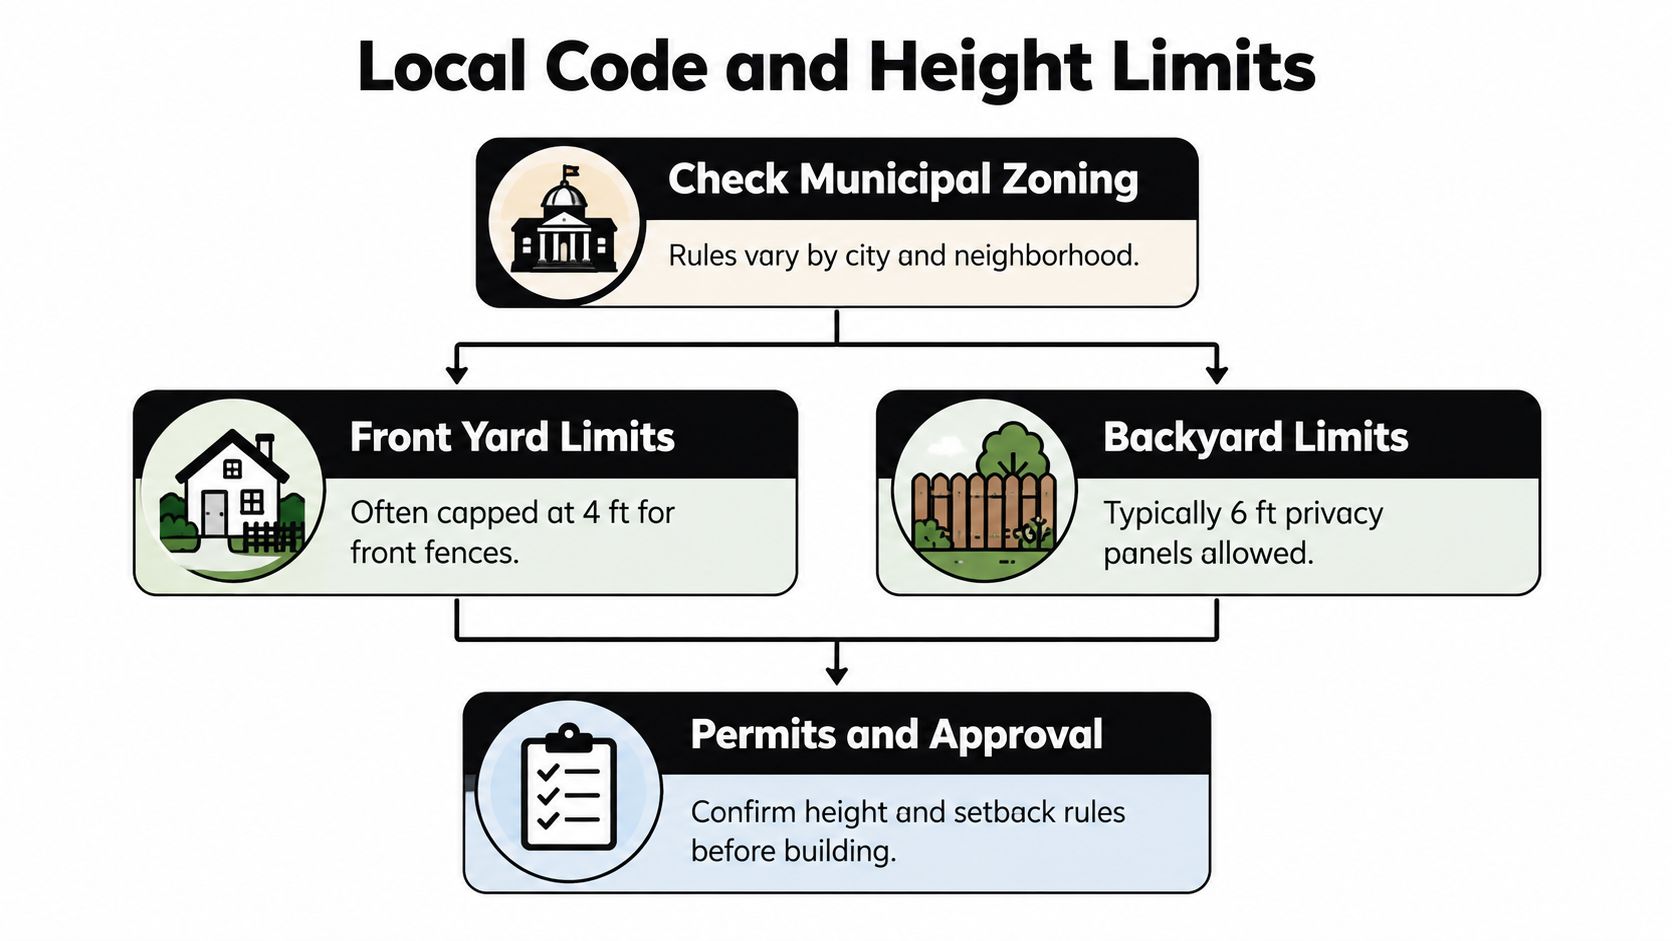
A 6-foot privacy panel may be the right product for a rear yard and the wrong product for a front-yard setback. California's baseline residential rule states that a fence on a lot shall not exceed 6 feet in height, and a fence taller than 42 inches that runs parallel to a unit or habitable accessory structure must be at least 3 feet away from that structure. The California residential fence rule is a starting point, not permission to skip city and county review.
Local rules can be more restrictive. Santa Rosa allows 36 inches in a front-yard setback and up to 6 feet in interior side or rear yards, with an additional 2 feet of lattice in some locations. Capitola sets 3.5 feet in the front setback and 6 feet elsewhere, while Lake County allows 4 feet in a front-yard setback, 3 feet on a corner lot in that area, and 6 feet along side and back property lines. These examples are from different jurisdictions, so you must apply the rule for the actual property rather than combining them.
Location changes the usable panel height
Palmdale illustrates the effect of both lot size and setback. Its guidance allows up to 5 feet in the front-yard setback for lots under 20,000 square feet, using 3 feet of solid construction plus 2 feet of open-view construction. Lots of 20,000 square feet or larger may use 6 feet, with 3 feet solid plus 3 feet open-view. The same guidance describes yard setbacks generally ranging from 10 to 20 feet, with building setbacks typically an additional 10 feet, and notes lower fence heights in those zones. Palmdale's fence guidance shows why a panel order should follow the site plan, not precede it.
Rear and interior side setbacks often support the familiar 6-foot panel, but exceptions matter. San Luis Obispo generally limits fences in those setbacks to 6 feet, while fences outside required setbacks may reach 8 feet unless connected to a building. Arcata similarly allows 6 feet within required interior side or rear setbacks and up to 8 feet outside required setbacks by design review. This San Luis Obispo code example demonstrates how the same property can have different allowable dimensions depending on the fence's relationship to the setback.
Finished grade controls the result
Several California jurisdictions measure height vertically from finished grade at the fence base to the top edge. Santa Barbara specifies measurement from the lowest point of contact with the ground directly beside either side of the fence to the highest point on that vertical line. Santa Rosa also addresses differing ground elevations near the fence base, which is especially important beside retaining walls and on sloped lots. Santa Barbara's fence guidelines explain why a nominal panel can become non-compliant after installation.
Measure from the side that produces the legally relevant finished height, document retaining walls and grade changes, and ask the planning or building department whether a permit or design review applies. Santa Rosa requires a building permit for fences over 7 feet, but a lower fence can still need approval if it sits in a regulated setback or affects visibility. Use the fence height requirements guide as a planning aid, then confirm the current local rule with the authority having jurisdiction.
Measuring and Ordering Checklist with Hardware
Once the layout is approved, order the hardware as a coordinated system. The panel thickness, post shape, rail channel, cap opening, and fastener length all need to agree. A beautiful panel can still fail as a project if the post cap is loose, the screw is too long for the rail, or the gate hardware is sized for a different post.
Start with a takeoff that separates panels, posts, rails, gates, and hardware. Record full bays and closing bays separately. Include corner and end conditions, because a corner may require a different post, bracket orientation, or cap arrangement from a line post.
Compare the connection options
Wood-to-wood fastening is familiar and easy to repair. Deck screws work for many exterior timber connections when the screw length and corrosion resistance suit the material, but driving too close to an edge can split a board or post. Pre-drilling is sensible near ends and on dry, brittle stock.
Carriage bolts provide a through-bolted connection for heavier assemblies and gate hardware. Use washers on the bearing face and check that the bolt length clears the combined thickness of the post, rail, bracket, and washer without leaving an exposed projection that catches clothing or tools.
Joist hangers and brackets are useful where a rail or frame needs supported geometry rather than a single screw carrying the load. Select a connector that matches the timber dimensions and use the fasteners specified for that connector. A connector is only as strong as the holes that are filled with the correct fasteners.
Wedge and sleeve anchors suit approved masonry or concrete applications, not ordinary soil. Confirm the base material, edge distance, embedment requirement, and anchor diameter from the product instructions before choosing them for a surface-mounted post base.
Match caps and posts precisely
Post caps are sold by compatibility, so compare the cap's internal opening with the actual post rather than relying on the nominal label. Xtreme eDeals carries pyramid, ball, and decorative caps, along with carriage bolts, lag bolts, joist hangers, post base brackets, deck screws, washers, and wedge and sleeve anchors. That range makes it possible to order the finishing and structural pieces together, but you still need to verify the product specification for each post and connector.
For a large or irregular project, Exayard construction estimating software can help organise quantities and distinguish full panel bays from custom sections before the order is placed. Keep the estimate tied to the site drawing, since software can count the items you enter but can't detect a misplaced property line or a grade measurement taken from the wrong side.
Make a hardware schedule with the following fields:
- Post connection: State whether the joint uses screws, bolts, brackets, or a proprietary rail connector.
- Panel retention: Identify clips, channels, rails, or direct fasteners.
- Gate hardware: List hinges, latch, stop, and any reinforcement separately from the fence panels.
- Post protection: Specify the cap style and any base treatment required by the installation.
- Finish compatibility: Check that coated, galvanised, stainless, or otherwise corrosion-resistant components are suitable for the site conditions.
Before purchasing, use the fence building supplies selection to cross-check the accessory list against the panel system. Don't substitute a convenient fastener just because it fits the hole. The correct hardware must also suit the panel thickness, post material, exposure, and connection detail.
Final Installation Tips and Verification
The most expensive fence mistakes happen before the first post is set. A dry fit gives you a chance to place the panels, posts, rails, and gate components along the proposed line without committing to concrete. It exposes a short closing bay, a blocked gate swing, an unexpected corner, or a panel that conflicts with a retaining wall while the layout is still adjustable.
Verify the site in the field
Use the following sequence:
- Confirm the boundary: Find property pins or obtain a survey when the line is uncertain. Don't use a neighbour's fence as proof of ownership.
- Check utilities: Contact the relevant utility-locating service before digging. Mark services and keep the post layout clear of restricted areas.
- Mark the setbacks: Identify front, side, rear, and building setback zones on the ground.
- Dry-fit the bays: Place the corner posts, gate openings, full panels, and closing sections in order.
- Check grade: Measure the proposed finished height at low and high points, including retaining walls and stepped sections.
- Review drainage and clearance: Keep the panel detail compatible with soil, mulch, irrigation, mowing, and water flow.
- Confirm approval: Ask the local planning or building authority whether the height, location, materials, or gate require a permit or review.
A string line helps with alignment, but it doesn't replace the physical dry fit. Posts can be perfectly aligned and still leave the wrong opening if the panel dimensions were interpreted incorrectly. Check the top edge, bottom edge, post faces, gate reveal, and cap clearance before you mix concrete.
A panel order is easy to change. A concrete-set post line is not.
Choose the installation method after measuring the terrain. Use a stepped layout when the system and appearance support it, rack only when the panels and rails are designed for that movement, and build custom sections where a standard panel cannot follow the site without unsafe gaps or stressed connections. Keep the local measurement rule beside the site plan so the finished height is checked from the correct grade.
The right fence panel dimensions are therefore the dimensions that work together. The panel must fit the bay, the post must carry the connection, the hardware must match the materials, the ground clearance must protect the lower edge, and the finished height must comply at the actual site. Verify those relationships twice before cutting or digging, and the installation will look deliberate rather than patched together.
XTREME EDEALS INC. supplies fence and deck hardware such as post caps, fasteners, brackets, hinges, anchors, and related finishing components for DIY and professional builds. Visit XTREME EDEALS INC. to match the hardware to your fence panel dimensions and organise the accessories before installation begins.