

A steel post spike can be a poor choice even when it fits a 4×4 perfectly. The deciding factors are lateral load, ground conditions and frost depth, not the lumber's nominal size. For a light fence or mailbox in suitable soil, a spike can save digging and concrete. For a gate, tall fence or deck support, it can leave the post loose, leaning or out of step with local requirements.
Check Your Site and Load Before You Buy
A 4×4 post spike suits light, low-height work, but it's a no-go for many tall, gated or attached structures. In Canada, a common 36-inch steel spike is marketed for installing nominal 4×4 posts without digging or mixing concrete. The product's installation sequence is to drive the spike, seat the post in its box-shaped socket, then secure it with pre-threaded bolts and self-locking nuts. An adjustable version lets you correct alignment after driving, but neither that feature nor the “no concrete” method makes the spike suitable for every load. Check the manufacturer's limits and local requirements before buying a 36-inch ground spike listing for 4×4 posts.

Sort the project by load
| Project | Spike suitable? | Main reason |
|---|---|---|
| Mailbox post | Usually yes | Light, mostly vertical load |
| Low picket fence under 1.2 m (4 ft) | Usually yes | Low height and modest panel load |
| Privacy fence to 1.8 m (6 ft) | Conditional | Needs firm, well-drained soil and a spike rated for the load |
| Corner or end post of a long run | Conditional | Carries the tension of the whole run |
| Gate or hinge post | Usually no | A swinging gate applies constant torque and racking |
| Freestanding low deck support | Limited | Must meet local deck height and load rules |
| Attached deck or ledger connection | No | Needs a code-compliant connection and frost-protected footing |
A fence's line posts mainly hold panels in position; corners and ends also resist tension from the run. A gate post has a harder job because every swing loads the post sideways and twists it. If you're planning a light fence, use compatible pressure-treated wood fence posts and match the spike to the panel and site, not just to the 4×4 label.
Deck posts need a separate check. California's prescriptive guidance allows 4×4 deck-support posts only up to 48 inches high, with 6×6 posts required for taller supports, illustrating how a post's role and height can rule out a 4×4 before installation begins (City of Escondido residential-deck guidance). Local rules and design conditions still control.
Make the yes-or-no call
Answer these questions before you buy:
- Is the project low and light-duty?
- Is the post not a gate, corner or attached-deck post?
- Is the soil firm and well drained?
- Will the installed depth meet local frost and code rules?
- Is the ground free of a slope that could push the post out of line?
- Are the panels light enough for the spike's rated load?
If any answer is no, choose a concrete footing or an appropriate post base instead. If every answer is yes, buy a spike that matches the manufacturer's load limits and confirm whether local permits or fence rules apply.
Buying the Right Spike, Socket and Fasteners
Start with spike length, then check the socket, coating and fastening system. A common 4×4 listing uses a 36-inch (914 mm) spike, but extra length alone doesn't prove the installed depth meets local frost or soil requirements. The product must suit the actual site and application, and the post must fit its socket without movement or forced insertion.
| Specification | What to look for | Why it matters |
|---|---|---|
| Spike length | A length that meets local frost and code rules, with 36 inches (914 mm) common in listings | Sets the buried depth, which must still meet local frost and code rules |
| Socket fit | Sized for a nominal 4×4, about 3.5 x 3.5 in | A loose fit wobbles; a tight fit can split the post |
| Coating | Galvanized or powder-coated steel | Resists corrosion at the grade line |
| Adjustability | Collar or bracket that allows plumbing after driving | Lets you correct lean before the post is fixed |
| Included hardware | Pre-threaded bolts and self-locking nuts | Keeps the connection tight under vibration and wind |
| Lumber grade | Ground-contact pressure-treated 4×4 | Limits rot where the post meets the soil |
A nominal 4×4 is not the same as a piece measuring four inches on each side. Measure the post you'll install, and don't hammer a post into a socket that's too small. If the socket is loose, use only a manufacturer-approved way to take up the gap; improvised packing can loosen or crush under movement. For compatible deck or fence components, compare available 4×4 post holders by their intended installation and load direction.
Match the connector to the load
A steel holder bolted to concrete is not interchangeable with a soil-driven spike. One Canadian heavy-gauge post holder listing says the holder secures a 4×4 or 6×6 post to concrete, but is designed for vertical loads and doesn't provide adequate resistance to wind or other horizontal loads. It's not recommended for fencing (Canadian post-holder listing).
That listing specifies four 16d, 3 1/2-inch, hot-dipped galvanized nails, one through each of four holes. Use the fasteners specified for the connector you buy; don't substitute shorter nails or a different bolt pattern because the hardware also fits a 4×4. Choose by application and direction of force, not by shared post size.
Site Prep, Tools and Layout Before You Drive
Ground conditions decide whether a spike enters straight and stays put. Slope can pull a post out of line; loose fill may settle; water can wash soil away or contribute to frost movement. Canadian public-sector fencing guidance identifies drainage and surrounding ground conditions as factors in heaving and erosion, and recommends compacted gravel in vulnerable locations to help reduce both (Canadian public-sector fencing guidance).
Walk the fence line
Use this short yard checklist before setting out:
- Slope: Check whether the ground falls away, because a sloping run can push posts out of plumb.
- Standing water: Note wet spots, since waterlogged ground may provide poor support and increase frost movement.
- Buried rock: Look for likely refusal points; a spike that strikes stone can twist or drift.
- Fill: Identify loose backfill that may shift around the spike.
- Recent excavation: Mark disturbed ground because its holding strength may differ from compacted soil.
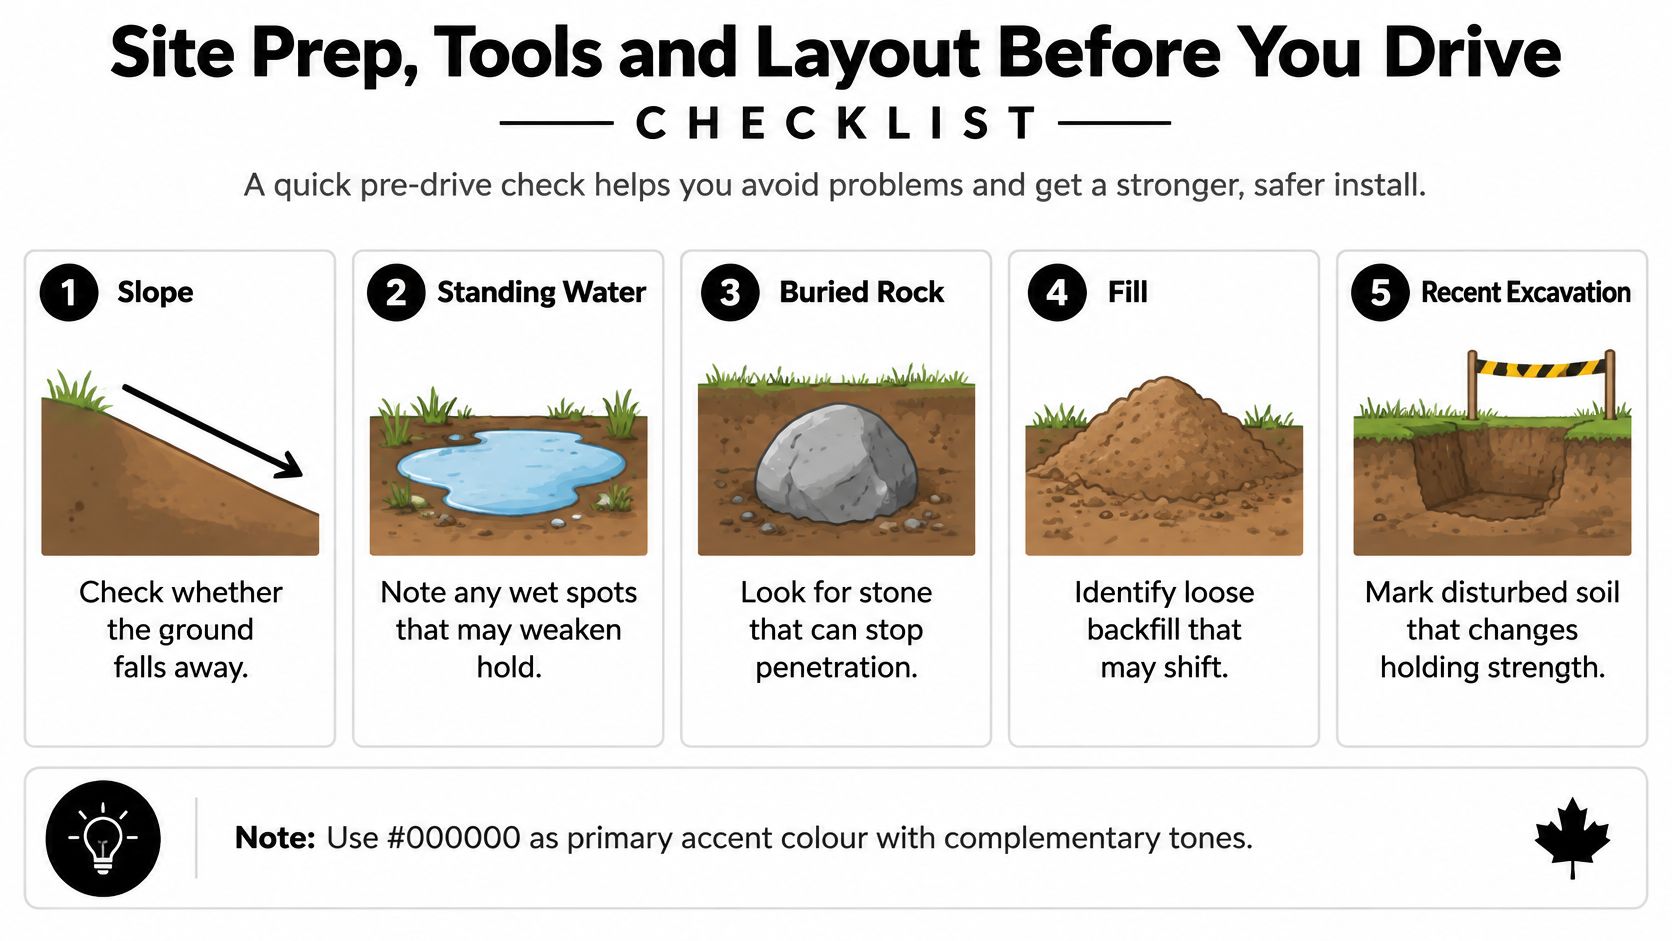
Route surface water away from the post line, and place compacted gravel at low or wet sections where appropriate. If the ground is steep, freshly disturbed or persistently wet, reassess whether a spike is suitable rather than expecting drainage work to correct an unsuitable foundation.
Gather tools and mark the layout
Bring stakes and string line, a tape measure, a level or plumb bob, a sledgehammer, a sacrificial 4×4 block, a socket set or torque wrench, a shovel and gloves. The block protects the socket rim from hammer damage, while the level helps you keep the spike vertical in both directions.
Before driving, contact your provincial one-call service to locate buried utilities. Check municipal height, setback, permit and fence-by-law rules, plus any applicable homeowners' association requirements. Mark the centre of each post on the string line so you can see the full run from one end.
Set line-post spacing according to panel size and expected wind exposure. Four, six or eight feet can serve as practical layout references, but the spike manufacturer's span and wind limits take priority. Adjust the plan for corners, ends, slopes and changes in panel layout rather than forcing every post onto the same spacing.
How to Drive, Set and Fasten the Post
A spike that enters the ground crooked usually makes the post crooked too. Set it carefully, protect the steel, and correct any drift as it happens. Don't use the post itself to force a misaligned spike back into line.
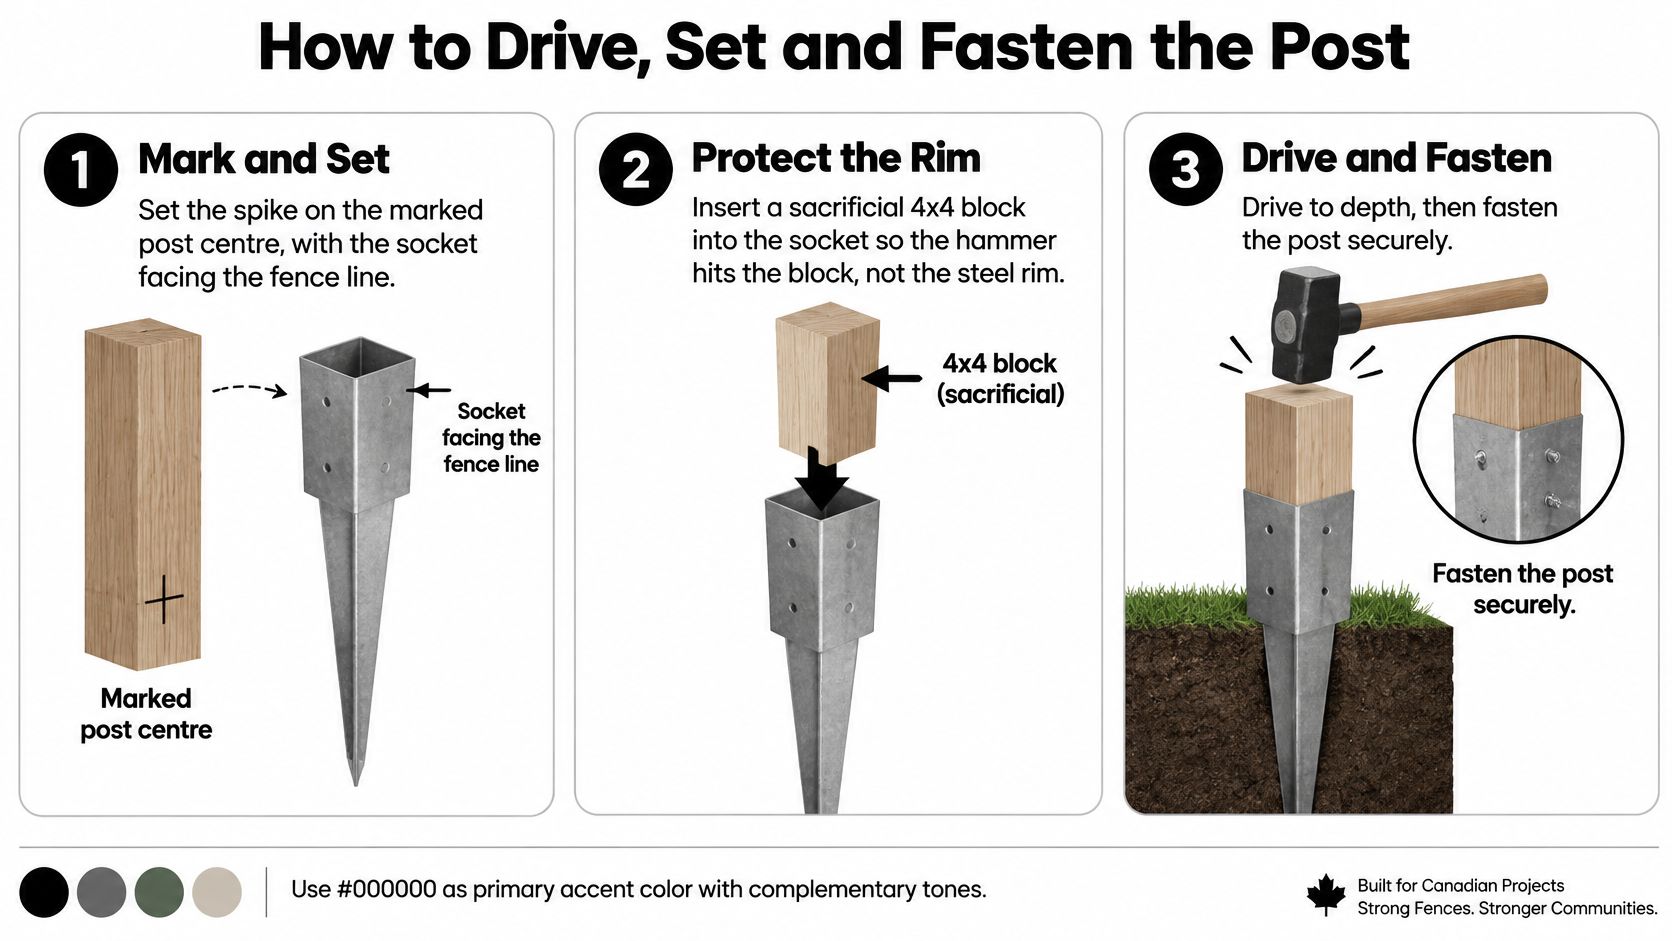
Position the spike. Set it on the marked post centre with the socket facing the fence line, so the post will align naturally with the panels. Check that the spike starts upright before you strike it.
Protect the rim. Insert a sacrificial section of compatible 4×4 into the socket so the hammer hits the wood, not the steel edge. A direct blow to the rim can deform the socket and leave the post sitting off-square.
Drive in controlled strikes. Use a sledgehammer and check the top for plumb and line every few strikes, because small errors become harder to correct as the spike sinks. Stop when the socket base reaches finished grade, unless the manufacturer's instructions specify otherwise.
Correct drift immediately. If the spike twists or starts moving off line, stop and correct it before driving further. If gentle adjustment won't bring it back, pull it and reset it in a new spot rather than forcing the post to compensate for a crooked base.
Set and fasten the post. Place the 4×4 in the socket, check that it sits square, then install the pre-threaded bolts and self-locking nuts. Tighten evenly in a cross pattern so the post seats securely rather than being pulled to one side.
Test before attaching panels. Push the post by hand and check for movement at the top and inside the socket, because a loose base won't become more stable when the fence is attached. Recheck plumb, alignment and fastener tightness first.
Check frost depth, not just product length
In frost-prone areas, the spike must be installed in a way that meets local requirements for the site. A Canadian fence-installation guide says holes should extend below the local frost line and that installers should check local codes for required hole size and depth. It gives example recommended underground depths of 21 inches and 27 inches for different fence configurations, showing that installation depth is not one universal figure (Canadian fence-post installation guide). A spike's overall length doesn't, by itself, confirm that the installed support meets your municipality's frost or structural requirements.
For practical guidance on keeping posts stable through winter, read FenceScape's tips for winter-ready fence posts alongside the spike manufacturer's instructions.
The installation sequence is easier to follow visually:
Common Mistakes and How to Fix Them
The fastest way to ruin a new spike is striking the rim directly with a hammer. The steel deforms, the socket goes out of square, and the post never seats properly. Drop a sacrificial 4×4 block into the socket before the first blow, and replace it once it starts to splinter.
| Symptom | Likely cause | Fix |
|---|---|---|
| Post wobbles at the base | Loose socket or gap around the post | Snug the bolts, and if the socket is loose, use only the manufacturer-approved method to take up the gap |
| Post leans after heavy rain | Soil washed out around the spike | Reset the spike and tamp soil in layers |
| Spike twists while driving | Off-centre hit or buried rock | Pull it, move a few centimetres, and reset |
| Socket splits or cracks | Hammer struck the rim directly | Replace the socket and use a sacrificial 4×4 block |
| Wood rots at grade | Untreated lumber or trapped water | Use ground-contact treated wood and improve drainage |
| Bolts or nails pull out | Wrong or short fasteners | Replace with the specified hardware |
On the wobble fix: improvised packing in the socket can loosen or crush once the post starts moving, so a gap that keeps coming back is telling you something. If the manufacturer-approved take-up still leaves the post rocking under hand pressure, the fence is asking more of the spike than it can give, and a proper footing is the honest fix.
A post that leans after rain needs more than a push back into place. Pull the spike, reset it, tamp the soil in thin layers rather than dumping it all at once, and redirect runoff so water stops cutting a channel around the base. If the spike hits rock and twists while driving, stop. Harder blows will bend the shaft before they move the stone.
Check the post again after the first freeze-thaw cycle and in spring. A spike set into wet soil can look solid for weeks, then develop play as the ground shifts. Push the post sideways at rail height; if the base moves, tighten the hardware and correct any socket gap before the fence panels turn that wobble into a lever.
Frost Depth and When to Choose a Footing Instead
Frost decides this one before you buy anything. The Ontario 2024 Building Code sets frost depth from local experience rather than a single provincial figure (Ontario 2024 Building Code compendium), so your municipality's requirement is the number that matters. Municipal and provincial codes share the same underlying rule: a footing has to extend below local frost penetration so freezing soil cannot push the post upward. Where frost depth runs deeper than a spike's reach, the whole anchor sits inside that moving soil, which is why soil drainage, frost susceptibility, fence height, wind exposure and gate loads all factor into the verdict.
| Option | Best for | Main trade-off |
|---|---|---|
| 36-inch post spike | Light fences, picket fences, mailboxes | Fast, but limited lateral load and frost margin |
| Adjustable post base on concrete footing | Deck posts, fence gates, corner posts | Needs concrete and proper frost-depth footing |
| Post holder on concrete pad | Freestanding deck posts under vertical load | Not recommended for fencing or wind load |
| Deep-buried post in concrete footing | Tall privacy fences, gates, wet soil | Labour-intensive, but matches code requirements |
| 24-inch deck-foot ground anchor | Freestanding decks, sheds, ramps | Not for attached decks in freezing soil |
Read the table as a go or no-go call. A light picket line or mailbox post in well-drained soil, where local frost depth stays shallower than the spike's reach, is a go. A tall privacy fence or a gate post on wet clay is a no-go: wind and gate loads land on a foundation with no frost margin, so the deep-buried footing earns its labour there. The adjustable post base on concrete splits the difference for gate and corner posts, where the load concentrates on one post instead of spreading down a run.
Two anchors get misused often enough to flag. The post holder on a concrete pad is a vertical-load tool for freestanding deck posts; it is not a fence anchor, and it handles wind load badly. The deck-foot ground anchor suits a freestanding deck, shed or ramp, and a Canadian listing cautions against attaching a deck to a house where freezing soil conditions exist (Canadian deck-foot anchor listing). Match the anchor to the structure and its attachment method, then confirm local requirements.
XTREME EDEALS stocks post base brackets, post caps, wedge and sleeve anchors and carriage bolts for footing-based builds, and its fence-post installation guide walks through the hardware each foundation type needs.
Score your site the same way the table does. If drainage is good, the fence is light and low, and local frost depth stays well above the spike's reach, buy a spike with an adjustable bracket and pre-threaded hardware and order ground-contact treated 4x4s. If any one of those fails, put the money into a footing-based build and the post base, post caps and anchors it requires.