
A lot of fence projects start the same way. The panels get most of the attention, the post style gets picked for looks, and the hardware gets tossed in the cart at the end. Then a few seasons pass, and the fence starts telling the truth. The rails loosen, the posts lean, and the first soft spot shows up right where the post meets the soil.
That failure usually doesn’t start with the panel. It starts with the post and the connection points around it.
A pressure treated wood posts fence works when you treat it as a system. The post needs the right treatment rating. The fasteners need to resist the preservative chemistry. The top of the post needs protection from water. The base needs the right installation method for the soil it’s going into. Get those parts right and the fence stays straight, strong, and worth the effort.
Building a Fence That Stands the Test of Time
Three winters in, the fence still looks straight from the street, then one gate post starts to rack and a few rails loosen. By the time that movement is obvious, the underlying issue has usually been developing for a while at the post base and at the hardware connections.
A pressure treated wood posts fence lasts because the whole assembly is chosen to work together. The post has to match the exposure. The screws, bolts, and brackets have to handle treated wood chemistry without corroding. The post top needs a cap or a detail that sheds water instead of letting it soak into end grain. Get one of those pieces wrong and the service life drops fast, even if the boards still look good.
That is the part many DIY builds miss.
I see plenty of fences built with decent posts and bargain fasteners, or solid concrete work with post tops left open to weather. Those are system failures, not just wood failures. If the goal is a fence that still stands straight after years of rain, sun, irrigation, and soil contact, the hardware matters as much as the lumber. That includes the screws, post caps, anchors, and bases you choose from suppliers such as Xtreme eDeals.
The same rule shows up in other exterior builds. Projects like durable patios and decks hold up because the builder controls moisture paths and connection details from the start, not because one material gets all the attention.
A fence stays upright for decades when water is managed, corrosion is controlled, and every connection is built for outdoor exposure.
What Makes Pressure Treated Wood So Tough
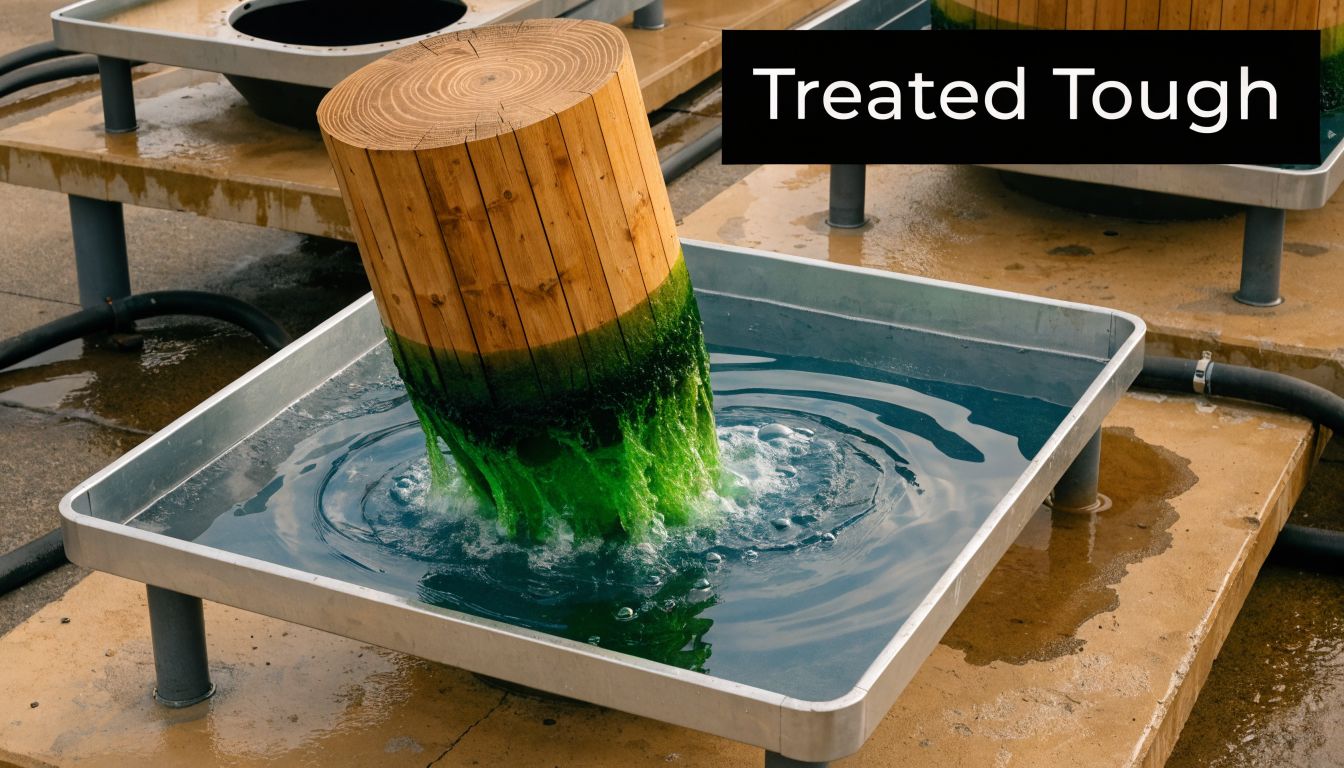
A fence post can look solid on delivery day and still be wrong for the job. What gives treated wood its staying power is not the green tint or the label. It is how thoroughly the preservative is driven into the wood, and whether the rest of the fence system is built to protect that post once it is installed.
Pressure treatment pushes preservative into the wood fibers under vacuum and pressure. That matters because decay usually starts from moisture cycling, fungal growth, and insect activity inside the vulnerable parts of the post, especially near the soil line and at checks in the grain. A brush-on sealer helps at the surface. It does not replace treatment that runs through the wood where rot gets established.
What the treatment is doing
Modern treated fence posts commonly use preservative systems such as CA-C or MCA for ground-contact applications. Those chemicals are selected to slow fungal decay and reduce insect damage over long outdoor exposure.
That protection does two jobs:
- Resists rot in wood that sees repeated wetting and slow drying
- Resists insects that target posts in soil contact or damp conditions
That is why a pressure treated wood posts fence holds up better than untreated lumber in the same yard. The treatment gives the post a fighting chance. The rest of the service life comes from good installation and hardware that does not fail before the wood does.
Why species still matters
Treatment improves durability, but it does not make every species behave the same. Some woods take treatment more evenly, stay straighter, or check less as they dry. For fence work, that affects more than appearance. It affects how well fasteners hold, how much water sits in cracks, and how much movement the rails and brackets have to absorb through the seasons.
Douglas-fir is common in western markets for a reason. It is strong, available, and widely used for treated posts. But even a good species can disappoint if the post is under-treated, installed wet without allowance for shrinkage, or paired with light-duty screws and brackets that corrode early. I have seen posts outlast the hardware, and I have seen good hardware attached to posts that never should have gone in the ground.
Ground contact is the ultimate test
Buried posts live in the worst part of the fence. The soil line stays damp, gets oxygen, and sees constant temperature swings. That combination is where decay gets started fastest.
So "pressure treated" by itself is not enough. A buried post needs a ground-contact rating, and the details around it need the same level of attention. Use fasteners and post bases rated for treated lumber. Cap the post top so water does not soak into the end grain. Choose connectors from outdoor-rated product lines, including suppliers such as Xtreme eDeals, with the same care you use when picking the post.
Practical rule: Buy the post, fasteners, caps, and bases as one durability system. A long-life fence depends on all of them working together.
Decoding Treatment Types and Use Grades
A fence post usually fails at the soil line, not because the wood looked bad in the stack, but because the treatment level did not match the job. The stamp on the tag matters more than the green or brown tint.
For buried posts, look for the use category first. A post marked UC4A is rated for ground contact and suits standard residential fence runs. UC4B steps up for harsher service, including heavier structures, gate posts, and sites that stay wet longer. UC3B is for above-ground exterior use. It belongs in rails, pickets, and other parts that are not buried.
Here is the quick check I use in the yard:
| Marking on tag | What it means | Good for fence posts |
|---|---|---|
| UC3B | Above-ground exterior use | No |
| UC4A | Ground contact | Yes |
| UC4B | Heavy-duty ground contact | Yes |
Treatment chemistry matters too, but for a DIY buyer, the use category is the faster way to avoid a costly mistake. If the post is going in the ground, buy for ground contact. Then match the rest of the system, including outdoor-rated fasteners, caps, bases, and fittings, so the metal does not become the weak link before the wood does.
4×4 or 6×6
Size affects stiffness, movement, and service life under load.
A 4×4 works for many standard residential fence runs where height, span, and wind exposure are moderate. It is lighter to handle, easier to drill, and cheaper to buy. It also gives you less margin for gate weight, twisting, and seasonal movement.
A 6×6 costs more and takes more effort to set, but it earns its keep in the right places. Use it for gate posts, corners, taller fences, exposed runs, and open yards where wind can rack the whole line. The larger section resists twist better and gives lag screws, hinges, and brackets more wood to bite into.
That trade-off is simple. Save money on straight runs if the design is light. Spend more where the loads concentrate.
Round posts, turned posts, and checking
If you are buying round treated posts, choose turned posts over tapered ones when you have the option. Turned posts are more uniform, which helps with layout, bracket fit, and overall appearance. They also tend to behave more predictably as they dry.
Checking is normal in treated wood. Long cracks that open as the post dries do not always mean failure, but shape still matters. A straighter, more uniform post sheds hardware loads better and gives you fewer surprises when attaching rails and line brackets. If you want a better sense of how screw choice affects holding power in wood joints, the guide on best screws for woodworking is a useful reference.
Buy the post for the exposure, load, and hardware it has to carry. That is how you build a fence system that lasts.
Choosing the Right Fasteners and Hardware
A treated post can outlast the hardware holding the fence together if you choose badly. That’s one of the easiest ways to ruin a good build.
Standard bright screws, ordinary nails, and mismatched metal brackets don’t just look rough after a while. They corrode, stain the wood, loosen joints, and create weak spots where the fence should be strongest.
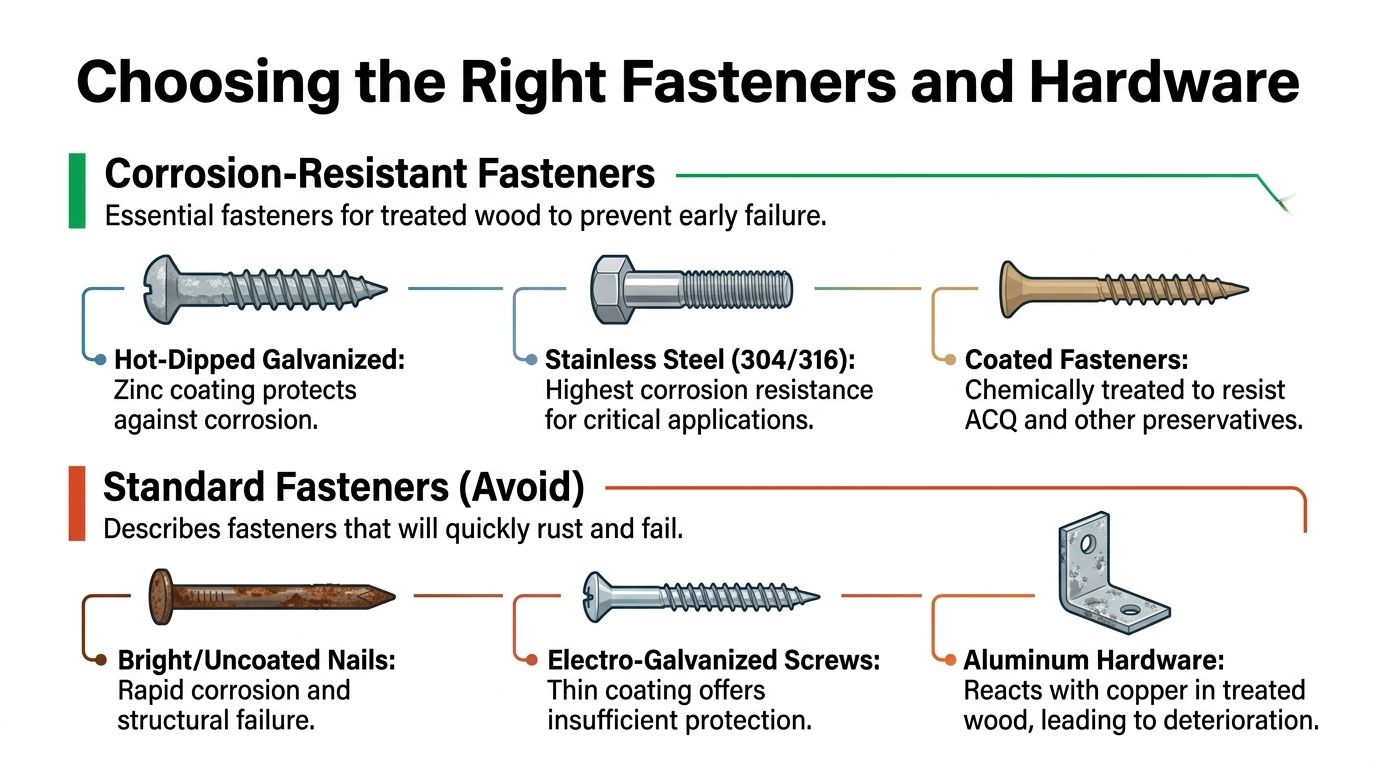
Why treated wood changes the hardware choice
The preservative chemistry in pressure-treated wood can react with the wrong metal. That’s why hardware isn’t an afterthought. It’s part of the structural system.
In wet regions, MCA-treated wood can offer 15% better zinc compatibility with galvanised fasteners than CA-C, reducing galvanic corrosion to less than 2 mils per year according to the treated wood guide from American Pole & Timber. That’s a useful detail if you’re balancing post type with fastener choice in damp conditions.
What to use instead
For most pressure treated wood posts fence builds, stick with corrosion-resistant hardware throughout:
- Hot-dipped galvanised fasteners for common fence assembly
- Stainless steel hardware where exposure is severe or staining would be unacceptable
- Galvanised post brackets and bases where wood meets concrete or masonry
- Lag bolts and carriage bolts for heavier rail, gate, and brace connections
If you need a refresher on screw styles and when thread design matters, this guide to best screws for woodworking is a useful companion read before you buy.
The hardware pieces that matter most
Different joints fail in different ways. Match the hardware to the stress.
| Hardware | Best use | Common mistake |
|---|---|---|
| Deck screws | Rail and board attachment | Using interior or light-duty screws |
| Lag bolts | Heavy timber connections | Under-sizing for gate posts |
| Carriage bolts | Through-bolted structural joints | Relying on screws where bolts are needed |
| Post bases | Mounting to concrete | Skipping uplift and moisture separation |
| Sleeve anchors | Fastening bases into masonry | Using wood screws in concrete |
For a fence system that includes the right connection hardware, brackets, bolts, and anchors, the most relevant product category is https://xtremeedeals.ca/fasteners-and-fittings/
Cheap hardware doesn’t save money. It just delays the cost until the fence starts moving.
Fence Post Installation Best Practices
A fence usually starts failing long before a board breaks. You see it first as a gate that drags, a post that is a little out of plumb after winter, or rails that start pulling fasteners loose. In most cases, the post was set wrong, not chosen wrong.
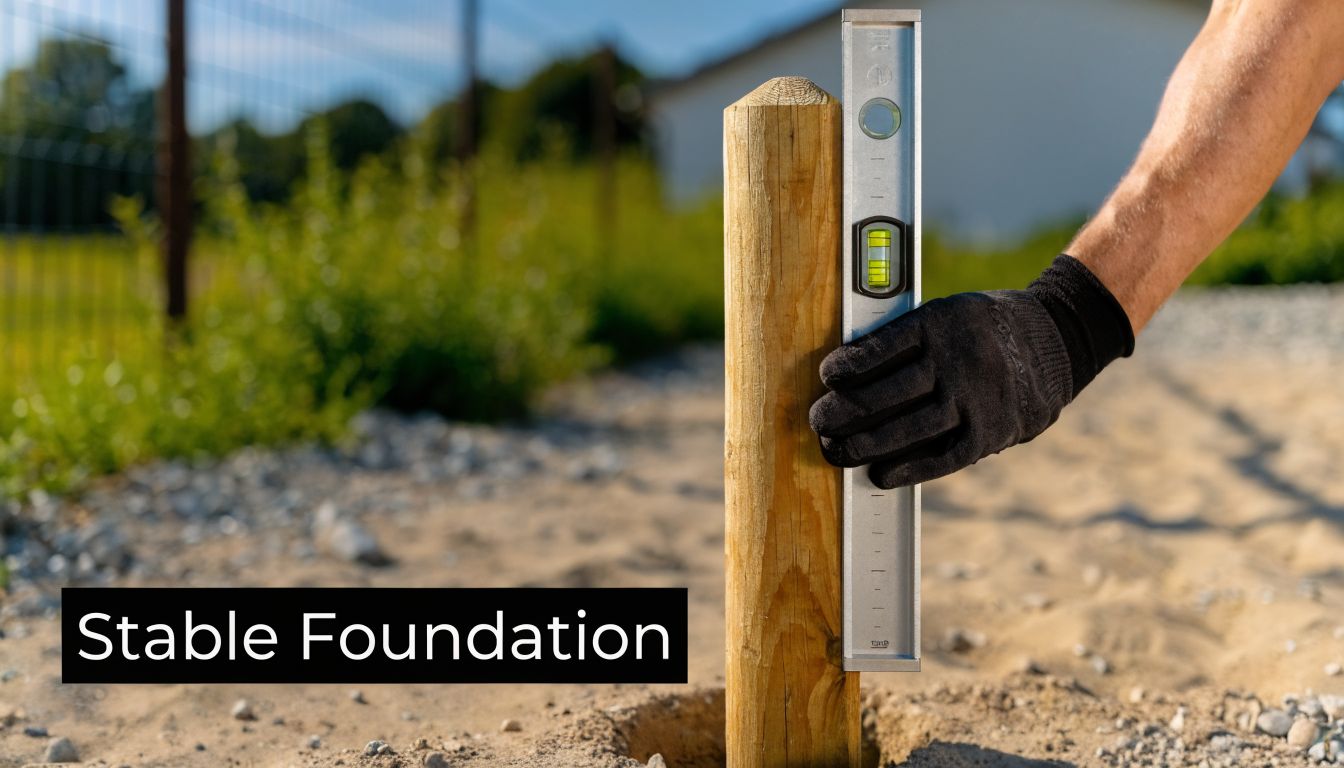
Get the depth right first
Set posts deep enough to resist wind load, frost movement, and the extra strain that shows up at corners and gates. The right depth depends on fence height, soil conditions, and climate, but shallow holes are one of the fastest ways to shorten the life of the whole run.
Depth is only part of it. The hole needs the right diameter, the post needs to be plumb in both directions, and the bottom of the hole needs to support the load without turning into a sump. A tall privacy fence in soft or wet ground asks much more from the footing than a short decorative run in firm soil.
Build for drainage at the ground line
The ground-line area is where wood posts take the most abuse. It stays damp longer, gets oxygen, and goes through repeated wet-dry cycles. That is why good installation is about water management as much as strength.
Use a base that drains, then choose backfill that matches the job.
- Compacted gravel works well where drainage is the priority
- Concrete adds holding power for gate posts, tall panels, and high-wind sites
- Loose spoil tossed back in the hole leads to movement and trapped moisture
Concrete is not a cure-all. If you use it, crown the top so water sheds away from the post instead of pooling around it. If you use gravel, compact it in lifts so the post cannot wobble under load. Either way, the goal is the same. Keep the post stable and keep water moving away from the collar.
Protect every cut and drilled opening
Factory treatment does not fully protect fresh cuts, notches, and bored holes made on site. Those exposed fibres are the first place decay gets started if you leave them raw.
Brush on an end-cut preservative anywhere you cut the post, especially near grade or at hardware locations. This matters even more if you are fitting post bases, brackets, or bolt holes as part of the install. The post, the fasteners, the cap, and the base all work as one system. If one part is careless, the service life of the whole fence drops with it.
For a practical walkthrough on layout, digging, plumbing, and setting, follow this step-by-step guide on how to install fence posts.
A short visual helps if you’re checking your sequence in the field.
Finishing Touches for Maximum Lifespan
A fence often looks finished the day the panels go up, then starts aging early because the small protection details were skipped. The top of the post, the exposed faces, and the hardware connections take weather every day. If those areas are left bare or poorly fitted, water gets in, the wood checks, and the fasteners start carrying more stress than they should.
That is why I treat the last steps as part of the system, not cleanup. A pressure treated wood posts fence lasts longer when the post, cap, screws, brackets, and maintenance plan all work together.
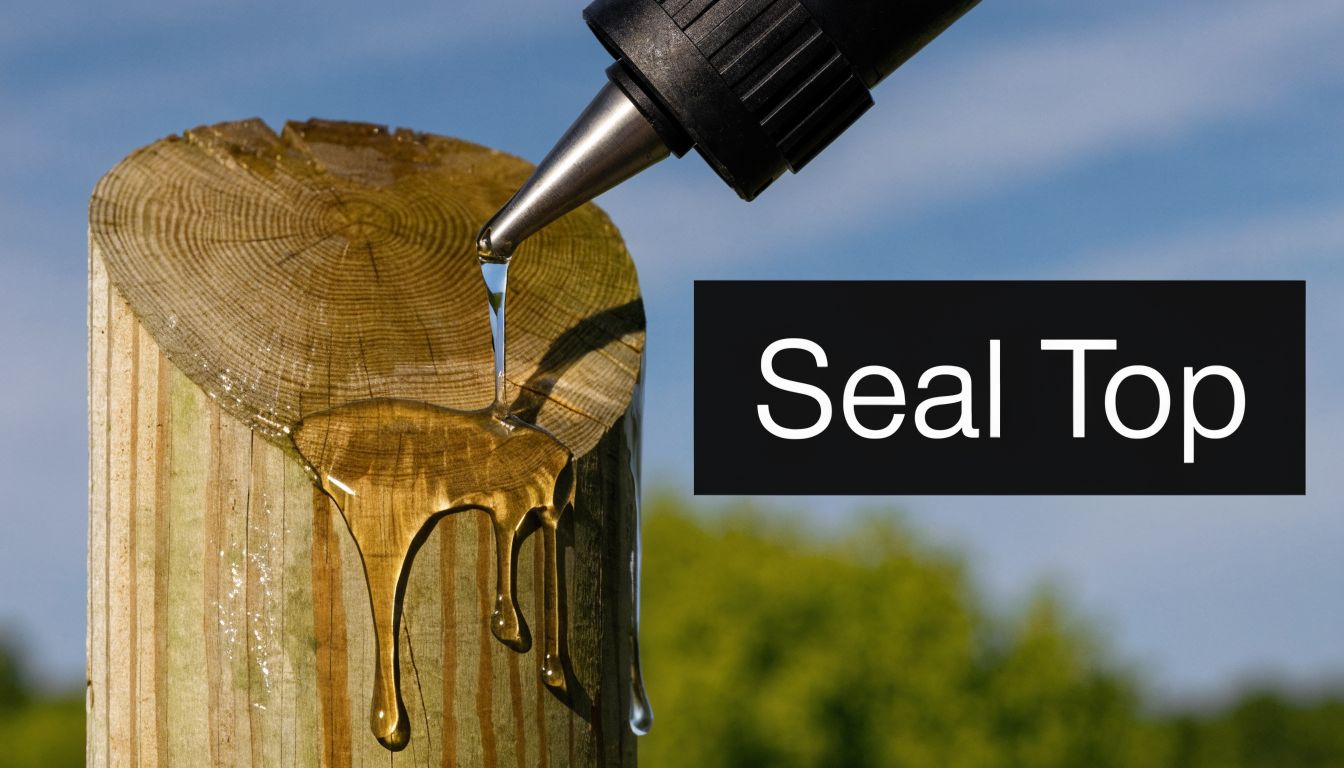
Post caps earn their keep
The top end grain is one of the easiest places for a post to absorb water. A good cap sheds rain before it can sit on the post and soak in. That simple step helps limit splitting at the top and slows the wear that starts from repeated wetting and drying.
Style matters less than fit. A loose cap rattles, traps dirt, or blows off. A cap that fits properly and throws water clear of the edges does the job. For practical options in different sizes and finishes, compare fence post caps for wood and metal posts.
Caps also protect the rest of the assembly. If the post top stays drier, the rails, brackets, and fasteners tied into that post deal with less movement from swelling and shrinking over time.
Seal the part of the post that actually weathers
Pressure treatment protects against decay and insect attack. It does not stop sun, surface checking, or water cycling above grade. That is where a quality exterior water repellent or stain helps.
Do not rush this step on wet lumber. Let the post dry enough to accept the finish, then coat the exposed portion on a maintenance schedule that matches your climate and sun exposure. South-facing runs and gate posts usually need attention first because they move more and see harder service.
Focus on exposed faces, post tops if they are uncapped during storage or staging, and any area around brackets or bolt heads where water tends to sit.
Finish the details that usually get ignored
A long-lasting fence usually comes down to a short list of habits done consistently:
- Cap every post top so water does not keep entering through exposed end grain
- Recoat weathered surfaces before the finish has fully failed
- Check around hardware once a year for loose fasteners, black staining, or movement at brackets and hinges
- Keep post tops and connections clear of debris so moisture is not held against the wood or metal
- Store spare posts and caps flat and dry so replacement parts are still usable when you need them
The fence that makes it past the 20-year mark usually is not the one with the fanciest lumber. It is the one where the builder paid attention to the full assembly, then kept water off the weak points.
Common Mistakes When Using Treated Posts
Most fence failures aren’t mysterious. They come from a short list of avoidable decisions made during buying or installation.
The biggest one is buying treated wood without checking whether it’s rated for burial. A post meant for above-ground use can still look right in the yard or at the timber counter. It’s still wrong once it goes into the soil.
The second mistake is using the wrong metal around treated wood. Ordinary screws and bargain hardware often become the weak link long before the post itself has reached the end of its useful life.
The short checklist that catches most problems
- Wrong use category. Above-ground rated stock used as an in-ground post.
- Shallow installation. The fence may stand at first, then start shifting with soil movement and load.
- Poor backfill practice. Water gets trapped around the post instead of draining away.
- Untreated fresh cuts. Every cut end becomes an exposed entry point.
- No top protection. The post top absorbs water and starts breaking down from the end grain.
The expensive version of “good enough”
A fence doesn’t usually fail all at once. It gets loose one connection at a time.
First the post moves slightly. Then the rail connection opens up. Then the gate drags, the panels stop lining up, and repairs start chasing symptoms instead of causes. That’s why a pressure treated wood posts fence needs disciplined decisions early, not patchwork fixes later.
Small shortcuts in a fence build usually become structural repairs, not cosmetic ones.
Frequently Asked Questions
Fence questions usually show up after the materials are already in the driveway. These are the answers that keep a straightforward build from turning into a repair project.
| Question | Answer |
|---|---|
| Can I use any pressure-treated post for a fence? | No. For buried fence posts, buy stock marked for ground contact use. The treatment level matters, and the tag matters more than how the post looks on the rack. |
| Are 4×4 posts enough for a residential fence? | Often, yes, on light residential runs with moderate span and wind exposure. For tall privacy panels, corners, slopes, and gate openings, larger posts usually hold alignment better over time. |
| Do I need to seal treated wood right away? | Wait until the wood has dried enough to accept finish properly. After that, sealing the exposed portion helps control surface checking and slows weathering, but it does not replace the need for proper post caps and good hardware. |
| Should posts go in concrete or gravel? | Soil conditions decide that. Concrete can add holding strength, but poor detailing can trap water. Gravel improves drainage, but it has to be installed and compacted correctly. The right choice depends on frost, soil type, fence height, and load. |
| Why are post caps worth buying? | The top of a post is exposed end grain, and end grain pulls in water fast. A good cap is cheap insurance because it protects the most vulnerable part of the post and helps the whole fence system last longer. |
| Can I cut pressure-treated posts on site? | Yes. Treat every fresh cut, notch, and bore hole with the correct end-cut preservative before installation. That small step closes up the spots where decay starts early. |
| Are treated posts safe in residential fencing? | Current treated wood used for residential fencing is generally considered appropriate when it is installed and handled correctly. Oregon DOT notes that preservative metals remain close to the post and did not significantly raise surrounding soil levels under normal conditions. See the ODOT summary here: https://www.oregon.gov/odot/GeoEnvironmental/Documents/Leaching_from_CCA_Treated_Wood.pdf |
| How often should I inspect the fence? | Check it once a year and after major storms. Look at the ground line, fasteners, hinges, caps, and any connection that carries load. In my experience, loose hardware usually shows up before visible post failure does. |
XTREME EDEALS INC. is a good fit if you want to build the fence as a complete system instead of buying posts first and figuring out the rest later. Their catalogue covers the pieces that often decide whether a fence lasts 8 years or 20 plus, including post caps, lag bolts, carriage bolts, deck screws, anchors, brackets, hinges, and other fence and deck hardware. If you want one place to source the connection details that are easy to overlook, browse XTREME EDEALS INC..