
You've finished the fence, cleared the sawdust, and stepped back to admire the clean lines. In daylight, it looks complete. After sunset, though, the posts disappear into the dark, and the deck or boundary feels like it's missing one final detail. That's where solar fence post caps earn their place. They add a finished top to each post, provide a restrained glow, and avoid the trenching, cabling, and electrical work that wired fixtures demand.
The catch is that a cap that looks excellent in a product photograph can become a poor purchase once it meets a real fence. Loose bases rattle, shaded panels fail to charge, overheated housings reduce output, and cheap batteries eventually turn a dusk-to-dawn product into a dark plastic ornament. This guide focuses on the practical decisions that determine whether solar caps remain useful beyond their first season.
Why Solar Fence Post Caps Are the Perfect Finishing Touch
A homeowner typically reaches this decision at the end of a project. The fence is built, the gate hardware is adjusted, and the post tops are exposed to every view from the garden. Standard caps protect those openings, but solar caps add a second function by marking the fence line after dark.

What the light does well
The strongest use case is low-level perimeter lighting. A cap can outline a deck, identify a gate, make a change in level easier to see, or give a driveway edge a consistent visual rhythm. It's useful for orientation and ambience, but it shouldn't be treated as a floodlight or a replacement for dedicated security lighting.
That distinction prevents disappointment. A downward-facing LED with controlled optics can put light where people walk, while a translucent decorative housing may produce a softer halo with less useful illumination. Neither approach is automatically better. Choose the first for visibility and the second for atmosphere.
California provides a particularly favourable environment for small-format solar hardware. The Solar Energy Industries Association's California profile identifies 55,056 MWdc of installed solar capacity, 60,595 MWh of storage capacity, and 2,328,973 solar installations in the state. It also reports that solar supplies 36.70% of California's electricity and supports 78,982 solar jobs, evidence of an established solar and home-improvement ecosystem.
Practical rule: Treat a solar cap as a boundary marker and accent light first. If you need bright task lighting, specify a separate fixture.
Why homeowners choose solar
Solar caps are attractive because installation is usually straightforward. There's no cable to conceal, no low-voltage transformer to locate, and no need to disturb a finished deck or fence line. Once the battery is charged and the sensor detects darkness, the cap handles operation automatically.
They also protect the post top, just like a conventional cap. The housing keeps rain away from the exposed end grain of wood and closes the opening on hollow posts. Fit still matters, because a cap that shifts in wind can admit moisture and look unfinished.
For fence-system planning, it helps to understand how the boundary itself is constructed. Binks Balustrades' glass panel fence guide is a useful reference when comparing solid, framed, and transparent edge treatments around decks and outdoor spaces. Solar caps suit many of those settings, but their performance depends on sun exposure and the exact post profile.
How Solar Post Cap Actually Work
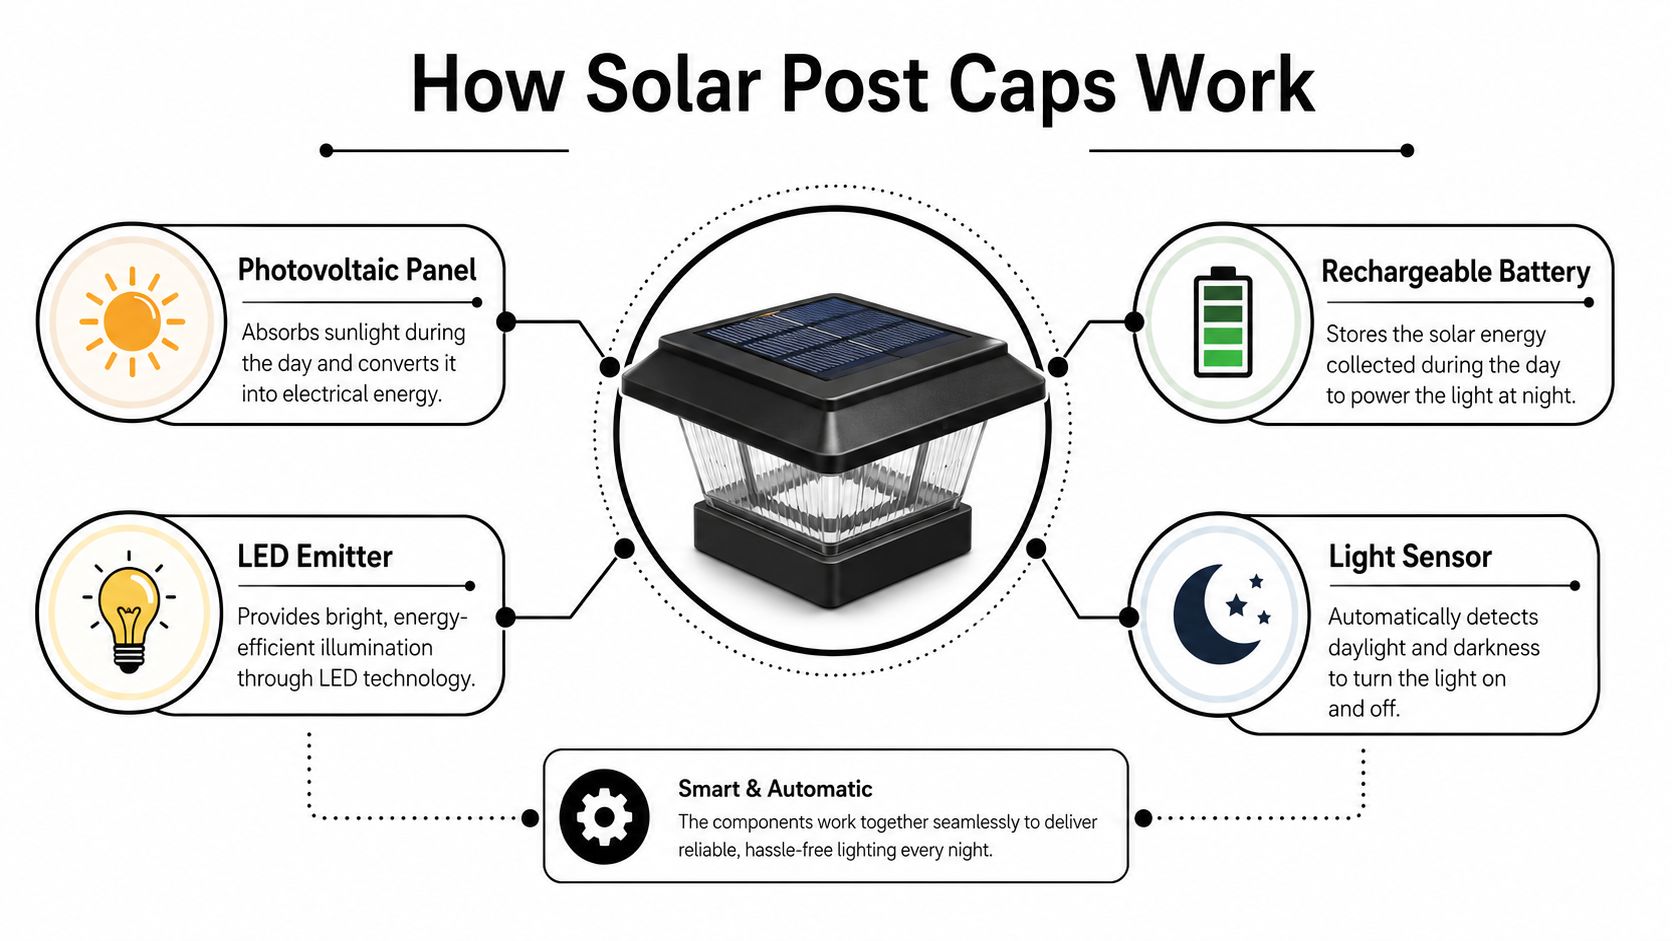
A solar post cap is a small energy system with four working parts. The panel collects energy, the battery stores it, the sensor decides when the light should operate, and the LED converts stored energy into illumination. If any one of those parts is poorly matched to the others, the cap may appear bright in a shop while providing disappointing runtime outside.
The daytime charging cycle
Think of the rechargeable battery as a small water tank. The photovoltaic panel is the pump, sunlight is the available water supply, and the LED is the outlet that empties the tank overnight. A larger or better-positioned panel can put more energy into the battery, but only when it receives useful direct light.
Panel orientation is therefore more important than a headline wattage figure. A cap beneath a roof overhang, behind a tall privacy fence, or under dense foliage may receive enough ambient brightness to trigger its sensor while collecting too little energy for a full night. Dust, pollen, and leaves create the same problem by reducing the light reaching the photovoltaic surface.
The battery chemistry and construction affect how reliably the cap stores and releases energy. Look for a replaceable rechargeable battery rather than a sealed unit when long-term servicing matters. A replaceable battery turns a tired cap into a maintainable product, while a sealed design may require complete replacement when storage performance declines.
The nighttime operating cycle
At dusk, the light sensor detects the change in ambient conditions and activates the LED. A low standby draw helps preserve stored energy, but brightness and runtime remain a balancing act. A brighter emitter consumes more energy, while a gentler glow can operate for longer under marginal charging conditions.
Modern LEDs make compact solar lighting practical because they produce useful light with modest power demand. The driver still matters. Poor electronics can waste stored energy, create inconsistent brightness, or fail after moisture enters the housing.
For a visual explanation of the charging and lighting sequence, this video shows the basic operating principle:
A good specification balances panel area, battery capacity, LED output, sensor behaviour, and enclosure quality. Comparing lumen claims alone misses the system-level question: how much energy reaches the battery during the day, and how efficiently does the cap spend it after sunset?
Comparing Solar Post Cap Styles and Materials
Style affects more than appearance. The shape of the top determines how rain sheds, where light travels, and how prominently the cap sits above the fence. Material affects UV stability, impact resistance, heat behaviour, and the way the product ages.
Match the shape to the lighting job
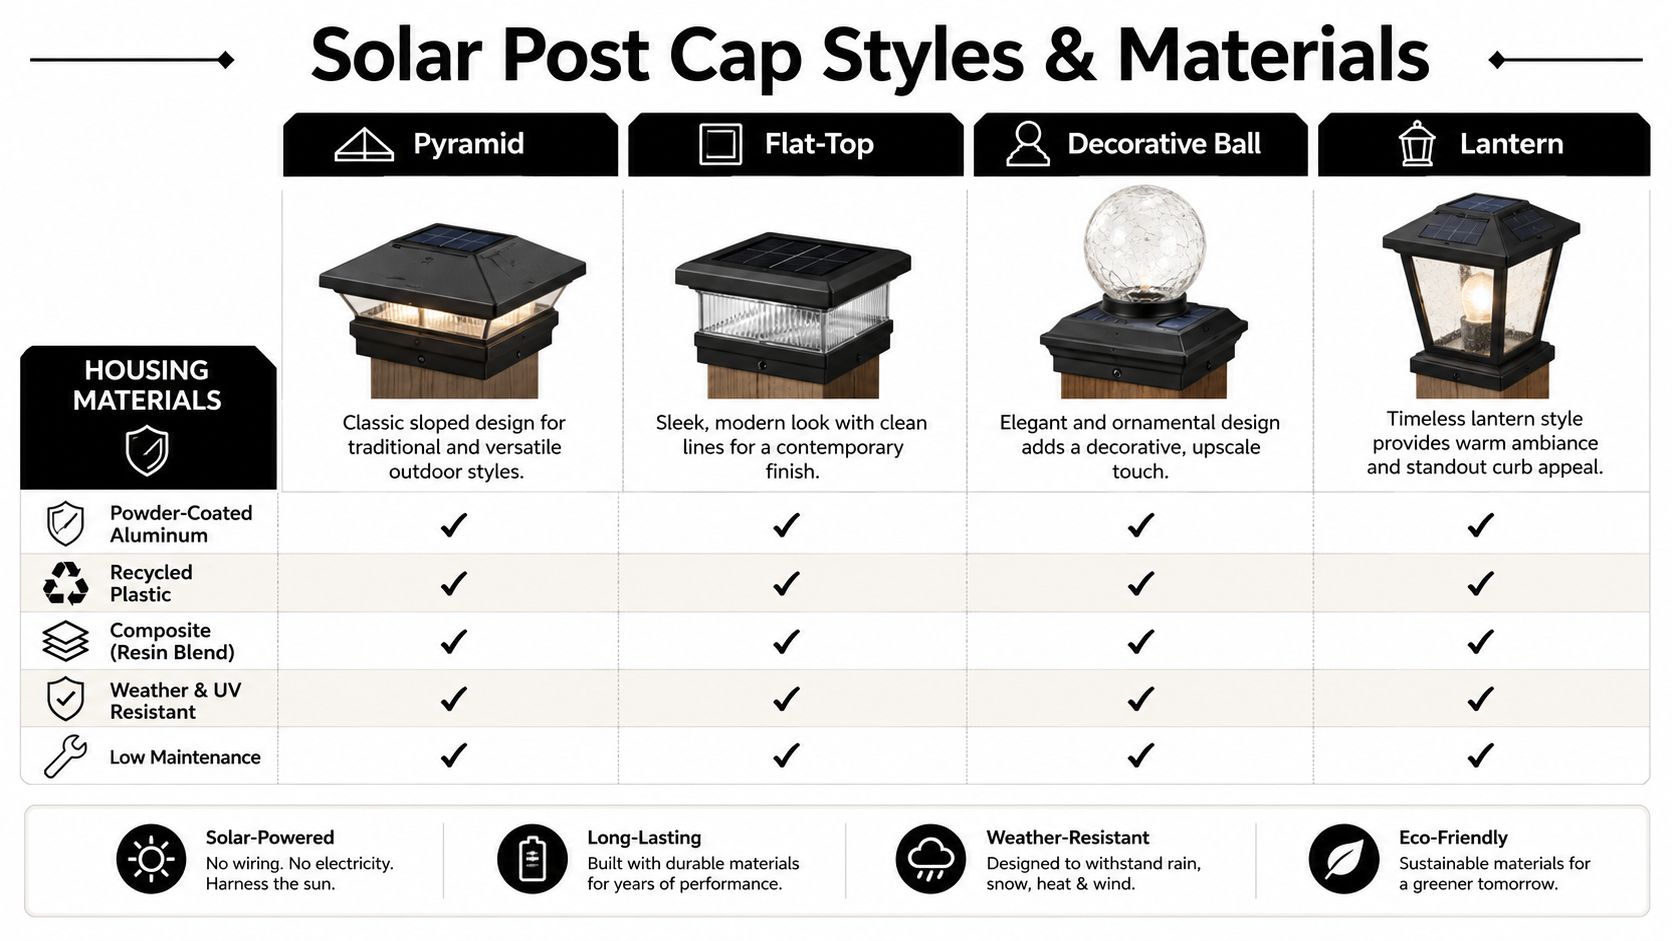
Pyramid caps suit traditional fences and shed rain effectively from the sloped top. They tend to direct light around the upper post rather than creating the most concentrated downward beam.
Flat-top caps work well with contemporary fence lines. They have a restrained profile and can support a panel that faces the sky, but the housing must provide adequate drainage and sealing around the top surface.
Decorative ball caps prioritise visual character. They create a noticeable focal point on gate posts or entry posts, but the ornamental form can reduce the amount of useful downward light.
Lantern styles deliver a more architectural appearance. Their lenses may produce a broader glow, though more decorative openings also mean more surfaces and joints that require careful weather protection.
Fence height, panel opacity, and the surrounding area all influence the result. A buyer comparing privacy, picket, and ornamental systems can use this practical overview of garden fence types and their advantages to match the cap's visual weight to the fence design.
Compare housing materials honestly
ABS plastic is light and affordable, but it needs strong UV stabilisation and a sturdy lens if it's going to survive exposed installation. Polycarbonate generally offers better impact resistance, though its long-term appearance still depends on formulation and surface exposure.
Aluminium housings handle outdoor abuse well and can provide a more rigid mounting base. Powder coating helps maintain appearance, but the coating, seals, and fasteners still need to be compatible with the surrounding post.
Copper-finished products can look excellent when new and develop a changing appearance over time. They're a design choice, not automatically a performance upgrade. The most important questions are whether the housing seals properly, whether the base fits the post, and whether the panel and battery remain serviceable.
For a range of shapes and mounting options, review the solar fence post cap selection, then compare the actual base dimensions rather than choosing only by photograph or finish.
Sizing and Fit for Common Post Dimensions
Fit causes more returns than brightness. A post sold as 4 by 4 doesn't necessarily measure four inches on every face, and a vinyl sleeve may have a different outside dimension from the wood or structural post inside it. Measure the finished post where the cap will sit.
Nominal lumber dimensions are labels, not guaranteed finished measurements. Wood can also change slightly with moisture, while vinyl and composite posts are manufactured with their own tolerances. A cap that fits a true square post may be loose on a sleeve with the same nominal description.
Post Size Compatibility Guide
| Nominal Post Size | Actual Dimensions | Recommended Cap Base Size | Mounting Method |
|---|---|---|---|
| 2×2 | Measure finished post | Match measured outside dimension | Screws or suitable exterior adhesive |
| 3×3 | Measure finished post | Match measured outside dimension | Screws preferred on exposed posts |
| 4×4 | Measure finished post | Match measured outside dimension | Screws, press fit, or compatible adhesive |
| 5×5 | Measure finished post | Match measured outside dimension | Mechanical fasteners or fitted sleeve |
| 6×6 | Measure finished post | Match measured outside dimension | Mechanical fasteners, especially on wood |
| True 6×6 | Verify all faces and corner profile | Use a true 6×6-compatible base | Fasteners with careful pilot drilling |
Wood, vinyl, and unusual posts
Wood posts accept screws well, but pilot drilling prevents splitting and protects plastic bases from cracking. Vinyl posts need more caution. A screw driven into a thin wall can strip or deform the material, so use a fastener designed for the wall thickness or add an internal reinforcement where the system allows it.
Adhesive works when the surfaces are clean, dry, and closely matched. It's a poor solution for a large gap, a dusty post, or a cap you may need to remove for battery service. For an exposed fence, a properly sized base with mechanical attachment is usually more dependable than trying to fill a loose fit with glue.
The 4×4 post cap range is a useful starting point, but confirm the product's internal and external dimensions before ordering. Odd-sized posts may need an adapter plate or a custom-fabricated transition, not a universal cap forced into place.
Understanding Heat and Cold Weather Performance
Solar caps operate outdoors, so their performance changes with the weather. Heat reduces photovoltaic output, while cold affects battery behaviour and available charging time. Product pages often simplify this reality into a promise of automatic lighting, but automatic operation doesn't guarantee identical runtime through every season.
Heat reduces charging headroom
PV modules are rated at 25°C cell temperature under Standard Test Conditions, and modern panels typically lose about 0.29% to 0.34% of power for every 1°C above that baseline according to the California solar heat guidance. The effect matters even on a compact cap.
Using the provided engineering example, a cap rated at 1 W under STC may deliver about 6.4% less power at roughly 45°C cell temperature and about 9.6% less at 55°C. Those figures describe panel output under the stated temperature conditions, not guaranteed brightness loss, because the battery, driver, and LED also influence the final result.
Heat exposes weak designs first. A dark housing with no ventilation can hold heat around the panel and battery, reducing charging performance when long summer evenings create the greatest demand.
Manufacturers can improve the situation with sensible enclosure design, ventilation that doesn't invite water in, and panel placement that avoids unnecessary heat buildup. Inland California installations deserve particular attention because strong sun and hot surfaces can push small modules away from their rating conditions.
Cold and short days change expectations
Cold-weather performance is less straightforward. Lower temperatures can reduce available battery performance, while shorter winter days and low sun angles reduce the energy collected. Snow, frost, dust, and wind-blown debris can block the panel entirely until someone clears it.
California's distributed-generation reporting platform, the California Distributed Generation Statistics site, provides the state's official public reporting for distributed generation projects. The wider solar market has expanded across varied climates, but a fence cap still faces local conditions at its exact mounting point. A panel in winter shade behaves differently from one on an unobstructed southern-facing post.
The practical answer is to expect seasonal variation. Buy for serviceability, place the panel where it gets the clearest available sky, and don't specify solar caps as the sole safety lighting for stairs, gates, or work areas.
Installation Steps and Common Mistakes to Avoid
Installation starts before the first screw. Lay every cap beside its intended post, confirm the base fit, and inspect the housing, lens, panel, and battery compartment. If a unit has a shipping tab, remove it according to the instructions, but test the cap in the dark or cover the panel before fixing it permanently.
A reliable installation sequence
Measure the finished post. Check more than the label. Record the outside width, corner shape, and any sleeve or trim that the base must cover.
Test the location. Set the cap in place temporarily and observe whether a roof, tree, wall, or adjacent structure shades the panel. The fence post installation guide provides useful context for keeping posts plumb and stable, which also helps caps seat evenly.
Clean the contact surfaces. Remove sawdust, grease, loose coating, and dirt. Adhesive cannot compensate for contamination or a badly oversized base.
Choose the attachment method. Use the supplied screws where possible. Drill pilot holes in wood, and avoid driving fasteners so tightly that they distort a plastic base or crack the housing.
Protect the joint. Apply only a compatible exterior sealant where the product design calls for it. Don't block drainage openings or seal a battery compartment that needs to be opened.
Set the panel for exposure. A cap can be perfectly secure and still fail to charge if the panel faces permanent shade.
Mistakes that create callbacks
Overtightening is common. It pulls the base out of shape, creates stress around screw holes, and can leave the cap visibly tilted. Using an incompatible construction adhesive creates a different problem, because some adhesives attack plastic or make future battery replacement destructive.
Another mistake is installing every cap before testing any of them. Keep one unit accessible, check its sensor response, and confirm that the light behaves as expected before repeating the installation across the entire run. Leave enough clearance for the battery door and don't place a cap where branches will scrape the panel or drop debris onto it.
Maintenance and Troubleshooting for Long-Term Performance
Solar caps are low-maintenance, not maintenance-free. The panel is an exposed charging surface, and dust, pollen, bird residue, and leaves can reduce the light reaching it. A soft cloth and clean water are usually safer than abrasive pads or harsh cleaners that scratch the panel or cloud the lens.
Diagnose the symptom first
If a cap doesn't illuminate, cover the panel to simulate darkness and check the switch position, battery tab, and battery contacts. If several caps fail together, look for a common cause such as seasonal shade, a dirty panel, or a control setting. If one cap fails while neighbouring units operate, inspect that unit's battery, sensor, seals, and wiring.
Reduced runtime usually points to inadequate charging or a tired rechargeable battery. Clean and expose the panel first, then test with a known-good compatible battery if the design permits replacement. A dim LED with a charged battery may indicate a driver or emitter problem, while moisture inside the lens suggests enclosure or seal failure.
Serviceability is part of product quality. A cap with a replaceable battery, accessible fasteners, and a properly sealed compartment is easier to keep working than a sealed unit that must be discarded after one component ages.
California's lighting framework reinforces the importance of controls and optical restraint. The California Energy Commission's outdoor-lighting guidance discusses power allowances, efficacy, uplight, glare, and controls. For a residential cap, the practical lesson is simple: downward-shielded light, low standby consumption, and reliable dusk sensing generally make more sense than an exposed, wasteful emitter.
Smart Buying Decisions and Where to Find Quality Options
Start with the post, not the product photograph. Confirm the actual base dimensions, material, mounting method, panel exposure, battery access, and whether the light pattern suits your purpose. A low price means little if the cap doesn't fit, can't be serviced, or needs replacement after weather damages the housing.
California's rules offer useful design guidance even when a small residential product isn't directly governed by every nonresidential provision. The state uses lighting zones from LZ0 through LZ4, and its outdoor-lighting framework addresses controls and light pollution through the Title 24 lighting guidance. Separate 2022 guidance says luminaires rated at 6,200 initial lumens or greater must comply with BUG ratings and that outdoor lighting must shut off when daylight is available through automatic controls, as described in the California Energy Commission requirements. A small solar cap is far below that luminaire threshold, but the design principles still favour controlled, shielded illumination.
For state-owned, leased, or managed property, California law effective January 1, 2024 limits newly installed fixtures to 2,700 K or below and specifies options involving dimming, shutoff, motion activation, or shielding, as set out in the state-law update. The Energy Code materials also classify outdoor LED luminaires as high-luminous-efficacy products without separate JA8 compliance, according to the Energy Code support document.
Compare warranty language, replacement-battery availability, seal construction, and returns policy. XTREME EDEALS INC. offers solar post caps alongside post caps for wood and metal posts, installation hardware, and common deck and fencing accessories, giving buyers a place to compare fit and attachment requirements rather than selecting on brightness claims alone.
XTREME EDEALS INC. offers solar fence post caps and related post-cap hardware in options for common wood and metal post sizes, including solar-compatible products for nominal 6×6 applications. Visit XTREME EDEALS INC. to check the cap dimensions, materials, and installation hardware that match your fence before you order.