
You're halfway through pricing a backyard project when the spreadsheet looks reassuring. The deck boards and fence lumber are listed, concrete is included, and the total seems workable. Then the build starts. You need post caps, gate hinges, joist hangers, carriage bolts, extra screws, a permit, and another delivery because the first takeoff didn't account for waste. The budget didn't fail because multiplication was difficult. It failed because the scope was incomplete.
Project cost estimation for decks and fences has to account for the small, finish-critical items that make the structure work and look complete. It also has to reflect Canadian market conditions, design maturity, permit timing, labour productivity, and the risks hidden below the soil. The practical method is simple: define everything, measure it, price each component, test the assumptions, and keep the estimate live until the project is finished.
Why Deck and Fence Estimates Go Wrong
A homeowner may start with a 12 by 16 deck and a short privacy fence, price the visible lumber, and assume the rest will be minor. The first missing items usually appear at the hardware counter. Post caps, gate hardware, joist hangers, post base brackets, washers, anchors, and fasteners each look inexpensive beside a load of lumber, but together they can change the estimate and delay the work.
Fence projects create a similar trap. A contractor may count posts and panels but overlook a gate insert, hinges, latch hardware, decorative caps, or the extra concrete required when site access makes post setting slower. A deck estimate can miss stair framing, railing components, balusters, ledger fasteners, or the screws needed for the actual board layout. These aren't theoretical gaps. They're the line items that appear after the client has already accepted the price.

The leaks hide in the interfaces
Decks and fences combine structural materials with finish hardware. Lumber gets measured by area or length, while hardware gets counted by connection, post, gate, or railing section. Those measurement systems don't naturally fit together, so estimators who price by instinct often capture the large quantities and miss the interfaces between them.
The site adds another layer. A sloped yard changes post lengths and excavation effort. Tight access increases handling and delivery work. Existing concrete, buried utilities, drainage, property-line uncertainty, and an attached deck ledger can all affect the final cost. The estimate needs assumptions that another person can read and challenge before construction begins.
Practical rule: If an item will be installed, cut, drilled, transported, inspected, or removed, it belongs somewhere in the estimate.
A pergola changes the load paths, footings, posts, and approval discussion on a deck, so a homeowner should review design considerations such as these pergola on deck plans before treating the deck surface as the full project. The same discipline applies to a fence gate, railing return, or decorative finish. Price the complete assembly, not just the material that covers the largest visible area.
Defining Scope and Building Your Material Takeoff
Before opening a supplier catalogue, write a scope that can be measured. For a deck, record the length, width, height, framing arrangement, stairs, railing, surface boards, attachment method, and finish. For a fence, record the run length, height, post spacing, corners, ends, gates, infill style, post treatment, and access conditions.
Start with a measurable breakdown
Use a bottom-up takeoff. Break the work into quantities that can be checked on site:
- Deck area: Calculate the surface area, then identify board direction, board length, picture framing, borders, and stair treads.
- Fence run: Measure linear feet, then separate straight runs, corners, ends, and gate openings.
- Posts and footings: Count structural posts, terminal posts, gate posts, railing posts, and footing locations separately.
- Hardware connections: Map each connection to a product category, such as joist hangers, carriage bolts, lag bolts, anchors, or post base brackets.
- Finishing pieces: Count post caps, balusters, gate inserts, hinges, latches, washers, and other visible or functional accessories.
XTREME EDEALS categories provide a useful takeoff backbone because they mirror the way these projects are assembled. Organise the worksheet under post caps, balusters, gate inserts, hinges, joist hangers, post base brackets, deck screws, carriage bolts, lag bolts, nails, washers, and anchors. The fence building supplies collection can help you match the hardware list to the fence design rather than leaving accessory pricing until installation.
A practical 12 by 16 deck takeoff
For a 12 by 16 deck, begin with the 192 square feet of surface area, calculated from the stated dimensions. That area is only the starting point. The worksheet should separately identify decking boards, rim boards, joists, beams, posts, footings, stairs if included, railing sections, balusters, and all attachment hardware.
A usable line-item sheet might include:
- Deck boards by length and board count, with a separate allowance for cuts and unusable offcuts.
- Joists and rim framing, followed by the number of joist hangers and structural fasteners required.
- Posts, beams, footing materials, and post base brackets where the design uses supported connections.
- Railing posts, top and bottom rails, balusters, and post caps.
- Deck screws by intended coverage, plus carriage bolts, lag bolts, washers, and anchors where specified.
- Stair stringers, risers, treads, and handrail components if stairs form part of the approved scope.

A baluster spacing calculator is useful when the railing run doesn't divide neatly into equal openings. It helps convert post-to-post measurements and the desired clear gap into a defensible baluster count. That's more reliable than buying by eye and discovering at the final section that the spacing or quantity doesn't work.
Use a video walkthrough as a visual check, but don't let a generic example replace the drawings, dimensions, and local requirements for your project.
Every item needs three fields beside it: quantity, unit price, and source date. Add a notes column for product size, pack quantity, finish, and substitutions. That structure makes fastener underestimation visible before the bid is issued.
Pricing Labour and Subcontractor Work
Material takeoff tells you what must be purchased. Labour pricing tells you what the crew must do to turn those purchases into a finished structure. Treat the work as separate operations, because framing productivity isn't the same as installing deck boards, setting fence posts, assembling rails, or hanging a gate.
For a deck, estimate hours for layout, excavation, footing preparation, framing, board installation, stairs, railing, cleanup, and material handling. For a fence, separate property-line layout, post-hole excavation, concrete placement, post alignment, panel or board installation, gate assembly, hardware installation, and cleanup. Include loading, travel, delivery coordination, and return trips when the site or supplier location makes them real costs.
Use local evidence, not a universal rate
Statistics Canada's Building Construction Price Index tracks quarterly changes in contractor bid prices for new residential and non-residential buildings across 11 Canadian Census Metropolitan Areas, plus a Canada-wide composite. Its prices include materials, labour, equipment, overhead, and profit, while excluding land, design, land development, and real estate fees, as explained in the BCPI methodology. That makes BCPI useful for checking whether an internal rate still reflects the market, but it doesn't replace your own crew records.
The index is available quarterly from the first quarter of 1981, providing a long historical record for escalation review. Regional conditions still matter. A crew in Vancouver, Calgary, Toronto, or Halifax may face different travel, labour, supplier, and access conditions than a crew in a smaller market.
A working labour-rate table
The table below is a template for entering your own current rates. No universal Canadian hourly or per-unit rate is defensible without local crew data, project access details, and the actual scope.
| Task | Hourly Rate (CAD) | Per-Unit Rate | Typical Subcontractor Needed |
|---|---|---|---|
| Deck layout and framing | Confirm locally | Confirm locally | Sometimes, structural or engineering review |
| Deck board installation | Confirm locally | Confirm locally | Usually self-performed |
| Fence post setting | Confirm locally | Confirm locally | Concrete or excavation subcontractor may be needed |
| Fence panel or board installation | Confirm locally | Confirm locally | Usually self-performed |
| Rail assembly and baluster installation | Confirm locally | Confirm locally | Usually self-performed |
| Gate installation and adjustment | Confirm locally | Confirm locally | Specialist help may be useful for complex gates |
Decide what stays in-house
Self-perform repetitive work when your crew has the tools and predictable productivity. Subcontract when the work carries specialised risk or requires equipment you don't own. Concrete footings, electrical work for deck lighting, and property-line surveying are common triggers.
Don't hide subcontractor allowances inside a vague labour total. Request a written price, record what it includes, and check whether mobilization, disposal, inspection support, and return visits are included. A professional bid also carries overhead for insurance, vehicles, tool depreciation, supervision, scheduling, and administration. If those costs aren't recovered through your labour pricing or markup, the project can look busy while losing money.
Adding Permits and Contingency Without Guessing
Permit costs belong in the estimate before the client approves the work. Check the municipality for deck height rules, setbacks, lot coverage, fence-height requirements, structural documentation, engineering-stamp needs, inspection stages, and submission timing. A fence may be treated differently from a deck, and a deck attached to a building may create different requirements from a freestanding platform.
Treat the permit as a scheduled cost
List the permit application, drawing preparation, engineering review, survey support, inspection coordination, and expected administrative time separately. Confirm the fee with the authority having jurisdiction rather than copying an old estimate. Permit timing can also affect material ordering and crew scheduling, so the cost plan should note what cannot start until approval is received.
The fence height requirements resource can help organise the questions you need to ask, but the municipality remains the controlling source for the property.

Build contingency from identifiable risks
A contingency isn't permission to inflate the quote or fund a client's new ideas. The Royal Architectural Institute of Canada guidance describes construction contingency as a reserve for risks such as design evolution before construction, escalation between estimating and construction, unknown conditions, and functional or design changes within the approved work. British Columbia guidance further says contingency should be a separate line item, based on quantitative risk analysis, and limited to items within the approved scope, as set out in its cost estimating guidance.
Create a risk register with four columns:
- Risk: Soft soil, hidden utility, delayed material, difficult access, or design development.
- Probability: Use your documented judgement, supported by past project records where available.
- Impact: Estimate the likely additional labour, material, equipment, or delay cost.
- Expected allowance: Multiply probability by impact, then sum the allowances.
Do not apply a flat rule without explaining what it covers. California public-sector experience illustrates why that shortcut is weak. A State Auditor review of 25 projects found that 19 had cost estimates, 12 of those exceeded their initial estimate, and 7 overruns were greater than 10%. The review also found 6 projects without usable estimates, reinforcing the value of documented scope, assumptions, and contingency in the audit results.
Markup and Profit for Contractor Bids
A contractor's direct cost is not the client's price. Direct cost includes materials, field labour, equipment, and subcontractors. Overhead includes business expenses that support delivery across jobs, such as insurance, vehicles, office administration, estimating time, software, tool replacement, and supervision. Profit is what remains after those costs are recovered.
The first mistake to avoid is confusing markup with margin. If direct cost is (C), markup is calculated as:
Selling price = C × (1 + markup percentage)
Margin is calculated from the selling price:
Margin = (selling price − total cost) ÷ selling price
A markup percentage and a margin percentage aren't interchangeable. Build a rate sheet that shows direct cost, allocated overhead, desired profit, taxes where applicable, and the final client price separately.
Make the bid readable without exposing confusion
Use a lump-sum price when the scope is clear and the client wants a simple decision. Attach a detailed inclusions and exclusions list so the lump sum doesn't become an invitation to add unpriced work. Itemise allowances for uncertain selections, such as railing style, gate hardware, finish, engineering, or excavation conditions.
For contractors, a spreadsheet can work if every revision is controlled and actuals are captured. Estimating software such as Exayard construction estimating software can be useful when a growing operation needs reusable assemblies, stored rates, and clearer proposal records. The tool doesn't fix weak assumptions. It only makes a disciplined estimating process easier to repeat.
Protect the price after approval
State the validity period for material pricing, the assumed site access, the permit responsibility, and the change-order process. If the client changes fence height, gate design, deck shape, railing, or finish, update the estimate rather than absorbing the work.
A strong bid makes trade-offs visible. You can offer a different post-cap style, railing layout, fastener pack, or gate insert, but each substitution should preserve compatibility and show its cost effect. Competitive pricing isn't the lowest number on the page. It's a price that matches the promised scope and still supports competent installation.
Complete Example Calculation for a Deck and Fence Project
A worked example is useful only if the reader can see the assumptions. The following project combines a 12 by 16 pressure-treated deck with a 50-foot privacy fence run. The figures shown in the required breakdown are editorial example values, not a current supplier quotation, so a live estimate should replace them with dated local pricing and confirmed labour rates.
The example budget
The supplied project breakdown assigns these costs:
- Decking materials: CAD 1,250
- Framing and footings: CAD 980
- Deck labour: CAD 2,400
- Fence materials: CAD 1,850
- Fence posts and concrete: CAD 620
- Fence labour: CAD 1,600
- Permit fee: CAD 150
- Contingency: 12%, shown as CAD 990
- Total project estimate: CAD 7,840
The visual below presents the same worked allocation.
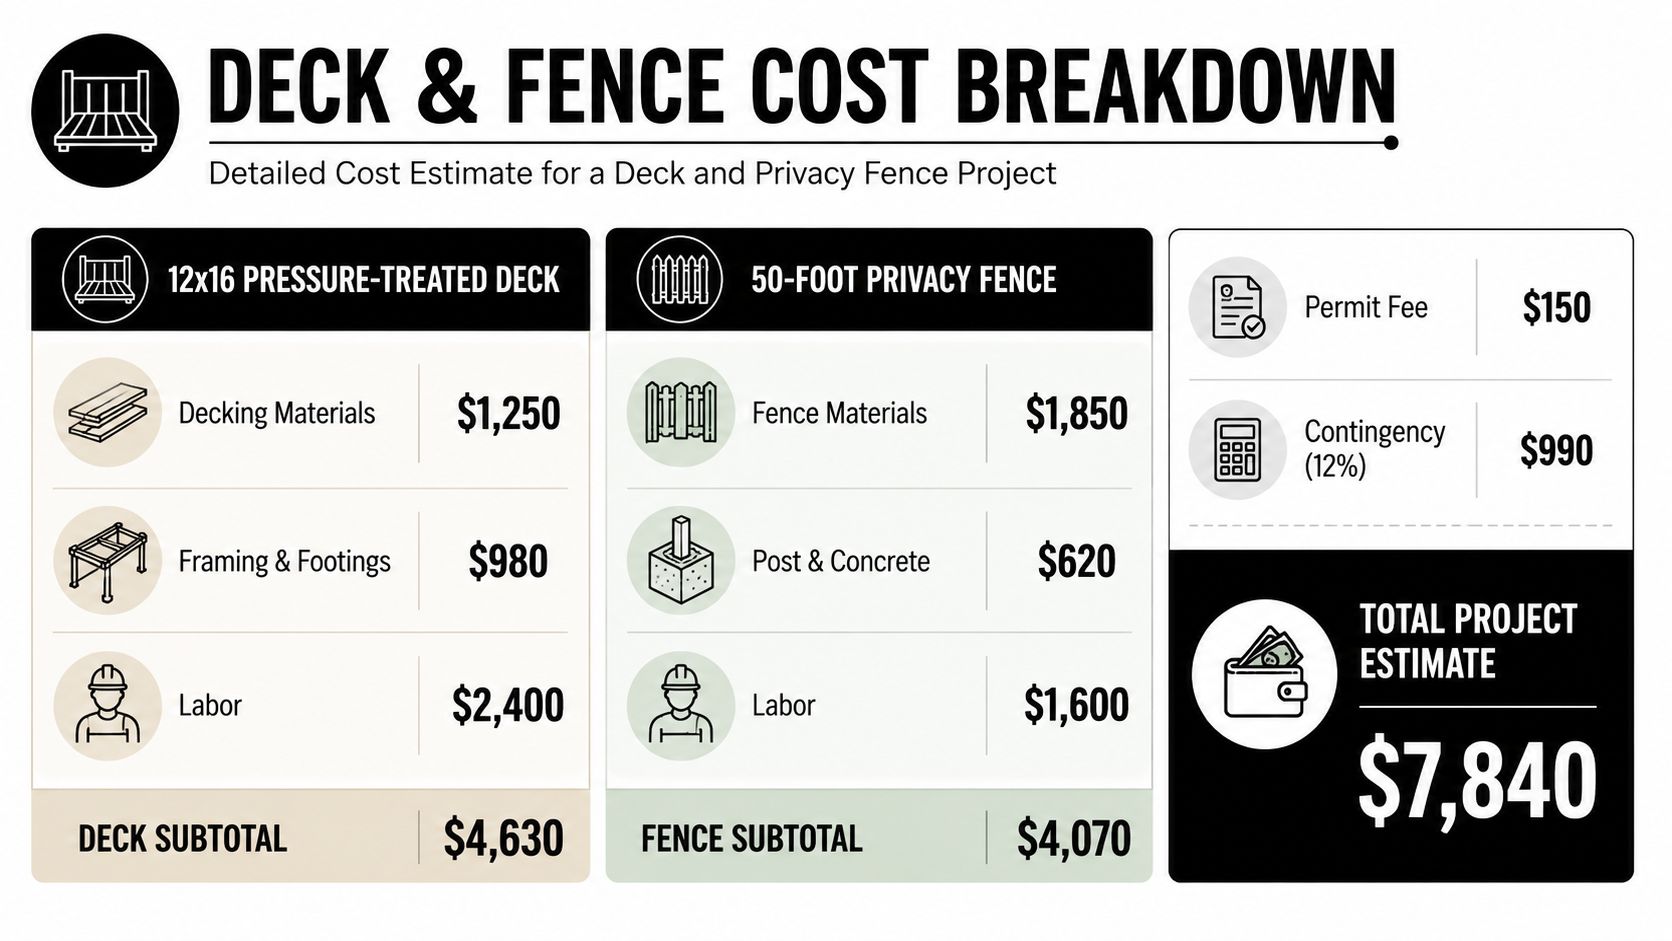
The arithmetic needs a careful review before anyone sends a quote. The listed pre-contingency categories total CAD 8,850, so a CAD 990 contingency and a CAD 7,840 total don't reconcile as a conventional additive estimate. That discrepancy is exactly why an estimator should keep the worksheet open, identify whether categories overlap, and never rely on a graphic or rounded total without checking the source lines.
Make the template reusable
The material sheet should break the deck and fence allowances into the XTREME EDEALS categories used during takeoff: post caps, joist hangers, deck screws, carriage bolts, post base brackets, balusters, and gate hardware. Record the required pack quantity, selected product, price date, shipping, and substitution notes. A build a deck guide can support the planning process, but it shouldn't replace the project drawings or local approval requirements.
The best template has separate tabs for scope, takeoff, labour, subcontractors, permits, risk, markup, and actual costs. After construction, compare purchased quantities and recorded hours against the estimate. If screws, concrete, delivery trips, or gate adjustments repeatedly exceed the allowance, update the assembly rather than accepting the same leak on the next bid.
Regional escalation also deserves a dated review. Statistics Canada reported that in Q2 2026, residential building construction costs rose 2.3% year over year and non-residential costs rose 3.5% across the 15-CMA composite; Ontario non-residential costs were reported at 4.0% year over year in Q2 2025 and 4.5% in Q4 2025, while London reached 9.9% year over year in the cited period in the Statistics Canada release. Altus Group's 2026 Canadian Cost Guide draws from 6,652 projects worth C$573 billion and provides city-level hard-cost benchmarks across asset classes, while cited ranges include GTA enclosed-mall retail at C$260 to C$480 per square foot and Ontario GTA underground LRT guideway at about C$88.9 million to C$206.6 million per kilometre in the Canadian Cost Guide. Those broader benchmarks aren't deck prices, but they demonstrate why region and asset type must stay visible in any cost model.
XTREME EDEALS INC. offers post caps, balusters, gate inserts, hinges, joist hangers, post base brackets, deck screws, bolts, anchors, and other deck and fence hardware in CAD-priced product listings with multi-pack options. Visit XTREME EDEALS INC. to build a dated material takeoff around the exact accessories and fasteners your deck or fence estimate requires.