
You're standing in the hardware aisle on Saturday morning, latch in hand, because your vinyl gate caught fine last month and now it bounces open unless you lift it and push. That doesn't always mean the latch wore out. It often means the gate moved, the post settled, or you bought a side-yard latch for a gate that has to work like a pool barrier.
A gate latch vinyl fence job is a system job. Code height, swing direction, hinge tension, and sag decide whether the hardware keeps working after wind, irrigation, and a season of use.
Check Code Height and Gate Size Before You Buy
A latch that fits a side gate can fail a pool barrier inspection. That's the rule that surprises most DIYers, because the hardware looks identical on the shelf.
Shasta County pool enclosure guidance describes a minimum effective height of 5 feet, openings small enough that a 4-inch-diameter sphere cannot pass through, and gates that are self-closing and self-latching, hold securely closed, and can be locked when the pool is closed. Appearance doesn't save a lightweight decorative latch that won't engage on its own.
Why the Numbers Do Not Match Everywhere
California cities and counties adopt and interpret pool rules separately. One jurisdiction uses a 60-inch latch rule, another uses a hand-operated hardware range, and a third adds solid infill around the release. Treat the table as a starting point for a call to your building department, not as a permit.
If you're still sorting out whether the fence itself needs approval, the HomeProBadge guide to fence permits is a useful plain-language starting point before you call the city. Check your lot rules against local fence height requirements at the same time, because height, location, and use get decided together.
| Requirement | Value | Where it applies |
|---|---|---|
| Pedestrian access gate latch height | At least 60 in above ground | Statewide pool-safety provisions |
| Vehicle gate on a pool enclosure | Does not satisfy the 60 in pedestrian latch rule | San Joaquin County guidance |
| Hand-operated hardware height | 42 to 44 in above deck or walkway | Shasta County guidance |
| Latch height and pool-side mount | At least 4 ft 6 in above ground, 6 in below fence top | Chula Vista ordinance |
| Enclosure height | At least 60 in; 5 ft effective in some county guidance | Statewide and county rules |
| Maximum opening size | 4 in in any dimension; 4-in sphere must not pass | Chula Vista and Shasta County |
| Low-mounted release gap | Release on pool side 3 in below gate top; no opening over 1/2 in within 18 in of release | Release below 60 in under California pool-barrier guidance |
| Solid area below latch | At least 24 in in every direction | Chula Vista open-type gates |
| Regulated gate size and weight | Over 50 lb and over 48 in wide or 84 in high | California public-use gates |
Measure from the finished deck or walkway on the pool side, not from bare soil you plan to grade later. Write down gate width, gate height, and your planned latch height before you order anything.
Separate pedestrian gates from vehicle gates first. A wide driveway gate doesn't satisfy the pedestrian latch rule, so a pool enclosure usually needs its own walk gate that swings outward, away from the water.
For accessible-route projects outside a pool enclosure, UpCodes hand-activated hardware text places hand-activated latch hardware between 30 and 44 inches above the floor or ground. Don't mix that range with a pool-barrier height. Confirm which code governs your gate, then pick the hardware.
Pick the Latch Type That Matches Your Gate
The gate looked straight when you hung it. A windy week later, it's swinging open on its own, and the latch gets blamed for a problem that started in the hinges and the frame.
Latch type decides three practical things. It decides whether the gate self-latches, whether you can lock it, and whether it belongs on a pool gate, a driveway gate, or a quiet side yard. Colour and style come last.
| Latch type | Self-latching | Lockable | Pool-barrier fit | Best use |
|---|---|---|---|---|
| Gravity drop latch | Only when gate hangs plumb | Padlock hole only | Poor, sag defeats it | Light side-yard gates on square posts |
| Two-side locking post latch | With spring or gravity return | Yes, with key or padlock | Good when mounted at code height | Driveway and pedestrian gates on 5×5 posts |
| Self-closing spring latch | Yes | Usually no, add a lockable release | Strong candidate | Pool enclosures and frequently used gates |
| Thumb or push-button latch | No | No | Rarely compliant | Decorative side gates with low traffic |
| Magnetic latch | Partial, needs a close gap | No | Limited | Lightweight interior gates only |
| Keyed or lockable gate latch | Depends on model | Yes | Good if self-latching | Pool gates and gates needing security |
How to Read the Table on a Real Gate
A gravity latch is honest hardware, but it's unforgiving. If the gate drops even a little at the latch corner, the bar lands on top of the keeper instead of dropping into it. On a square, light side gate that you check often, that's workable. On a pool gate, it's a weak choice.
A self-closing spring latch suits pool and busy pedestrian gates because it doesn't wait for someone to lift and drop a bar. Pair it with self-closing hinges, then test it properly. A spring latch that needs a hip bump to engage isn't self-latching in practice.
A decorative thumb latch belongs on a low-traffic side yard only. It feels nice in the hand, but it usually gives you neither reliable automatic engagement nor a real lock. Don't let a black finish make it look more capable than it is.
Choose by function first, then by finish. A latch that matches the hinges but won't catch from a slow close is the wrong latch.
A two-side locking post latch is useful when people need access from both sides and you want a key or padlock option. Check post size before you buy it. Models made for 5×5 and similar posts need enough flat surface for the screws to land solidly, and vinyl posts usually need through-bolting or a metal insert behind the wall, as covered in the reinforcement section later.
Magnetic latches have a narrow role. They need a close, consistent gap, and they don't give you the positive mechanical engagement most outdoor gates need in wind. Keep them off pool barriers and heavy gates.
Before you shop, write four things on a scrap of paper: gate width, post type, pool or non-pool use, and whether you need locking from one side or both. XTREME EDEALS stocks gate hardware and Decorex Hardware latches at xtremeedeals.ca, so you can compare those rows against real models instead of guessing from a package photo.
How to Install a Vinyl Gate Latch Step by Step
Plan on about two hours for a single gate if the posts are sound. You need stainless screws, a drill with a vinyl-safe bit, a level, a tape measure, and a spacer block to hold a consistent gap while you mark.
The flow below is the order that prevents re-drilling holes in vinyl.
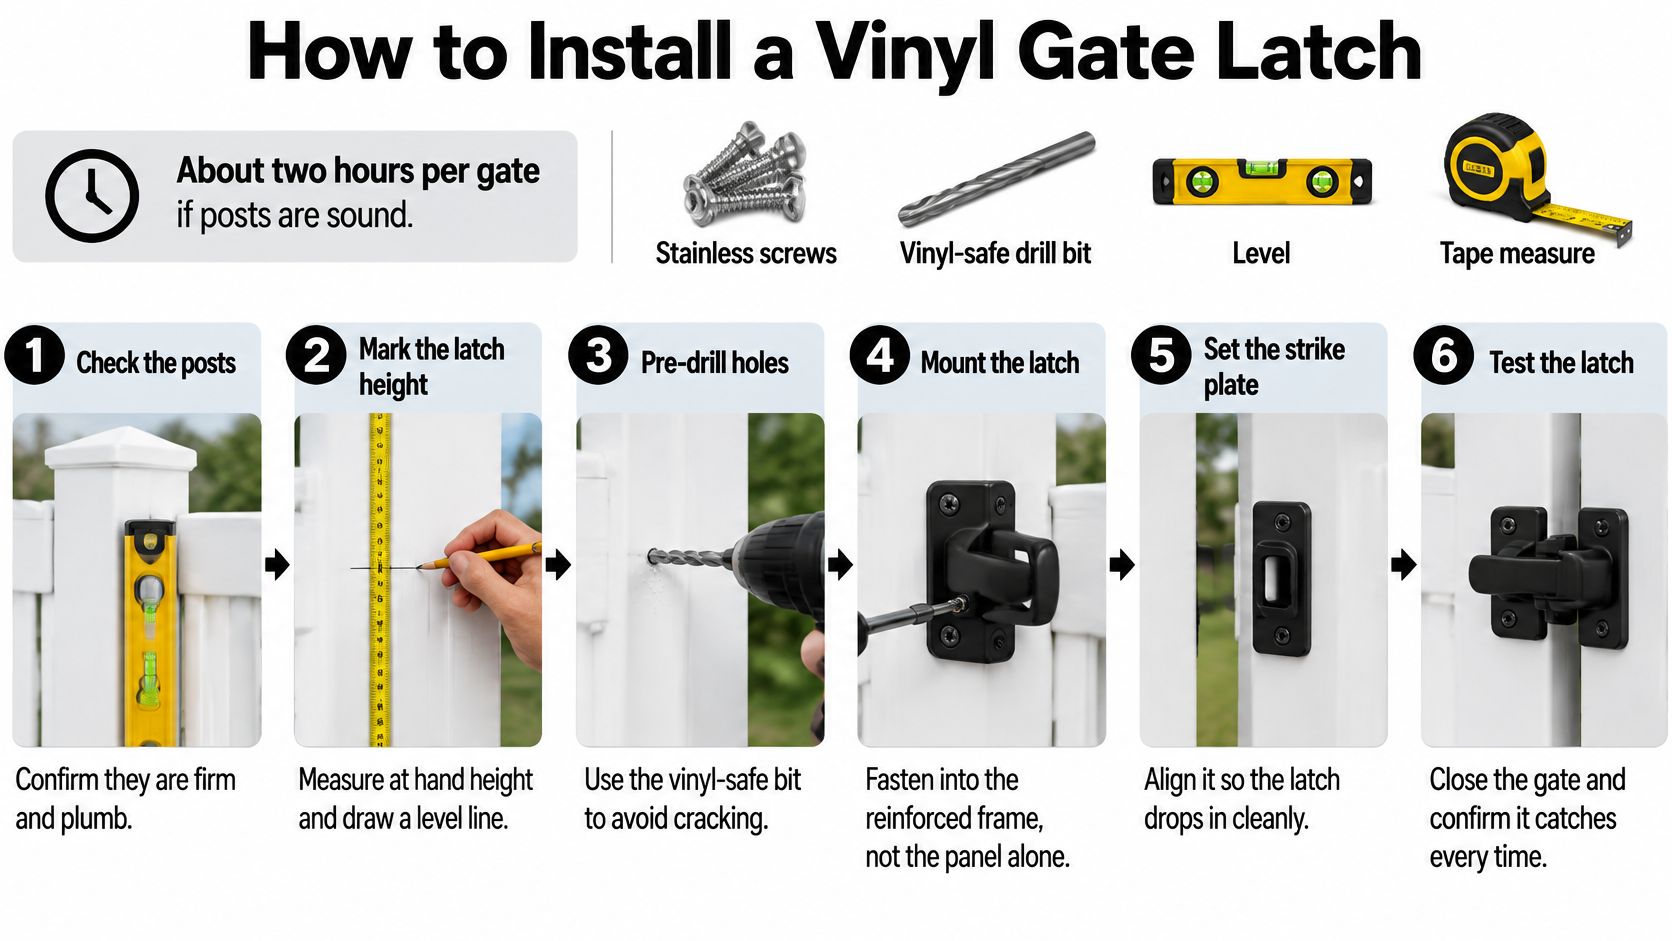
Confirm the gate hangs plumb and closes square. Don't drill anything until the gate swings cleanly and the latch side meets the post without lifting or forcing it. If you have to push the gate into alignment now, the latch will miss later.
Mark the latch height from finished deck or grade on the pool side. Use the local figure you confirmed earlier, then draw a level line across the gate and post. Measuring from soil that will get pavers or deck boards later puts you at the wrong height on inspection day.
Drill pilot holes and fit backing. Make pilot holes slightly larger than the screw shank so the vinyl doesn't crack, and put a metal backing plate or insert behind the vinyl where the hardware lands. Screws that only bite a thin hollow wall will strip and wobble.
Mount the keeper on the post and the latch on the gate. Leave a small, consistent gap so the latch engages without force. Snug the screws, then stop. Overtightening compresses and cracks vinyl, and a keeper set too high will make the strike ride over the top instead of catching.
Check self-close action from wide open and nearly closed. Test from about 90 degrees and from about 15 degrees, as those two angles expose weak hinge tension and poor alignment. A latch that only catches when the gate slams isn't finished.
Confirm swing, lock, and gaps. Pool gates swing outward away from the water. Check that the release can be locked, then check picket and rail gaps around the latch against your local opening rules.
The Low Release Trap
If your release sits below 60 inches, El Dorado County pool barrier information requires the release on the pool side at least 3 inches below the gate's top, with no opening larger than one-half inch within 18 inches of the release. You can't mount a low latch wherever your hand falls naturally and sort out the gaps afterward. The pickets, rails, and latch-side construction have to stop a child reaching through to work it.
Watch the full swing and close sequence before you copy any hole positions onto your own gate.
Buy the keeper, latch, and fasteners as a matched set where you can. A complete vinyl gate hardware kit reduces the common mismatch where the latch tongue is too short for the keeper you grabbed from another bin.
Reinforce the Gate Frame and Hinges
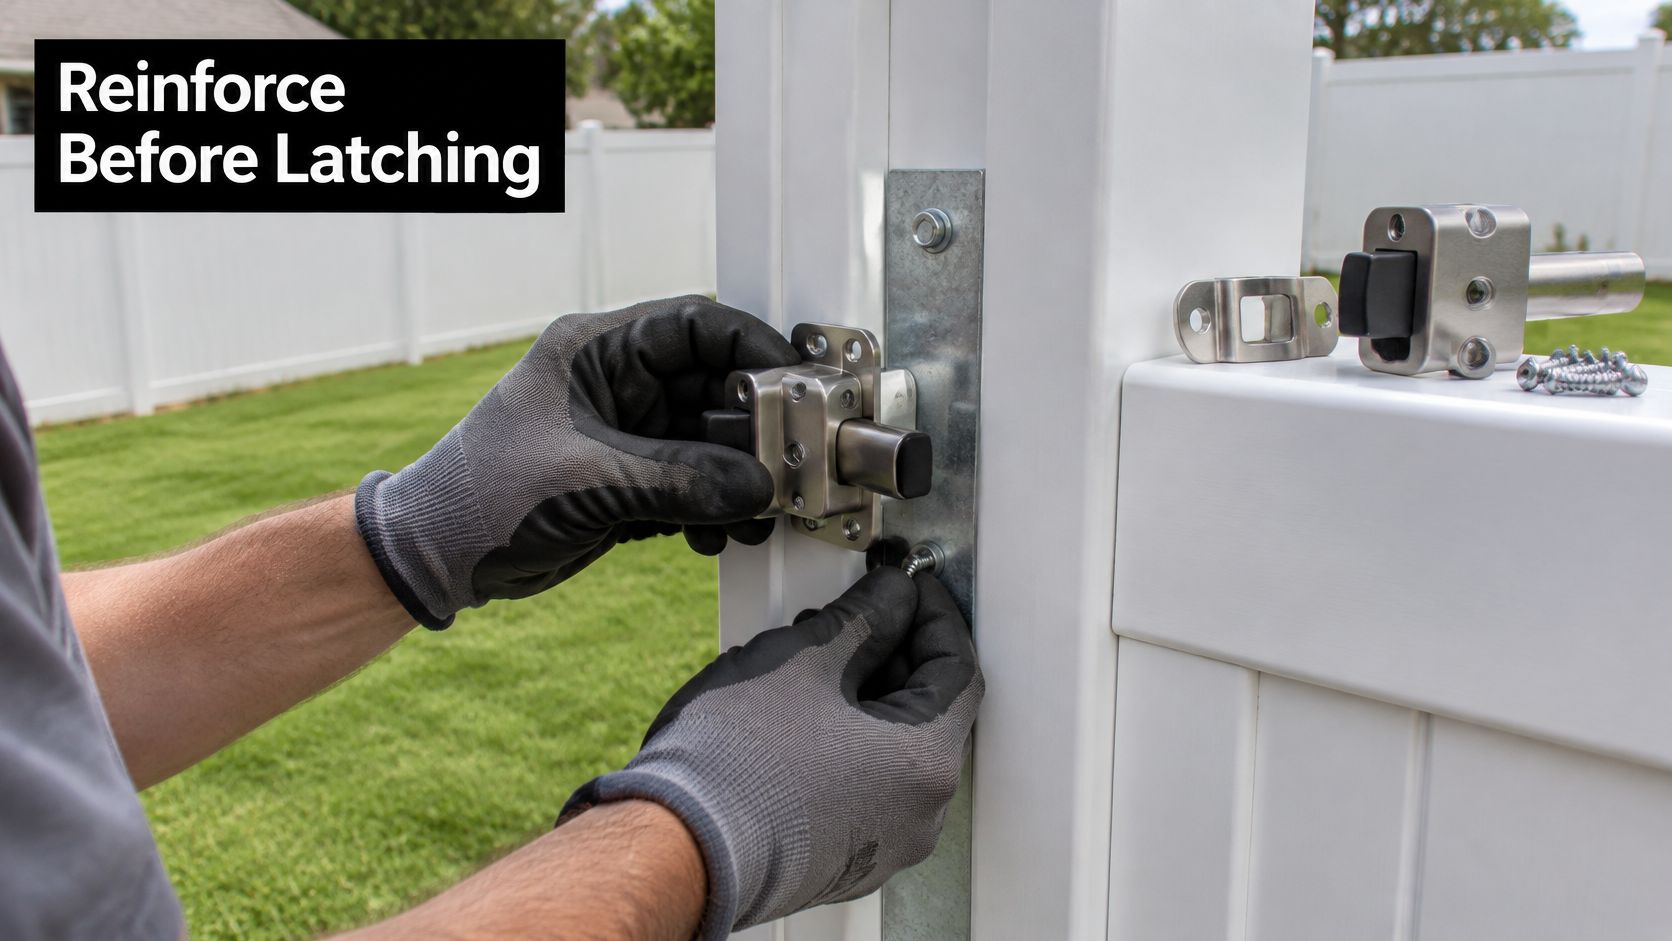
Vinyl panels flex. Screw a latch into a flexing panel with nothing behind it and you'll get a season of movement, elongated holes, and a latch that rattles before it pulls through.
The fix isn't a bigger screw. It's a steel or aluminium insert running the height of the gate frame, with hinge and latch hardware through-bolted into that structure. The vinyl becomes the weather skin and the finish. The metal carries the load.
The photo below shows the mounting point that matters, the post and frame connection, not the decorative panel surface.
Size Changes the Hardware Conversation
For tall or heavy gates, use at least two hinges and consider three. Hinges do the daily work of keeping the latch aligned. A strong latch on weak hinges is a temporary repair.
California regulated gate provisions in AB 2149 define a regulated gate for public or similarly broad use as weighing more than 50 pounds and measuring more than 48 inches wide or more than 84 inches high. Those gates must meet ASTM F900 or F1184, follow manufacturer instructions, stay balanced, and not fall more than 45 degrees from vertical if detached from supporting hardware.
Your backyard gate may not fall under that public-use rule, but the measurement habit still applies. Measure width, height, and approximate finished weight. Then check that the closed gate doesn't lift or rack enough to pull the latch out of the keeper.
- Use an adjustable keeper carefully: Add one only where it doesn't block self-closing.
- Don't force a keeper sideways: That hides sag for a week and makes the next failure harder to diagnose.
- Don't use a decorative latch as the sole restraint: An oversized gate needs real hinges, real frame support, and a latch rated for the job.
- Respect automated and sliding gates: They need positive stops to limit travel and resist impact. A swing-gate latch is not a substitute.
Wind deserves respect on coastal and open lots. A solid vinyl gate is a sail, and a latch that holds on a calm Tuesday can pop under a gust that twists the frame. Add a rubber bumper or stop block on the latch side to absorb impact, then recheck hinge tension after the first month, once everything has settled into real use.
Align the Gate and Fix a Latch That Stops Catching
Is the latch broken, or has the gate moved? Answer that first. Replacing good hardware on a sagging gate buys you the same failure with shinier parts.
The checklist below puts gate checks ahead of latch replacement for a reason.
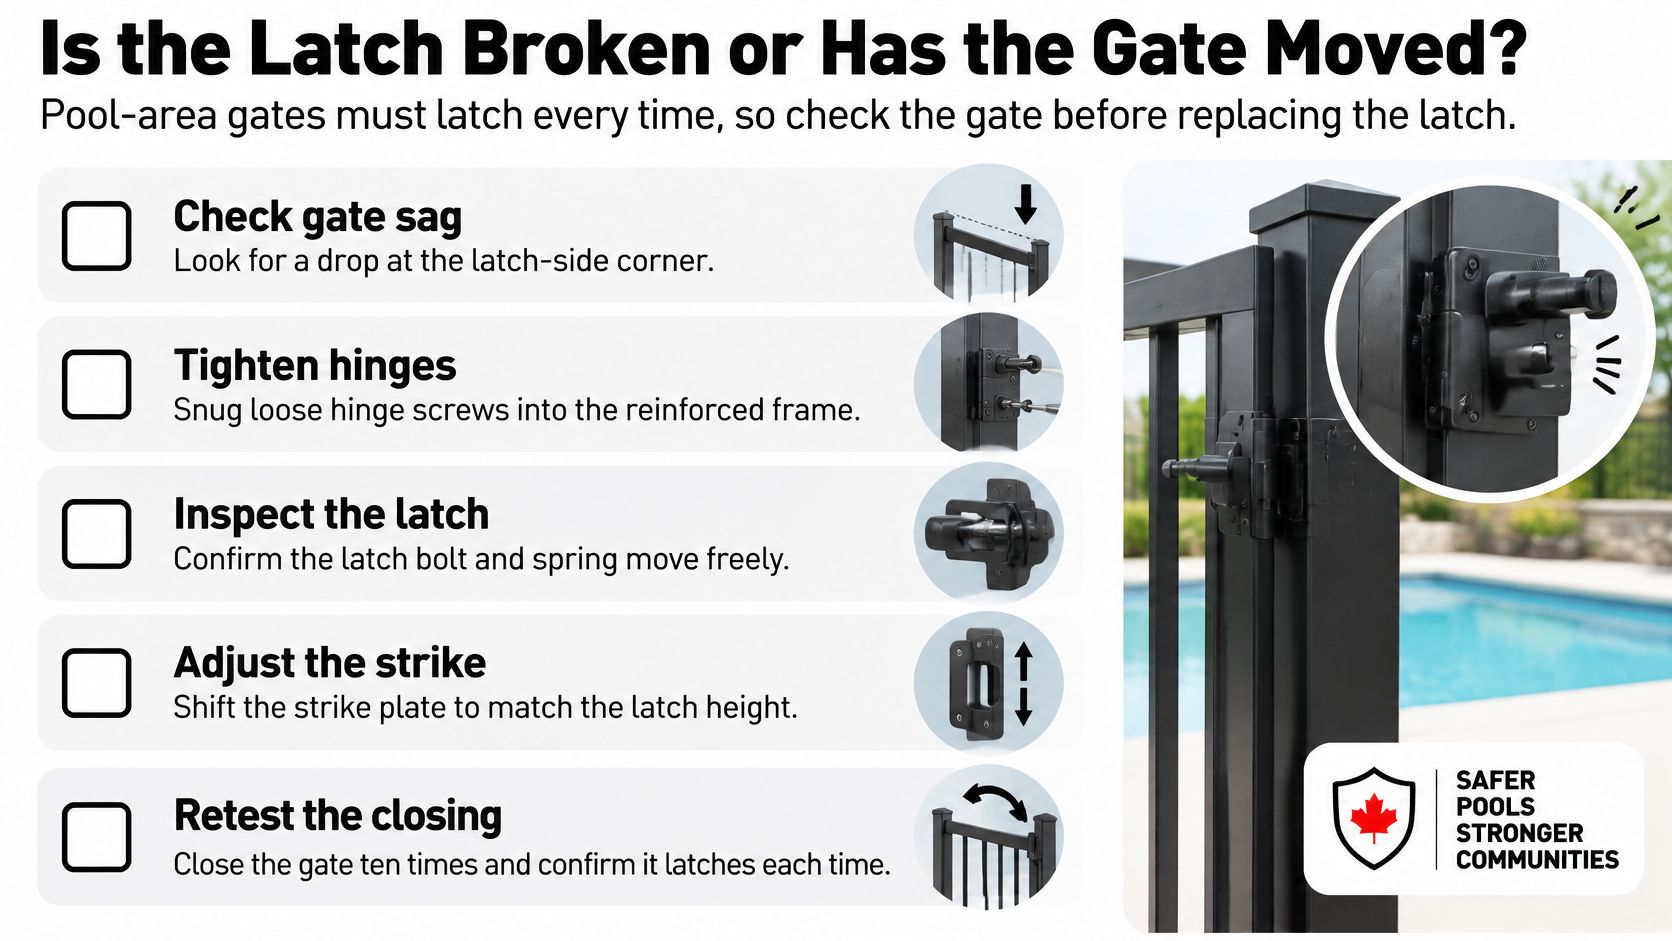
Checks to Run in Order
Measure both diagonals of the gate frame. Treat a difference of more than about 1/4 inch on a 4-foot gate as out of square. Then check the post with a 4-foot level in two directions, because a post can look straight from the street and lean badly toward the yard.
Lift the latch-side corner gently. If it rises and the latch suddenly lines up, you're looking at hinge wear, loose hinge screws, or frame sag, not a dead latch. Close the gate from several angles after each adjustment, as California pool enclosure safety guidance expects the gate to remain securely latched and self-closing, not merely capable of latching when pushed by hand.
Seasonal drivers explain most repeat calls. Heavy rain and irrigation soften soil around posts. Freeze-thaw movement shifts grade. Inland heat and sun exposure move materials, and coastal salt attacks fasteners, especially where steel screws touch aluminium and trap moisture at the contact point.
| Symptom | Likely cause | Fix |
|---|---|---|
| Latch misses the strike | Gate sag or out-of-square frame | Re-square the frame and adjust hinge tension |
| Gate drifts open on its own | Post settlement or weak return spring | Re-plumb the post and replace the spring latch |
| Latch catches at one angle only | Hinge wear or racked panel | Adjust or replace hinges, then retest from several angles |
| Latch loose or rattles | Screws pulled out of vinyl | Fit a metal insert and through-bolt the hardware |
| Gate rubs the ground | Post movement or uneven grade | Re-set the post and add a stop or raise the gate |
| Corroded latch or screws | Salt air or dissimilar metals | Replace with stainless hardware and isolate the contact |
Test after irrigation, after temperature swings, and after a month of use. Installation day is the easiest test your gate will ever pass.
If hinge screws keep loosening or the hinge leaves have play, work through how to fix fence gate hinges before you move the keeper again. Moving the keeper to chase a dropping gate teaches the gate to keep dropping.
Practical rule: If the gate sags, fix the gate before you touch the latch.
Test the Latch Every Season Before You Rely on It
Maintenance on a vinyl gate latch is mostly inspection, not repair. Most failures start as a loosened screw, a dry spring, or grit packed into the keeper. A five-minute check catches all three.
A Seasonal Routine That Works
- Spring: Rinse grit from the latch and keeper, tighten every screw by hand without overtightening, and retest self-close from several angles.
- Late summer: Check the irrigated or coastal side for corrosion, soft ground near the post, and screws that have started to stain the vinyl.
- Winter: After the first hard freeze, check for frost heave, new ground rub, and a latch corner that has dropped.
Use a silicone-based lubricant on moving parts. Oil attracts grit and dust, which turns a smooth spring latch into a sticky one by midsummer. Work the latch by hand after lubricating it, then let the gate close on its own.
For pool gates, the standard doesn't soften with familiarity. If it fails to self-latch once, treat it as failed until you've fixed it and retested it. Don't leave a note for the family to push harder.
When replacement time comes, confirm the local pool or fence rule with your city or county building department before ordering. Pick the latch type using the comparison criteria from earlier, then buy the latch, keeper, and vinyl-compatible fasteners together so the parts match, including the gate latch vinyl fence hardware sold for hollow vinyl profiles rather than solid wood. That one habit prevents most Saturday return trips.
Measure your gate, confirm your local latch height, then shop Decorex Hardware gate latches, keepers, hinges, and vinyl-compatible fasteners in one order so the parts arrive matched. Visit XTREME EDEALS INC. to compare self-latching and lockable options for your post size before your next Saturday job.