
You're standing at a gate that used to close cleanly, and now it drags, rattles, or leaves a gap every time the wind picks up. The hinge may have worn oval, the latch may no longer meet cleanly, or the post may be too light for the way the gate is being used. Chain link gate accessories are what turn that daily nuisance back into a reliable entrance, and the right mix of parts matters for both homeowners and contractors.
In California alone, the professional side of this work is substantial. The U.S. Bureau of Labor Statistics reports that California employed 4,150 fence erectors in May 2024, with an annual mean wage of $54,610 (California fence erector employment and wage data). That tells you gate hardware isn't an occasional niche purchase, it sits inside a large, recurring installation and repair market.
This guide breaks the hardware down in plain language, from hinges and latches to posts, braces, closers, wheels, and privacy slats. You'll see how the parts work together, how to match them to an existing gate, and why winter weather, wind, and corrosion change the buying decision. XTREME EDEALS INC. carries a broad range of fence and gate hardware for both DIY repairs and contractor work, so the main task is knowing which pieces fit your gate before you order them.
Introduction to Chain Link Gate Accessories
A gate that used to swing smoothly can start announcing itself every morning. The latch catches late, the hinges squeak, and the bottom edge scrapes because the frame has sagged just enough to be annoying. When issues arise, the gate itself is frequently blamed, but the underlying cause is often a mismatch in chain link gate accessories, not the mesh.
Why the small parts matter
A chain link gate is a system, not a single panel with a handle. Hinges hold the moving side, latches keep the gate closed, and posts give the whole assembly something stiff to work against. If one part is undersized, every other part gets stressed, which is why a gate can look fine yet still fail under regular use.
The broader installation market in California shows why these parts get replaced so often. California issued 131,277 total housing permits in 2023, including 101,248 single-family permits and 30,029 multifamily permits (California building permit data). Those projects create steady demand for perimeter security hardware, repair items, and replacement fittings, especially where new construction, infill, and remodels all need working access points.
The accessory ecosystem
A lot of first-time buyers assume they only need a hinge and a latch. In reality, the full system includes terminal posts, tension bars, brace bands, rail ends, loop caps, tie wires, and post caps (chain link fence parts overview). That list matters because the gate hardware has to connect cleanly to the rest of the fence, not just to the opening itself.
Practical rule: if the gate feels loose, binding, or noisy, don't replace only the visible part. Check the post, the hinge, the latch alignment, and the bracing together.
For contractors, that system view saves time on site. For homeowners, it prevents the common mistake of buying a “universal” part that almost fits. Once you understand what each accessory does, the next question becomes simple, which parts match your actual gate, your actual post size, and your climate.
Understanding Key Components in Gate Hardware
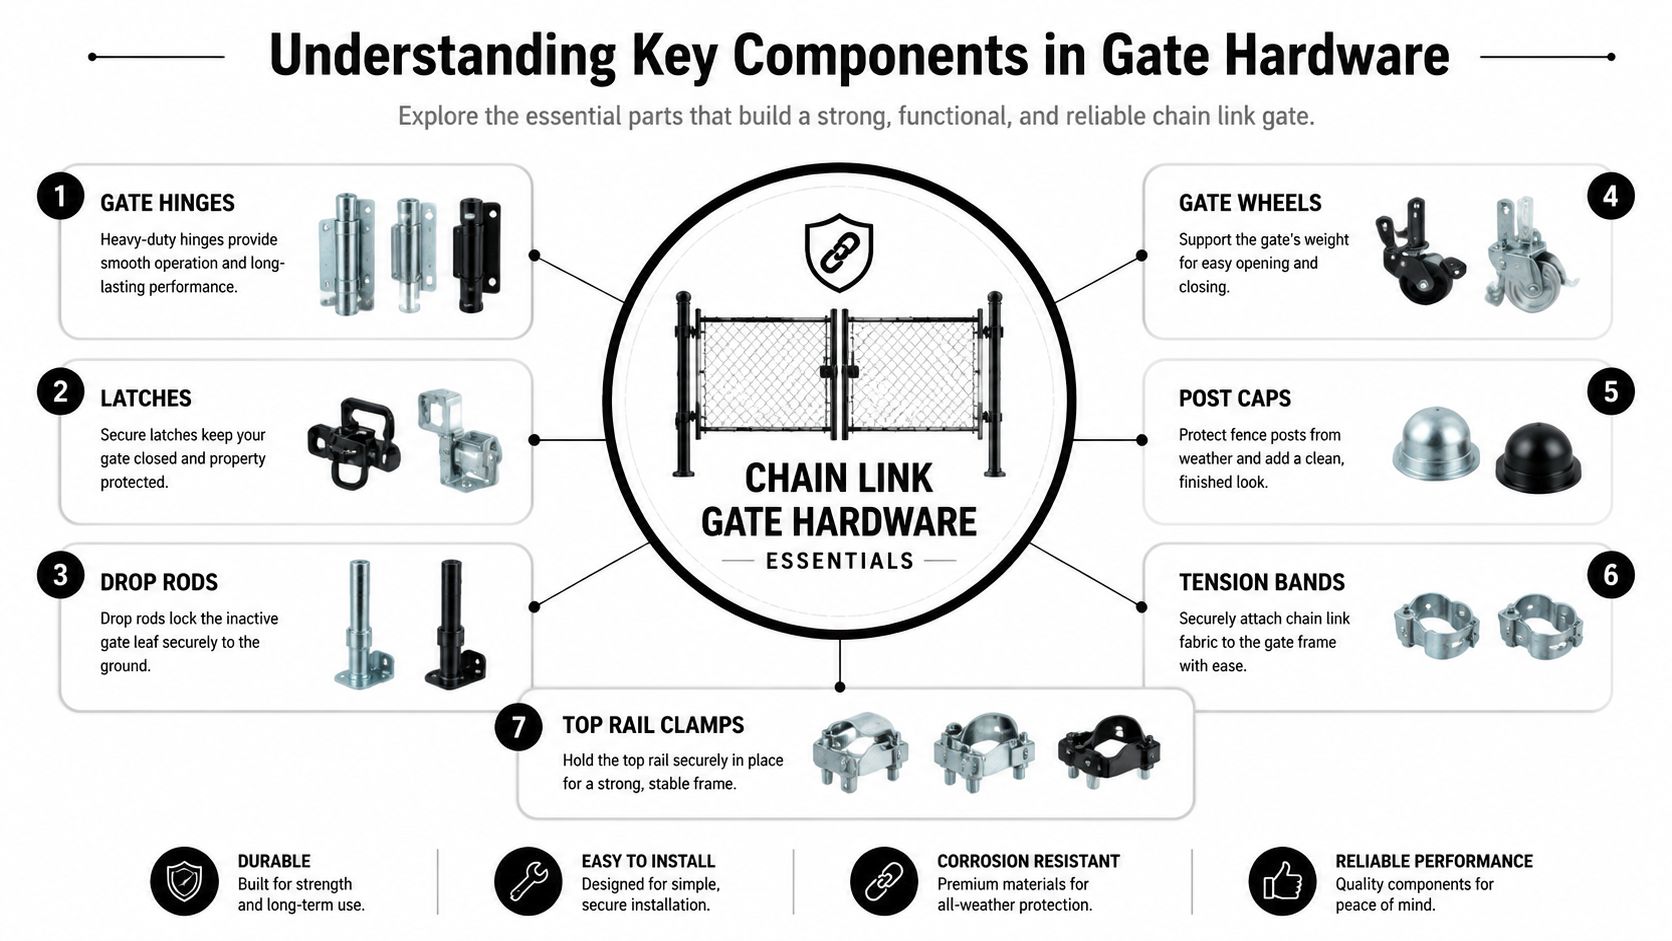
A chain link gate is easier to understand if you break it into roles. Hinges let the gate move, latches keep it shut, and the posts hold the opening in place. If the post or frame is out of line, the rest of the hardware starts working harder than it should.
What each part actually does
The moving side of the gate depends on hinge hardware that can handle repeated opening and closing without twisting the frame. The latch keeps the gate closed, but it also has to meet the gate edge at the right height, or it will wear unevenly and stop catching cleanly. Wheels, where they are used, help carry load on swing or slide paths, while rails give the gate frame its shape and keep it from sagging.
Accessory names can sound repetitive until you see how each one fits into the assembly. Terminal posts hold fence ends, tension bars pull the fabric tight, brace bands tie the fabric and rails to the post system, rail ends cap tube connections, loop caps guide rails at the top, tie wires secure the mesh, and post caps help keep moisture out of the tubing. You can find a complete range of these components in the chain link fence hardware collection. That is why a gate problem often starts with a small fitting and then spreads to the whole opening.
Why gate-specific accessories differ
A drop rod, closer, or holdback hardware does more than add convenience. Each part controls how the gate behaves under use, which matters if the opening gets slammed, left partly open, or exposed to wind. The accessory package has to suit the opening size and the job site, not just the fence style.
Useful mental model: the gate frame gives shape, the hinges give motion, the latch gives closure, and the bracing keeps the motion controlled.
For buyers comparing parts online, the simplest way to judge them is this. If one item is doing the work of three because the others are too light or missing, the gate will show it fast. That is why fitting, alignment, and load path matter as much as the name on the box.
Compatibility and Sizing Guidance
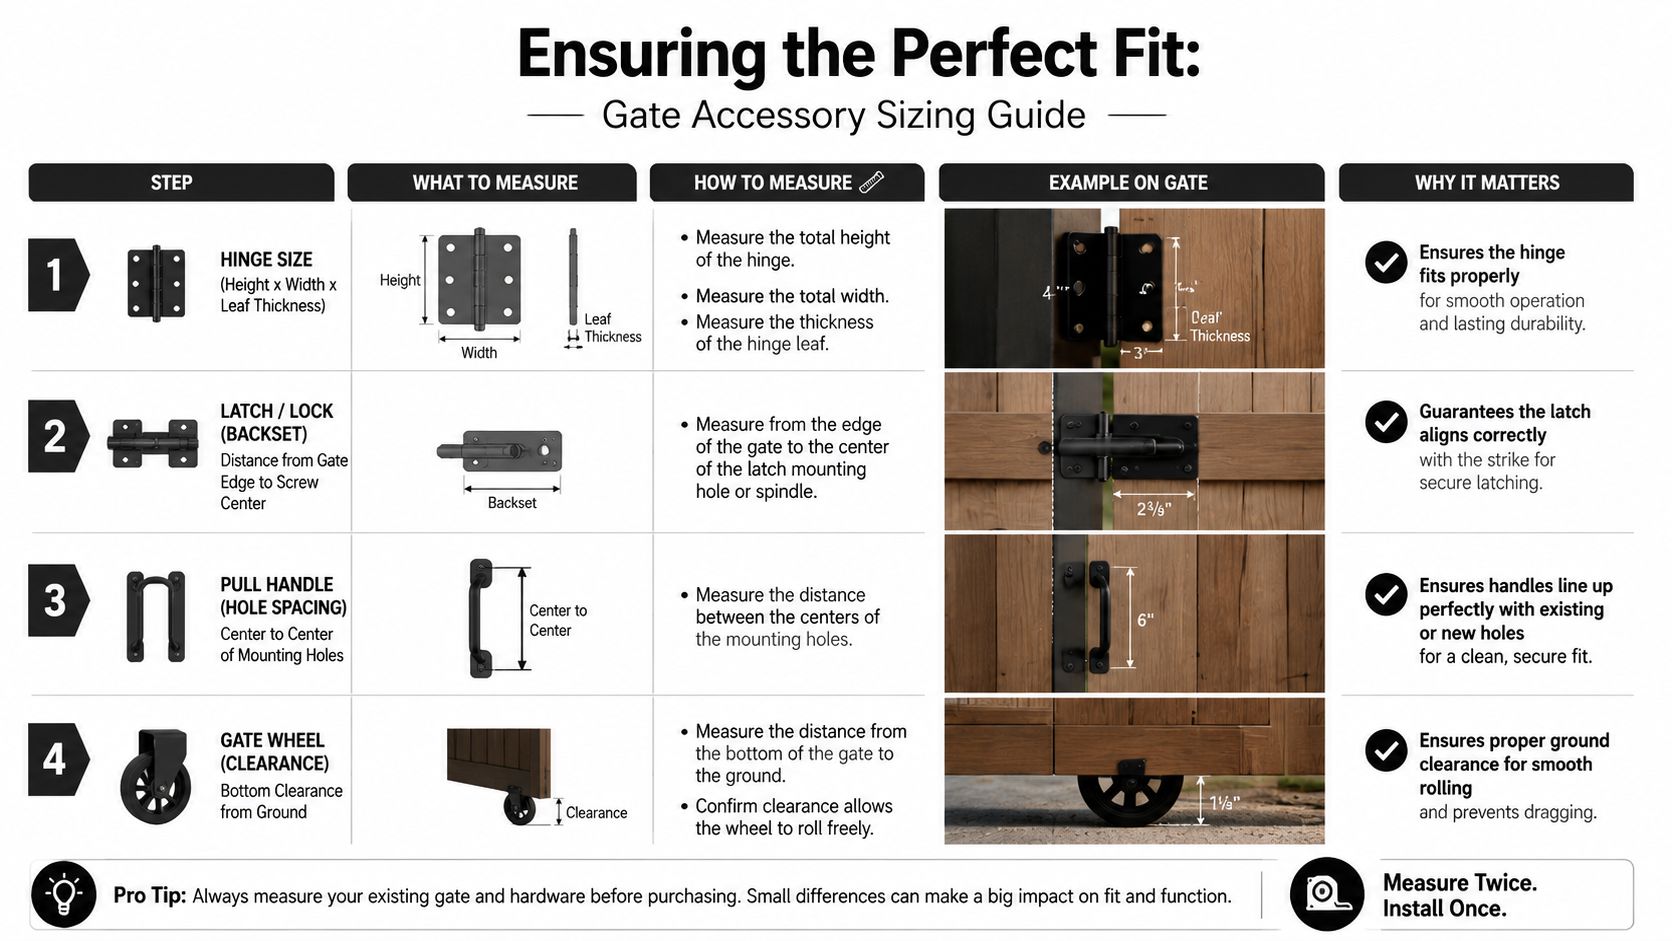
The hardest part of retrofitting is not finding a hinge or latch, it's finding one that fits the gate you already own. Older openings often mix pipe sizes, patched frames, and replacement hardware from different eras, so a part that looks right in a catalogue can still miss by a fraction of an inch on site. That's why measuring first saves more time than ordering twice.
Measure the gate like a mechanic
Start with the outside diameter of the post and the size of the gate frame tube. If you're not sure, use calipers or a tape that can wrap cleanly around the pipe, then confirm the reading against the part listing. Next, measure the opening width and the space the hinge strap or latch body needs so the gate can swing without rubbing on the post or fence fabric.
If you're replacing hardware on an older installation, compare the existing post to the new part rather than assuming “close enough” will work. A gate built around a 1.9-inch post won't behave the same way as a gate built on a 2-inch schedule pipe, even if both look similar from a distance. The same logic applies to hinge straps, because strap length has to match the frame thickness and the offset needed for the gate to clear the post cleanly.
Match the opening to the hardware class
California public works specifications show why universal kits are risky. Caltrans lists separate item codes for chain link gate openings from 3 ft to 24 ft, which makes the sizing issue obvious (Caltrans chain link gate item codes). Wider openings and different security classes need different accessory assemblies, because the hardware has to control sag and alignment over the actual span being used.
For retrofit work, keep a short checklist in your pocket:
- Post diameter: confirm the tube size before choosing hinges or latch brackets.
- Gate frame size: verify the tube the hinge will clamp or weld to.
- Opening width: check the clear opening, not just the gate leaf.
- Fabric gauge and fit points: make sure the accessory won't interfere with mesh tension or tie points.
- Clearance to grade: confirm the bottom edge won't drag on seasonal ground movement.
Good fit beats generic fit. A part that is “almost right” usually becomes a recurring maintenance problem.
Comparing Materials and Durability
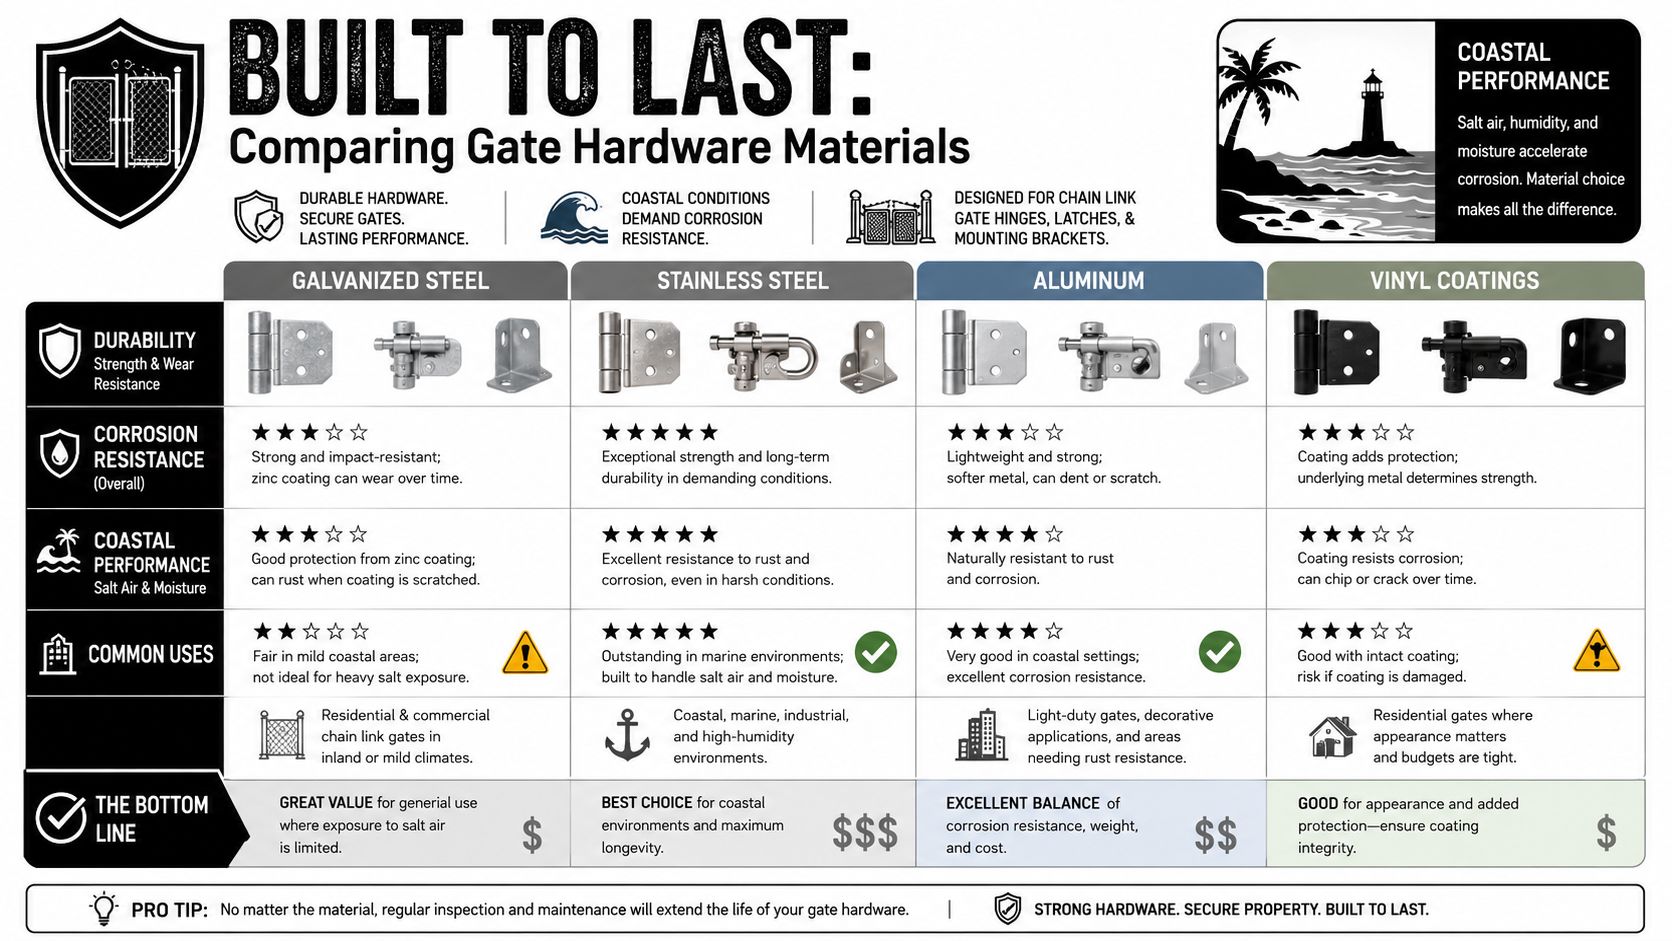
Material choice is where many buyers overspend in the wrong place or save money in the wrong place. A hinge that sits on a coastal property needs different protection than one on a sheltered suburban side yard, and the finish on a latch can matter just as much as the base metal. The right choice depends on exposure, cycle count, and whether you want the hardware to disappear visually or stand out as a design feature.
Side-by-side trade-offs
Galvanized steel is the standard workhorse for many chain link gate accessories because it handles outdoor use well and fits the rest of the fence system naturally. Stainless steel makes sense when corrosion resistance is a top concern, especially where moisture or salt exposure would attack lesser finishes over time. Aluminium is lighter, which can help on smaller assemblies, but it isn't the same answer as a heavy-duty hinge or latch on a wide gate. Vinyl coatings add a finished look and extra protection layer, which can help match privacy slats or reduce visual contrast.
Canadian standards also matter here. CSA A231-17 is the national standard for chain-link fences and gates in Canada, covering material grades, fabrication tolerances, and installation requirements for accessory hardware (CSA A231-17 reference). That doesn't tell you which finish looks nicest, but it does show that hardware is treated as part of a regulated system, not a decorative afterthought.
Choose for the environment, not just the price tag
A gate in a damp, high-use setting needs hardware that resists wear and coating damage. A gate in a dry, protected location can often use simpler finishes without sacrificing service life. The key decision is whether you want the part to survive one season or to keep performing after repeated use, weather swings, and routine adjustment.
If you're comparing finishes before buying, a product page such as the one at protective coatings for fence hardware is useful because it puts the coating question front and centre. That kind of decision is especially important for hinges and latches, where worn finish often becomes the first visible sign of a part that's failing mechanically.
Choosing Accessories for DIY and Professionals
A homeowner doing a weekend repair and a contractor outfitting a job site rarely need the same hardware package. The DIY buyer usually wants predictable fit, fewer loose pieces, and a straightforward install path. The pro installer usually wants hardware that tolerates heavier use, faster turnaround, and less forgiving service conditions.
What works for DIY work
For a simple gate repair, pre-assembled hinge and latch kits reduce guesswork because the main pieces already belong together. Adjustable drop rods help on gates that need a little on-site tuning, and snap-on privacy slats are easier to manage than a full custom infill when the goal is privacy rather than redesigning the fence. A multi-pack can also make sense when you're replacing several small fasteners at once, because the project stops being about one perfect part and starts being about getting the gate working again.
What contractors tend to prioritise
Contractors usually lean toward heavy-duty strap hinges, duckbill holdback latches, and coated or powder-finished fittings that can take repeated cycles without feeling flimsy. They also care about replacement consistency, because one weak hinge on a commercial or multi-unit property creates a callback that costs more than the better part would have cost in the first place. In that setting, a single-unit pro-grade component often makes more sense than a general kit.
Rule of thumb: if the gate gets used every day, choose the hardware that still feels stable after the novelty of the first month wears off.
Some buyers use XTREME EDEALS INC. for multi-pack fastening solutions, while others prefer specialised hinge, latch, or gate insert components when the installation calls for a more exact match. The best choice depends on whether you're simplifying a repair or building a higher-duty assembly that needs tighter control at the hardware level.
Installation Steps and Troubleshooting Tips
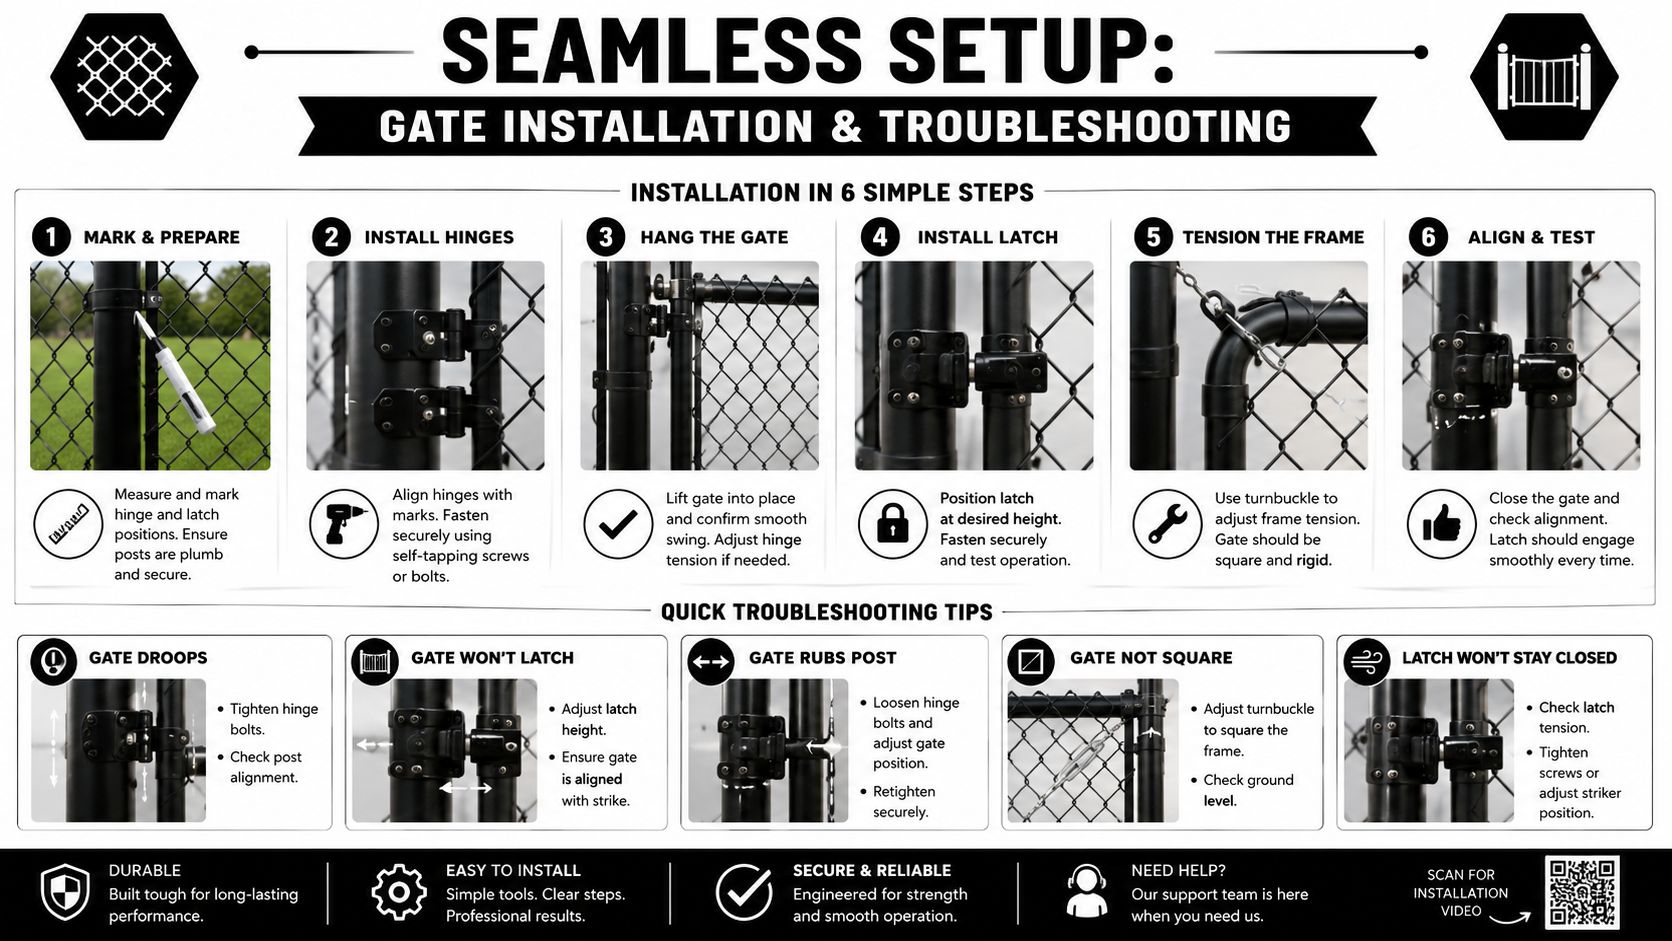
A clean installation starts with the post, not the latch. If the support is out of plumb or the hinge spacing is guessed instead of measured, the gate will tell you fast by binding, sagging, or drifting shut on its own. Set the geometry first, then lock in the moving parts.
The installation sequence that keeps problems down
Start by fastening the post brackets or hinge hardware at the planned height, then dry-fit the gate frame before tightening anything fully. Set the hinge pins so the gate clears the ground and swings without scraping, then check the latch line with the gate held square in the opening. If the gate uses a drop rod, trim or adjust it so it seats cleanly without forcing the frame downward.
The brace geometry matters more than many buyers expect. DIY guidance notes that a brace angle above 45° changes the load path and is a common cause of gate sag, especially under snow and freeze-thaw cycles in Canadian climates (brace angle and sag guidance). That's why a brace that “looks sturdy” can still fail if the angle works against the gate instead of supporting it.
Troubleshooting the common failures
If the gate sags, start by checking the post and the hinge tightness before you blame the latch. If it binds in wind, the frame may be racking or the hinge side may need a stronger support point. If the latch misses the strike, re-check the gate's plumb, then adjust the latch body rather than forcing the closing edge to bend into position.
If the gate only closes when you lift it by hand, the hardware is telling you the load path is wrong.
A helpful installation reference is available through this chain link gate installation guide, especially if you're deciding whether a light repair or a heavier rebuild is the smarter move. For a visual reference while setting hardware in place, the embedded walkthrough below is useful.
Maintenance Practices and Safety Checks
A gate that's installed correctly still needs routine attention. The moving parts are small, but they live outdoors, so dust, water, vibration, and constant hand contact all work on them over time. The good news is that the maintenance routine is short if you stay ahead of the obvious wear points.
Seasonal care that prevents repeat failures
Check the hinge pins for smooth movement and add lubrication before they start to squeak. Inspect the latch spring and the latch face for wear, because a weak spring often shows up as a gate that won't stay shut under normal use. Tighten mounting hardware if the post brackets or straps have loosened, then look for rust, cracked coating, or metal staining where water may have been sitting.
Privacy slats, when installed, need their own glance. Make sure they're clipped on securely and haven't shifted into the path of the latch or hinge side. If a drop rod is part of the assembly, confirm that it retracts and seats freely rather than dragging or catching on debris.
Safety checks that take seconds
A few quick checks catch most problems before they become repairs:
- Latch engagement: confirm the gate closes fully without a hard shove.
- Drop rod travel: make sure it retracts and drops without binding.
- Fastener security: look for loose nuts, screws, or clamps.
- Surface condition: inspect for rust at scratches and edge wear.
- Gate swing: open and close the gate once to feel for new resistance.
The point isn't to over-maintain the hardware. It's to replace a washer, tighten a bracket, or touch up a worn area before the whole assembly starts shifting. Small adjustments usually cost far less in time than a broken latch or a bent hinge side after the gate has been ignored for a season.
Buyer's Checklist for Gate Accessories
Good buying starts at the gate, not in the cart. If you measure first and buy second, you avoid the most common mismatch, the part that seems right until you try to mount it. A short checklist keeps the decision practical.
What to confirm before ordering
- Post size and frame tube size: verify the actual diameter and tube shape on site.
- Opening width and clearance: measure the actual swing path, not just the nominal gate size.
- Hinge style and latch type: match the hardware to the way the gate moves and closes.
- Material preference: choose a finish that fits the environment, especially if the gate sees moisture, salt, or heavy use.
- Brace and support needs: decide whether a simple kit is enough or whether a heavier support assembly makes more sense.
- Tools on hand: check for drill bits, wrenches, pliers, fasteners, and any cutting tools needed for adjustment.
- Maintenance items: keep grease, spare washers, and touch-up protection ready for later service.
A smart buyer also checks how the gate behaves now. If it already sags, drags, or misses the latch, the replacement list should address the cause, not just the symptom. That usually means looking at alignment, post stiffness, and load direction together before choosing hardware.
If you're sorting through options for a retrofit or a new install, compare the part dimensions against the gate site one more time before you place the order. A little checking now prevents the most frustrating kind of repair, the one where the hardware arrives, but the gate won't cooperate.
XTREME EDEALS INC. offers gate hardware, fasteners, and fence accessories that fit into real retrofit and installation work, from small repair parts to broader hardware solutions. If you're ready to match the right chain link gate accessories to your gate, visit XTREME EDEALS INC. and compare the options against your measurements before you buy.