
You've got two stakes in the ground, a string line pulled tight between them, and a hole that's filling with water faster than you can bail it. The bags of concrete are still at the store, and the key question isn't whether gravel works. It's whether it works in your yard, at your fence height, on your soil.
It can. Gravel-set posts hold for decades in the right ground, and they pull straight out when you want to move a gate or open access to the back lot. They also fail predictably, and almost every failure traces back to one of three causes: too shallow, too wet, or too loose.
Embedment Depth and Hole Size by Fence Height
Start with the number that decides everything else. Bury about one third of the post's total length, and never less than 24 inches, before you count a gravel base. A 6-foot privacy fence on an 8-foot post means 30 to 36 inches of post in the ground. Get that right and compacted stone has something to grip. Get it wrong and no amount of tamping will save the fence.
Embedment depth and hole size for a 4×4 post by fence height
| Fence height | Post length | Minimum embedment | Hole diameter for 4×4 post |
|---|---|---|---|
| 3 ft fence | 6 ft post | 24 in | 10-12 in |
| 4 ft fence | 7 ft post | 24-30 in | 10-12 in |
| 6 ft privacy fence | 8 ft post | 30-36 in | 10-12 in |
| 8 ft privacy fence | 10 ft post | 36-42 in | 10-12 in |
Wind load is why the taller rows go deeper. A solid privacy panel behaves like a sail, and the buried length of the post is the only thing resisting overturning. An open picket, rail or wire fence at 3 feet catches a fraction of that, which is why 24 inches holds it. A board-on-board run at 8 feet is a different structure entirely, and the difference is in the soil, not the lumber.
Hole diameter follows the same logic. Dig roughly three times the post's width across, which puts a 4×4 in a 10 to 12 inch hole. A wider hole means more stone to tamp, so more work, but it also builds a bigger plug of interlocked aggregate around the post. Go too narrow and you can't get a bar down the sides to compact properly, which is where most gravel jobs go wrong.
Frost is the local variable. California has no single statewide frost depth, and a compilation of local requirements reports verified values from 0 to 30 inches across 32 locations, with the exact figure set by city or county code (California frost depth compilation). In the mountains that number climbs fast: Placer County values reported for elevations above 5,000 feet are 18 inches at 5,001 to 7,000 feet and 24 inches at 7,001 to 8,000 feet.
In coastal and southern counties, the practical floor often comes from a county standard rather than frost. San Diego County guidance puts posts at least 24 inches into undisturbed ground or properly compacted fill, with a gravel layer beneath footings (San Diego County fence guidance). Find your row in the table, then confirm the local minimum with the building department before you mark a single hole. Gate and corner posts carry loads the table doesn't cover, and they need more.
Testing Your Soil Before You Set a Post
A gravel-set post holds through friction: interlocked angular stone gripping the sides of undisturbed soil. Saturated clay gives you nothing to compact against, and loose fill gives you a post that settles on its own schedule. Twenty minutes with a test hole tells you which situation you're standing in.
Three field tests that decide the method
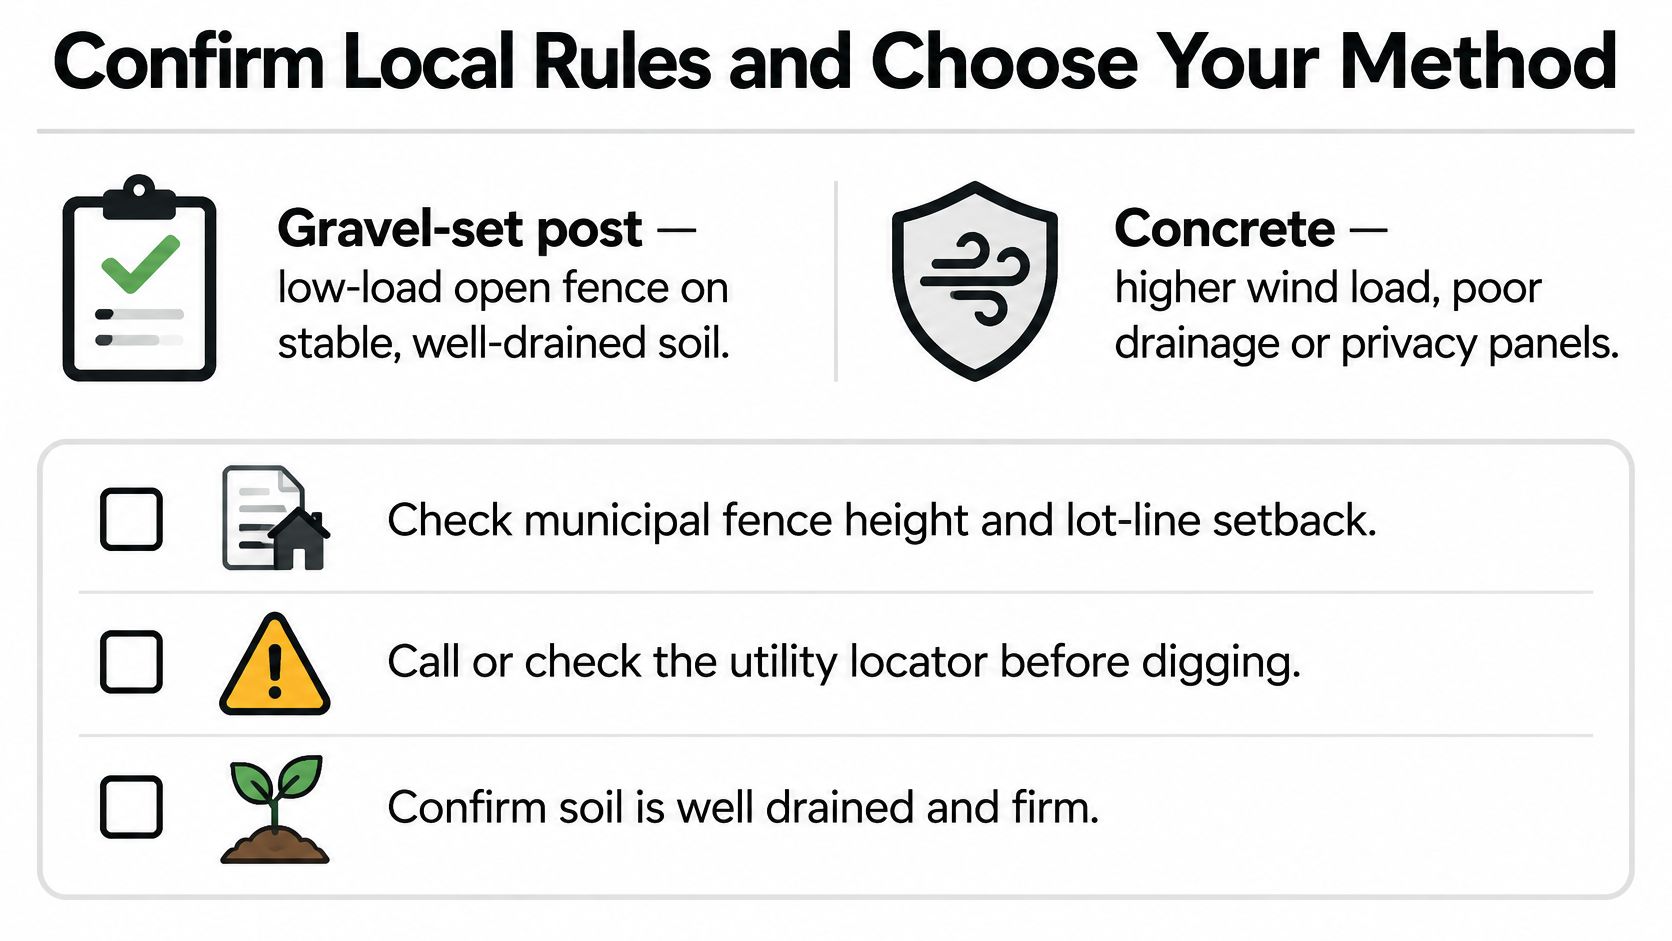
- Drainage. Dig a test hole about 12 inches deep at the first planned post location, fill it with water and time how long it takes to disappear. Water gone within an hour points to free-draining sandy or gravelly soil. Water still standing after several hours means the hole is saturated or perched, and stone alone won't deliver durable lateral resistance without drainage work.
- Texture. Squeeze a handful of moist soil. A ball that sticks together and then cracks as it dries points to expansive clay, which swells and shrinks through the seasons and can walk a post out of line within a few years. Plan a wider hole, a deeper footing, or concrete.
- Structure and slope. Look for old fill near a foundation, a backfilled utility trench or a former garden bed. A post set in uncompacted fill settles. Note whether the line sits on a grade, because water running downhill will wash the backfill out around the post.
A statewide soil map won't answer this for you. The University of California, Davis soil resource system aggregates USDA Natural Resources Conservation Service SSURGO data into 800-metre grid cells, and one documented California profile shows clay loam from 11 to 25 inches over stratified gravelly loamy sand to sandy clay loam from 25 to 60 inches (UC Davis California Soil Resource Lab). That describes a region. Your test hole describes your yard.
Soil test results and what they mean for a gravel-set post
| Test result | Likely soil | Verdict |
|---|---|---|
| Water drains within an hour | Free-draining sandy or gravelly soil | Suitable, compact backfill in thin lifts |
| Water still standing after several hours | Saturated or perched water | Improve drainage or use another footing |
| Soil forms a sticky ball and cracks when dry | Expansive clay | Concrete or engineered footing; gravel alone not advised |
| Loose ground with recent fill | Uncompacted fill | Dig into undisturbed soil or do not use gravel alone |
| Firm, dense soil with no standing water | Stable native soil | Suitable for line posts at standard depth |
Burned ground deserves its own check. USGS monitoring covers 61 sites across major Northern California fires, including the 2019 Kincade, 2020 LNU, Walbridge and Glass, 2021 Dixie and 2022 McKinney fires, with measurements of rainfall, runoff, infiltration and recovery (USGS post-fire soil hydrology data). Burned chaparral soils can show increased hydraulic conductivity, and infiltration generally returns toward pre-fire conditions within three years. A hole that felt rock solid in October can behave differently after the first post-fire winter.
Record the results in a notebook next to each post location. If the test fails in two places, skip the gravel method entirely and price out concrete or an engineered base.
Confirm Local Rules and Choose Your Method
Here's the verdict before you spend anything. A gravel-set post suits a low-load open fence on stable, well-drained soil, and the test hole is what confirms it. Concrete remains the better call for gate posts, tall solid privacy panels, corner posts on marginal fill, exposed high-wind sites, and any post within influence of a slope or retaining wall. Each method answers a different load, and a concrete-free post is judged by that load and that soil, never by how firmly the gravel packs on installation day.
Height limits change the job before you buy materials
Municipal limits vary enough that a fence legal in one yard can be a violation across town. The City of Edmonton's zoning guidance permits fences up to 2.0 metres in rear or interior side yards and 1.3 metres in front or flanking side yards (City of Edmonton fence permits). A 6-foot run that clears the rear limit is well over the front one.
Other cities draw the line elsewhere. The City of Hamilton states that residential and commercially zoned fences cannot exceed 2 metres in height (City of Hamilton residential fences). Lethbridge allows up to 1.0 metre in front yards and 2.0 metres in side and rear yards (City of Lethbridge fence requirements). Regina allows 1.22 metres in front yards, 2.14 metres in back and side yards, and up to 2.44 metres beside arterial or expressway streets (City of Regina residential fence rules).
Read those four sets of numbers side by side. The same 6-foot fence is routine in one city, a front-yard violation in the next, and treated differently again beside an arterial road.
If your lot sits in a subdivision with architectural controls, check the private covenants as well as the municipal bylaw. A homeowner association can be stricter than the city, and its enforcement arrives as a letter rather than an inspection. Prestonwood's guide to HOA landscaping is a useful primer on how those approvals usually work. Compare your planned height against your own municipality's bylaw, which you'll find on the city or county website. A general reference on fence height requirements can help you frame the right questions before you call, but the local bylaw is the document that decides the design.
The order that saves a rebuild: measure the fence height, label each post as line, corner, end or gate, run the test hole, then call the building department. Materials come last.
When the posts are set, the finish work is a small decision with a big visual payoff, and our catalogue covers post caps for metal or wood posts in a range of sizes along with the fasteners and gate hardware that go with them.
How to Dig, Set and Backfill a Post Without Concrete
The sequence below is the one I'd follow on any line post in well-drained ground. Each step carries a reason, and each one has a mistake that shows up six months later.
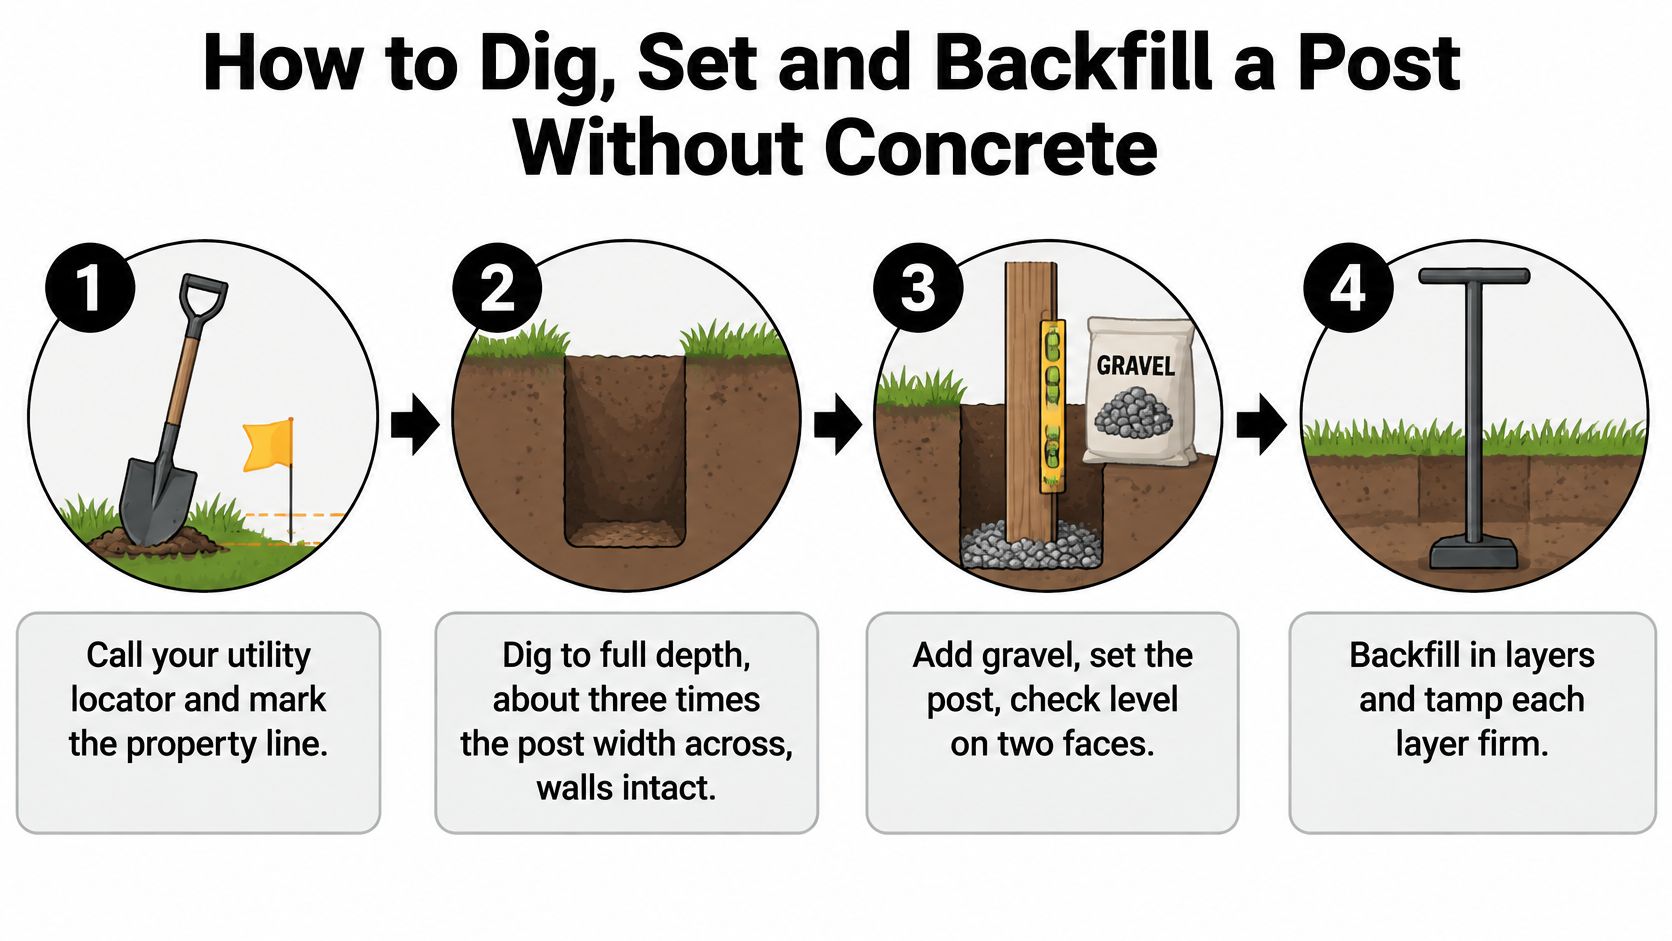
- Call the utility locator and mark the property line. Free marks beat a severed irrigation line or a gas service, and the property line keeps the hole inside your boundary. Digging first and asking later is how fences get moved at your own expense.
- Dig to full depth with the walls intact. Go to the depth from the table plus the drainage layer, and keep the hole roughly three times the post width across. A bell-shaped hole undercuts the very soil the stone needs to grip.
- Check you've hit undisturbed soil. Loose fill at the bottom means the post settles on its own. If the base is soft, keep digging until you reach native ground.
- Tamp the base firm and add 2 to 4 inches of angular crushed rock. The post bears on firm native soil, with the stone acting as a drainage sump beneath it, not as a cushion. Pea gravel fails here because round stone rolls instead of locking.
- Choose the post before it goes in. Use pressure-treated or naturally durable wood rated for ground contact, and never bury untreated lumber. California Civil Code section 896 states that untreated wood posts must not be installed in soil in a way that causes unreasonable decay based on the original finish grade (California Civil Code).
Here's the installation walkthrough most homeowners find easiest to follow:
- Set the post and plumb it in two directions. Check from two adjacent faces with a spirit level, not one. A post that reads true from the front can be leaning badly from the side.
- Backfill in lifts of about 4 inches of angular crushed rock. Tamp each lift with a steel bar or hand tamper before adding the next. Loose backfill is the single biggest cause of post movement, and it's invisible once the job is done.
- Recheck plumb after every two or three lifts. A post unchecked after the first lift drifts as the stone goes in, and correcting it at the top means pulling the whole thing apart.
- Slope the top few inches of soil away from the post and tamp the final layer. Surface water should run off, not pool against the wood. Cross-check spacing and depth with a tape rather than by eye, the way California's construction guidance treats post spacing and hole depth as measured values on a field check (Caltrans construction manual).
Finish with a hand push test. A properly set post shouldn't rock at all. If it does, the problem is depth or compaction, and no cap will hide it. On soft ground where a driven post is permitted, a 4×4 post spike skips the hole entirely, though it suits open fencing rather than a tall privacy panel.
Bracing Corner, End and Gate Posts While the Rock Sets
Line posts carry only their share of the panel's wind load. Corner, end and gate posts carry added pull from the fence running off them, plus every slam and swing in the case of a gate, and they move first. That's why bracing isn't optional on terminal posts, even when the rock feels tight the same afternoon.
Brace each post type to its load. For a corner or end post, run a diagonal brace from the post near its top down to a stake driven into firm ground at roughly 45 degrees, with one brace for each exposed direction. A gate post needs two braces, one on the hinge side and one on the latch side, because the gate loads it in two directions every time it opens.
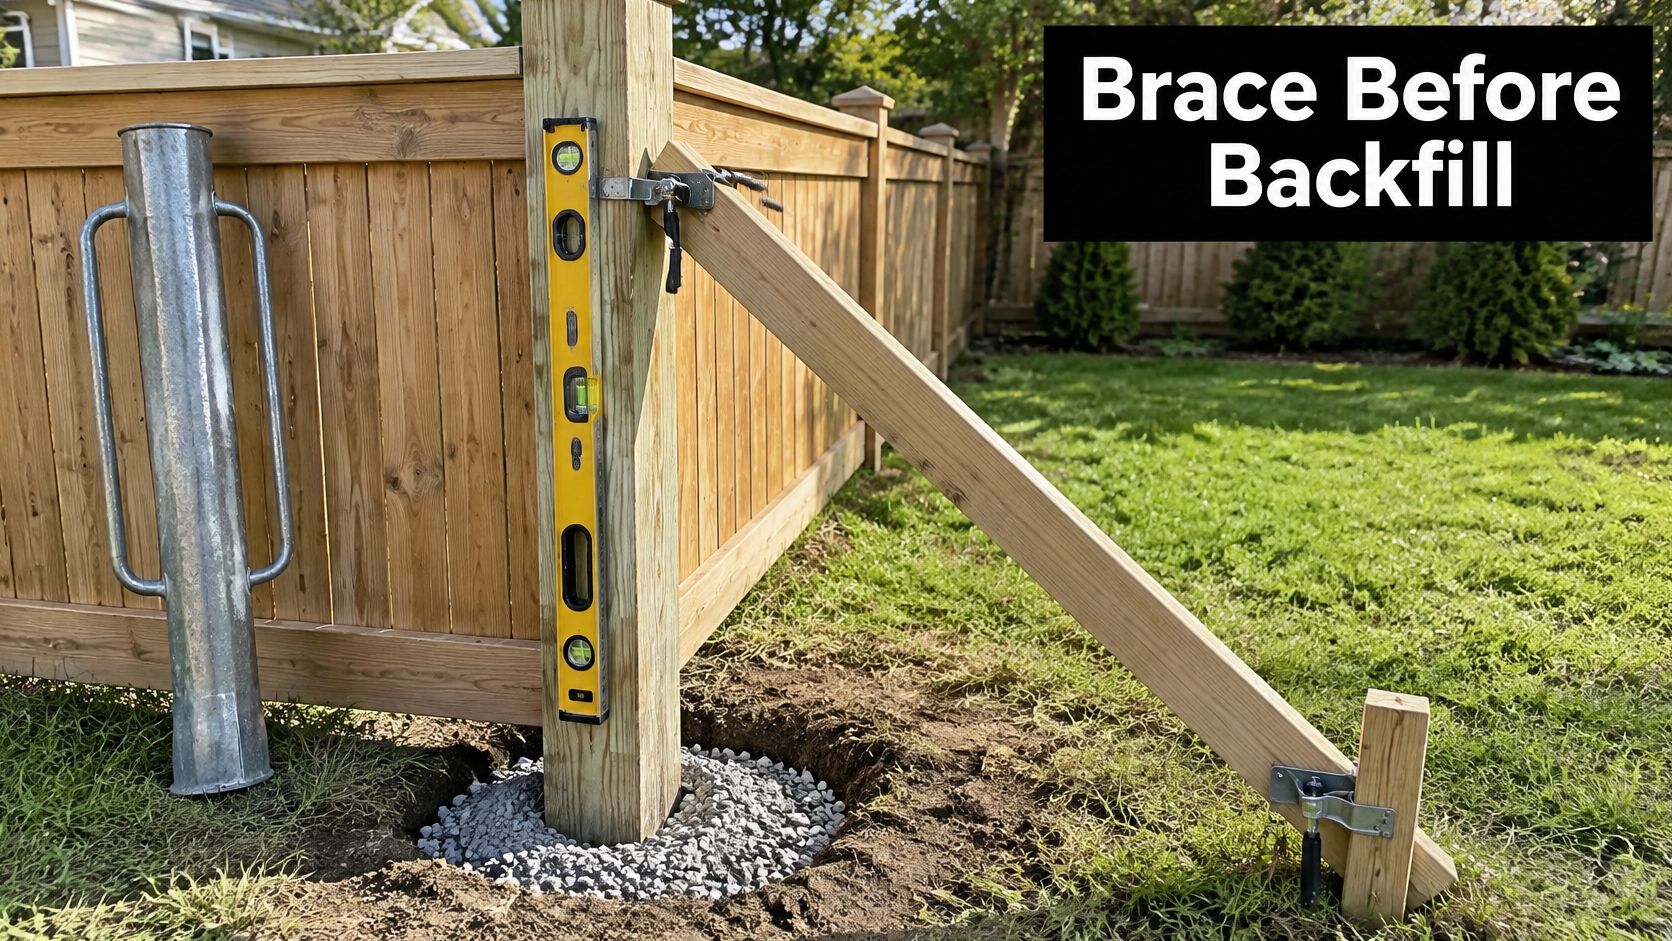
Leave the braces on until the stone is fully tamped and the post passes the push test. Twenty-four to forty-eight hours is the realistic window, and taking them off early is the classic mistake.
Take a corner post on an exposed lot. The brace comes off after one day, before the upper lifts have been compacted, and the first gale walks the post out of line. The stone was fine. The schedule wasn't.
Lateral and uplift forces are real even on light fencing. Where California's code applies, an embedded post is treated as a load-bearing element, and designs using posts embedded directly in earth or in concrete footings in earth must comply with the applicable embedded-post provisions or ASABE EP 486.3 (California Building Code, soils and foundations). Wind pressure, gate movement and soil resistance combine into an overturning problem, not a tightness problem.
Some jurisdictions settle the question for you. Tiburon's accepted standard specifies 24 to 30 inch holes for a six-foot fence with concrete around the post above a gravel layer, and planning review applies to many fences over 42 inches (Town of Tiburon common permits). Where a project isn't exempt from permitting, San Diego's information bulletin notes it must be designed by a California-licensed registered design professional (San Diego Information Bulletin 222). That's the correct route for a heavy gate on marginal soil.
If the fence is solid panel and the post sits at a corner, gate or end, treat gravel as the riskier option and plan a deeper setting, a larger post, or a stronger footing.
Fixing a Post That Leans, Loosens or Rots
The most common call comes after the first heavy rain: a post that stood straight in July leans by November. The gravel itself is rarely the problem. Water reached the base, the backfill went in too fast, or the post was never deep enough for the load it carries. A lean tells you the soil gave way under pressure, so the repair starts with the cause rather than the symptom.
Post symptoms, likely causes and fixes
| Symptom | Likely cause | Fix |
|---|---|---|
| Post leans after heavy rain | Backfill not tamped or base saturated | Dig out the top 12 inches, re-tamp angular rock in 4-inch lifts and reset plumb |
| Post rocks when pushed | Shallow embedment or loose top layer | Pull the post, dig deeper, re-tamp and brace for 48 hours |
| Post loosens within a season | Undersized hole or untreated wood in wet ground | Re-set deeper with drainage, or replace with a ground-contact rated post |
| Gate post sags | Insufficient embedment under repeated load | Reset deeper or larger, or add a concrete footing |
| Soil washes out at post | Surface water pooling | Slope grade away and add a shallow swale |
| Post rots at the ground line | Wet, untreated end grain | Replace the post and seal all cuts with approved treatment |
Match the repair to the diagnosis. A surface lean is a one-day job: excavate, re-tamp in lifts, check plumb. A rocking post needs the full reset, and the 48-hour brace is what keeps the fresh backfill from loosening again while it consolidates. A post that loosens over a whole season usually sits in wet ground, and replacement runs a week or more because the old hole has to be cleared out and re-drained before the new post goes in. A sagging gate post is the one case where I reach for concrete, since repeated gate load on marginal soil beats a gravel setting every time.
Rot at the ground line means moisture stayed trapped against untreated end grain. Replace the post, seal every fresh cut with an approved treatment, and keep soil and mulch sloped away from the base. The drainage and treatment details are covered step by step in this guide to preventing fence post rot.
Check each new or repaired post after every heavy rain through the first season. Keep mulch and vegetation clear of the base, and recut and seal any end grain before it stays wet.
XTREME EDEALS INC. stocks the parts that finish a gravel-set fence properly: post caps for wood and metal posts in sizes from 2×2 up to true 6×6, plus fasteners, gate hardware, balusters and deck accessories, with CAD pricing and multi-pack options whether you are setting four posts or forty. Our blog guides on selecting post caps and designing fences pair with that catalogue so the whole job stays in one place, and our customers range from deck builders and fence installers to homeowners doing it themselves. Visit XTREME EDEALS INC. when you are ready to order the hardware for your build.