
Your fence looks straight from the patio. Walk up to it, grab a post at chest height, and give it a firm shake, and it moves. The boards are fine, the cap is still on, but down at the soil the wood feels soft when you poke it with a screwdriver.
That's how most fences fail. Not from the top down, and not all at once. One post softens at the soil line, the rails loosen, the gate sags, and suddenly you're pricing a rebuild for a fence that's only a few years old.
Knowing how to prevent fence post rot means spending your time and money in two places most guides rush past. The first is the soil line, where wet, drying, oxygen and fungi all meet. The second is every cut end, where bare end grain drinks water faster than any other surface. A cap helps with the second problem at the top. It can't rescue a post sitting in wet soil with the wrong treatment stamped on its tag.
Choose Posts That Can Handle Ground Contact
A post tagged for above-ground use fails the job the moment it goes in the hole. The wood can look green and the label can say treated. That rating still was not written for soil. Bury it and a light treatment has to do a ground-contact job it was never meant to do.
The options that actually work in soil
For most in-ground runs I would start with ground-contact pressure-treated pine. Treatment is forced into the fibres, and the end tag states the exposure the post was made for. Read that tag on every post, not only the first one on the stack.
Naturally durable heartwood is the second real option. Cedar, black locust and juniper resist decay through extractives in the heartwood itself, without preservative. You pay more, and the quality is less consistent. A board sold as cedar can still carry plenty of sapwood. Sapwood is not resistant in the same way. It takes on moisture and feeds fungi well before tight, dark heartwood does.
California rules make the distinction concrete. California Building Code Section 2304.12.2.6 requires wood in contact with exposed earth to be naturally durable for decay and termite resistance or preservative-treated under AWPA U1 for soil or freshwater use. That is the bar worth using anywhere soil stays damp. Above-ground lumber does not meet it.
How far the treatment runs matters as much as which chemical was used. A California Department of Fish and Wildlife fence specification requires preservative treatment to extend from the butt end at least 30 inches for line posts and at least 36 inches for corner, gate and brace posts, unless the post is naturally durable Orange Osage, Western Red Cedar, Juniper or Black Locust. That extra treated length covers the band just above grade, where splash and drying cycles are hardest on the wood. A sealed cut end still matters, but the stamp has to reach the soil line first.
Steel trades one failure for another. Galvanized or powder-coated steel does not rot, so it holds up where soil stays wet. It rusts instead, usually where a shovel, string trimmer or soil abrasion breaks the coating right at grade.
Untreated lumber has no place buried in soil. It is fine for boards and rails kept clear of the ground. Bury it and you have built in a short service life on purpose.
Match the post to your climate, not a generic label
A dry inland yard and a foggy coastal yard punish posts differently. Treated California redwood post life varies with climate rather than following one number. A USDA Forest Service guide on redwood post life is a reference for that spread, not a promise of a single lifespan. Irrigated lawn, heavy winter rain, coastal fog and fast-draining sand do not call for the same species, the same treatment, or the same expectations.
Post materials and where each one holds up in soil
| Post type | Suited to soil contact | Main weak point | Prevention step |
|---|---|---|---|
| Ground-contact pressure-treated pine | Yes, when stamped for ground contact | Untreated cut ends and sapwood exposed on site | Seal every cut and set the post with drainage |
| Naturally durable heartwood (cedar, black locust, juniper) | Yes, in most soils | Heartwood content varies by grade; sapwood rots | Buy heart-grade stock and seal end grain |
| Galvanized or powder-coated steel post | Yes, with a sound coating | Rust where the coating breaks at grade | Inspect the soil line and touch up coating damage |
| Untreated lumber | No | Decays quickly once moisture reaches it | Keep off the soil; use a standoff base or concrete collar only if the wood is above ground |
At the yard, run a short buying check before anything goes on the cart. Use these checks alongside our guide to wood post treatment options and labels so the stamp, not the colour of the wood, drives the choice.
- End tag first: Confirm a clear ground-contact designation and the preservative named on the label.
- Sight every post: Roll it and look down its length for crook, twist and cupping you will fight at install time.
- Reject damaged stock: Split ends, deep checks and crushed corners open paths for water and weaken fastener hold.
- Check end grain: Look for a clean, solid centre before you cut, since interiors can receive less treatment.
- Grade heartwood: For cedar and similar species, choose pieces with the most heartwood and the least pale sapwood.
Buying rule: Match the post to how wet the soil stays across the whole year, not to how dry the yard looks on installation day.
Compare Footings for Drainage and Strength
After a heavy rain, water pooling around a post can undo the strength of an otherwise sound footing. Choose the support method for the post's load, then make sure water can drain away instead of lingering at the soil line.
Three ways to support a post
Compacted gravel backfill suits many line posts in soil that drains well. Set the post on about 15 centimetres of compacted gravel at the bottom of the hole, then backfill in layers and tamp as you go. This gives water a path away from the post end, but gravel alone may not provide enough rigidity for a heavily loaded gate or corner.
A concrete footing resists movement where posts carry greater loads, such as at corners, gates and braces. Shape the top of the collar to sit at least 5 centimetres above grade, with a crown that directs rain away from the wood. Concrete adds stiffness, but a flat or cracked collar can hold water against the post.
A standoff base supports the post above soil on a bracket anchored to concrete. It avoids direct contact between the wood end and damp ground, and can make a post easier to replace without breaking up a footing. Compare the bracket's dimensions with your post using this guide to raised bases for posts, and check that the wood will sit clear of the ground.
Footing methods compared on drainage and rot control
| Footing method | Water handling | Rot risk | Best use |
|---|---|---|---|
| Compacted gravel backfill | Lets water drain around the post end | Lower when surrounding soil drains well | Line posts in fast-draining soil |
| Concrete footing with sloped collar | Sheds water when the top is crowned | Water can collect if the collar is flat or cracked | Corner, gate and brace posts that carry load |
| Standoff base bracket | Keeps the post end above soil | Reduces ground-moisture contact at the post end | Replacing or retrofitting posts |
| Direct burial in soil | Can hold water against the post | Higher when soil stays wet | Avoid for wood posts where water collects |
The concrete trap
Concrete poured tight around wood can collect water at the post. As the wood shrinks, a gap may open; rain enters, and the concrete can slow drying. A flat or dished collar makes that problem worse.
A crowned collar and a clear drainage path matter more than adding extra concrete. Keep surrounding soil graded so it falls away from the footing, and avoid creating a low ring that channels runoff toward the post. The same basic attention to slope appears in these groundwork tips for synthetic grass: shape the surface so water moves away rather than pooling beside the structure.
For installation, have a post hole digger or auger, level, tamper, tape measure and gravel on hand, with concrete mix for footings that need it. Clay soil holds water longer, so a gravel layer may not solve drainage on its own. Where a hole remains wet, consider a standoff rather than burying wood in a spot that keeps it damp.
Before closing each hole, check that the post is plumb in two directions, the footing surface slopes outward, and nearby fence boards can dry above the soil. Correct a slope or alignment problem while the hole is open. For ordinary line posts in well-drained soil, gravel is a practical choice; use concrete where the load calls for more rigidity, and a standoff where buried wood would remain wet.
How to Set, Seal and Cap Each Post
The visual sequence below lays out the full workflow from marking utilities through to the finished cap, so you can see the order before you start cutting.
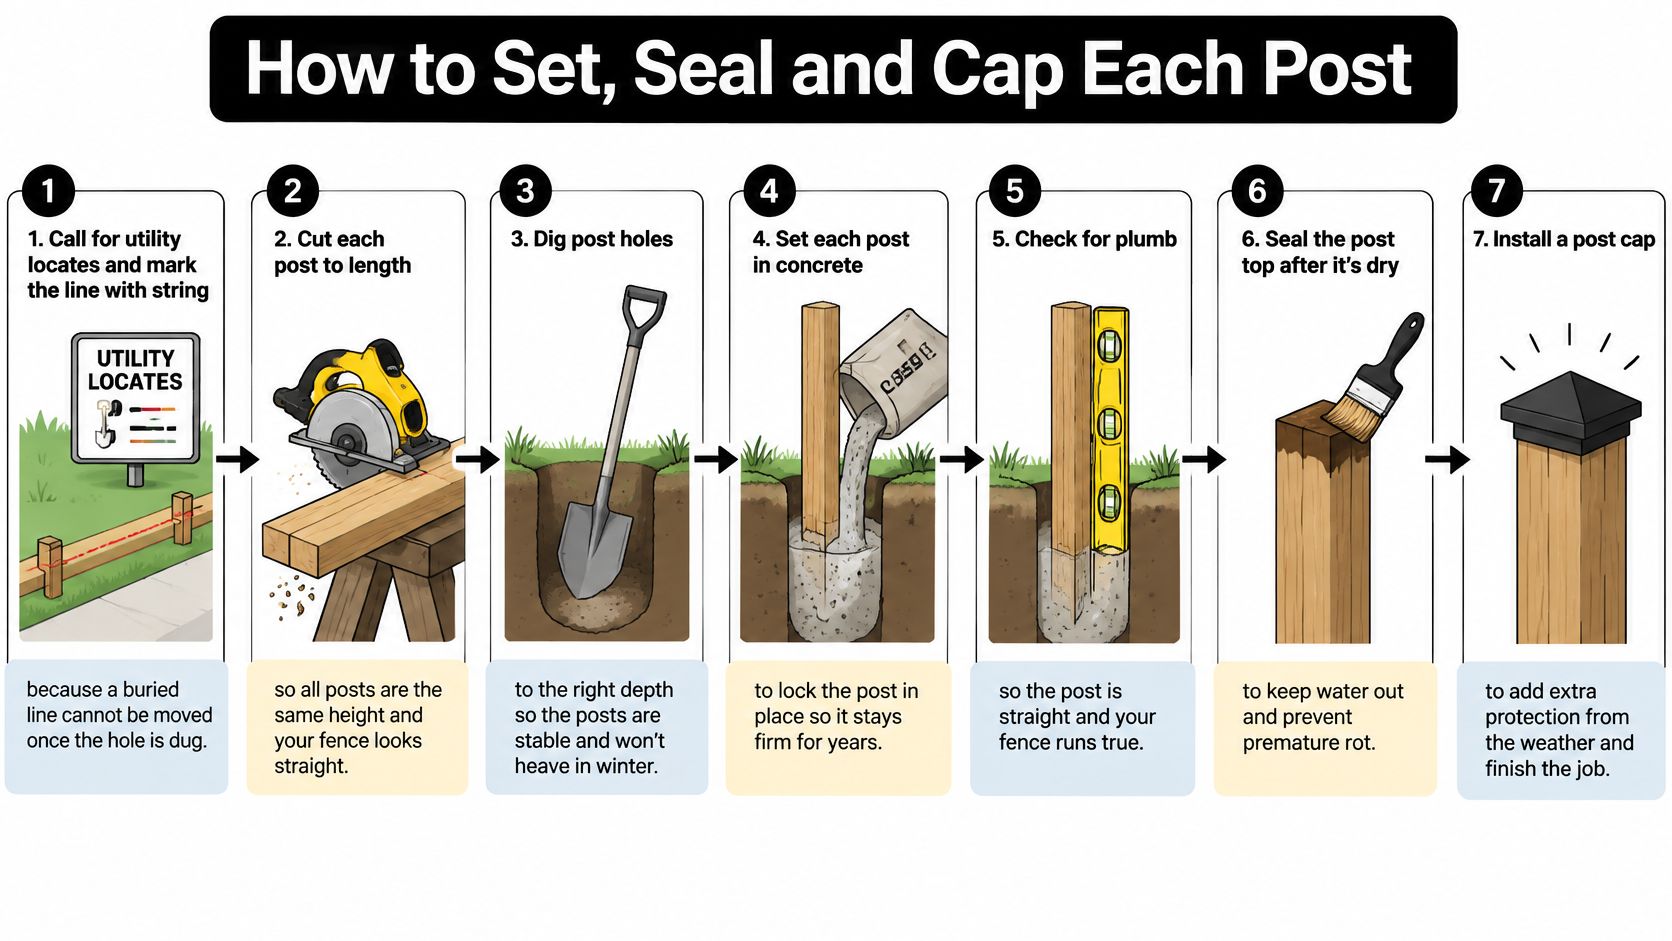
Sequence matters because the cheapest protection becomes impossible once the post is buried. Sealing a butt end takes one minute on sawhorses. It can't be done after backfill.
- Call for utility locates and mark the line with string, because a buried line cannot be moved once the hole is dug. Confirm gate widths and corner positions before the auger comes out.
- Cut each post to length and brush end-grain sealer on every fresh cut, top and bottom, since bare end grain takes on water first. Field cuts can expose wood that received less preservative penetration than the outer shell, so treat them with a compatible preservative according to its label.
- Set the post plumb with its bottom resting on about 5 centimetres of gravel so the butt drains rather than sitting in the wettest part of the hole.
- Backfill and tamp in lifts of about 15 centimetres using your chosen footing method, checking plumb as you raise each lift. Loose pockets let the post shift and open water paths.
- Confirm the collar or gravel top is sloped so water runs off rather than pooling against the post faces.
- Fit a post cap sized to the measured post and bed it with sealant so water cannot slip under the cap and reach the top end grain. Measure the actual post before ordering a cap made for a 4 by 4 post, because nominal lumber names rarely match finished dimensions.
- Grade soil away from the fence line and keep sprinklers from spraying the posts. Constant irrigation overspray defeats good materials faster than occasional rain.
Watching the setting and sealing sequence before you mix concrete helps you keep each step in order, especially where the cap and collar meet the post.
Gather a level, tamper, brush, sealer, gravel, post cap, sealant and a tape measure before the first hole. Finish by checking that each post is plumb, tight in the hole, free of bare end grain, and shedding water from its base within minutes of rain or a hose test.
Inspection Schedule That Catches Rot Early
You won't find early rot from the driveway. You find it on your knees at the soil line, pushing a tool into wood that still looks presentable from standing height.
The probe test
Use an awl or a flat screwdriver. Push firmly into all four faces at grade and just above it. Sound wood resists and lifts in long splinters if you pry gently. Decayed wood gives, feels spongy or crumbles into short, brash pieces.
Check the shady side and any face hit by sprinklers first. Also probe rail-to-post joints, fastener penetrations and cracks, because those spots trap water above ground. If the tool sinks in easily across a wide area, the post has lost structural wood. Coating it won't bring that strength back.
Post inspection schedule
| Check | How often | What to look for | Action |
|---|---|---|---|
| Post base at soil line | Spring and fall | Softness, dark staining, crumbling | Probe the wood; replace if it gives |
| Cut ends and end grain | Yearly | Cracks, bare wood, checks at the top | Reseal and re-cap |
| Cap and fasteners | Yearly | Loose cap, rusted screws, gaps | Refit cap, replace fasteners with exterior-rated ones |
| Sprinkler and gutter spray | Each season | Water hitting posts or pooling at the base | Redirect spray and clear the drain path |
| Metal post coating at grade | Yearly | Rust bloom or bare metal | Clean, prime and paint with rust-inhibiting coating |
Wet winters, irrigation, coastal fog and poor drainage shorten the interval. Add a quick check after every heavy storm, looking for shifted soil, new pooling and mulch washed against the post. A structured template like those used to plan routine facility maintenance from Facility Management Insights works well scaled down for a fence. Keep a simple log with the date, post number, probe reading and action taken, and you'll spot which posts are deteriorating years before they lean.
After wildfire, probe even when boards look fine
Heat can damage a fence without burning it down. After any wildfire nearby, inspect every post even where boards appear intact. Look for hidden charring at the ground line, heat-cracked wood, loosened soil, eroded footing support and weakened connections.
Firefighting water and stripped vegetation can also change how runoff moves along the fence line. Probe suspicious wood and expose the base if the surface feels brittle. Replace any post that gives under the probe rather than swapping only visibly burned boards and trusting a compromised support.
The rule never changes. A post that fails the probe test gets replaced, not coated.
Fixing Rot on Wood and Metal Posts
A soft post at the soil line is the symptom homeowners notice first, usually because the fence starts to wobble. The cause is almost always buried sapwood, an above-ground-rated post used below grade, or water held against the base by soil, mulch or a flat concrete collar.
Work from symptom to cause
Dig around the base and probe below grade before deciding anything. If decay is short and confined to a cut end you can reach, cutting back to sound wood and resealing can work. If softness wraps around the post or runs deep at grade, the section carrying the fence is compromised. Replace the post. Sistering new wood against rotten wood that's still sitting in wet soil only gives fungi fresh food beside an active colony.
Top-end rot tells a different story. A loose or missing cap lets rain sit on the end grain, checks open, and the top crumbles while the base stays sound. Trim back to firm wood if enough height remains, reseal the end grain, and refit a correctly sized cap bedded in sealant so water can't creep underneath.
A dark wet ring along the bottom of boards points at contact, not the boards themselves. Mulch heaped against a fence or soil graded up over the board ends keeps them damp continuously. Clear the contact away and leave a gap of about 2 to 3 centimetres so air can dry the bottoms. California pest guidance ties fungal problems to earth-to-wood contact, faulty grade levels and excessive moisture, and the California structural pest control material allows structurally weakened members to remain only where an adjacent member performs the same function, both are dry below 20% moisture content, and the moisture condition has been corrected. That 20% figure isn't permission to keep wetting a post. It's a threshold for judging retained wood after you've fixed the water problem.
Metal posts need the same honesty. Wire-brush rust bloom at grade back to sound metal, prime with a rust-inhibiting primer, and paint with an exterior coating. If pitting has thinned the wall so it flexes or dents under hand pressure, paint is cosmetic. Replace the post.
Symptoms, causes and fixes for wood and metal posts
| Symptom | Likely cause | Fix |
|---|---|---|
| Soft wood at the soil line | Buried sapwood or water held at grade | Probe, dig out and replace if soft; correct grading |
| Top of post crumbling | Water under a loose or missing cap | Reseal end grain and refit cap with sealant |
| Dark wet ring on boards | Mulch or soil touching the boards | Clear contact and leave a gap of 2 to 3 centimetres |
| Rust bloom on metal post base | Coating broken at grade | Wire-brush, prime and paint; replace if metal has thinned |
| Post leaning or loose | Decay at grade or failed footing | Check the soil line first, then reset or replace the post |
Know what paint cannot do
Paint and surface sealers slow water uptake on sound wood. They don't reverse decay already inside a post, and a coating over punky fibres traps moisture against wood that needs to dry. UC Agriculture and Natural Resources guidance on lumber for outdoor exposure is clear that untreated wood decays when moisture is available and recommends pressure treatment where wood must contact soil. That means treatment in the wood, rated for the exposure, not a film over the damage.
Sort repairs by time. Resealing a top, refitting a cap, clearing mulch and touching up a metal coating are one-day jobs. Replacing a post is also often a single day. Correcting grade, rerouting a downspout, or reworking drainage along a whole fence line is a season project, and it's the one that determines whether the new post outlasts the old one.
When a post comes out, handle the old wood as what it is. The California treated wood waste fact sheet lists fence posts among wood products commonly used in ground-contact applications and treated to protect against insects and fungal decay. Preservative stays in the fibres after removal, so don't burn old posts or toss them on a brush pile. Use a lawful disposal route, keep the treatment paperwork from the replacement lumber, and install the new post to the ground-contact standard the old one may never have met.
Confirm Your Post Plan Before You Buy
Most wasted fence money is spent at the checkout, not at the hole. A five-minute confirmation before you order catches the mismatches that no installation trick can overcome later.
Run this checklist against every post position, not just the run as a whole. The wettest corner of the yard deserves its own answer.
- Post rating confirmed: Each wood post going into soil is stamped for ground contact, or it's a durable species with the heartwood grade verified piece by piece. Untreated and above-ground-rated stock stays out of the hole.
- Footing matched to soil and load: Line posts in draining soil get gravel drainage. Corners and gates get the footing strength their load demands without a water-holding collar. Chronically wet spots get a standoff or steel instead of another buried post expected to beat the site.
- Cuts and calendar planned: Sealer and a brush are on the materials list for every field cut, and inspection dates are set for spring and fall, with extra checks after heavy storms or a nearby wildfire.
- Cap measured against the actual post: You measured the finished post with a tape rather than trusting the nominal lumber name, so the cap beds tight instead of rattling loose in the first wind.
Then take the practical next step. Xtreme eDeals carries post caps and related hardware, including post caps for metal or wood posts in various sizes, and has sold deck, fence and railing hardware online since 2010. Confirm current sizes on the site against your measured post before you order, because a cap that's even slightly oversized lets driven rain reach the end grain it's meant to protect.
Prioritise the posts standing in wet soil first. Those are the ones deciding how long this fence lasts. Buy their replacements, bases and caps before spending on decorative upgrades for posts in dry, easy ground.
Set the first inspection reminder before the first winter, while the install details are still fresh in your mind. Note which footing went where and which posts sit in sprinkler range. That record turns a vague worry about rot into a short, scheduled check you can act on.
Learning how to Prevent Fence Post Rot comes down to this. Keep wood rated for the exposure, keep water moving away, and verify both with a probe twice a year.
Measure your posts, confirm the ground-contact rating, and order caps that fit the actual wood rather than the nominal size, then set your first soil-line inspection for this season. Visit XTREME EDEALS INC. to compare post caps, bases and fence hardware against your measurements, and build the wettest post positions first so the whole fence lasts.