

You've finished the fence, opened the box of post caps, and discovered that the caps marked “4×4” don't slide over the posts. This is one of the most common finishing-stage mistakes in fence and deck work, and it usually comes from treating a lumber label as a physical measurement.
The answer to what size fence post caps do I need depends on the post's actual outside dimensions, its material, the cap's inside opening, and the conditions where the fence will be installed. Measure first, then choose the style and finish. That order saves far more frustration than trying to force a cap that's slightly too small.
Understanding Nominal Versus Actual Post Dimensions
A post sold as a nominal 4×4 usually isn't four inches square after it has been dried and surfaced. Canadian product listings use the practical example that a nominal 4"x4" post cap typically fits an actual 3.5"x3.5" post, while a rough 4"x4" cap is intended for a true 4"x4" post. You can see that distinction in this Canadian post-cap sizing example from Home Depot Canada.
That difference is the reason a cap labelled 4×4 may fit a standard smooth post but fail completely on rough-sawn timber. The label describes the lumber category, not necessarily the finished width and depth. A cap manufacturer uses the category as a shopping reference, while the inside dimensions determine whether the cap will seat.
The rule for standard lumber
For a standard surfaced post, start with the nominal size, but don't stop there. Measure the post at the location where the cap will sit and compare that measurement with the product's stated fit. A cap made for an actual 3.5"x3.5" post isn't the same product as one designed to clear a full 4"x4" post.
Pressure-treated wood deserves extra care because moisture can affect the finished dimensions. Older posts may also have swollen edges, worn corners, paint buildup, or previous cuts that make them different from a new post bought from the same nominal category.
Rough-sawn posts need a different approach
Rough lumber keeps more of the material left by the sawmill. A true rough 4"x4" can therefore require a cap with a larger opening than a cap intended for a standard surfaced 4×4. The same principle applies to custom-milled posts, wrapped posts, vinyl sleeves, and composite coverings. Measure the finished outside surface, not the hidden wood beneath it.
Practical rule: Treat “4×4” as a starting category, never as proof of the cap's required inside opening.
If the cap is too tight, forcing it can damage the corners or leave the cap tilted. If it's too loose, it can shift, look uneven, and leave the post top exposed to water. The right purchase matches the measured post, the cap's internal clearance, and the material being capped.
How to Measure Your Fence Posts for a Perfect Fit
Measure the post at the very top, exactly where the cap will sit. Measuring lower down can give you the wrong answer if the post tapers, twists, has a sleeve, or has been altered during installation. For a reliable result, use a tape measure and a square, and record the dimensions rather than relying on memory.
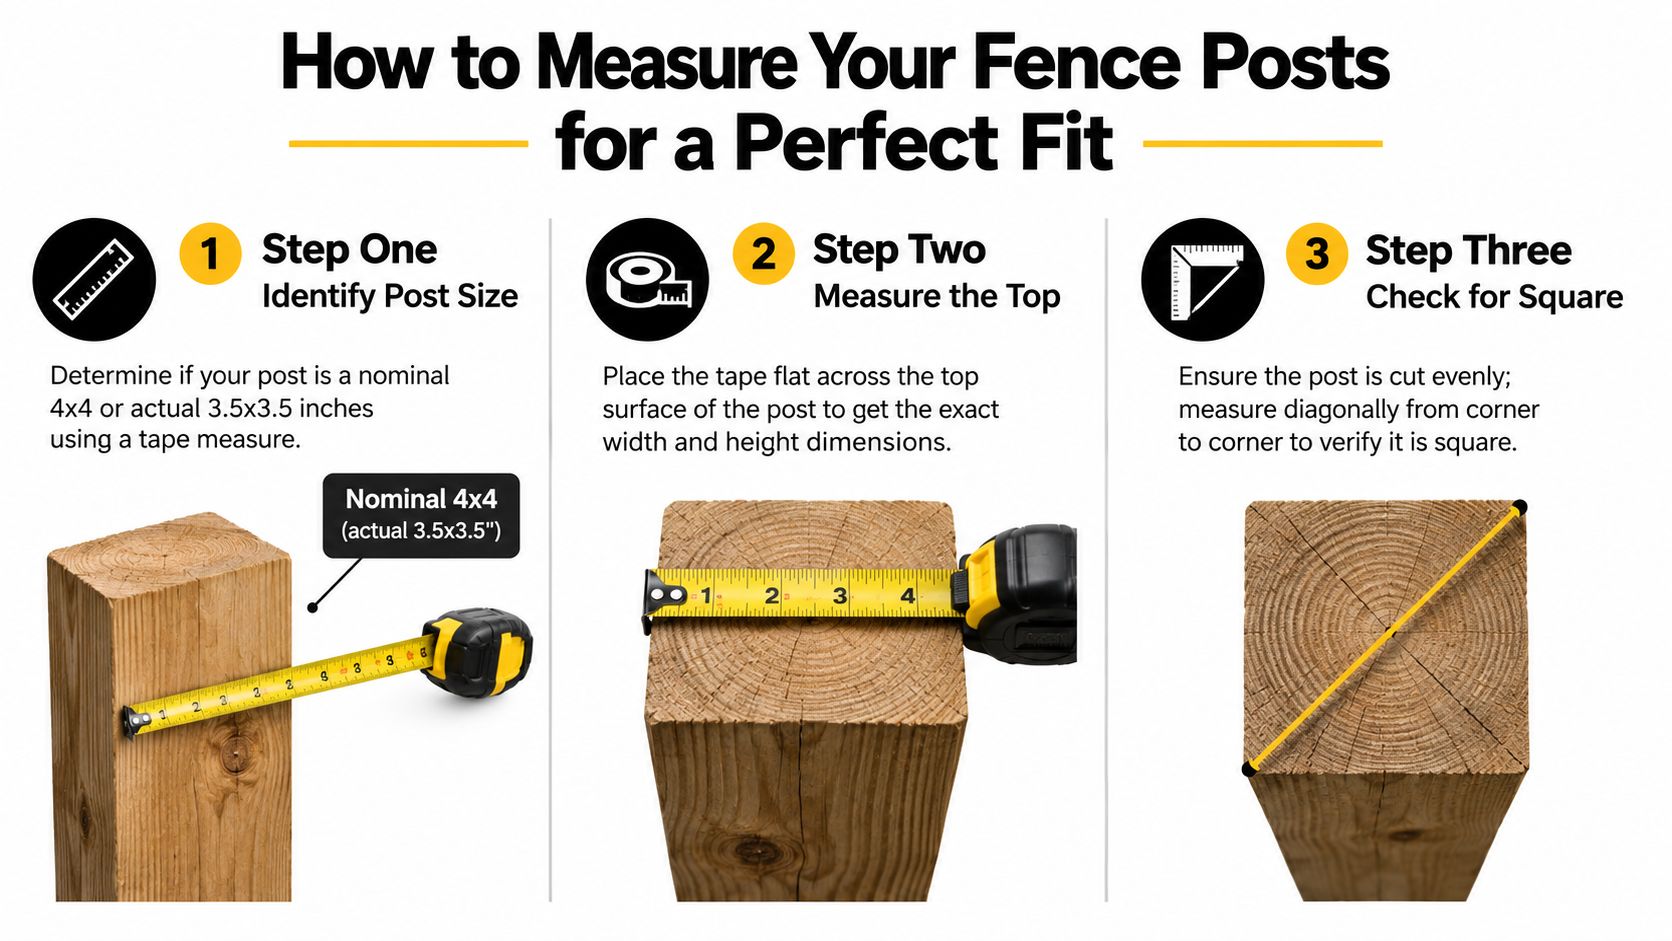
A dependable measuring process
- Clear the post top. Remove loose splinters, dirt, old sealant, and anything that increases the outside dimension. Don't remove sound material just to make a cap fit.
- Measure both faces. Place the tape from outside edge to outside edge across one face, then repeat across the adjacent face. Write the result as width by depth.
- Check the corners. Look for chipped edges, twisting, and a cut that isn't level. A cap needs to clear the widest usable portion of the post.
- Measure the diagonals. Check from one corner to the opposite corner, then repeat across the other pair. Unequal diagonals indicate that the top isn't perfectly square.
- Check the product specification. Compare your largest outside measurement with the cap's inside opening and installation method.
For California fence work, the recommended workflow is to measure at the top, record both face-to-face dimensions, and check the diagonals. If the post is slightly out of square, select a slip-over cap based on the largest outside dimension. For a tight-fit cap, the relevant limit is the smallest inside clearance, as reflected in Caltrans fence construction guidance.
A post with a small irregularity may only need careful cleanup and a cap with sensible clearance. Don't sand away a large amount of sound wood to accommodate the wrong product. If you're fitting a standard wood cap, review the available 4×4 post cap options only after you know the actual measurement.
Use the same process on gate posts, corner posts, and replacement posts. A fence repaired in stages may contain different lumber profiles even when every post was described as a 4×4.
Sizing Caps for Metal and Mixed-Material Projects
Metal posts don't follow the same sizing assumptions as surfaced wood. Chain-link systems, steel pipe, and aluminium fencing commonly use diameter-based or manufacturer-specific measurements. A cap listed for a wood 4×4 won't solve a chain-link post problem, even if the two posts appear similar from a distance.
Canadian retail categories include wood sizes such as 4"x4", 5"x5", and 6"x6", along with metal and chain-link sizes such as 1.875" and 2.375". These product categories are shown together in the Canadian post-cap listings for wood and chain-link systems. The key point isn't the label alone. It's the post type and the actual outside dimension that the cap must cover.
Wood and metal require different checks
With wood, you're usually comparing a measured square or rectangular outside dimension with a cap's inside opening. With metal, you may need to identify whether the listed measurement refers to the outside diameter, the inside diameter, or a system-specific post designation.
Measure a metal post with care around welds, galvanised buildup, paint, and fittings. A cap that fits over a clean pipe may not seat over a post with a projecting fastener or a collar. Check whether the product is intended for a slip fit, a screw attachment, or a post system with a dedicated top fitting.
Mixed materials create hidden sizing problems
A fence may combine steel line posts with wood gate posts, or a wood post may be covered with a vinyl sleeve. In each case, buy by the finished surface at the cap location. Don't measure the wood core if the sleeve is what the cap must cover.
Adapters can help where a product is designed for more than one compatible post size, but an adapter isn't a substitute for measurement. It must still leave the cap centred and secure. For a clean result, separate the shopping list by post type, shape, and measured size rather than ordering one universal cap for the entire fence.
Navigating Regional Codes and Structural Requirements
A post cap is a finish component, but it also helps close the exposed top of a post. That matters on wood, where an uncovered end can collect water, and on steel pipe, where an open top can admit rainfall and small animals. California fence specifications can require steel pipe posts to be permanently capped for that reason, while local fence standards also address concrete embedment and footing dimensions.
Examples in California guidance include wood fence posts set in concrete footings about 12 to 24 inches deep, a footing example with a minimum 10-inch diameter and 2 feet of embedment, and another enclosure-post requirement calling for at least 12 inches of burial. These requirements are summarised in the California residential deck guidance and related sizing references. The cap can't correct an unstable post, but the post's installation conditions determine how much exposure the cap will face.
California-specific design checks
California buyers should check more than fit. Decorative caps may affect the finished height of a fence, especially where local rules measure from grade to the highest part of the installation. A tall finial or ball may be treated differently from a low-profile cap, so confirm the local interpretation before installing a decorative profile on a regulated boundary.
Wildland-Urban Interface projects also call for a more deliberate material review. A regional guide may recommend fire-aware choices for exposed components, and a decorative metal or polymer product shouldn't be selected solely for appearance without checking the applicable local requirements. The California-focused product guidance for a 6×6 metal cap illustrates why regional constraints belong in the sizing decision.
A cap should cover the post completely, but it shouldn't create a new compliance problem through its height, material, or attachment method.
Confirm the fence height, post installation, and material requirements with the relevant municipality or project authority. A cap that fits perfectly is still the wrong choice if it interferes with a local height limit or a fire-conscious specification.
Choosing the Right Styles and Brands for Your Project
Once the dimensions are confirmed, style becomes a practical design decision rather than a guess. A low-profile flat cap suits a clean contemporary fence, while a pyramid cap adds a more traditional finish. Ball and finial designs draw more attention to gate posts, entry points, and deck corners.
The product should also match the post material. Metal caps can provide a crisp contrast against stained wood, while a coordinated finish can make a long fence line look more organised. For polymer or other non-metal options, review the manufacturer's information on UV exposure, moisture, and temperature changes rather than assuming every finish will weather in the same way.
Comparing product priorities
Decorex Hardware and Nuvo Iron are useful names to compare when you're choosing decorative fence hardware. The decision shouldn't be based on brand recognition alone. Compare the actual post size, inside opening, attachment method, finish description, and whether the shape suits the scale of the post.
Decorex Hardware products available through XTREME EDEALS INC.’s fence post cap selection can be assessed alongside Nuvo Iron alternatives by checking the same practical details. A powder-coated finish may be attractive, but you still need to confirm how the product is specified for outdoor use, whether screws are included, and whether the opening matches the measured post.
Match proportion to the structure
A cap should look intentional from the property side as well as the street side. A narrow cap on a broad structural post can look undersized, while an oversized decorative top can dominate a modest fence. Keep the profile consistent across posts that can be seen together, but use a different size where gate or deck posts genuinely require it.

Read the listing details before adding a product to your cart. Confirm whether the stated size describes a nominal category, an actual fit, or a cap with an adapter. That distinction matters more than the photograph, especially when the product is intended for a true-fit post.
Installation Tolerances and Common Fitment Fixes
Installation exposes the small differences that measuring alone can't always predict. A slip-over cap needs enough clearance to slide over the post without force, while a tight-fit cap depends on a close match between the post and the internal opening. Bracket-mounted and screw-in caps offer another approach when the post top isn't perfectly uniform, but their fasteners still need sound material to bite into.
Start with a clean, reasonably level post top. Set the cap in place without hammering it down. If it stops early, remove it and inspect the corners, splinters, paint, fastener heads, and moisture-related swelling rather than forcing the cap.
Fixing a loose or tight cap
A slightly loose slip-over cap can sometimes be stabilised with the manufacturer's recommended fasteners or an appropriate installation method. Don't fill a large gap with improvised material and assume that the cap will remain weather-tight. Excess movement can enlarge screw holes and leave the finish looking uneven.
A tight cap needs a different response. Check the measured post against the cap's inside dimensions, then inspect whether the post is out of square. Lightly cleaning a rough edge can help, but cutting down a substantial amount of post material usually indicates that the cap size is wrong.
Use adapters with care
Canadian listings show that a nominal 6"x6" cap generally fits an actual 5.5"x5.5" post, while some products include adapters for actual 6"x6", 5.5"x5.5", and 5"x5" posts. Review the 6×6 metal cap specifications and adapter details before relying on an adapter.
The adapter should centre the cap, maintain a stable fit, and suit the cap's fastening method. It shouldn't conceal a seriously mismatched post size. For a professional finish, test-fit one cap before installing the full order, particularly on pressure-treated wood or a fence assembled from different batches.
Count the posts by actual size and type, keep the correct fasteners with each product, and install caps only after the tops are clean and ready. That approach prevents a common last-minute problem, a fence that looks complete except for caps that rock, split, or refuse to seat.
XTREME EDEALS INC. offers fence and deck accessories, including pyramid, ball, and decorative post caps for wood and metal posts in several measured fit categories, along with fasteners and related hardware. Visit XTREME EDEALS INC. with your post dimensions recorded so you can compare the correct cap size, attachment method, and finish before ordering.