
You've got a fence post, deck bracket, or railing base ready to bolt down. The sleeve-anchor package shows an impressive load figure, the concrete looks solid, and the installation seems straightforward. It's tempting to match that number to the weight of the structure and start tightening.
That approach is risky. Sleeve anchor weight capacity isn't one universal number, because the usable load changes with concrete strength, embedment, edge distance, anchor spacing, installation torque, and whether the force pulls straight out or pushes sideways. Canadian builders also need to account for wind, people leaning against railings, fence movement, and the long-term effects of outdoor exposure.
The practical question isn't “How much can this anchor hold before it breaks?” It's “What working load can this anchor safely carry in this concrete, in this orientation, with this installation?”
Understanding Real-World Sleeve Anchor Loads
A homeowner once sees a sleeve anchor rated for a large ultimate load and assumes four anchors can support four times that amount. The calculation looks tidy on paper, but it ignores what happens at the job site. Concrete may be weaker than expected, a hole may be oversized, dust may remain at the bottom, or a post bracket may turn a modest horizontal force into serious tension on one anchor.
The ultimate load is a failure-point value. It describes the force at which the anchor or surrounding concrete gives way under a particular test setup. That failure might involve steel fracture, pullout, concrete breakout, or a combination of failures. It isn't a service recommendation for a deck, fence, shelf, or railing.
Canadian industry guidance commonly reduces ultimate capacity to about 25% for working loads, as shown in the Canadian sleeve anchor load guidance. That reduction provides room for variation in materials, installation, loading, and deterioration. It also recognises that outdoor hardware doesn't experience one perfectly steady load.
Why the load changes after installation
A fence post can catch wind. A deck railing can receive a sudden shove. A swing or gate can create movement that repeatedly loads the fasteners. Those forces are different from a carefully measured weight hanging still from a ceiling.
Concrete also varies from one project to another. A laboratory or manufacturer rating may assume a particular concrete strength, a clean drilled hole, the specified embedment, correct spacing, and a correctly torqued anchor. Your installation only deserves that rating when those conditions are present.
Practical rule: Treat the catalogue figure as a starting point for design review, never as the weight you should routinely apply.
The safest selection process identifies the force direction first, then checks the anchor's evaluated capacity for the actual concrete and installation. For structural decks, guardrails, and posts, the anchor is only one part of the system. The bracket, bolt, concrete slab, edge distance, and post connection must work together.
Working Loads Versus Ultimate Failure Points
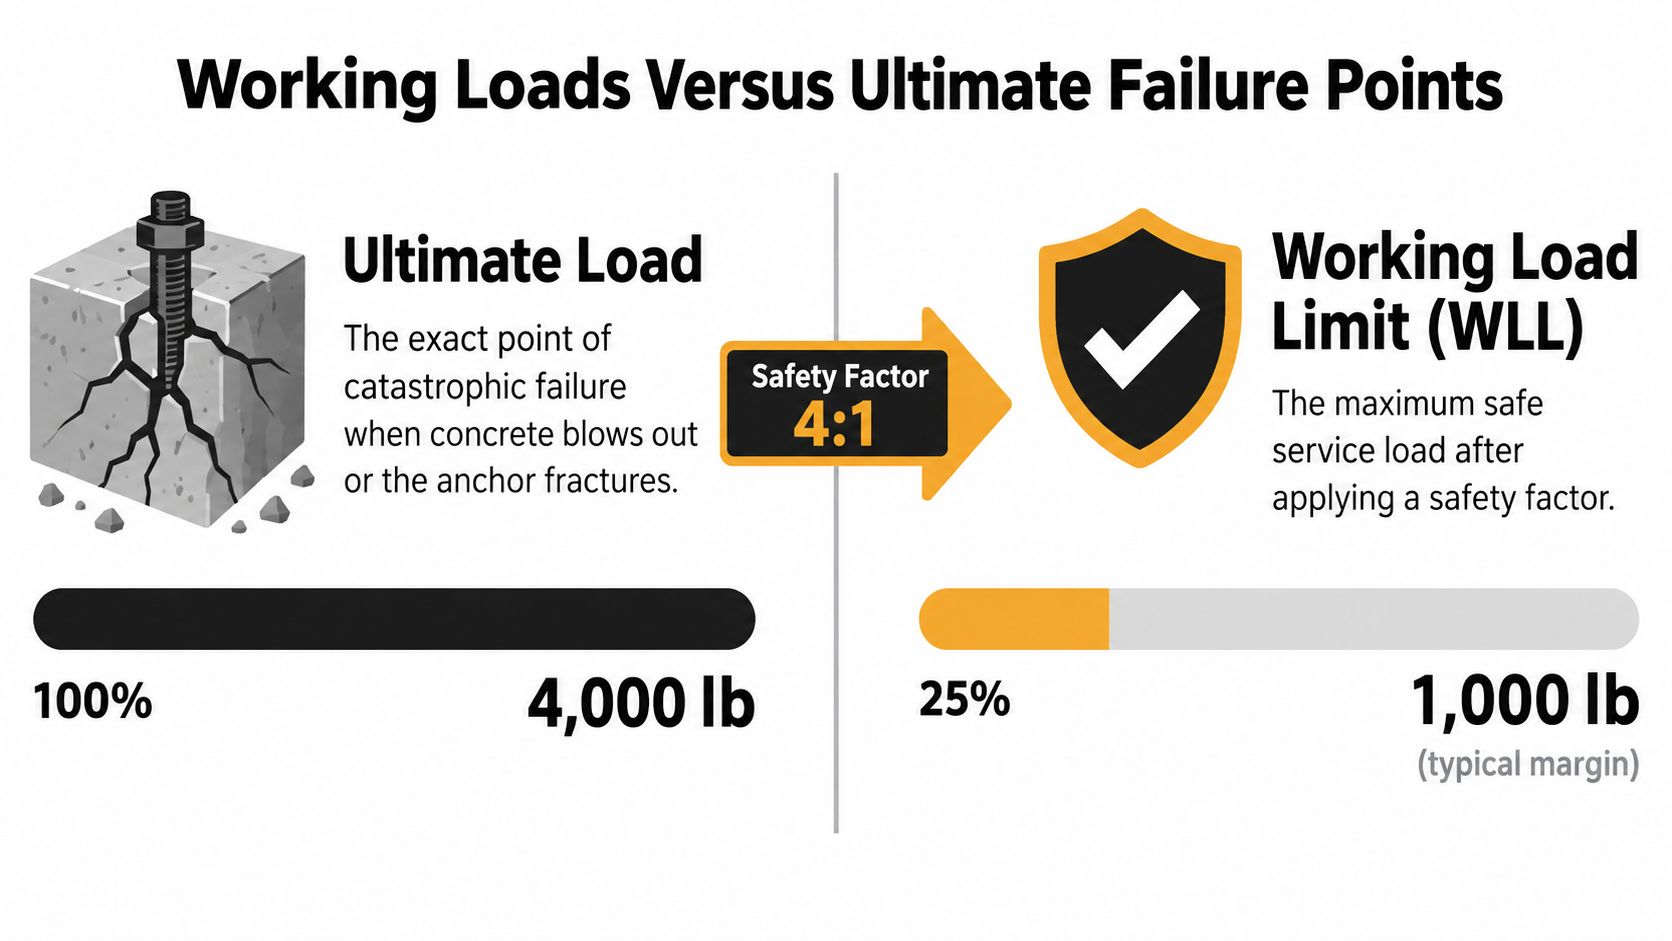
The distinction is simple but important. Ultimate load is the point where the tested assembly fails. Working load limit, or WLL, is the service load selected below that failure point so the connection can perform reliably under ordinary variation.
The Canadian buyer-facing guidance cited above uses a working-load approach of about one quarter of ultimate capacity. The arithmetic is direct:
| Rated ultimate capacity | Approximate working load at 25% |
|---|---|
| 1,000 lb | 250 lb |
| 4,000 lb | 1,000 lb |
The 4,000 lb and 1,000 lb illustration reflects the comparison shown in the required load-limit graphic, not a universal rating for every sleeve anchor. A specific anchor still needs its own manufacturer data, concrete conditions, and design checks.
What the reduction protects against
A static load is only one scenario. A fence panel can act like a sail, a person can push against the top rail, and a gate can transfer impact into its post. These forces can produce tension, shear, prying, or a mixture of all three.
The 25% working-load approach also leaves room for practical uncertainty. You may not know the exact concrete mix, the condition of the slab, or whether an earlier repair has weakened the area. A conservative working load helps prevent a connection from operating close to its failure threshold.
For a real design, do not divide one large package number across several anchors. Load sharing is rarely perfect. The outside anchor in a bracket may carry more tension because the post or bracket rotates under lateral force. One anchor may also be closer to an edge or installed in a slightly damaged portion of concrete.
Use the weakest relevant condition
A sleeve anchor may have separate tension and shear values. Choose the lower applicable working capacity after considering the direction of force and the actual base material. If the connection experiences wind or repeated movement, a designer may apply additional conservatism rather than relying on the basic reduction alone.
The key habit is straightforward: never design from ultimate failure capacity alone. Establish a working load, check the load direction, and confirm that the concrete and hardware can support the complete assembly.
Variables That Dictate Anchor Performance
Concrete anchors don't develop their rated performance in isolation. The surrounding concrete supplies the resistance, and small changes in the installation can alter how the load spreads through that material.
Concrete strength comes first
The evaluated heavy-duty sleeve anchor in the ICC-ES evaluation report is approved for specified compressive strengths from 2,500 psi to 8,500 psi, and its use includes both cracked and uncracked normal-weight and lightweight concrete. That range shows why an anchor diameter alone can't tell you the capacity.
A residential slab may not match the strength assumed by a product table. Old concrete may also have cracks, honeycombing, repairs, or surface deterioration. If you don't know the substrate, avoid treating a published capacity as automatically transferable.
Embedment is not simply “deeper is stronger”
The anchor must reach the manufacturer's required embedment, but drilling deeper isn't a free upgrade. A thin slab may not provide the available depth, and drilling can encounter reinforcing steel or embedded services. If the sleeve doesn't engage the intended thickness of sound concrete, the connection may not perform as rated.
Check the product instructions before drilling. Confirm the anchor length, fixture thickness, washer and nut arrangement, and required embedment. Mark the bit so the hole reaches the required depth without unnecessarily penetrating the slab.
Edge distance and spacing control breakout
Concrete can fail in a cone or wedge-shaped region around an anchor. When an anchor sits too close to an edge, the available concrete volume is reduced. When anchors sit too close together, their failure regions can overlap, so the group may deliver less capacity than the individual ratings suggest.
For that reason, don't crowd anchors merely to fit a narrow bracket. Follow the evaluated product's spacing and edge-distance requirements, and move the bracket or choose a different fastening system when the concrete geometry can't provide the required clearance.
A sound review asks four questions before installation:
- Base material: Is the anchor approved for this concrete type and condition?
- Embedment: Will the full required length engage sound concrete?
- Geometry: Are edge distance and anchor spacing adequate?
- Load direction: Will the force act in tension, shear, or both?
Those checks matter more than selecting a larger diameter by guesswork.
Common Anchor Sizes and Orientation Capacities
Orientation changes the answer to “how much weight can a sleeve anchor hold?” A ceiling-mounted anchor carries a direct tension load, while a wall-mounted anchor often carries shear. The concrete reaction, anchor behaviour, and failure mode differ, so a single capacity figure can mislead a buyer comparing deck, fence, and overhead applications.
Canadian supplier data illustrates the difference. One listing gives a 3-inch expansion sleeve anchor a ceiling-mounted rating of 273 kg and a wall-mounted rating of 341 kg in concrete. Another lists a 6-inch sleeve anchor at 667 kg ceiling-mounted and 1,143 kg wall-mounted in 3000 PSI concrete. These are product-specific rated values, not universal capacities, and they shouldn't be transferred to a different brand, embedment, or substrate.
| Anchor Size | Min. Embedment | Tension Capacity (Ceiling) | Shear Capacity (Wall) |
|---|---|---|---|
| 3-inch expansion sleeve anchor | Product-specific | 273 kg | 341 kg |
| 6-inch sleeve anchor | Product-specific | 667 kg | 1,143 kg |
The table is a field reference, not a design approval. The source does not provide a common minimum embedment for both examples, so the embedment column must be confirmed from the exact product documentation. For a specific Canadian project, compare the manufacturer's tension and shear data with concrete strength, edge distance, spacing, and the applicable code requirements.
How to use the table without overloading the connection
A ceiling value is relevant to a suspended fixture or overhead bracket, where the anchor is pulled from the concrete. A wall value is more relevant to a bracket bearing against a wall, but a post base or railing bracket may still introduce tension through prying.
That distinction matters for a fence or deck. A post base can rotate under lateral force, lifting one side of the bracket and pulling the far anchor upward. The connection then needs a combined tension and shear review, not just the wall-mounted figure.
For product selection, review the sleeve anchors for concrete collection and match the exact anchor length and diameter to the manufacturer's technical data. Don't use a longer anchor as a substitute for checking the concrete thickness or the required embedment.
Why concrete PSI changes the answer
The 3000 PSI condition attached to the 6-inch example is part of that rating. It isn't a decorative product detail. A different concrete strength, cracked substrate, lightweight mix, or damaged slab can change the allowable result.
Use the published value only when the installation conditions match. If they don't, treat the listed capacity as unsuitable for direct comparison and obtain an evaluated value or engineering review.
Installation Torque and Verification Rules
A sleeve anchor works through expansion. As the nut tightens, the stud draws the wedge into the sleeve, pressing the sleeve against the hole wall. That means an anchor can look properly seated while still falling short of its intended performance if the hole is oversized, dirty, shallow, or under-torqued.
A reliable installation sequence
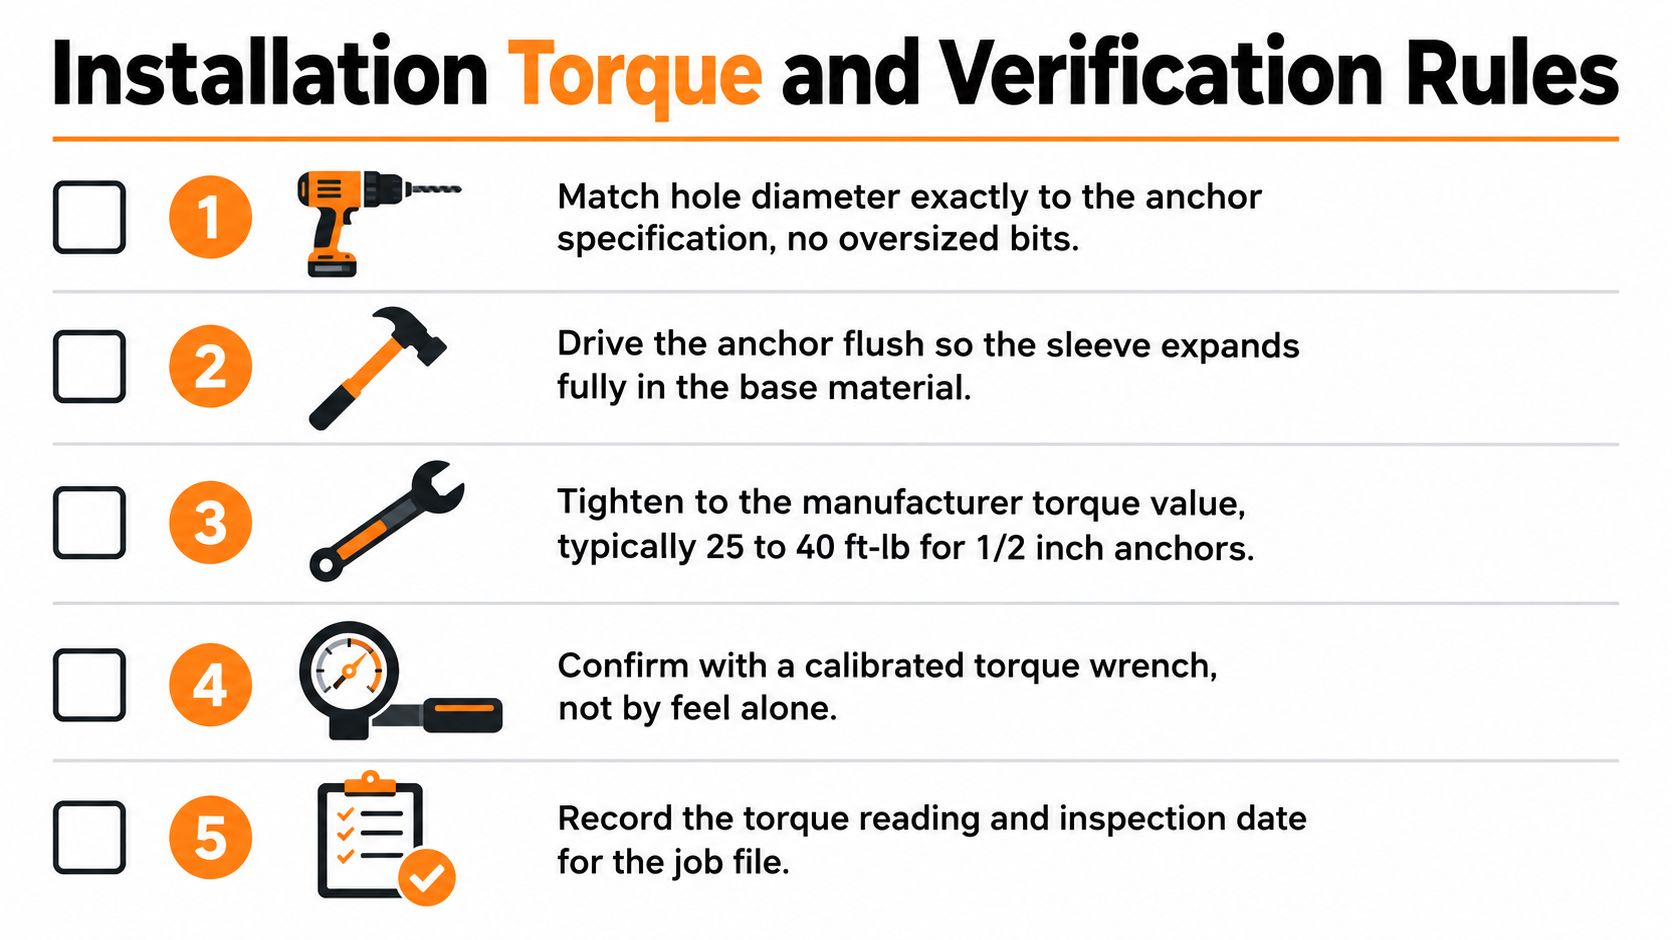
- Confirm the product. Check the anchor diameter, length, substrate approval, required embedment, and specified torque before drilling.
- Drill the hole accurately. Use the specified bit diameter and drill straight. An oversized hole reduces the sleeve's ability to bear against sound concrete.
- Clean the hole. Remove dust with the cleaning method required by the product instructions. Dust can interfere with expansion and reduce contact with the hole wall.
- Set the anchor. Drive the anchor until the sleeve is fully engaged and the fixture sits properly against the concrete. Don't tighten an anchor that hasn't reached the required position.
- Torque the nut. Use a calibrated torque wrench and the manufacturer's stated value. Hand feel isn't a measurement.
The sleeve anchor installation guide provides product-oriented installation information for concrete, brick, and block. Always give priority to the instructions supplied with the exact anchor being installed.
The seven-turn acceptance check
California heavy-duty specifications provide a useful example of strict torque verification. Cal Poly's standard specifications require the sleeve to be fully engaged and the anchor to reach the manufacturer's recommended torque. After the nut reaches 10% of specified torque, it must reach 100% of specified torque within 7 or fewer complete nut turns, or the anchor must be removed and replaced unless the engineer directs otherwise. The requirement appears in the Cal Poly standard specifications.
That rule is not a universal installation instruction for every Canadian product. It demonstrates the level of verification used when installation quality affects acceptance. If the nut turns excessively before reaching torque, stop and investigate the hole diameter, embedment, sleeve engagement, and substrate condition.
Record the anchor type, torque value, inspection date, and any replacement. For a structural project, a written installation record is far more useful than a verbal assurance that the anchors were “tight enough.”
Code Compliance for Decks and Guardrails
A guardrail post may look stable until someone leans hard against it. That force travels through the base bracket, puts some anchors in tension, and transfers shear into the concrete. Fence posts can experience the same demand when wind loads the infill.

Canadian railing compliance material identifies a 1.0 kN horizontal load at 1070 mm under the 2012 BC Building Code, 2015 National Building Code of Canada, and 2012 Ontario Building Code. It also calls for anchor selection based on a factor of safety of at least 1.5, as shown in the Canadian railing post-attachment compliance document.
That requirement describes a lateral load applied above the post base, not a simple suspended weight. The height creates a moment. Bracket geometry then determines how much tension reaches the outer anchors while the opposite side bears against the concrete.
Translating rail pressure into anchor demand
Review the complete connection before judging the anchor. Check the post height, bracket dimensions, anchor spacing, concrete edge distance, and force direction. A narrower bracket or closer anchor spacing can increase tension in the outer fastener, even when the anchor diameter stays unchanged.
A practical compliance review should confirm:
- Post connection: The post and base bracket suit the intended railing or fence.
- Concrete condition: The slab or footing is sound, sufficiently thick, and free of serious damage around the holes.
- Anchor layout: Spacing and edge distance meet the applicable design requirements.
- Combined loading: The design accounts for tension caused by prying and shear from the lateral force.
The concrete strength also matters. A sleeve anchor installed in sound, higher-PSI concrete may perform very differently from the same anchor in weak, cracked, or damaged concrete. The published anchor capacity cannot be separated from the substrate and installation conditions.
Before finalising a deck layout, ask the building department or a qualified designer to confirm local requirements, including guardrail height and post-attachment rules covered in our deck railing height code guide.
When auditing a property before a deck rebuild, pair the anchor review with roofing compliance tips for homeowners from RRSATX, since an inspector may assess both the guardrail attachment and the roof assembly.
For guardrails, balconies, raised decks, and public-facing work, obtain confirmation from the authority having jurisdiction or a qualified designer. A sleeve anchor suitable for one concrete attachment can be unsuitable for another, even when both connections use the same concrete pad.
Sourcing Reliable Hardware for Structural Projects
Structural fastening is a poor place to buy unidentified hardware from a mixed bulk bin. A sleeve anchor's appearance doesn't confirm its steel grade, coating, evaluated use, required torque, or performance in cracked and uncracked concrete.
For code-sensitive work, look for a product with traceable manufacturer information and technical documentation. An evaluated product report should identify the approved base materials, concrete strength range, load conditions, installation requirements, and limitations. The ICC-ES example cited earlier shows why the exact model matters. Its permitted concrete range and use conditions belong to that evaluated anchor, not to every sleeve anchor with a similar diameter.
What a useful product listing should show
Before ordering, check whether the listing provides:
- Exact dimensions: Confirm diameter, overall length, thread details, and fixture thickness allowance.
- Installation data: Look for required hole size, minimum embedment, cleaning instructions, and torque.
- Material and finish: Match the hardware to the moisture and corrosion conditions.
- Evaluation information: Confirm whether the anchor carries ICC-ES or equivalent documentation for the intended application.
- Pack quantity: Choose a quantity that supports the full project and allows for replacement of questionable installations.
Generic hardware may appear cheaper, but missing documentation transfers the uncertainty to the installer. That can become a serious problem when a railing moves, a fence post loosens, or an inspector asks how the fastening system was selected.
Match the supplier to the job
XTREME EDEALS INC. offers sleeve and wedge anchors, post base brackets, carriage bolts, washers, deck screws, and related deck and fencing hardware, with products such as a 1/2" x 4" Sleeve Anchor and a 5/8" x 6" Sleeve Anchor listed in its sleeve-anchor range. The catalogue also includes Decorex Hardware products and multi-pack options for residential repairs or larger installations.
That range can simplify purchasing, but it doesn't replace technical review. Select the product by its evaluated application and installation instructions, then keep the documentation with the project records. For a structural attachment, the right question isn't only whether the anchor is available. It's whether the exact anchor is appropriate for the concrete, load direction, and code context.
Common Installation Mistakes to Avoid
The most dangerous fastening mistakes often leave the anchor looking fine. The nut is tight, the bracket is flush, and nothing moves during a quick hand check. The hidden problem may be an oversized hole, dust under the sleeve, insufficient embedment, or a substrate the anchor was never designed to grip.
The hole is part of the fastening system
An oversized hole gives the sleeve more room and less reliable contact with the concrete. Use the specified bit diameter, keep the drill aligned, and don't enlarge the hole to make a misaligned bracket fit.
Concrete dust also matters. Dust can remain between the sleeve and the hole wall, reducing friction and interfering with expansion. Clean the hole thoroughly using the manufacturer's required method before inserting the anchor.
A shallow hole creates another failure risk. The anchor may bottom out before reaching the required embedment, or the sleeve may not engage the intended depth of sound material. Mark the bit and verify the hole before setting the fixture.
Tightening cannot correct poor seating
Don't torque an anchor while the sleeve is partly outside the hole or while the fixture is sitting on debris. The expansion mechanism needs the anchor in the correct position, and the fixture needs firm contact with the concrete.
Over-tightening is not a substitute for the specified torque. It can damage threads, distort the hardware, or stress weak concrete. Under-tightening can leave the sleeve insufficiently expanded. Use the product value and a calibrated torque wrench.
Check the substrate before choosing the anchor
Standard sleeve anchors aren't automatically suitable for every brick, block, or masonry condition. Hollow materials need a fastening system designed for the voids and wall construction. If the base material is hollow, cracked, friable, or badly deteriorated, stop and choose an anchor evaluated for that condition or obtain a professional recommendation.
Finally, don't place anchors too close to an edge or to each other just because the bracket has limited room. Change the bracket layout, enlarge the concrete support, or select a different fastening design when the required geometry isn't available.
Quick Reference and Technical Glossary
Use this checklist at the drill before you commit to the first hole:
- Drill the specified size. The hole diameter must match the anchor instructions.
- Clean the hole. Remove dust and loose material before inserting the sleeve anchor.
- Verify embedment. Confirm that the full required length will engage sound concrete.
- Apply exact torque. Tighten with a calibrated torque wrench to the manufacturer's value.
- Use a working load. Apply the applicable safety reduction rather than designing from ultimate failure capacity.
Field glossary
Embedment depth is the length of anchor engaged inside the base material. It affects how the anchor transfers force into the concrete and must be checked against the product requirement.
Shear is force acting sideways across the anchor, such as a bracket pushed against a wall. Tension is force pulling along the anchor's axis, such as an overhead fixture or the lifted side of a post bracket.
A shear cone is the wedge-shaped region of concrete that may break away when an anchor or anchor group receives shear or edge-related loading. It's why edge distance and spacing affect more than appearance.
Torque-controlled describes an anchor whose expansion depends on tightening the nut or bolt to a specified torque. A torque wrench provides a measurable installation check that hand tightness can't provide.
Working load limit, or WLL, is the service load selected below the tested failure point. Ultimate load is the force associated with failure under a defined test condition.
ICC-ES refers to the evaluation service whose reports identify approved products, materials, installation requirements, and use limitations. An ICC-ES report applies to the evaluated product and conditions named in that report, not automatically to similar-looking hardware.
For a Canadian deck, fence, or railing, keep the product instructions, layout measurements, torque records, and any engineering or permit documents together. If the load involves public safety, raised occupancy, or a code-required guardrail, have the complete assembly reviewed before installation rather than relying on an anchor number alone.
XTREME EDEALS INC. offers sleeve and wedge anchors, post base brackets, carriage bolts, washers, deck screws, and other deck and fencing hardware for repairs and full installations. Review the technical details for the exact fastener, then visit XTREME EDEALS INC. to source the hardware for your next concrete anchoring project.