
You've fitted a spring on a gate, closed it by hand, and watched it either slam into the post or stop short of the latch. A pool gate may creep shut while an inspector waits, or a driveway gate may swing with enough force to shake the hinges. Those failures usually aren't caused by the spring alone. The gate leaf, hinges, post, latch, and closing hardware must work as one system.
A properly selected spring on gate hardware returns the gate to closed, controls its speed, and helps the latch meet the striker without forcing the post out of alignment. In California, that adjustment also has measurable consequences. Accessible-building guidance requires a spring hinge to close a gate opened to 70 degrees in at least 1.5 seconds (California spring-hinge guidance). This is a field job, not a matter of tightening until the gate “feels right.”
When a Gate Won't Behave and Why the Spring Matters
On a recent repair, the gate looked square until it was released. The spring drove it toward the latch, but the closing speed was too aggressive, so the leaf bounced off the stop and reopened. On another property, the opposite problem appeared: the gate moved slowly enough that nobody trusted it to latch, and the owner assumed the spring had failed.
A spring has three jobs:
- Return the gate: It must overcome hinge friction and the gate's natural resistance.
- Control closing speed: It should prevent a slam, rebound, and excessive impact on the latch post.
- Support latch engagement: It must carry the gate through the final part of its swing so the latch reaches the striker cleanly.
That third job is where many installations go wrong. A spring can have plenty of force and still fail if the gate sags, the post flexes, or the hinge axis is out of line. More tension only masks the fault for a short time.
Practical rule: Tune the spring after the gate hangs freely and the latch aligns. Don't use spring tension to correct a bent hinge or moving post.
California's accessible-building rules make the closing test especially important. From an open position of 70 degrees, a spring-hinged door or gate must close in at least 1.5 seconds (California Standards for Accessible Design summary). The same guidance lists a maximum operating force of 8.5 pounds for exterior doors or gates, so the hardware must balance controlled movement with usable operation.
The right way to think about a spring is as a tuned component. Its job depends on gate mass, swing direction, hinge friction, post stiffness, and latch position. If one of those variables changes, the correct tension changes too.
Spring Types You'll Actually See on a Gate
The spring you choose should match the gate's movement, mass, exposure, and safety category. A light pedestrian gate has different needs from a broad agricultural leaf or a pool barrier that must self-close and self-latch.
| Spring Type | Best Gate Weight | Typical Mount | Where It Fails |
|---|---|---|---|
| Torsion spring | Light to heavy, depending on size | Hinge side or hinge barrel | Broken winders, fatigue, poor balance |
| Extension spring | Light to medium | Diagonal run from gate to post | Stretched coils, exposed spring damage |
| Adjustable coil hinge | Light to medium | Commercial self-closing hinge | Bent adjusters, stripped settings |
| Hydraulic closer | Medium to heavy, especially regulated gates | Hinge or top rail | Oil leaks, damaged seals, temperature-related drag |
Torsion springs
A torsion spring stores energy as it twists. You'll usually find it on the hinge side, often integrated with the hinge barrel or mounted beside it. This arrangement gives a clean closing action and works well when the spring can be aligned with the gate's pivot.
The common failure is a broken or damaged winder. Installers also get into trouble by adding tension before checking whether the gate is balanced. A torsion spring can pull hard enough to bow a weak post or overload fasteners.
Extension springs
An extension spring works by stretching as the gate opens. It commonly runs diagonally between the gate frame and the hinge-side or latch-side post, depending on the hardware design. It's easy to understand and often economical, but the exposed coil can snag debris, rust, or lose its working length.
Stretched coils are the usual scrap-pile symptom. If the spring has permanently elongated, adding more preload won't restore the original action.
Adjustable coil hinges
These combine a hinge with an adjustable spring barrel. They're compact, convenient, and common on pedestrian gates. The adjustment is usually made with a pin or winding tool, so small changes can produce a noticeable difference.
A bent adjuster or damaged winding socket makes the hinge unreliable. Follow the manufacturer's adjustment method rather than forcing a stuck mechanism. For a useful reference on spring-loaded hinge layouts and use cases, see this spring-loaded gate hinge guide.
Hydraulic closers
Hydraulic closers control movement with fluid rather than relying only on stored spring energy. They're useful where a gate needs a smoother final approach, particularly on pool barriers or heavier pedestrian gates.
They fail differently. Oil around the body, inconsistent closing, and a soft or dead adjustment usually point to seal or closer damage, not a loose spring. California guidance treats spring hinges and closers as different mechanisms. A closer moving from 90 degrees to a position 12 degrees from the latch must take at least 5 seconds under the cited accessibility guidance (door-closer accessibility notes). Match the mechanism to the required test rather than swapping one type for another.
Read the Gate Before You Buy the Spring
A fence crew reads the gate before reaching for a catalogue. Start by estimating the complete leaf weight, not just the frame. Include pickets, rails, infill, cladding, hardware, and any moisture the material may hold.
Write down these measurements:
- Gate width, measured across the leaf.
- Gate weight in pounds, weighed if possible or estimated from its components.
- Hinge spacing, including the distance between the upper and lower hinge centres.
- Swing direction, including the available opening arc.
- Open and closed positions, measured so the spring's travel matches the actual movement.
Push the gate open to 90 degrees and watch the hinge post. If the post moves, twists, or leans while the gate is loaded, a stronger spring will increase the problem. A post that flexes changes the latch position during every cycle.
Check the latch before installation. The latch body, striker, and gate frame should meet at the same height and plane. If the latch is already rubbing or missing the striker, correct that alignment before selecting spring tension.
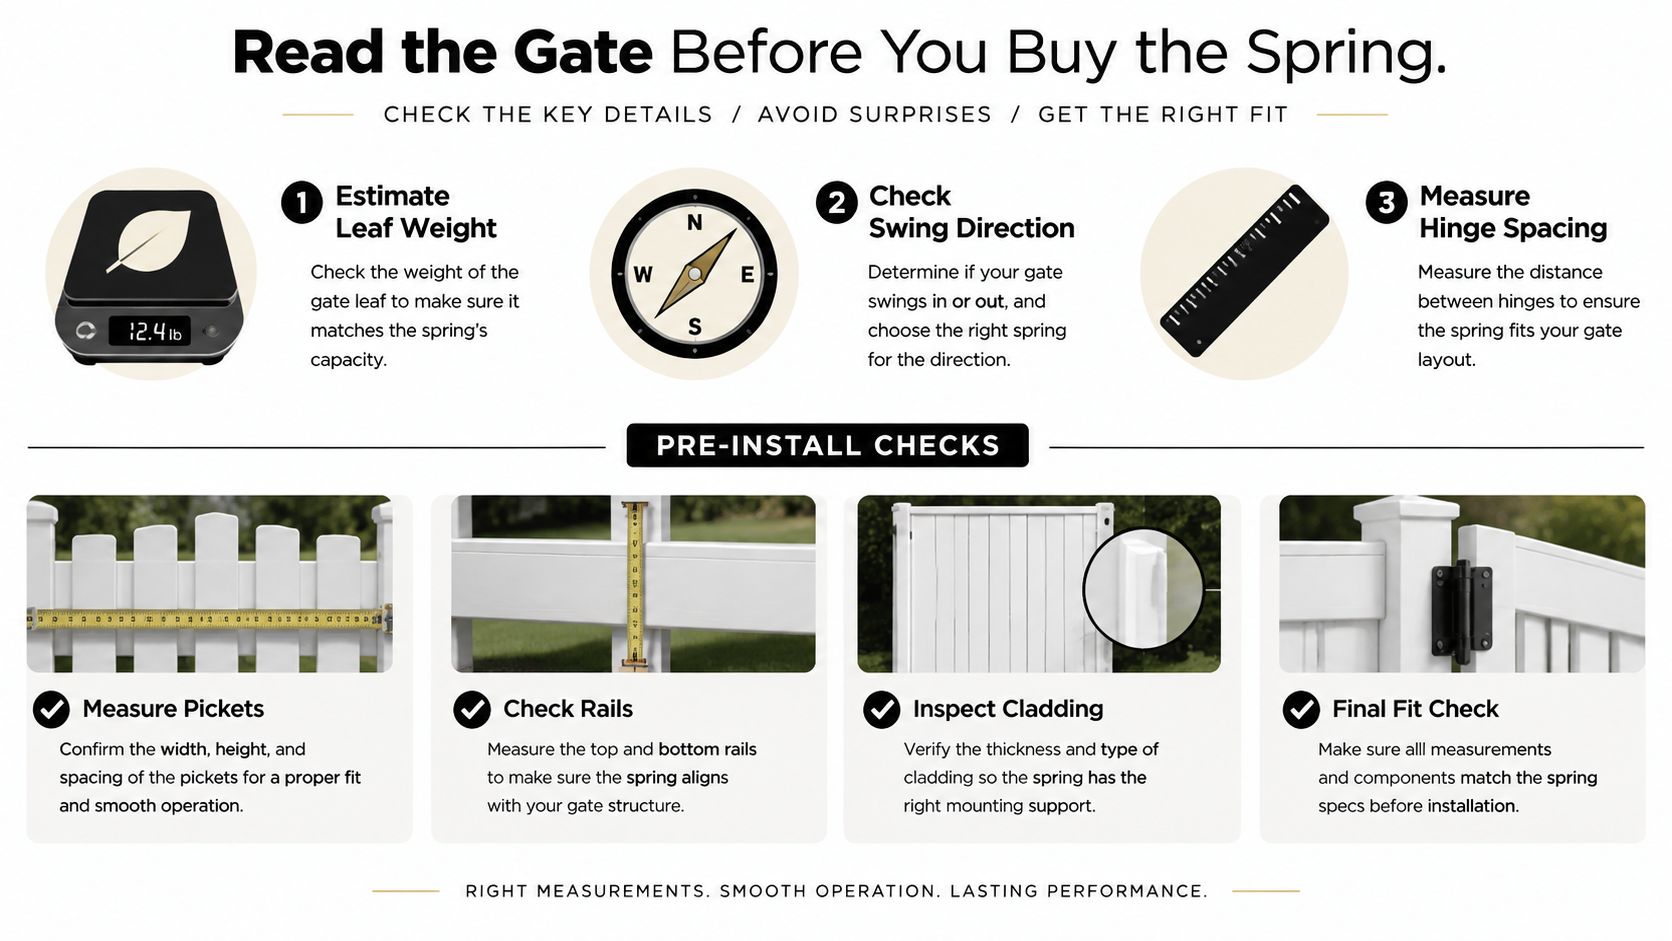
Swing direction matters because the spring must assist the closing arc, not fight it. Confirm where the spring's fixed anchor belongs with the gate closed and open. A spring that looks correctly placed while the gate is shut may pull against the hinge geometry once the leaf swings through its working range.
California regulated gates must be balanced and must not move under their own weight. State requirements also reference ASTM F900 or F1184, while motorized systems must comply with UL 325 and ASTM F2200 (California gate safety requirements). Those requirements reinforce the practical inspection: record the gate's mass, movement, post condition, and latch location before buying hardware.
Installing and Tensioning a Spring on Gate Hardware
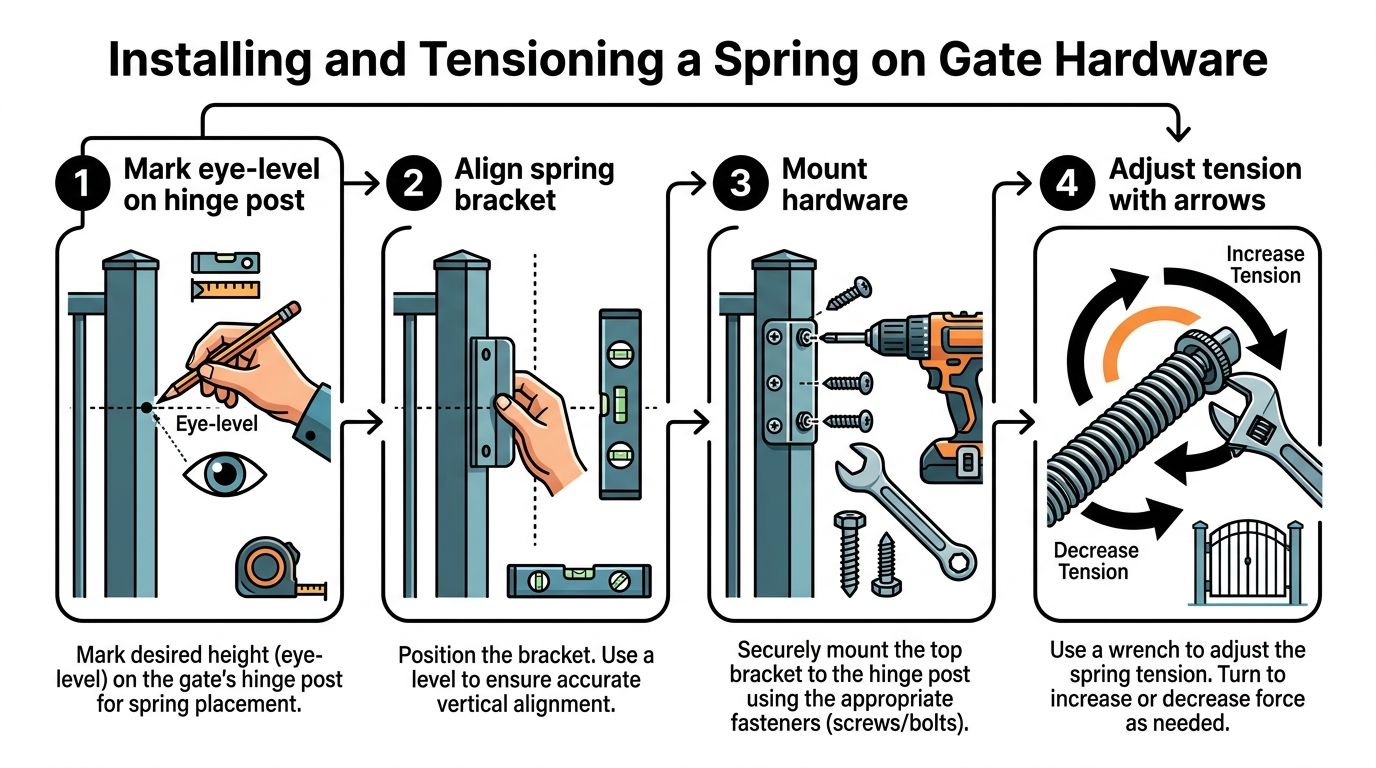
Mounting height depends on the gate, but eye-level placement on the hinge-side post works for many residential installations. Heavier agricultural swings may use a lower mounting position to keep the force path stable. Keep the spring aligned with the hinge axis or the manufacturer's intended pull line.
Use solid fixing. For wood, use 3/8-inch minimum lag bolts into solid material, or use through-bolts on metal posts. Don't rely on short screws in a thin post face. Bracket spacing should follow the hardware design and remain square to the gate, because a twisted bracket adds friction and makes the spring appear weaker than it is.
A practical installation sequence looks like this:
- Hang and level the gate before fitting the spring.
- Open it to 90 degrees and mark the spring's working arc.
- Pre-drill the mounting holes.
- Attach the spring end with the gate held at the specified open position.
- Secure the fixed bracket.
- Add tension gradually, testing after each adjustment.
For a torsion-style system, make small quarter-turn adjustments and test the gate after each one. Don't rely on a universal conversion between quarter-turns and closing force. Spring diameter, wire size, and mounting geometry change the result, so any fixed “turns per inch” rule can mislead you.
The field test is simple. Open the gate, release it without pushing, and watch the complete swing. It should move smoothly, avoid slamming, and carry the latch into the striker. California's spring-hinge benchmark is a minimum of 1.5 seconds from 70 degrees (California accessibility guidance), so use that test where accessibility rules apply rather than relying only on feel.
Mounting the spring on the latch side is a common mistake when the hardware is designed for the hinge side. It can pull the gate away from the latch during the final part of the swing. Over-tensioning is another. If the post bows, the bracket shifts, or the gate accelerates sharply, back off and correct the force path.
For a broader installation reference, use this gate hinge installation resource.
The Numbers That Decide If Your Spring Is Set Right
A gate can look well installed and still fail a measurable test. Start with closing time. California guidance requires a spring hinge to close a gate opened to 70 degrees in at least 1.5 seconds (California spring-hinge standard). Time it with a stopwatch, beginning when you release the gate and ending when the closing movement is complete.
Latch hardware has its own placement requirement. California accessible hardware rules place hand-activated latching, locking, and opening hardware between 30 inches and 44 inches above the floor (California accessible hardware requirements). Measure from the finished walking surface, not from an uneven grade or a temporary block.
Pool barriers need a separate check. California pool-barrier guidance requires a gate to self-close from any open position and self-latch, with the self-latching device no lower than 60 inches above the ground. It also requires outward opening away from the pool and a maximum gap of 1/2 inch between the closed gate and latch post (California pool-gate requirements).
| Test | Target Range | Tool Needed | What It Catches |
|---|---|---|---|
| Spring-hinge close | At least 1.5 seconds from 70 degrees | Stopwatch | Slamming or excessive delay |
| Accessible hardware height | 30 to 44 inches above floor | Tape measure | Incorrect latch or operating position |
| Pool latch height | At least 60 inches above ground | Tape measure | Pool-barrier placement failure |
| Pool gate gap | No more than 1/2 inch | Feeler gauge or tape measure | Reach-through and latch alignment issues |
Don't confuse a spring hinge with a closer. The cited closer guidance uses a different test, from 90 degrees to 12 degrees from the latch, with a minimum movement time of 5 seconds (accessibility notes on closers). Select and test the mechanism installed.
Fixing Noisy, Sagging, and Won't-Latch Gates
A squeak doesn't automatically mean the spring is worn out. Start at the hinges. Open and close the gate while listening closely, then inspect for a dry pivot, a bracket rubbing the post face, or a coil contacting metalwork. Clean the contact area, correct the bracket position, and lubricate the pivot with a suitable silicone product.
A sagging gate usually points to support, not spring tension. Check whether the upper hinge is pulling away from the post, whether the hinge leaf has bent, and whether the gate has gained weight from wet timber or added cladding. Spring tension won't straighten a hinge or stiffen a flexible post.
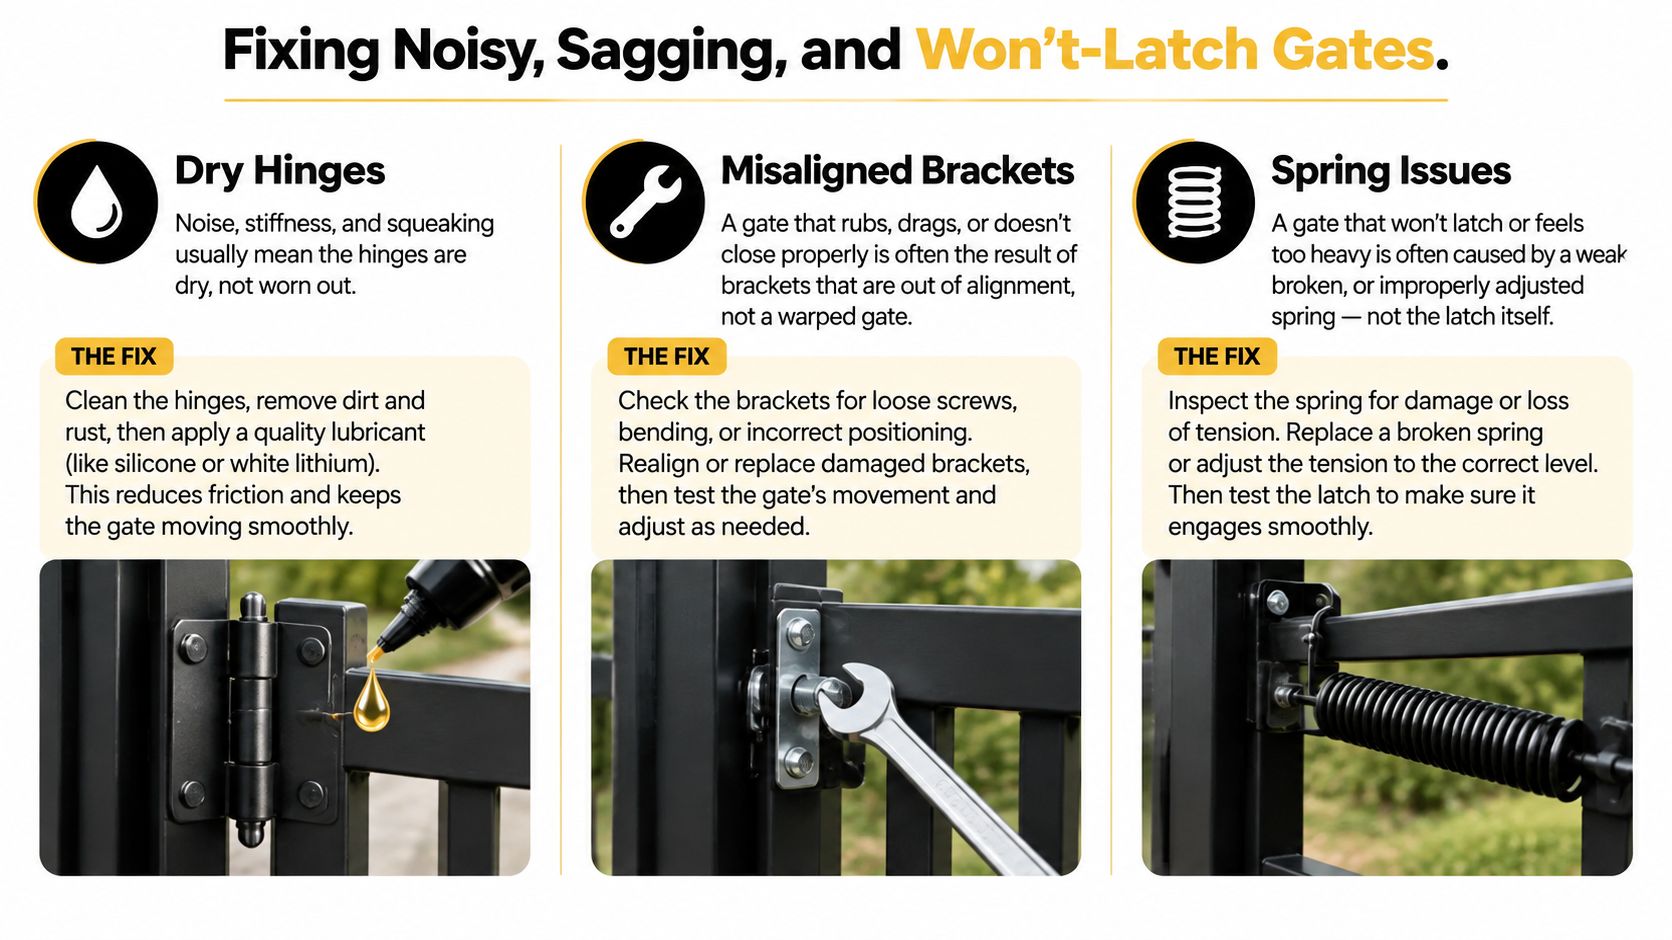
Use this diagnostic order:
- Hinges first: Check looseness, wear, bent leaves, and dry pivots. Tighten, replace, or lubricate as needed.
- Post plumb second: Push the gate through its swing and watch the hinge post. Reinforce a moving post before increasing spring force.
- Spring mounting third: Confirm the spring is square, firmly anchored, and not rubbing against the post or frame.
- Latch alignment last: Adjust the striker after the gate hangs correctly and closes along the intended arc.
A gate that won't latch is often arriving at the striker from the wrong angle. A racked post, worn hinge pin, or loose top hinge can move the latch past the catch. If the gate swings beyond the striker, reduce the closing energy only after checking the hinge and stop position.
A new spring can make a damaged gate move faster, but it can't make damaged geometry accurate.
For gates that need additional support at the free end, a gate spring wheel option may address rolling load and clearance, but it won't replace a sound hinge layout. Use it as part of the gate's support system, not as a substitute for correcting a loose post or misaligned latch.
Maintenance Habits and a Quick Buying Checklist
Quarterly maintenance doesn't need to become a major repair. Wipe dirt from the coil and mounting points, inspect the anchor eye for rotation or elongation, and look for fresh rubbing marks on the post or frame. Spray silicone on the pivot point, but avoid grease where it can collect grit.
Check the closing action with the same test used during installation. If the gate's closing time has drifted beyond six seconds, re-tension only according to the hardware design and then retest. A slower gate may indicate debris, hinge friction, post movement, or spring fatigue, so don't immediately add force.
Inspect the post after strong wind events. Movement at the top can change the spring's geometry and pull the latch out of alignment. Tighten loose fasteners, replace distorted brackets, and stop using the gate if a loaded spring or anchor is visibly damaged.
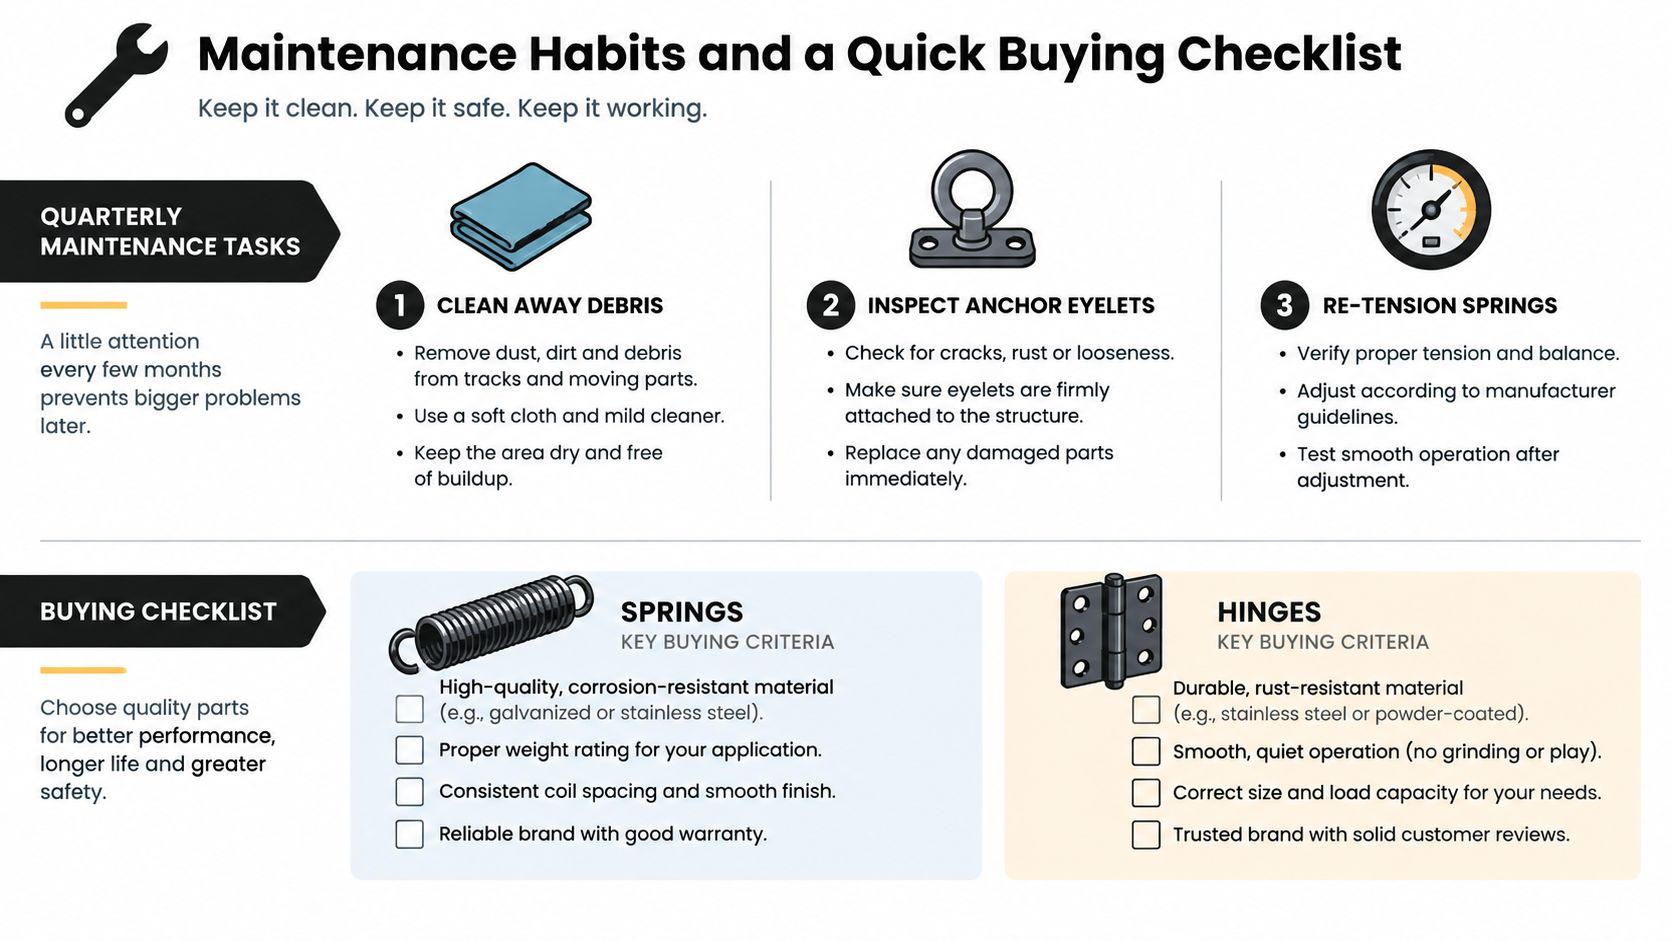
Before buying, confirm:
- Gate mass: Include the complete leaf, infill, hinges, latch, and any later cladding.
- Swing clearance: Check the full opening arc and whether the gate must open away from a pool.
- Exposure: Match the finish and material to rain, salt, dust, and temperature changes.
- Mounting method: Confirm the post can accept the required lag bolts or through-bolts.
- Code category: A California pool barrier needs self-closing and self-latching hardware suited to the gate load, not a light spring selected only for appearance.
XTREME EDEALS INC. offers gate hardware including the Self Closing Gate Spring 13″, Powder Coated Black, Screws Included, and the Spring Loaded Gate Latch with Cable and Ring for gate installations. Match duty to the gate first, then select the finish, latch arrangement, and mounting style.
If you're replacing a worn spring, correcting a latch problem, or building a gate from the post up, visit XTREME EDEALS INC. to review self-closing springs, latches, hinges, fasteners, and related fencing hardware. Choose the hardware around your gate's measured weight, swing, and code requirements, then test the completed installation instead of guessing.