
You're standing on a deck that looked fine last spring, but the colour has gone flat, the rail caps are starting to lift, and a few fasteners on the gate are already showing rust. That's the moment protective coatings stop being about finish and start being about whether wood, metal, or concrete can keep shrugging off sun, rain, salt, and daily wear.
The tricky part is that a coating can look right and still fail early if it's the wrong chemistry for the job. A fence stain that soaks beautifully into cedar can peel badly on a dense board, and a hardware finish that works inland may need a very different build near the coast. Contractors read that as a compatibility problem, not a mystery, and that's the mindset that makes the rest of this guide useful.
Why Protective Coatings Fail Before Their Time
A common failure starts with a normal weekend job. Someone brushes on a deck stain, it flashes off nicely, and the surface looks great for a month or two. Then the sun beats on it, dew settles overnight, and a few boards start greying, checking, or peeling before the next season is over.
That doesn't automatically mean the product was bad. More often, the coating was asked to survive a condition it wasn't designed for, or it was applied over a substrate that still held too much moisture, had poor surface prep, or needed a different film build. The substrate, the chemistry, and the environment all have to line up.
The three daily attackers
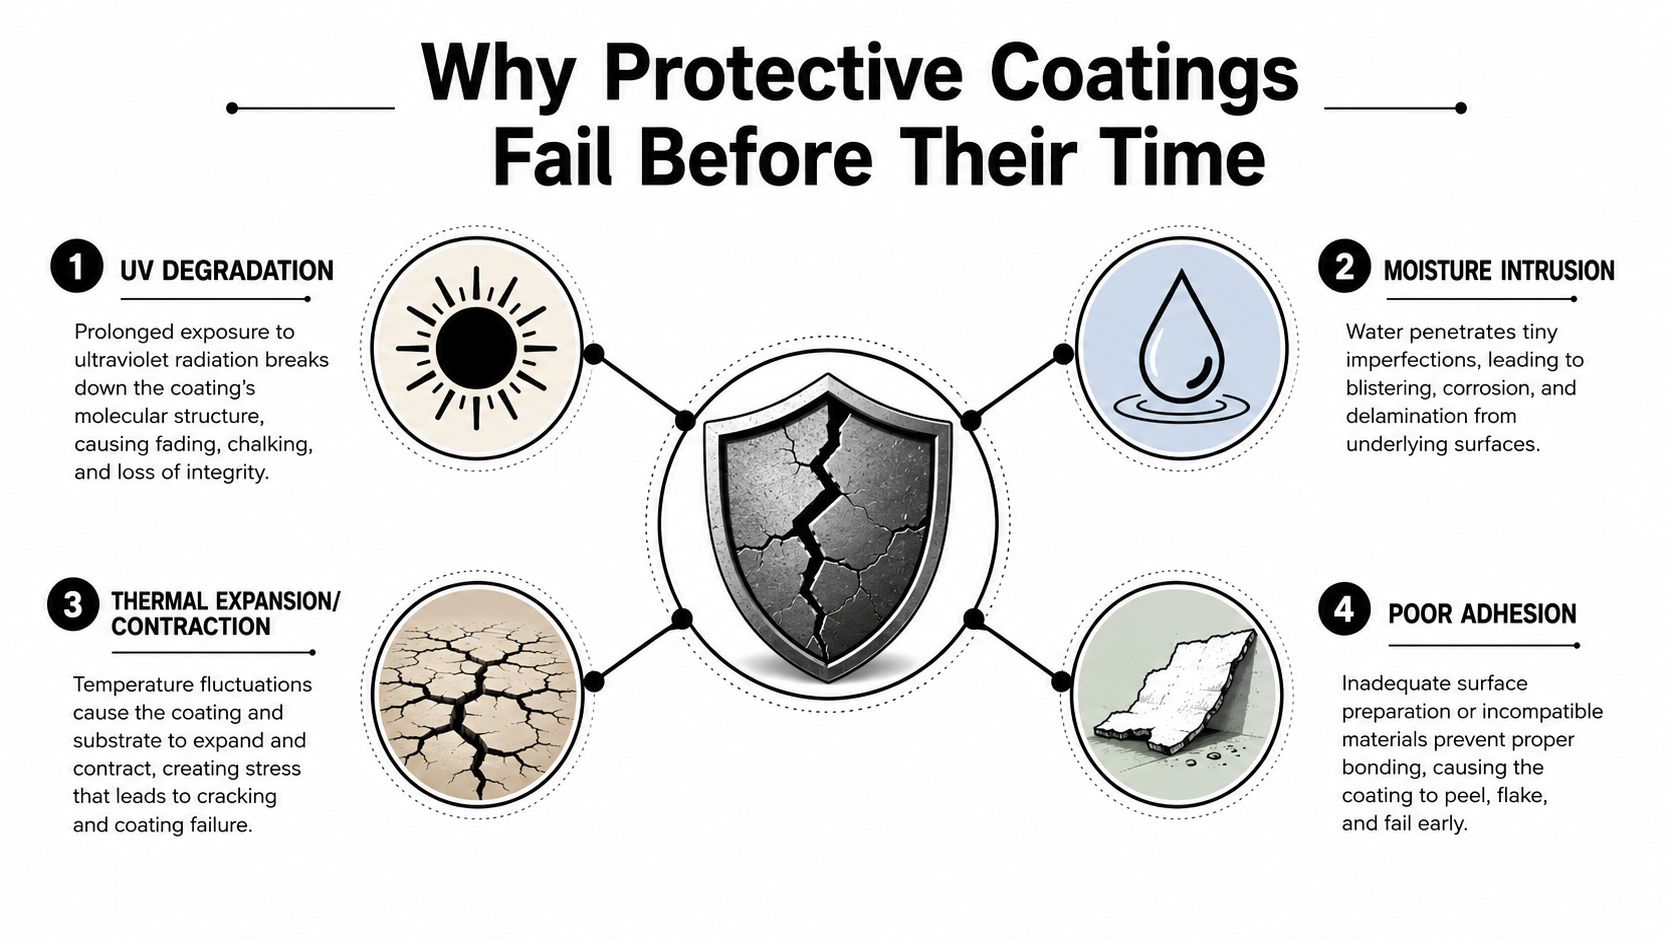
Outdoor finishes live under UV, oxygen, and moisture. UV breaks down binders and colourants at the surface, oxygen drives ageing reactions in many chemistries, and moisture gets under weak spots, then works on the bond line and the substrate itself. If the film is thin, brittle, or poorly anchored, those three forces win quickly.
Practical rule: if a finish fails at edges, fastener holes, or end grain first, assume the problem is usually build, prep, or incompatibility before you blame the can.
That's why a coating is really a controlled barrier. Sometimes that barrier is porous enough to let timber breathe a little, sometimes it's a tight film meant to sit on top of the surface and block liquid water, salts, or chemicals. The job site question isn't “What colour do I want?”, it's “What exposure am I buying for?”
For pressure-treated wood, the substrate itself changes how the coating behaves, because the treatment affects moisture movement and the way finishes grab the surface. A useful starting point is this short primer on pressure-treated wood basics, especially if you're deciding whether to stain, seal, or wait longer before coating.
The historical side of coatings makes that clear too. Protective coatings have roots going back to 5,000 BC, with tar, beeswax, gelatin, asphalt, and clay used to protect vessels and dwellings, and Pliny the Elder documented a rust-resistant mixture by 77 AD for iron protection (history of protective coatings). The chemistry has changed, but the mission hasn't.
The Five Families of Protective Coatings Explained
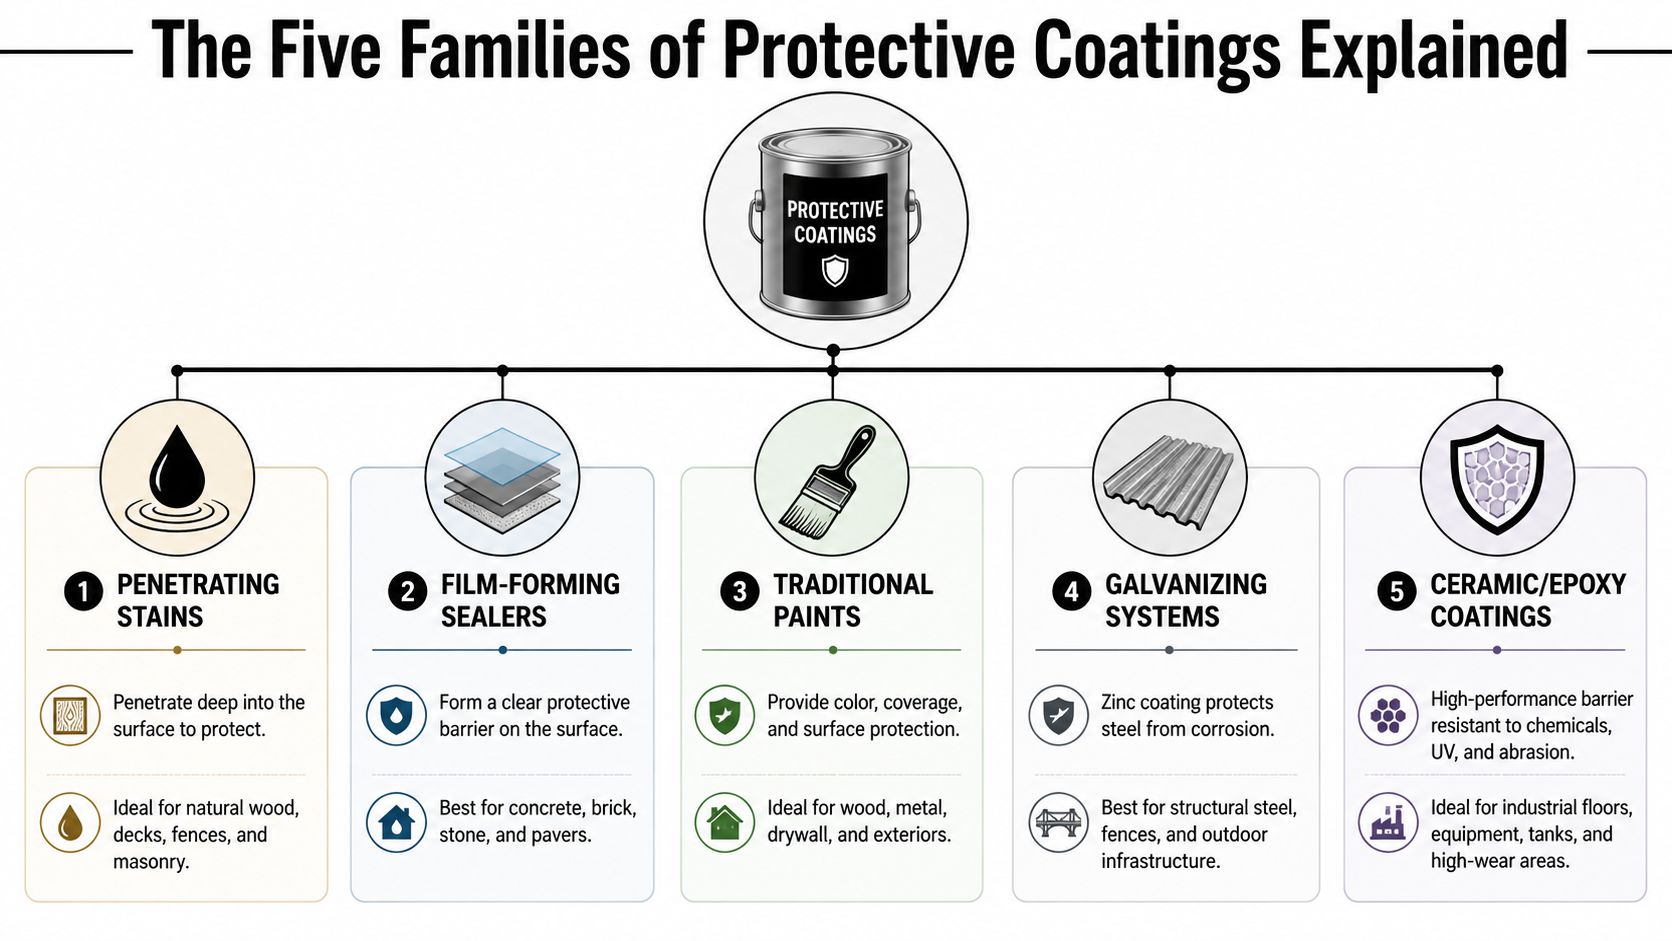
Open a can of coating and the label may promise durability, weather resistance, or easy cleanup. Those claims only make sense once you know what the material is doing to the surface. Some products soak in, some sit on top, and some create a metal or ceramic-like shell around the substrate. That basic behaviour tells you more than the marketing name ever will.
Penetrating stains and sealers
A penetrating stain works by moving into the wood fibres instead of building a thick skin on top. The result is closer to a soaked-in rain jacket than a plastic wrapper. Grain stays visible, the surface usually feels more natural, and wear tends to show gradually rather than in a sudden sheet of peeling film.
That behaviour is useful on wood that can accept the liquid. If the substrate is too dense, too smooth, or already sealed, the stain has little to grab, so it sits unevenly and loses performance early. These products also do not give the same surface armour as a film-build coating, so they are a poor match for abrasion, repeated splash, or hard mechanical wear.
For a deck-specific example, the right stain choice depends on how much you want the finish to soak into the boards, how much grain you want to keep visible, and how much upkeep you are willing to accept. A practical starting point is this guide to choosing the right deck stain for wood, because it ties finish selection to the condition of the boards rather than the color chip.
Film-forming sealers and paints
A film-forming sealer cures into a layer that stays on the surface. It behaves more like a thin plastic skin than a penetrating treatment, so its job is to block water, slow UV damage, and give you a visible layer you can inspect and maintain. Traditional paints and many acrylic deck coatings belong in this family.
The chemistry behind that layer matters. Protective-coating references commonly classify products by resin, solvent, and pigment, because each part does a different job. Resin controls adhesion and chemical resistance, solvent affects how the coating applies and levels, and pigment contributes color, hiding, and in some systems UV or corrosion performance. A pretty finish can still be the wrong system if the resin cannot survive the exposure.
For cabinet work, that same logic shows up in the way finish systems are specified. The discussion in Arsh Art Cabinet Refinishing on 2K lacquer is useful because it connects coating choice to the service condition, not just the appearance. That is the same habit a specifying engineer uses, only without the spreadsheets.
Galvanizing systems and powder coats
Galvanizing protects steel by adding a zinc layer that gives itself up before the base metal corrodes. The protection is built into the metal interface, so it follows a different logic from paint. For brackets, fasteners, post bases, and other steel hardware, galvanizing is often the first line of defense, and a compatible topcoat can be added when the exposure is harsher.
Powder coating is a baked-on finish that cures without the wet feel of a traditional liquid coating. It is common on manufactured parts because it leaves an even skin and handles normal wear well, but edge prep still matters. If corners are thin, sharp, or contaminated, the coating can chip there first, and once the film is breached, corrosion can spread beneath it.
The plain-English summary
If the coating must soak in, you are usually working with wood. If it must sit on top, you are in film-forming territory. If the job is to keep bare metal from oxygen and moisture, galvanizing or another hard metal finish may be the better starting point. That simple model keeps the can label from doing the thinking for you.
Matching Coatings to Wood, Metal and Concrete
A coating only earns its keep when it matches the substrate. Wood moves, metal expands and corrodes, and concrete behaves like a porous mineral surface that can either breathe or trap moisture depending on what you put on it. Treat them like the same surface and the failure mode shows up fast.
Wood needs movement tolerance, not just colour
Pressure-treated pine, cedar, and similar exterior woods often do well with penetrating stains or flexible film-forming systems, depending on the look and maintenance cycle you want. A thin acrylic stain can be a solid deck choice when you want easy clean-up and decent weathering, but it can peel if the board is too dense, too damp, or too slick to bond properly. That's why reading the substrate matters before you pick the can.
Dense hardwoods are a different story. They can resist penetration, so the coating sits badly on top and loses grip instead of moving with the timber. For a simple deck refresher, the practical approach is to confirm moisture, surface profile, and end-grain condition before coating, then choose the system that matches that reality rather than the colour chip.
Metal needs corrosion control first
Carbon steel and ferrous hardware fail by rusting, so the surface must be clean, dry, and properly primed or galvanised before any cosmetic topcoat goes on. In coastal or splash-prone areas, galvanized hardware often benefits from a compatible topcoat because salt air can still attack exposed edges and cut lines. That's where the coating becomes part of the corrosion-control system, not just the finish.
For California projects, that distinction matters on fences, gates, joist hangers, and fastener packs. A basic paint may look fine for a while, but if the edge prep is poor or the film is underbuilt, rust will show at the weakest points first. The fix is usually not “more paint,” it's better prep and a coating family that makes sense for the metal's exposure.
Concrete asks for barrier choice
Concrete and masonry can take a film-forming acrylic elastomeric when the goal is to preserve appearance and resist water entry without making the surface look plastic-heavy. A good example is a post base or low wall where you want the texture to stay visible but still keep moisture out. The big caution is breathability, because concrete that traps moisture can blister or disbond coatings that are too tight for the assembly.
If you're deciding between products, the guide from Newline Painting is a useful comparison point because it forces the same question every coating spec asks, what is the substrate, and what is it already doing with moisture.
| Coating Family | Wood | Ferrous Metal | Galvanized Metal | Concrete |
|---|---|---|---|---|
| Penetrating stain | Good for cedar and deck boards | Poor fit | Poor fit | Limited use |
| Film-forming sealer | Good if surface is dry and stable | Good with proper primer | Good with compatible prep | Good for many decorative uses |
| Traditional paint | Good on prepared trim | Good on prepared steel | Good with proper prep | Good on masonry with correct system |
| Galvanizing system | Not a fit | Excellent | Native system | Not a fit |
| Powder coat | Not a fit | Excellent on manufactured parts | Excellent on manufactured parts | Not a fit |
For deck-specific maintenance choices, a focused reference like staining deck wood helps you think through timing, appearance, and upkeep before the brush comes out.
Reading the Numbers on the Can
你站在貨架前,兩罐外觀看起來差不多,字都很漂亮,說法也都很強。真正會決定成敗的,往往不是外盒上的形容詞,而是技術資料表裡那些冷冰冰的數字。那裡寫的是 coating 的 performance envelope,也就是在正確的表面處理、厚度與固化條件都到位時,它能承受的使用範圍。數字寫得模糊,現場就只能靠猜。
DFT is the number that usually decides the outcome
Dry film thickness, or DFT, 是塗層固化後留下來的實際厚度。對需要承受腐蝕的鋼材來說,厚度不是裝飾性的指標,而是屏障本身,太薄,水氣和氧氣很快就會找到路徑;太厚,則可能帶來流掛、溶劑滯留,或固化不均。依照 ISO 12944 的厚度範圍說明,C5-M 的大氣暴露系統常見總 DFT 約為 320–500 µm,Im2 的濺濕或浸沒環境則常見 480–1000 µm,相關厚度等級可參考 ISO 12944 DFT ranges。
這個數字之所以重要,是因為屏障性能不是靠表面看起來均勻就算數。木欄杆、柵柱或其他戶外構件也是同樣道理,塗層得先形成足夠的連續膜層,才有機會擋住水分滲入。現場真正能確認的,不是罐身上寫的理論覆蓋率,而是實際量到的厚度有沒有回到規格。
Practical rule: 如果產品頁面一直談外觀,卻很少提 DFT、服務等級,或重塗時間,你看到的多半先是行銷語言,再來才是規格資訊。
VOC, cure time, and temperature are not small print
在加州買家,或者任何受法規與氣味限制的使用情境下,VOC content 會直接影響你能買什麼、能不能順利施工。低 VOC 與水性產品,已經是很多工作裡的基本選項,尤其是在鄰近住家、通風有限,或時間安排很緊的地方。
其他數字同樣不能輕忽。Minimum application temperature、recoat window 和 cure time,說的是樹脂有沒有在環境變化前完成交聯。標籤上寫「24 小時乾燥」,不代表它已經能承受行走、水洗,或上一層漆,因為現場的溫度、濕度和氣流都會改變結果。這就是為什麼同一款塗料,在晴天的戶外棚架上和在潮濕車庫裡,表現可以完全不同。
What to look for before you buy
- Service category: 先確認產品是給大氣暴露、濺濕、浸沒,還是單純裝飾用途。
- Thickness target: 看整套系統要的總 DFT,不要只看表面覆蓋率。
- Cure schedule: 先查清楚閃乾、重塗與完全固化的時間,再安排施工。
- Temperature limits: 讀最低施工溫度,不要只看理想施工溫度。
- Acceptance criteria: 找驗收或檢測用語,不要只看顏色與光澤。
重點其實很單純。罐身如果沒有清楚告訴你它是為什麼環境設計的,塗層本身也不會替你回答這個問題。
Application Best Practices From Surface Prep to Cure
A coating job is usually decided before the first brush stroke touches the surface. Once the substrate is clean, dry, and given the right profile, the work becomes a controlled sequence instead of a guess. Skip one step, and the finish can look fine until the first weather cycle or abrasion test exposes the weak spot.
Surface prep sets the bond
Start with the part that sounds simple and usually is not. Reclamation guidance ties coating performance to surface preparation, minimum temperature, curing time, and material composition, because the coating can only bond to what the substrate presents to it. For a fuller maintenance lens, the Guide to Protective Coatings Inspection and Maintenance is a useful field reference, but the job still begins with the surface in front of you. Dust, oil, mill scale, mildew, and loose fibres all have to go.
On metal, that may mean abrasion, wipe-down, and close attention to edges, corners, and fastener heads, the places that often get the thinnest film. On wood, it means letting the substrate dry and removing weathered fibres that act like a weak, fuzzy boundary layer. On concrete, it means stripping away laitance and any contamination that blocks penetration or adhesion.
Preparation is where the coating learns whether it has a solid anchor or not. If the substrate is damp, dusty, or glossy in the wrong places, the film may cure over a problem instead of onto a sound base.
Application is about film control
Brush, roller, spray, dip for galvanizing, and electrostatic powder are all different paths because each one handles a different job-site problem. The tool you choose changes how well the coating reaches corners, bolt heads, seams, and vertical faces. A quick spray pass can still miss edge build, and a heavy roller coat can trap solvent or leave ridges if the product was not designed for that method.
The failure usually starts with a shortcut, not with the brand name on the can. Applying over damp wood, skipping a wipe on galvanized hardware, or recoating before the previous layer has flashed off can all hurt adhesion, even when the surface looks acceptable in daylight. That is why compatibility matters so much for items like hardware and connectors, and why using stainless steel fasteners can reduce one obvious corrosion point where coating damage is likely during installation.
Cure and inspection close the loop
A coating needs its full cure window to develop the properties you paid for. That is the period when the resin cross-links, the film hardens, and the finish stops being so easy to mar with moisture, dust, or foot traffic. If rain, dirt, or handling comes too early, the film can skin over while the lower layers stay soft, which creates a surface that looks done but behaves like it is still wet underneath.
This is also where the craft starts to sound like spec language, because the field questions are really about measurable conditions. Was the surface profile adequate. Was the film build close to target. Was the recoat window respected. Those are the same kinds of checks that separate a stain that merely sits on top from a coating system that protects the substrate, whether you are working on steel, trim, or trying to reseal your RV roof.
The job-site checklist stays simple:
- Profile the surface: Create enough tooth for the coating to hold.
- Confirm cleanliness: Remove dust, oil, salts, and loose material.
- Check moisture: Do not coat a substrate that is still too wet.
- Measure film build: Verify the coating reached the intended DFT.
- Respect recoat timing: Follow the flash-off and recoat windows.
- Protect the cure: Keep water, debris, and abuse off the fresh film.
Inspect before coating, inspect after application, and inspect again after cure. That habit catches the problems while they are still easy to fix.
Maintenance and Troubleshooting in the Field
Healthy ageing looks different from failure, and that's where a lot of owners get misled. A penetrating stain can gradually silver out, acrylic paint can chalk a bit, and galvanized metal can slowly oxidise at cut edges without meaning the whole system is done. Those are maintenance signals, not panic signals.
Two shop-floor examples
One fence I saw held up because the crew washed it each spring and touched up the fastener zones before rust could spread. The coating aged, but it aged evenly, which gave the owner time to plan the next refresh. The problem wasn't avoiding ageing, it was keeping ageing predictable.
Another job failed fast because the coating was applied over dirty galvanized brackets and damp trim. The finish looked uniform for a short while, then peeling started at the edges and the hardware started bleeding rust through the film. The owner wanted a stronger topcoat, but the key fix was prep and compatibility, not more material.
If you're checking fasteners and connectors during maintenance, a set of stainless steel fasteners can help reduce one obvious corrosion point, especially where the coating around a hole gets damaged during installation.
A simple troubleshooting tree
- Peeling deck stain: Check moisture content, previous sealer type, and whether the surface was able to absorb the finish.
- Rusty post caps: Inspect the metal prep, look for breached edges, and confirm whether the cap is compatible with the finish around it.
- Chalky fence paint: Decide whether you're seeing normal weathering or early film breakdown, then look for UV exposure, under-build, or poor resin selection.
Inspect in spring, wash off winter residue, check hardware in fall, and look hard at UV exposure in midsummer.
The inspection rhythm matters because failure usually starts small. By the time a coating is obviously flaking, the damage under the film has often been progressing for a while. Catch it early and you're buying time, not replacing the whole system.
For more specialised roof or enclosure maintenance tasks, a practical guide like reseal your RV roof shows the same basic principle, surface condition and material match decide whether the repair holds.
Environmental, Safety and Regulatory Considerations
A coating can look fine on day one and still fail the job if the chemistry, the work practice, or the disposal step is wrong. That is why environmental and safety rules are part of protective coatings, not a separate topic for the end of the project.
The coatings market in North America did not grow up in a vacuum. Paint in North America was documented with the first paint mill in Boston in 1700 and the first U.S. prepared paint patent in 1867, then industry standards began limiting lead pigments in the 1950s, and the U.S. Consumer Product Safety Commission banned lead in consumer paint in 1978 (American Coatings Association history). By 2020, the U.S. coatings industry shipped about $26.1 billion of product, which shows how large and regulated the modern market has become.
That background matters because low-VOC and waterborne products are now normal parts of the field, not special exceptions. The chemistry changed as the rules changed. A peer-reviewed review notes that by 2002, over 70% of automotive coatings were waterborne, which shows how far the industry has moved toward lower-emission systems (coatings review).
Safety still follows the resin, solvent, and cure system you choose. Solvent-borne products call for proper PPE, contaminated rags need careful disposal, lead-safe work practices are required on pre-1978 structures, and California jobs may also need extra attention after wildfire smoke or ash exposure. More coating is not a cleaner or safer answer. Too much build can trap contaminants, stretch cure time, or hurt adhesion, which is the coating version of sealing a wet surface under plastic wrap.
The practical rule is controlled selection, controlled application, and controlled cleanup. That keeps the finish, the substrate, and the people working on it in the same system.
XTREME EDEALS INC. offers hardware, fasteners, post caps, brackets, and deck and fencing accessories that fit the same real-world jobs covered here. If you're planning a deck, fence, or exterior hardware project and want products that match the coating and substrate decisions you've made, visit XTREME EDEALS INC. and build from the right parts up.