
You're sitting in the backyard, but the chain-link fence leaves you looking straight into the neighbour's patio. Cyclone fence slats look like the easy fix: keep the fence, fill the diamonds and get some privacy. Before ordering a colour, though, check whether the mesh, posts and local rules can support the screen you want.
Slats change more than the view. They add material to an open fence, increase its exposure to wind and, with some products, introduce combustible material near a building. Start with the site and framework, then choose the finish and price.
Choosing Slat Material by Site and Fire Risk
Cyclone fence slats are narrow strips of PVC, polyethylene (HDPE), aluminium or galvanised steel threaded through chain-link diamonds. Woven windscreen fabric is another screening option, although it usually fastens across the fence rather than threading through individual openings. These products serve a similar purpose, but they aren't interchangeable.
The material affects fire behaviour, weight, appearance and maintenance. Wind load comes mainly from how much surface the product blocks, not whether it's plastic or metal. A tightly screened aluminium fence can put more wind force on its posts than a relatively open steel slat pattern.
Slat materials compared by privacy, fire, weight and use
| Material | Privacy and appearance | Fire behaviour | Weight and wind exposure | Typical use |
|---|---|---|---|---|
| PVC or vinyl | High privacy, wide colour range | Combustible | Light, moderate wind load with open profiles | Backyards and residential privacy |
| Polyethylene (HDPE) | Good privacy, UV-stabilised versions available | Combustible | Light, moderate wind load with open profiles | Garden and pool screening |
| Aluminium | Good privacy, clean metal finish | Noncombustible metal; check coatings and accessories | Light, moderate wind load with open profiles | Runs near homes in fire-prone areas |
| Galvanised steel | Strong privacy with a narrow profile | Noncombustible metal; check attached components | Heavier; high-coverage layouts need substantial framework | Commercial sites and security fencing |
| Woven windscreen | Medium privacy, fabric look | Treat as combustible unless documented otherwise | Can create the highest wind load when tightly woven | Short-term or temporary screening |
These are selection guides, not product ratings. Confirm privacy coverage, permitted installation and material documentation on the manufacturer's specification sheet. A material name alone won't tell you how much you'll see through the finished fence.
Choose for the location first
For fencing beside a building, start with fire exposure. The FEMA wildfire construction guide recommends noncombustible fencing for at least the first 5 feet adjacent to structures and warns against attaching combustible fences to buildings. Aluminium or galvanised steel is the sensible starting point there, with matching noncombustible components.
Other locations call for different priorities:
- Street-facing runs: Consider narrow or open-pattern slats only after checking visibility and height restrictions. Screening shouldn't obstruct views at a driveway.
- Commercial yards: Galvanised steel deserves consideration for durability, but post anchoring and exposure need checking before specifying dense coverage.
- Backyards: PVC or vinyl can suit an appearance-led privacy project where the frame is sound. For pool enclosures, confirm that the finished assembly still meets the applicable barrier rules.
- Sports grounds and schools: Keep supervision sightlines open. Lightweight, limited-coverage products may suit better than a dense perimeter screen.
Homeowners often start with colour and budget; property managers usually give durability and replacement work more weight. Both should settle the site constraints first.
If you're also refreshing adjoining painted fencing, Painters North Shore's guide can help you compare Auckland fence painting costs. Treat it as a separate finishing budget, not a local slat-price benchmark.
Shortlist two suitable materials before shopping by appearance. Reject anything that conflicts with fire exposure, visibility or the condition of the existing fence.
How Slats Fit Chain-Link Mesh and Posts
A slat fits the clear opening, not the nominal fence height alone. Its width, ribs, wings and locking channel must pass through the diamonds without spreading the wire. Forcing a nearly compatible product into place can distort the mesh and leave uneven rows.
Bring a tape measure, callipers if available, gloves and a phone for close-up photographs. Check a representative opening and any visibly distorted areas, because an old fence may not be consistent along its full length.
Check the complete assembly
- Measure the mesh opening. Measure between the inside faces of parallel wires and compare that dimension with the slat manufacturer's measuring diagram. Don't measure the diamond tip to tip unless the product instructions specifically use that method.
- Identify the wire gauge. Read the original fabric tag, invoice or specification where possible. A heavier wire leaves less clear space within an otherwise similar-looking mesh, so appearance isn't enough.
- Inspect the tensioning system. Check the top support, bottom tension wire and end tension bars for looseness or missing fasteners. Slats won't straighten stretched fabric.
- Measure posts and spacing. Record post diameter, distance between posts and any lean at ends, corners and gates. These details help an installer assess whether the framework can carry the screened run.
- Match the locking hardware. Confirm that the kit's channels, clips or ties suit the fabric and installation direction. A bottom-lock channel isn't a substitute for a missing structural tension wire.
Our chain-link fence guide can help you identify the framework and fittings before preparing a shopping list.
Older mesh may need re-tensioning, but badly corroded wire needs replacement rather than another pull. Check welds, brace bands and post bases as well as the visible fabric.
Go or no-go: If the mesh won't accept the specified slat, or the framework moves under inspection, repair the fence before buying screening.
Tall screened runs deserve particular care at terminal and gate posts. Have the footing and bracing assessed for the proposed screen rather than assuming that a post strong enough for open mesh is adequate.
How Slats Change Privacy and Wind Load
Privacy factor describes the share of the view blocked by the slat run. It isn't a structural rating, and it doesn't guarantee privacy from every viewing angle.
The relationship is easier to understand visually.

In 2025, ULINE Canada's privacy slat listing specified a 75% privacy factor, with 82 slats per carton covering 10 feet horizontally. That describes a product's visual blockage and packaging, not an allowable wind speed.
A more closed surface catches more wind than bare chain-link. Gaps provide some relief, but they don't eliminate the force transferred into posts, braces and footings. Exposure matters too: a sheltered courtyard and an unobstructed field boundary shouldn't receive the same structural assumption.
Block the sightline you actually need
Stand where you want privacy, then have someone check the view from the other side. A seating area may need a different pattern from a yard overlooked by a raised deck. Choose the lowest coverage that achieves the useful result, rather than buying maximum blockage automatically.
Screening also changes light and airflow around gardens and pools. It can reduce wind on the sheltered side, but dense coverage may shade planting or make a previously breezy corner feel enclosed.
For shared properties, keep visual screening separate from entry management. Nimbio's explanation of gated community access control is useful when the project also involves deciding who can enter, rather than who can see through the boundary.
A demonstration can help you recognise how slats sit within the mesh.
Keep privacy factor, slats per pack and horizontal coverage together when comparing specifications. Use our chain-link fence hardware guide to identify supporting components, but have the actual framework assessed separately from the slat packaging.
When Local Rules and Fire Codes Apply
An existing chain-link fence doesn't automatically have permission to become a screened fence. Adding slats can change its classification, visibility and engineering requirements without changing its height.
California examples show why you need a location-specific answer. They're examples of regulatory differences, not rules to apply to a Canadian property or another jurisdiction.
Local and fire rules that change slat choices
| Source | Rule | Effect on slats |
|---|---|---|
| Sonoma County technical bulletin | Chain-link fences between 10 and 12 feet may proceed without engineering only when no slats or cloth screening is installed | Slats can trigger engineering review |
| Saratoga code | Open chain link may reach 8 feet, but openings must be at least 2 inches, with no slats; solid fences over 6 feet require a building permit | Slats in chain-link openings are prohibited under that provision |
| Palmdale residential rules | Generally permits residential fences to 6.5 feet; front-yard setbacks on lots under 20,000 square feet have a 5-foot maximum, with only 3 feet solid; chain link must not be visible from the public right-of-way | Screening can conflict with openness and visibility restrictions |
| FEMA and CAL FIRE defensible-space guidance | Use noncombustible fencing beside structures; CAL FIRE advises replacing combustible fencing, gates and arbors attached to homes | Review the entire assembly, not just its metal frame |
| California Title 14, Section 1778 | For regulated oil-and-gas enclosures: minimum 5-foot height, steel posts at least 1 1/4 inches, wire no lighter than 11 gauge, mesh no larger than 2 inches, posts no more than 14 feet apart | Establishes a regulated substrate specification, not universal approval for slats |
The oil-and-gas enclosure rule is deliberately specific in scope. Don't use its dimensions as a residential design or assume they establish adequate wind capacity for an added screen.
Get an answer for the finished fence
Send the planning or building department a photograph and a simple sketch showing the proposed screening, yard location, overall height and nearby driveway or street. Ask whether the completed fence will count as open, screened or solid, and whether engineering or fire review is needed.
Our fence height requirements guide can help you organise those questions. Confirm height, solidity, visibility and fire-zone restrictions with the city or county before committing to material.
How to Install Slats Step by Step
Use the instructions for the exact slat system in your hands. Top-lock, bottom-lock and winged products don't all engage the same way, and adding improvised fasteners can damage a profile designed to move within its channel.
Set out gloves, safety glasses, a tape measure, a level and the cutting tool specified for the material. Remove sharp wire ends before you begin, and don't start inserting slats while someone else is adjusting fabric tension.
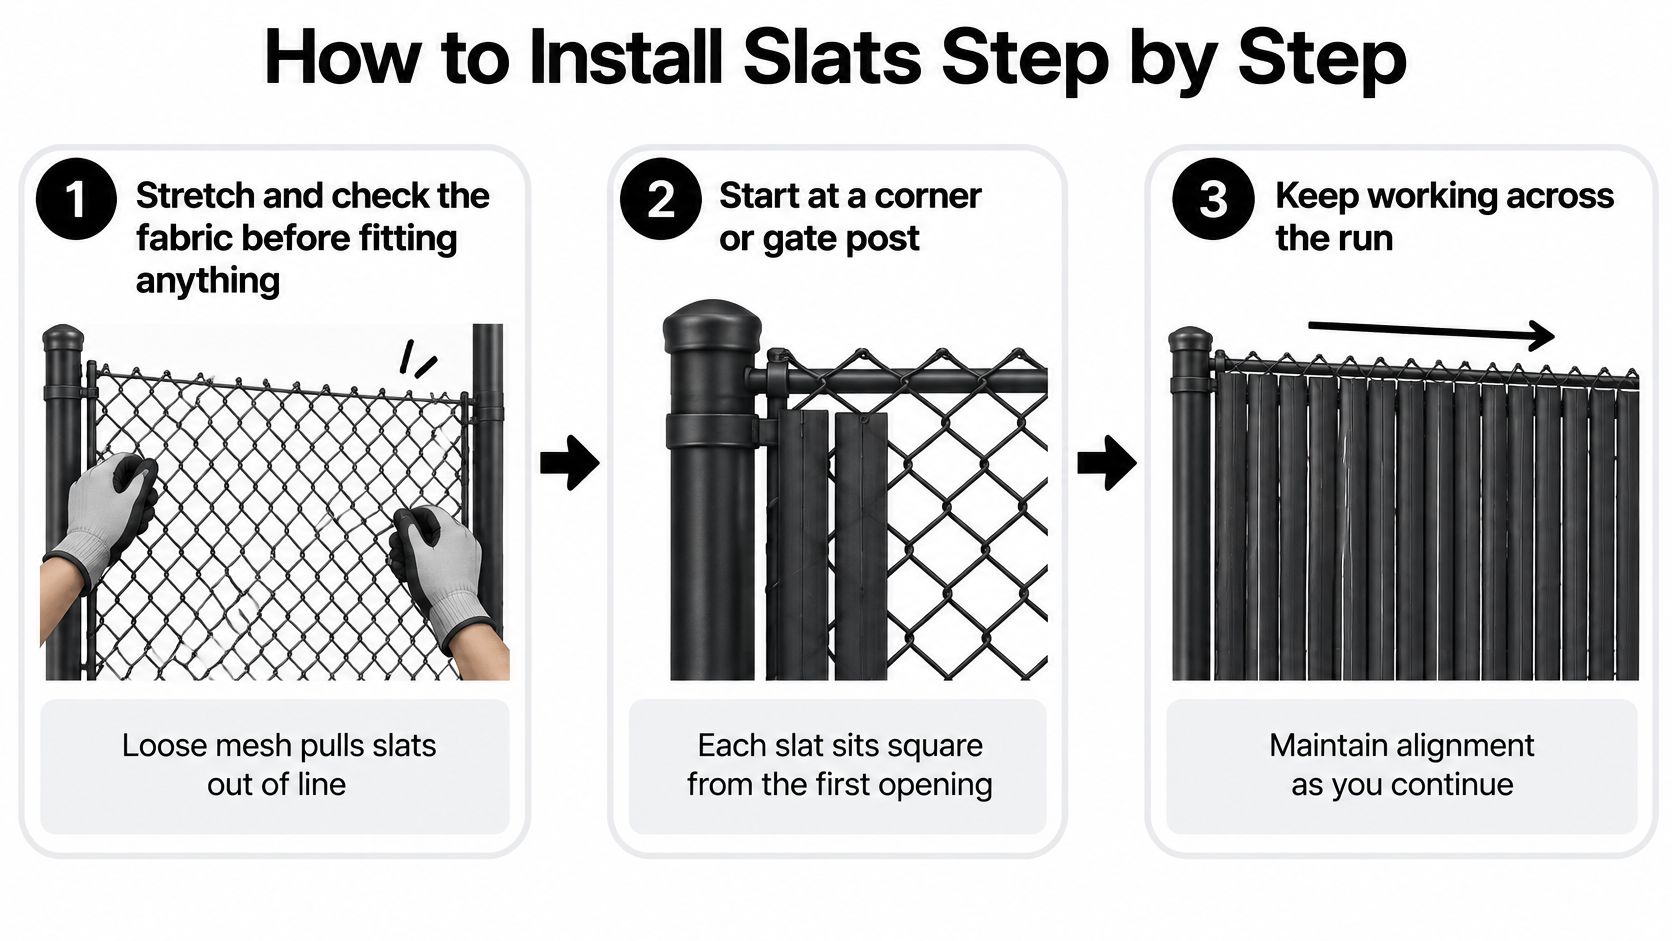
The basic sequence keeps alignment under control.
Work from a sound edge
Stretch and check the fabric before fitting anything. Correct loose fabric, damaged ties and bowed sections first, because mesh movement will pull the slats out of line. The common mistake is hiding a sag with inserts instead of correcting the underlying tension.
Start at a corner or gate post. Establish a straight first slat against the terminal area, checking its position with a level and the intended top line. Starting in the middle makes it harder to keep the pattern consistent at both ends.
Feed the first slat and engage its locking system. Slide it through the designated mesh path, then seat it in the top or bottom channel as the kit requires. Don't force cold plastic through a tight opening; choose a mild day and stop if the profile catches or begins to buckle.
Continue across the run with aligned faces. Follow the same diamond path for each slat and inspect the face frequently from a short distance away. A strip that crosses into the neighbouring path can look acceptable up close but create a visible diagonal fault across the finished screen.
Fit the specified restraints. Where the system calls for ties or clips at the top, middle and bottom, install them without crushing the slat; channel-locked products may use a different arrangement. Skipping a required top restraint can allow lifting, while leaving the lock disengaged can cause rattling and separation.
Trim only where the product permits it. Use the recommended tool, smooth sharp metal edges and retain clearance above soil for drainage and movement. Cutting off a moulded locking end is a common way to turn a usable slat into scrap.
Recheck after the installation settles. Make a follow-up inspection after about a month, checking locks, clips, fabric and gate operation. Don't respond to movement by tightening everything blindly; identify whether a restraint loosened or the framework shifted.
A finished run should look orderly from the street: consistent tops, parallel faces, tidy ends and no strips touching soil or fouling a gate.
Open and close every gate before putting tools away. Clear hinge movement and latch engagement matter more than forcing the last slat into an awkward gap.
Cost and Coverage Per Linear Foot
Compare coverage, not carton price. A cheaper pack may cover less fence, omit locking channels or provide a different privacy level. Match height and profile before comparing totals.
In 2025, Home Depot Canada listed M-D Building Products privacy slats at C$98.00 for a 6-foot-high, 82-slat package covering 10 linear feet, equivalent to C$9.80 per linear foot for the listed slat material.
Listed slat packs and coverage (2025)
| Source | Slats per pack | Coverage | Listed price |
|---|---|---|---|
| Home Depot Canada, M-D 6-foot privacy slats | 82 | 10 linear feet | C$98.00 |
| ULINE Canada, privacy slats with 75% privacy factor | 82 | 10 feet horizontally | Price not stated in the cited listing information |
These are historical listing details, not current quotations. Equal pack coverage doesn't establish equal height, privacy or included hardware.
Build a complete order
Use a clearly measured run rather than the property's approximate perimeter:
- Measure the screened length. Separate gates and sections requiring different slat heights.
- Divide by stated pack coverage. For a hypothetical 80-foot run, the Home Depot package basis gives 8 packs and C$784 before extras.
- Round up to complete packs. A partial-pack calculation still requires buying the next available package.
- Allow for cuts and spares. For estimating, a 5 to 10 per cent allowance is a practical starting point, then adjust for slopes, unusual ends and the manufacturer's packing format.
That allowance is a purchasing judgement, not a product specification. On a short project, a full spare pack may be excessive; on a complicated boundary, offcuts may be unusable.
Budget separately for clips, locking channels, brace bands and any framework upgrades. Labour spent correcting a weak corner can outweigh savings from a discounted carton.
For an accompanying exterior refresh, Aqua Painting's exterior cost breakdown offers a useful example of separating preparation from finishing costs. Its painting prices aren't fence-slat rates.
Compare the completed total for the same run length, height and privacy factor, not whichever pack has the lowest shelf price.
Maintenance Fixes for Loose, Faded or Cracked Slats
A slatted fence isn't maintenance-free just because the inserts don't need regular painting. Most early problems involve locks, restraints or the supporting mesh, so inspect those before replacing an entire run.
Match the repair to the symptom
Loose slats that rattle or drop: Re-seat the locking strip and replace missing specified clips or ties. Prevent repeat movement by checking the whole channel, including its ends, rather than securing only the noisy strip.
Faded or brittle plastic: Wash with mild soap and water to distinguish surface dirt from actual deterioration. Replace cracked strips rather than gluing them, and keep spare slats identified by profile and colour so replacements fit.
Mould or ingrained dirt: Use a soft brush and a mild cleaning solution compatible with the product. Rinse thoroughly, and keep sprinkler spray and piled vegetation away from the fence where practical.
Wind damage: Inspect corner and gate posts for lean and look for movement around footings before touching the screen. Repair structural movement first; reinserting displaced slats leaves the cause unresolved.
Sagging mesh: Check tension bars, wire and ties, then re-tension sound fabric with appropriate chain-link tools. Don't pull against a loose terminal post or brittle, heavily corroded wire.
Rust on steel slats: Remove loose corrosion and touch up exposed areas with a compatible zinc-rich coating where appropriate for the finish. Treat cut edges early, and investigate repeated rust where slats rub against fittings.
Maintenance priority: A straight-looking screen can hide a moving post. Inspect the framework from both sides.
Check ties and posts each spring and after major storms. Record replacement dates and photograph recurring trouble spots; a pattern of failures at one corner points towards exposure or support problems, not necessarily a bad batch of slats.
Confirm Fit and Order the Right Slats
Start with the tape measure, the mesh and the rulebook; colour and price come last. Keep one photo of the fabric, the slat specification and the measured run together, so every choice is checked against the same fence and the same numbers.
Xtreme eDeals has sold deck, fence and railing hardware online since 2010. Its Gate & Fencing category covers gate hardware and chain-link accessories, and the 1 7/8″ Galvanized Steel Chain Link Fence Centre Brace Band, Powder Coated Black, costs $6.29. Use that fitting list to finish the hardware side after the slat profile, privacy target, wind exposure and fire requirements are settled.
Check before checkout
- Match the fabric: Confirm mesh dimensions and wire gauge against the selected kit, including its locking-channel requirements.
- Verify permission: Obtain the local answer on height, solidity and street visibility for the finished installation.
- Review fire exposure: Where the fence approaches a home, confirm the required materials for the complete assembly.
- Calculate coverage: Use measured screened length and the exact pack coverage, with an allowance suited to cuts and replacements.
- Complete the hardware list: Order matching brace bands and fasteners together, checking actual post diameters rather than guessing from appearance.
If a check is still open, hold the order. Confirm fit and rules first, then buy slats and supporting hardware as one matched installation.
Take your mesh measurements, post diameters, fire exposure decision and coverage calculation to XTREME EDEALS INC., check the fencing accessories and gate hardware for compatible fittings, and confirm product specifications and prices on the site before ordering.