
Your fence looked fine in June. Now it's February, the pickets have dried and shrunk, three nail heads stand proud of the rails, and the gate drags on the driveway. Nothing has rotted. The fasteners stopped holding.
That failure almost always traces back to two decisions made at the counter: the shank and the coating. Ring shank nails for fence work solve the first problem well. The second is where most fences die, and it's the question nobody asks when they're buying a box by the pound.
Treated lumber, coastal salt air, and fire-zone rules all push on the same nail. Get the shank right and the coating wrong, and you'll be re-nailing in eighteen months. Get the coating right and the length wrong, and the picket splits the first time the temperature drops.
Choosing a Coating for Treated Fence Lumber
Start with the metal, not the ring. The shank geometry decides whether a board stays clamped to a rail. The coating decides whether the nail is still there in three years to do that job.
Modern pressure-treated lumber is the reason this matters more than it used to. Today's ACQ and copper-azole boards carry copper-based preservatives, and copper plus moisture plus bare steel is a galvanic cell. Thin zinc layers lose that fight fast. Independent corrosion testing found accelerated corrosion in galvanized hardware exposed to ACQ- and CA-treated lumber, and in severe coastal conditions it projected a service life for G185 galvanized fasteners in UC4A ACQ lumber as short as 16 to 18 months, while stainless steel showed no measurable material loss across the conditions tested (JLC report on corrosion in treated lumber).
California's code reaches the same conclusion. Its wood-construction provisions require corrosion-resistant nails and name hot-dip zinc-coated galvanized steel, stainless steel, silicon bronze and copper as the acceptable materials where fasteners contact preservative-treated wood. The same rules require the coating to be compatible with the chemicals used to treat the lumber, so the treatment and the nail have to be chosen together.
FEMA's corrosion guidance for metal connectors closes the loophole that catches most buyers: mechanically deposited zinc is not the permitted default for driven nails into treated wood. Specify hot-dip galvanizing or stainless steel, and read the product documentation rather than judging the coating by its shine.
| Coating | Best use | Corrosion resistance | Relative cost |
|---|---|---|---|
| Electro-galvanized | Dry interior or fully covered work | Low, thin zinc layer | Lowest |
| Hot-dip galvanized | Exterior fences on treated lumber | Good for most yards | Mid-range |
| 304 stainless steel | Coastal, salt air, damp ground contact | High | Premium |
| 316 stainless steel | Marine spray, de-icing salt | Highest | Highest |
What each coating is actually for
Electro-galvanized is a shelf-storage coating, not an outdoor one. It belongs on interior trim or under a roof where rain never reaches it, and nowhere near a treated post.
Hot-dip galvanized carries a heavier zinc layer and covers the great majority of residential fence work on treated lumber. For an inland California yard with normal sun and seasonal rain, it's the sensible default.
304 stainless earns its price within a few blocks of salt water, on fences in permanent damp, and anywhere the boards stay wet for days at a time. 316 stainless is for direct marine spray, dock areas, and driveways that get de-icing salt thrown at them all winter.
Practical rule: never mix metals in one joint. A stainless nail through a galvanized bracket, or a zinc-coated nail touching bare steel, creates a small battery that eats the less noble metal first.
A fence two streets from the ocean needs stainless, full stop. A fence in a dry inland yard can run hot-dip galvanized and outlive the boards. If you're still weighing those two, this comparison of galvanized versus stainless steel sets out the trade-off in plain terms.
Species matters too, because cedar and redwood carry tannins that stain boards blue-black when they react with iron. Before you settle on a board, it's worth reading how wood fence costs and maintenance compare between treated pine and cedar, since the cheaper board often needs the dearer fastener.
Choose the coating first. Then pick the length.
Ring Shank Nail Sizes for Each Fence Part
Here's the lookup many readers came for. Common shank diameters run from about .120 in to .131 in depending on the maker and the gun, and the three lengths that cover nearly all fence work are 8d, 10d and 16d.
| Fence part | Board thickness | Nail size | Penetration into support |
|---|---|---|---|
| Pickets into 2×4 rails | 3/4 in | 8d, 2-1/2 in | about 1-3/4 in into rail |
| Privacy boards into 2×4 rails | 1 in | 10d, 3 in | about 2 in into rail |
| 2x rails face-nailed into 4×4 posts | 1-1/2 in | 16d, 3-1/2 in | about 2 in into post |
| Trim and lattice | 1/4 to 1/2 in | 4d, 1-1/2 in | about 1 in into framing |
The penetration rule in plain words
Ignore board thickness when you pick a nail. Measure what's left after the nail passes through the board: it needs about 1-1/2 in of bite into the rail or post behind it.
A worked example makes it obvious. A 1 in privacy board on a 2×4 rail with a 2 in nail leaves roughly 1 in of hold in the rail. That's not enough for a board that will swell and shrink twice a year. Step up to a 3 in nail and you get the bite you need without punching through the back of the rail.
Nail length is set by penetration, not by board width. Measure the rail depth, not the picket face.
These sizes are starting points, not a design. The number of nails per joint and their spacing come from the fence design, the wood species, the wind exposure and your local code, and a tabulated fastening schedule assumes conditions a hilltop or coastal site may not meet.
Before you open a box, do three things. Measure the board thickness at the thin end, measure the rail depth, and confirm the nail reaches the required penetration with the coating you've already chosen. A 10d nail in the wrong coating is still the wrong nail.
Why Ring Shank Nails Hold Boards Tighter
Think about pushing a smooth peg into wet sand, then pushing a ridged cork into a bottle neck. The peg slides back out under its own weight. The cork locks because every ridge has to drag sand or material past it to move.
Ring shank nails work on the cork principle. The annular rings compress the wood fibres on the way in, and those fibres stay wedged in the grooves afterwards. A smooth nail holds by friction alone; a ring shank nail holds because the wood has to physically fail before the nail will back out.
Then the seasons do their work. A 1×6 picket swells across its width during humid weeks and dries and shrinks in winter. Every one of those cycles tries to push the fastener back out of the rail. Ring shank nails ride those cycles out. Smooth nails walk loose, the picket cups, and the heads pop proud of the face.
Where the rings stop helping
Rings resist withdrawal. They do nothing for sideways shear, and they don't fix a bad frame. A post set in a shallow footing will move with frost or wind no matter how good the nails are, and San Diego County's wood fence guidance sets the standard that has to come first: posts of naturally durable or preservative-treated wood, set in 12-inch-diameter concrete footings extending at least 24 inches into undisturbed ground, with at least 3 inches of loose gravel beneath the footing.
Rings also don't protect against corrosion. That's a coating job, and it's the one that decides whether the nail you drove this spring is still a nail in three years.
Run a test on scrap before you commit to a whole fence. Drive one ring shank and one smooth nail of the same length into the same offcut, then pull both with a claw hammer and feel the difference. The smooth one comes out with a few taps.
Ring Shank or Screws? When Each Fence Connection Fits
A fence isn't one connection. It's forty or fifty small ones, and they don't all want the same fastener.
- Ring shank nails for the field of the fence. Pickets, lattice, and rails on a standard residential run. A pneumatic gun drives them in seconds, the rings fight seasonal pull-out, and the cost per joint is trivial.
- Exterior screws where the joint has to come apart again. A section the homeowner expects to replace, a panel beside the meter, and gate frames that take repeated swing loads all benefit from being unscrewable.
- Smooth common nails nowhere that moves. They're fine for temporary bracing and framing jigs, and wrong for any board that will swell against its neighbour.
- Structural connectors for the structure. Post bases, brackets, post caps and gate posts are sized to the wind and load design, not to whatever fits the nail gun.
That last point has a code basis. Fastening provisions such as IBC Section 2304.10.2 require the number and size of fasteners to meet the applicable fastening table, and those tabulated requirements apply only where the ultimate design wind speed is below 140 mph. Stainless or other non-carbon-steel fasteners require design by acceptable engineering practice rather than a table lookup. If your site is exposed or the fence is tall enough to catch real wind, the connection needs an engineer's input, not a heavier nail.
Rule of thumb: nails for boards, screws for removable parts, connectors for structure.
Picture a 6 ft privacy fence on an exposed corner lot. Ring shank 10d hot-dip nails for the pickets, a properly sized galvanized post base or through-bolt for the gate post, and a check that the nail count at each rail meets the schedule. If you're deciding between collated nails and a screw gun for the rails, this breakdown of deck screws or nails covers where each one wins.
Code and Wildfire Limits on Ring Shank Fence Nails
Two sets of rules can override a good nail spec, and both are worth knowing before you buy.
The first is the building code. California's wood chapter requires nails and staples to conform to ASTM F1667, including Supplement 1, which covers material, dimensions and marking. A bin label that says "strong" proves nothing; the standard number does. Compliance also doesn't mean rings are mandatory on every joint, only that the fastening system is adequate for the loads.
The second is fire. FEMA's builders guide for wildfire zones recommends the first 5 feet of fence next to a structure be noncombustible, and that combustible fencing not be attached to buildings. Where attachment can't be avoided, combustible components should sit at least 10 feet from the building or its overhang, whichever is closer. CAL FIRE's home-hardening guidance advises replacing attached combustible fencing or gates within the first 8 feet and warns that privacy fences collect embers where horizontal rails meet vertical pickets.
Scale makes the point. An early field survey of the 2025 Los Angeles-area fires found 61% of surveyed parcels had a fence attached to the structure or inside Zone 0, the first 0 to 5 feet around a building, and 65% of those fences were wood.
- Confirm the zone. Map the distance from the fence line to the nearest wall or overhang.
- Check local attachment rules. Chapter 7A adoption and fire-code amendments vary by jurisdiction.
- Verify the fastener spec against the fastening table for the nail count, then confirm the noncombustible requirement for the first section.
Ring shank nails improve withdrawal resistance. They do not make a fence assembly noncombustible, and a wood privacy fence running into a house wall in a high-risk zone needs a noncombustible first section or a gap, however well the nails hold.
How to Drive Ring Shank Nails Without Splitting Wood
Ring shank nails split wood more readily than smooth ones because the rings displace fibres instead of sliding past them. The fix is in the sequence, not in the hammer.
Here's the full sequence as a single reference you can keep beside the gun.
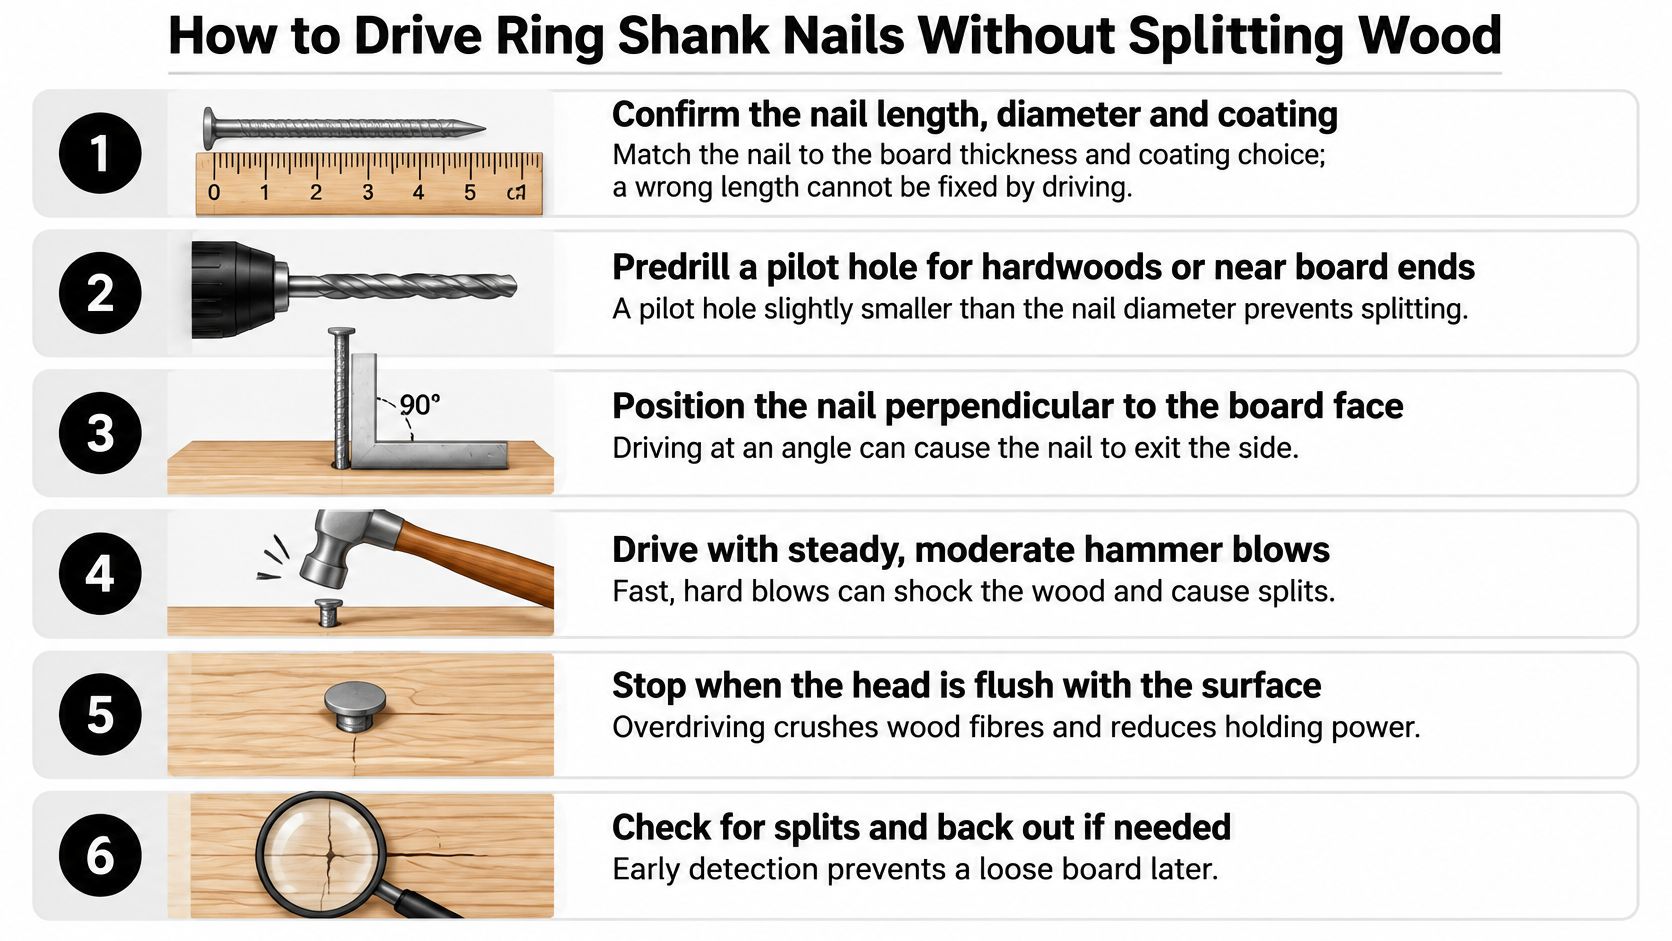
- Confirm the length, diameter and coating against your sizing. A wrong length can't be fixed by driving harder, and a wrong coating can't be fixed by painting over the streak.
- Pre-drill board ends and dense hardwoods. Use a bit slightly smaller than the shank diameter. Ring shanks split thin end grain, and a 60-second pilot hole beats replacing a picket.
- Set the board on the rail and keep every nail at least 1 in from the board end. End grain has almost no resistance to a wedge, and the rings act like a stack of wedges.
- Tune the gun pressure so the head finishes flush. Too much pressure overdrives the head into the face and crushes fibres, which reduces holding power. Too little leaves the head proud and ready to catch a sleeve.
- Drive at 90 degrees to the face and stay off the knots. A nail angled toward a knot will follow the grain and either bend or exit the side of the board.
- Place two nails per picket per rail, at least 1 in apart, staggered. Two fasteners stop the board twisting around a single point as it dries.
- Walk the run when you finish and check every joint. Pull and replace any bent nail rather than hammering it flat, because a bent shank has already lost its grip.
A good joint looks boring: the head sits flush in a tight board with no split running out of the end grain and no shadow gap between picket and rail. If you can slide a business card between the board and the rail, the joint is loose and the next dry spell will make it worse.
If you'd rather watch the motion than read it, this short walkthrough shows the driving angle and depth control in real time.
Wear eye protection and keep your off hand clear of the gun nose. A ring shank nail that hits a knot can deflect sideways out of the board, and it comes out fast.
Common Problems and How to Fix Them
Nearly every complaint about a three-year-old fence falls into five patterns, and each one has a signature you can read off the boards.
| Symptom | Likely cause | Fix | Time to fix |
|---|---|---|---|
| Nails backing out after one season | Smooth or undersized nails, board movement | Re-drive ring shank 10d nails beside the old ones | One day |
| Split picket ends | Nail driven too close to the board end, no pre-drill | Cut back or replace the board, pre-drill, set nail 1 in from end | One day |
| Rust streaks on boards | Plain galvanized nails over treated wood | Replace with hot-dip or stainless nails | One day per run |
| Heads sitting proud | Gun pressure set too high or nail driven into a knot | Reset pressure and set the nail flush | Minutes |
| Corrosion pitting at ground line | Wrong coating in ground-contact wood | Rebuild the rail and use stainless or hot-dip nails | One season or rebuild |
The cheapest fix is almost never the neatest one. When a nail has backed out and bent, driving a fresh ring shank an inch away takes seconds and holds better than straightening the old one. Pulling a bent nail and reusing it leaves an oversized hole that will never grip the same way again.
Split picket ends are the repair that surprises people, because the damage is invisible until it isn't. Once a split runs up from the nail line, the fix is a replacement board, not more nails. Cut the board out, pre-drill the new one, and set the fasteners further from the end.
Rust streaks and ground-line pitting belong to the same family of mistake and cost the most to undo. A single run of nails can be swapped in an afternoon with a cats-paw and a fresh box. Corroded rails at the base of the fence take a season's worth of weekends or a full rebuild, which is why the coating decision deserves five minutes at the counter.
Cheapest fix: a new nail an inch from the old one. Pull-and-reuse is how small problems become loose pickets.
Check the calendar too. Fresh treated lumber shrinks for a season, so a joint that looks tight in May can show a 3 mm gap by October. Re-check the run after the first dry spell and re-drive anything that has opened up before winter.
Confirm the Nail Spec Before You Buy
Run this list once, in order, and you'll buy the right box the first time.
- Penetration. At least 1-1/2 in of bite into the rail or post after the nail passes through the board.
- Coating match. Hot-dip galvanized or stainless for anything touching treated lumber; 304 or 316 if salt air or permanent damp is in play.
- Standard. The maker's documentation should name compliance with the relevant fastener standard and state the intended use, including treated wood.
- Count and spacing. Follow the fence design or the applicable fastening table, not a guess based on how the last fence looked.
- Local rules. Where wildfire risk or fence-to-house attachment applies, confirm the noncombustible first section and separation distance before you frame.
Then match the spec to the box. We stock Decorex Hardware ring shank framing nails in 3-1/4 in x .131 in, 1,000 count (DHSNR-314.131K), at $46.79 CAD, and 3-1/2 in x .120 in ring shank strip nails at $47.69 CAD per 1,000-piece box for collated strip guns. For a sense of the market, a 1,500-count box of 3-1/4-inch hot-dipped galvanized ring-shank framing nails was listed at CAD $169 by Home Depot Canada in 2026.
Read the label for shank diameter before ordering, and confirm the coating is hot-dip galvanized or stainless. Diameter and coating have to match your spec, and a .120 in nail won't substitute for a .131 in nail in a gun set up for the heavier collation.
Buy one box, trial a 10 ft run, and inspect the joints after a week. If the heads are flush and the boards are tight, order the balance for the full fence. Our wider fence building supplies range covers the post bases, brackets and gate hardware that carry the structural connections.
Write down the length, the coating and the nail count per joint, then order against those three numbers and nothing else.
XTREME EDEALS INC. supplies ring shank framing nails and strip nails in the lengths and coatings that treated fence lumber needs, alongside the post bases, brackets and gate hardware that finish the connections. If you're matching a nail spec to a treated-lumber fence this season, you can browse the full fastener range and order by the box at XTREME EDEALS INC.. Start with one box and a 10 ft trial run, then scale up once the joints hold the way they should.