
A deck plan lands on the kitchen table, or a bracket sits in an online cart, and every box says the same thing: 4×4 post base. Three finishes, two price points, no obvious reason to pick one over another. The post is a 4×4 either way, so what's the difference?
Quite a lot, and none of it shows on the outside of the box. The bracket isn't a trim piece that keeps a post from wandering off its mark. It's the point where the deck's loads leave the wood and enter the concrete, and it carries forces running in three different directions. Get the size, finish or rating wrong and the deck can still look finished while the connection underneath is the weakest link in the whole structure.
What follows is the order a careful buyer works through: what the bracket does, how to read a load rating, which bracket type fits which footing, why a nominal 4×4 isn't 4 inches square, how finishes hold up, how to mount each setup, how to install one properly, and a final checklist to run before you order.
What a 4×4 Deck Post Bracket Does for Your Deck
A windy night is a fair test. In the morning the deck boards are where you left them, the guardrail feels solid, and the posts look plumb from above. Walk down to the ground and one post has crept a few millimetres off its mark, so the beam above it sits out of line. Nothing cracked. The base was not held.
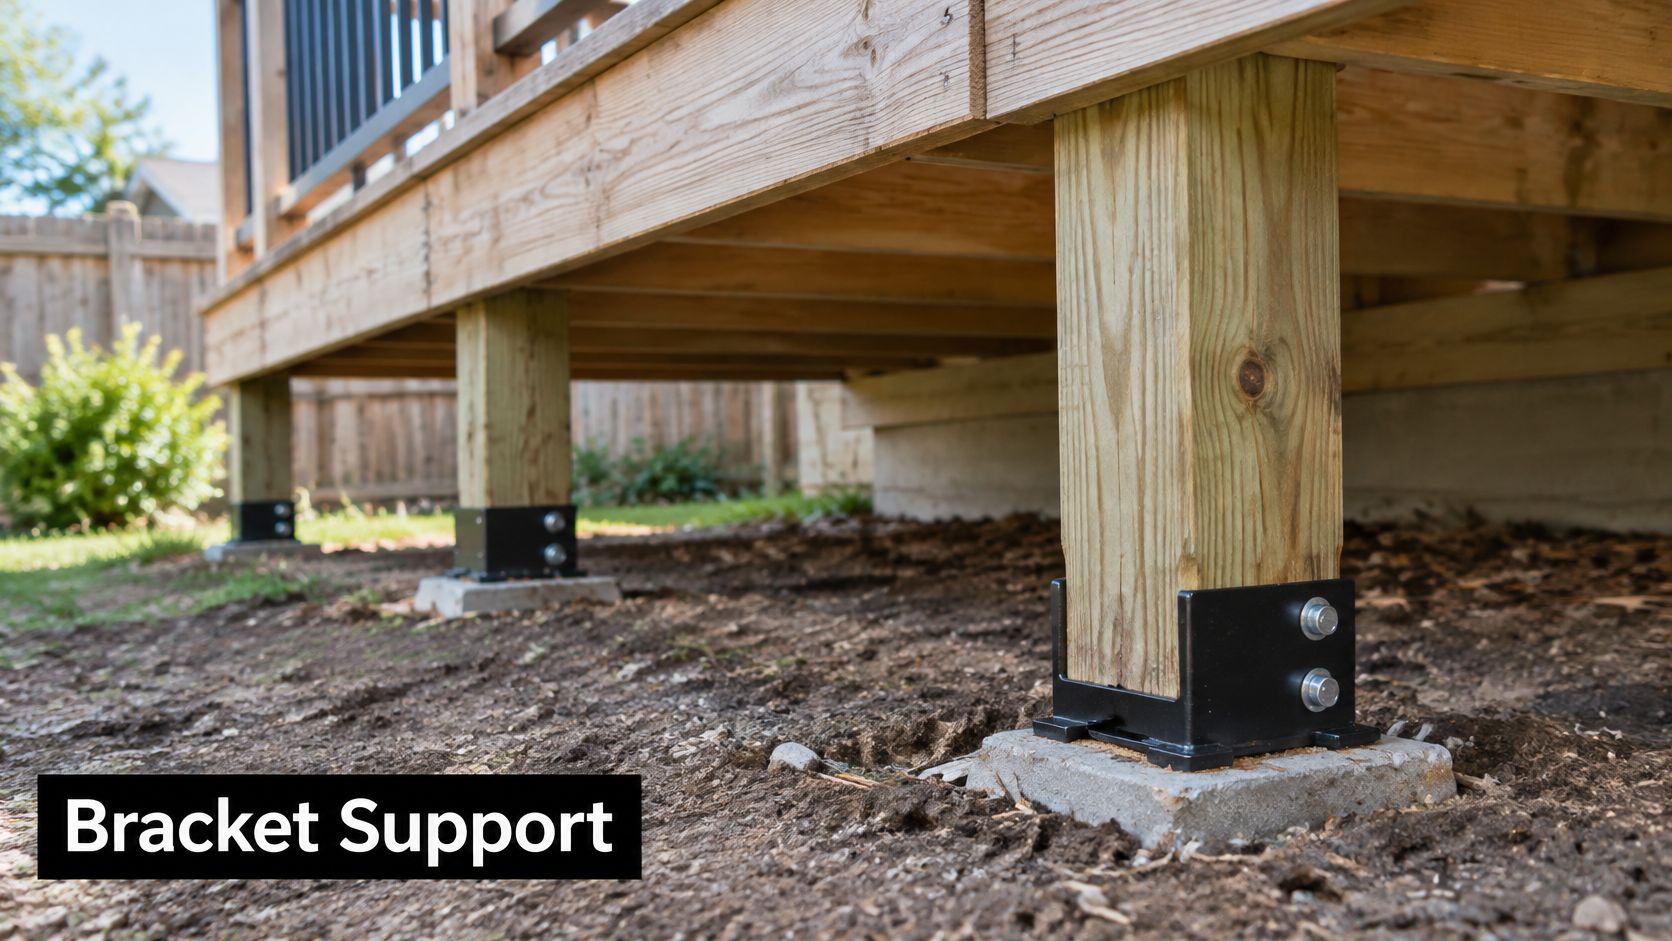
A 4×4 deck post bracket is the structural connector at that point. It sits in the load path, the route forces take from the framing, through the post, and into the footing. The size printed on the box only tells you what the bracket has to fit. Rated uplift and lateral capacity tell you whether the connection can stay put.
The bracket does two jobs. It holds the bottom of the post where the plan puts it, and it transfers the loads that arrive there into the footing. That second job is why the hardware is part of the structure, not a trim piece that keeps a post looking tidy.
A tent stake is a useful comparison. The pole holds the tent up. The stake keeps the bottom of the pole from walking sideways when wind leans on the fabric. A deck post carries the deck. Its bracket keeps the bottom of that post from sliding or lifting off the footing.
The parts are simple enough to name. There is the post, the bracket or base itself, the anchors that fix the bracket to concrete, and the screws or nails that fix the bracket to the wood. A good bracket also holds the post slightly above the concrete. That standoff gap keeps the end grain out of splash water and standing moisture. A post end sitting in water rots from the bottom up while the rest of the post still looks sound. The gap is decay control, not a styling choice.
Building codes treat a post on a concrete footing as a restrained connection. The post has to be held by an approved manufactured connector, or by adequate embedment in soil or in a concrete pier. A shoe that only looks like a base, with no tested capacity for the forces at that joint, does not provide that restraint.
Three forces meet there: compression pushing down, uplift trying to pull the post out, and lateral movement trying to slide the base sideways. Bracket type, true post size, finish, load rating and footing have to be checked together. Matching the label "4×4" and stopping there leaves the rest of the load path unverified.
Reading Load Ratings Without Guesswork
A rating table is the only place a bracket tells the truth about what it can carry. Marketing copy says "heavy duty" on almost everything. The engineering document says something you can check.
Three forces, in plain words
- Compression is the easy one. The deck's dead load and whatever you put on it press down through the post into the footing. Almost any steel base carries compression, which is why a decorative shoe can feel solid in your hand and still be wrong for the job.
- Uplift is wind lifting the deck and overturning forces trying to lever the post up out of its base. Uplift grows as the deck gets higher and as the site gets more exposed.
- Lateral movement comes from people walking, wind pressure on the deck and guardrail, and beams shifting under load. The post base has to hand those horizontal forces to the concrete without letting the bottom of the post slide or rotate.
That's why a low deck and a raised deck can need different hardware even when both use the same post.
Allowable load and ultimate load aren't the same number
Allowable load already includes a safety factor, so it describes what the connection can carry in normal service. Ultimate load describes the point where it fails, and it's always a bigger number. Comparing one bracket's allowable capacity against another bracket's ultimate capacity tells you nothing except which spec sheet you read first.
The rating also only applies to the exact installed conditions the document lists: anchor type and diameter, fastener schedule, concrete strength, and post dimensions. Change the anchor and the number doesn't apply anymore.
What 600 mm of deck height changes
Ontario's 2024 Building Code requires exterior columns and posts to be anchored against uplift and lateral movement. For decks, balconies and verandas where the underside of the joists is no more than 600 mm above finished ground, posts must be anchored to the foundation, or the supported joists and beams must be anchored directly to the ground, according to the 2024 Building Code Compendium. Low decks are exactly where builders assume post weight alone is enough, and exactly where the rule says it isn't.
Take a deck with joists a little under 600 mm off the ground, and the bracket still has to be a rated connector. Raise the same deck to a second storey with open sides and the demands climb: longer posts, more wind exposure, greater overturning at the base, and anchors that need a bigger embedment and a wider edge distance.
Practical rule: compare two brackets only when both numbers come from the same table, for the same post size, using the same anchors and fasteners.
Four checks before you trust a number
- Find the actual rating document, not the bullet point on the product page.
- Match the post size and installed conditions to the table's headings.
- Confirm the anchors and fasteners listed are the ones you plan to use, with no substitutions.
- Ask for an engineer's letter when the deck is high, wind-exposed, or unusual in shape.
A bracket rated only for compression has answered one of three questions. On a raised or exposed deck, that's the wrong one to stop at.
Bracket Types and Where Each One Fits
Six bracket families cover nearly every residential deck, and each one solves a different problem at the connection.
| Bracket type | Mounts to | Best for | Load behaviour | Watch for |
|---|---|---|---|---|
| Standoff post base | Poured concrete footing or pier | Ground-level and low decks | Compression and some lateral | Keeps wood off concrete; limited uplift capacity |
| Adjustable post base | Poured concrete footing | Footings that are slightly out of level | Compression and lateral with proper anchors | Check the adjustment range and the anchor holes |
| Heavy-duty post base with uplift rating | Poured concrete footing | Elevated and exposed decks | Compression, uplift and lateral | Needs rated anchors and the specified fastener schedule |
| Post-to-beam connector | Beam and post top | Joining the top of the post to the beam | Lateral and uplift at the top of the post | Not a base; confirm beam width and post size |
| Embedded post anchor | In-ground or concrete pier | Fences and posts set in soil | Lateral resistance from embedment | Needs drainage and a soil or pier rating from the maker |
| Decorative post base | Poured concrete footing | Visible porch posts | Light loads only | Not a structural connection; do not rely on it for a primary deck post |
Read the table in a fixed order. Deck height and exposure narrow the field first, because they set how much uplift and lateral capacity the base has to provide. Mounting surface comes next: poured footing, raised pier, existing slab, or soil. Only then compare ratings within the shortlist. Starting with price reverses the logic and usually ends with a base that's either overbuilt for a low garden deck or underbuilt for a second-storey one.
Two traps catch people here. A post-to-beam connector ties the top of the post to the beam and does nothing at the base, so it adds to a base bracket rather than replacing it. A decorative base can look heavier than a structural one and still carry light loads only, so it belongs on a porch post that isn't a primary support, not as the sole connection under a deck.
Three answers narrow the shortlist fast: how high is the deck, is the site windy or coastal, and is the footing poured, level and existing?
True 4×4 Versus Nominal Size for Bracket Fit
A nominal 4×4 is a name, not a measurement. It's the rough-sawn size before drying and planing, so a dressed 4×4 usually measures 3-1/2 inches (89 mm) across. Most brackets sold for 4×4 posts are built around that dimension.
| Nominal size | Actual size (in) | Actual size (mm) | Common use | Fit note |
|---|---|---|---|---|
| 4×4 dressed | 3-1/2 x 3-1/2 | 89 x 89 | Deck posts and guards | Standard bracket openings are sized to this |
| 4×4 rough-sawn | About 4 x 4 | About 102 x 102 | Rustic rails and some posts | May not seat in a bracket made for dressed lumber; measure |
| 4×6 | 3-1/2 x 5-1/2 | 89 x 140 | Heavier posts and rectangular supports | Rectangular section changes the bolt pattern and plate width |
| 6×6 | 5-1/2 x 5-1/2 | 140 x 140 | Heavier deck supports | Confirm the local post-size rule for your deck height |
The fit rule is simple to state and easy to get wrong. The bracket's inside opening has to match the post you have. A rough-sawn post close to a full 4 inches won't drop into a base formed for dressed lumber, and a 3-1/2 inch post will sit loose in an oversized opening, which throws off the fastener pattern and the edge distance.
Ontario's housing guard guidance treats 89 x 89 mm as the minimum guard-post size for the standard nominal 4×4 configuration, and lists smaller minimums for certain species, including 70 x 70 mm for oak or maple and 82 x 82 mm for hemlock, white pine or yellow poplar in specified guard details, per the Building Code Compendium guard provisions. Bracket plates and bolt locations also have to leave enough wood around the connection to resist splitting.
A 4×6 post shows why the shape matters as much as the width. The rectangular section shifts where the bolts land and narrows the plate that can sit against the face.
Three checks close the gap: measure the post in both directions, read the listing's stated fit rather than its nominal label, and confirm the bracket is rated for the size you'll install.
Materials and Corrosion Resistance Compared
The right finish starts with one question: what's the worst exposure this deck will see over its life? A sheltered porch under a roof and a beachfront deck on the same street don't need the same hardware, and the bracket isn't the only part that has to match.
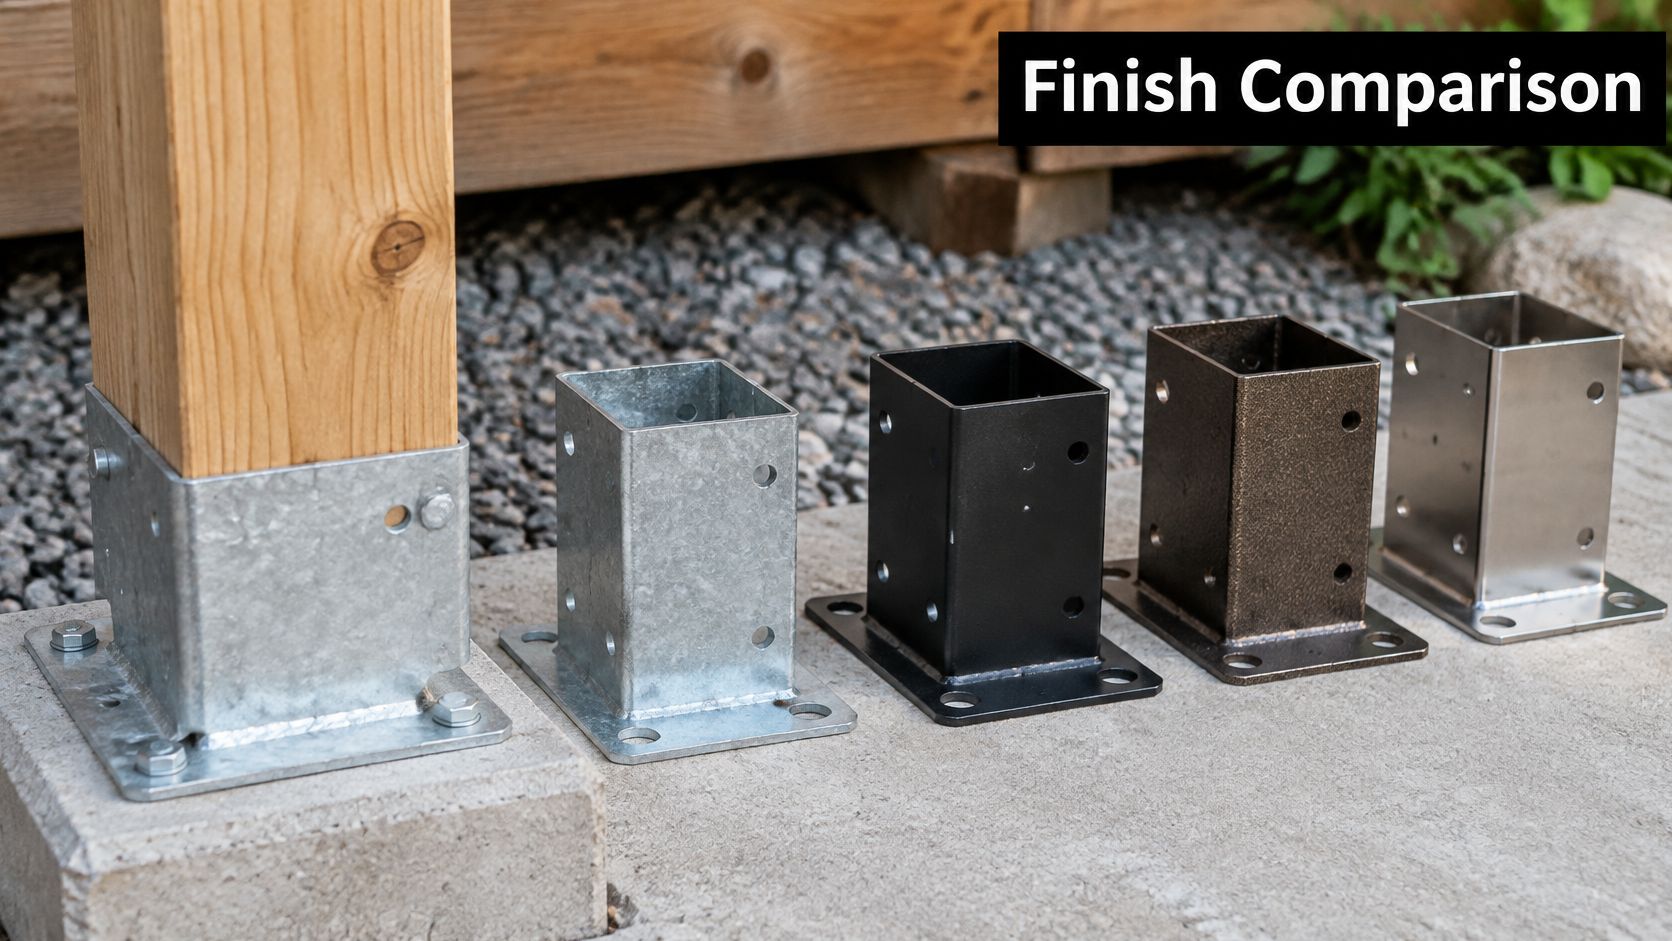
| Finish | Coating or alloy | Best fit | Watch for |
|---|---|---|---|
| Painted or powder-coated steel | Paint or powder layer over steel | Dry, sheltered, interior-adjacent sites | Scratches expose steel; not for ground contact |
| Hot-dip galvanized steel | Zinc coating, standard or heavier grade | Most outdoor decks with treated lumber | Cut ends and fasteners need matching protection |
| Stainless steel 304 | Austenitic stainless alloy | Mildly wet, humid or near-coastal sites | Higher cost; confirm compatibility with the treated wood |
| Stainless steel 316 | Austenitic stainless alloy with molybdenum | Salt spray, pool decks and strong chloride exposure | Highest cost; match the screws and anchors to it |
Modern pressure-treated lumber is the reason this matters more than it used to. Many copper-based preservative systems are more aggressive toward standard zinc coatings than the old chemistry was, so the bracket, screws and anchors all need to be rated for the treatment in use. A galvanized base with plain steel screws is a corrosion cell waiting for moisture.
Salt air and standing water speed everything up. Cut ends, drilled holes and scratched powder coat are where corrosion starts, so touch up cut edges with the maker's approved coating and use fasteners with the same or a compatible finish. Mixing metals, such as stainless screws in a galvanized bracket, can accelerate corrosion unless the manufacturer approves the pairing.
For a closer look at how the two main families behave, this comparison of galvanized versus stainless steel covers the trade-offs in more detail.
A corrosion-resistant finish doesn't make a weak bracket strong. The rating decides the load, and the finish decides how long the bracket keeps meeting that rating.
Mounting Options for Concrete, Pier and Timber Posts
Four setups cover almost every deck you'll meet, and the anchor is where each one lives or dies.
Poured footing with the base on top. The most common arrangement on a new deck. The bracket bolts to the cured concrete, and the anchor type and embedment come from the manufacturer's table, not from whatever is loose in the shop.
A concrete pier rising above grade. The pier carries the bracket above the soil line, which keeps the post base out of splash zone moisture. Ontario deck-construction guidance requires piers to extend 6 inches above finished grade and calls for lateral bracing on decks more than 24 inches above grade, per the Amherstburg guide to deck structures.
A retrofit onto an existing slab or footing. Here the concrete condition and the edge distance decide whether the anchor holds. An anchor set too close to a slab edge can crack out under load, and old, cracked or thin concrete may not suit the anchor the bracket was rated with.
Timber to concrete through a metal bracket. The same guidance is direct about this: wood members must not contact soil and must not be installed directly within concrete, and must be separated from the foundation with a proper metal bracket on the concrete base. The point is drainage. Water that wicks into a post end sitting on concrete has nowhere to go.
Before you commit to any of the four, settle these:
- Anchor type and diameter, exactly as the bracket's rating document lists them.
- Embedment depth into the concrete, which the anchor maker sets.
- Edge distance from the concrete edge, measured, not guessed.
- Concrete condition and strength, and whether the maker's data covers your case.
Our post brackets for concrete selection shows the range of bases built for these mounting conditions.
How to Install a 4×4 Post Bracket Step by Step
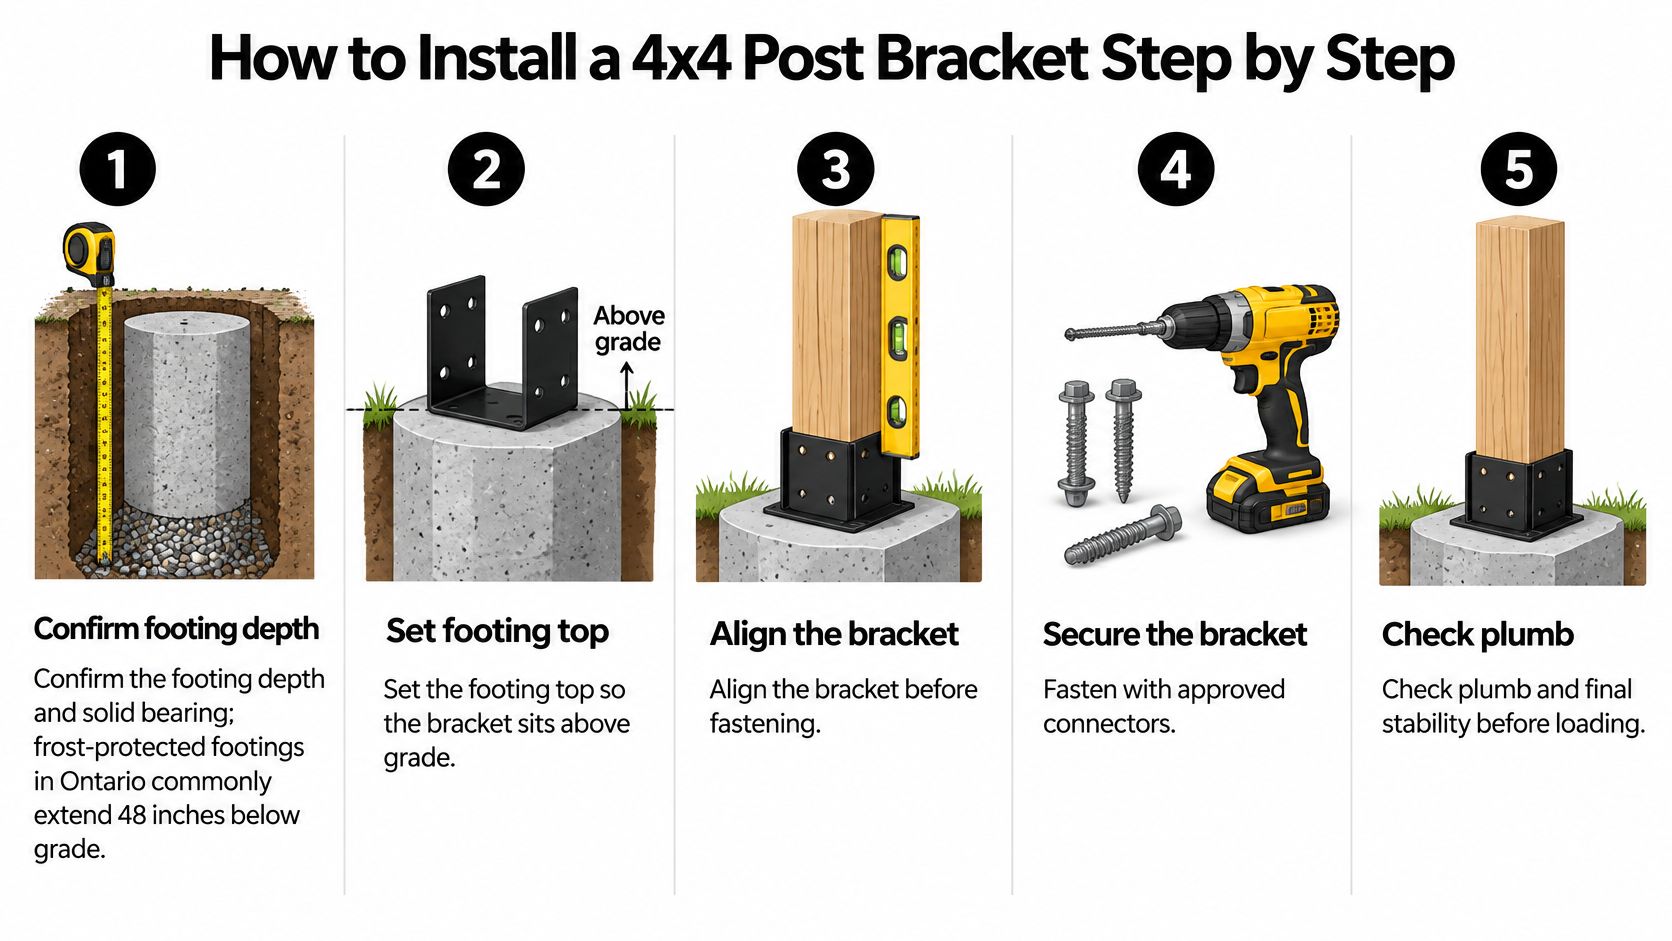
The pier is poured and the bracket is still in the truck. The beam line is chalked on the concrete. Set that bracket crooked, or on the wrong anchors, and the post cannot hand its load to the footing the way the rating assumed. A post base is a link in the load path, the same way a joist hanger is. It is not a metal shoe you add for looks.
Work the connection in this order. Each step locks in a condition the next one cannot fix.
- Confirm the footing depth and bearing. Ontario municipal deck guidance commonly requires footings to extend at least 48 inches below grade for frost protection and to bear on solid ground, per the LV Township deck and porch guidance. A shallow footing heaves in spring and lifts the post and beam with it. Confirm the local frost figure with your building department before you dig.
- Set the footing top above grade. The bracket should sit clear of soil and the snow line so the post end stays dry. The common slip is pouring flush or low, then trying to make up the height with a taller base later.
- Mark the post centre and check bracket orientation. Line the base up with the beam direction, not only with the post. An off-centre or reversed bracket eats the adjustment you have and can throw the beam line off.
- Fix the bracket to the concrete with the rated anchors. Follow the maker's torque or setting method, and keep the specified edge distance. Anchors set off the marked centres, or too close to an edge, are a frequent inspection finding.
- Set the post into the bracket and plumb it in two directions. Check both faces, not one. A post that looks plumb from the front can lean sideways and shift the beam above it. True size matters here: a dressed 4×4 is smaller than a full 4 by 4, so the post has to match the opening the bracket was made for.
- Fasten the bracket to the wood with the specified screws or nails. Longer or shorter fasteners change the capacity of the connection, so match the deck post fasteners to the schedule on the drawing. Before you order, check post size, maximum unsupported height and any required embedment against the span and post tables in the local building code, or with the building department. A 4×4 is a common deck post, but only the tables for your span and height say whether it is allowed on this job.
- Add the lateral bracing the design calls for. The base resists movement at the bottom of the post. Bracing handles racking in the rest of the frame. Finish and rating still have to suit the exposure: treated lumber and standing water will attack a base that was only rated for a dry location.
- Call for the footing and framing inspection before decking goes down. Once boards cover the connections, nobody can verify them.
A connection that will pass inspection shows a visible standoff gap, anchors on the marked centres, a post plumb in both directions, and fasteners that match the drawing. Take a photo before the decking goes on. If anyone questions the work later, a photo of the open connection answers faster than a description.
Choose the Right Bracket Before You Buy
Run this list before you order anything. Every item is a measurement or a document, not an opinion.
- True post size matches the opening. Measure the post in both directions and compare it with the fit stated in the listing.
- Bracket type matches the mounting surface and deck height. A standoff base for a low deck, a rated uplift base for a high or exposed one.
- Rated uplift and lateral capacity covers the listed conditions. Same post, same anchors, same concrete.
- Finish matches the worst exposure. Treated lumber, salt air, pool splash and standing water all count.
- Anchors and fasteners carry the same or a compatible finish. Match the whole assembly, not just the bracket.
- Footing depth and pier height match local rules. Confirm the frost depth and the above-grade height with your building department.
- Permit and inspection requirements are confirmed before concrete is placed. Connections get inspected while they're still visible.

At XTREME EDEALS INC., our Deck Hardware category includes joist hangers, brackets and covers, so you can compare a post base against the connectors that tie the rest of the frame together in one place. We also sell contractor-grade fasteners, post caps, balusters, gate hardware and deck hardware under our own Decorex Hardware brand alongside other lines, which makes it practical to match screw and anchor finishes to the bracket.
Bring four details when you ask about a specific base: your measured post size, the deck height, the exposure, and the footing type. Ask for the rating document for that exact bracket, not the category page, and read the anchor and fastener schedule before you buy.
The bracket is one part of a connection, and the parts have to be chosen as a set. Confirm current stock, finishes and rating documents on our Deck Hardware category page before ordering.
A 4×4 post bracket is small enough to order in a hurry and important enough to get right the first time. XTREME EDEALS INC. stocks deck post bases and brackets alongside the contractor-grade fasteners, joist hangers and covers that make up the rest of the connection, all in one catalogue so the finishes and ratings can be matched in a single order. Measure your post, note your deck height and footing type, then visit XTREME EDEALS INC. to check current brackets, finishes and rating documents before the concrete gets poured.