

You're standing in the fastener aisle with a post in your cart, a sketch on your phone, and three boxes that all look right. One says galvanized, one says exterior, one is cheaper. That's where most deck problems start, not with the lumber, but with a fastener picked by length and price instead of by the job it has to do.
A deck post connection isn't held together by good intentions. It needs deck post fasteners matched to the connector, the wood treatment, and the exposure. Get the coating wrong and a bolt that looks solid today thins out over a few wet seasons. Skip the rated post base and the post can shift on its footing in a storm. I would start by identifying every connection from the footing up, then buy the fastener that belongs in each one.
Post Fastener Types and Where Each Goes
A deck post is held by a small set of fasteners, and each one has one job. Work from the concrete up and you can match every connection on your drawing to a single row below. The Resists column tells you whether the piece handles uplift, sideways movement, or only surface fixing. The Coating to check column names the finish to verify on the packaging before you pay.
Deck post fasteners by location, use and typical size
| Fastener | Where it goes | Typical size | Resists | Coating to check |
|---|---|---|---|---|
| Post base bracket | Post to concrete footing | Sized to the actual post, such as 4×4 or 6×6 | Uplift and lateral push at footing | Hot-dip galvanized or stainless steel |
| Sleeve anchor | Post base or footing to concrete | 1/2 in diameter | Tension and shear at footing | Zinc or stainless steel, per approved detail |
| Wedge anchor | Heavy base plate to concrete | 1/2 in diameter | Tension and shear at base plate | Hot-dip galvanized or stainless steel |
| Carriage bolt | Post through beam | 1/2 in diameter, length clears both members | Shear between post and beam | Hot-dip galvanized or stainless steel |
| Lag screw | Ledger to band joist | 1/2 in diameter, full body | Vertical and lateral deck load into the house | Hot-dip galvanized or stainless steel |
| Deck screw | Decking boards to joists, not structural | #8 or #10 | Surface fixing only, no structural load | Hot-dip galvanized or stainless steel, not electro-galvanized |
Reading the Rows From Footing to Beam
The post base bracket is a structural connector, not a collar to hide the post end. Its anchor, whether a sleeve anchor or a wedge anchor, transfers tension and shear into the concrete. A sleeve anchor suits lighter base fixings where the approved detail allows it. A wedge anchor gives you a heavier mechanical grip for a base plate, provided you respect embedment depth and edge distance.
At the top, a carriage bolt passes through post and beam and clamps them together with a washer and nut. The beam should still bear directly on the post or in a notch. The bolt locks the joint, it doesn't hang the beam off the side of the post like a shelf bracket.
The lag screw row belongs at the house, not at the post. It fixes the ledger to the band joist, so the whole deck can transfer load into the primary framing.
The One Row That Carries No Structural Load
Deck screws hold boards to joists. They don't replace anchors, carriage bolts, or lags, no matter how many you drive. A large box of deck screws can't do the work of a single 1/2-inch anchor in concrete. If you're weighing screw versus nail for the boards themselves, the comparison in deck screws or nails for decking boards covers holding power and board removal, but keep that choice separate from structural connections.
Selection rule: choose a structural fastener by its connector and approved detail, not by length, box count, or what's left in the truck.
Deck screws are also where coating warnings get ignored most often. Electro-galvanized screws aren't suitable for treated wood, so the table lists hot-dip galvanized or stainless steel only. Check the exact wording on the box. Exterior, weather resistant, and zinc plated aren't the same claim.
How Posts Resist Uplift and Sideways Movement
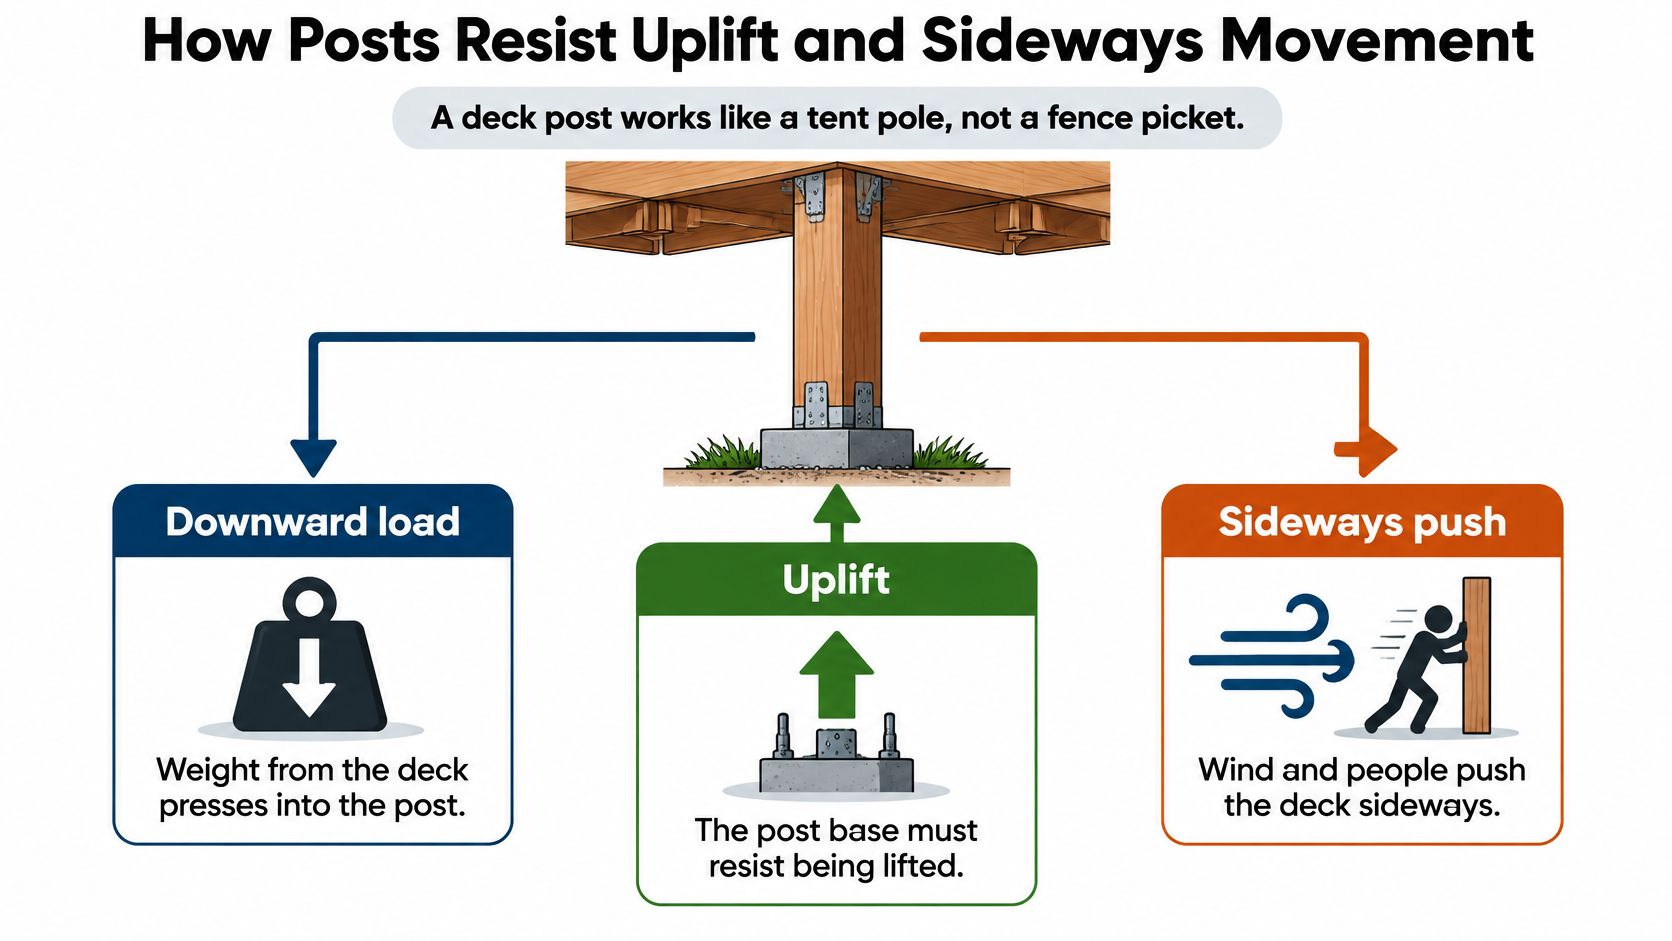
A deck post works like a tent pole, not a fence picket. It carries weight down, but wind, people leaning on a guard, and uneven loading also push it sideways and try to lift it at the corners. If you design only for downward load, you've handled one force out of three.
What Fails When a Force Is Missing
A post sitting loose on a concrete pad can slide off that pad under lateral push. A toenailed joint can pull out under uplift because the nails are loaded in withdrawal. Neither failure needs a dramatic overload. Repeated movement loosens the joint, water enters, and the connection gets weaker each season.
California permitting guidance in the Berkeley decks, porches and stairs document states that posts bearing on concrete footings need lateral restraint through manufactured connectors or at least 12 inches of embedment in surrounding soil or concrete piers. Separate California deck guidance requires post and column bottoms to be restrained against lateral movement and calls for approved post bases, straps, or equivalent hardware.
Reading a Connector Rating Properly
A post base listing gives uplift, shear, and tension values for a specific anchor, post size, concrete condition, and edge distance. You can't borrow a rating from a larger base or a different anchor diameter. The complete assembly carries the rating, the bracket plus anchor plus concrete, not the bracket alone.
Keep the rating valid with three field checks.
- Size to the actual post: a 4×4 base doesn't become a 6×6 base with shims.
- Fill every required hole: use the specified anchor or bolt in each one, with washers where shown.
- Check the concrete: don't install over cracked or inadequately cured concrete, and respect the manufacturer's embedment and edge distances.
Run a simple site test before framing goes on. Grip the installed post and try to push it off its footing by hand. If it moves, rocks, or lifts, it isn't restrained. Fix the base and anchorage then, while you can still see them.
Code Benchmarks That Shape Fastener Choice
Deck codes vary by region, and your local building department has the final word. That isn't a disclaimer to skip. It means a fastener that's acceptable inland under one permit can be rejected on a coastal lot under another. California's residential rules make a useful worked example because they spell out coating standards instead of leaving you with vague advice to buy something corrosion resistant.
What a Strict Code Actually Names
The California Residential Code chapter on floors identifies hot-dip galvanized, mechanically galvanized, and stainless-steel options for deck hardware. Bolts may use hot-dip galvanizing under ASTM A153, mechanically galvanized coating under ASTM B695, or 410 stainless steel, while metal connectors can use G185 galvanized steel or post hot-dip galvanizing under ASTM A123. Those standard numbers are what a reviewer can check against a product sheet.
The coastal rule is sharper. Fasteners and connectors exposed to salt water or located within 300 feet of a salt-water shoreline must be stainless steel under that code. There's no upgrade path with a thicker galvanized coating once you're inside that distance.
How That Rule Changes a Shopping List
Say you're building the same small deck in two places. Inland, you might buy hot-dip galvanized carriage bolts, lag screws, post bases, and washers that meet the named standards. Two blocks from the beach and inside the 300-foot line, you swap the exposed hardware to stainless steel, including the small pieces people forget, such as washers and nuts. Mixing a stainless bolt with a plain washer leaves the weakest part in the wettest spot.
Buy the connection as a matched set. A premium bolt through a cheap connector still gives you a cheap connection.
A permit reviewer will also ask two questions that have nothing to do with coating. First, what's the approved connection detail for the post base and ledger? Second, does the connector rating match the loads for this deck size, height, and exposure? Bring product listings, not just receipts.
Take a one-page list to the permit office.
- Coating standard: the ASTM designation or stainless grade printed on the listing.
- Coastal distance: measured distance to the salt-water shoreline for the lot.
- Connector approval: manufacturer name, model, and specified anchor.
- Load rating: uplift and lateral values for the exact post and footing setup.
That sheet answers most fastener questions before they become a failed inspection. It also stops a mid-build substitution where someone swaps in a similar looking connector with a lower rating.
Choosing Corrosion-Resistant Hardware for Treated Wood
Any galvanized fastener will do. That shortcut causes more slow deck failures than almost any other buying mistake. Galvanized covers everything from a thin electro-plated finish that disappears quickly in treated lumber to heavy hot-dip coatings built for exterior connectors. The word alone tells you almost nothing.
Treatment chemicals attack metal at different rates. ACQ, copper azole, and ACZA produce higher accelerated-test corrosion rates than older CCA, so a post bolt that's adequate on day one can lose section and capacity over years of contact. You won't see that loss until the head crumbles under a wrench or the base rusts through at the waterline.
Acceptable fastener coating by treated wood and exposure
| Wood treatment or case | Acceptable coating inland | Coastal or salt exposure |
|---|---|---|
| ACQ, copper azole or ACZA treated post | Hot-dip galvanized or stainless steel with washers | Type 304 or 316 stainless steel |
| CCA treated post | Hot-dip galvanized or stainless steel | Type 304 or 316 stainless steel |
| Fire-retardant-treated wood | Approved connector named on the treatment label | Treatment label and manufacturer approval for salt exposure |
| Any treated wood | Electro-galvanized screws or bolts | Not suitable |
| Any treated wood | Aluminum in direct contact | Not suitable |
Walking Through the Table
For modern ACQ, copper azole, or ACZA posts inland, I would use hot-dip galvanized or stainless steel with washers. The washer spreads clamping load and keeps the head or nut from crushing into wet wood. For coastal or salt-laden air, move to Type 304 or 316 stainless steel. Type 316 gives you the stronger margin where chloride exposure is severe, such as ocean spray or a post base that stays damp.
The Sonoma County guidance on timber connectors and fasteners for pressure-treated wood identifies hot-dipped galvanized, stainless steel, silicon bronze, or copper as acceptable categories. California's 2025 state interpretation gives examples such as G185 coating for some dry-service ACZA-treated wood and Type 316L stainless steel for severe conditions. It also confirms that pressure-treated and fire-retardant-treated wood can chemically attack zinc-coated steel and that electro-galvanized screws are specifically unsuitable.
Fire-retardant-treated wood is the row where you don't guess. Use the approved connector named on the treatment label, and get manufacturer approval for salt exposure. Aluminium shouldn't sit directly against ACQ, copper azole, ACZA, or CCA treated wood because of compatibility and corrosion concerns.
Can you use ordinary galvanized deck screws with a pressure-treated post and post base? Only if ordinary means the exact hot-dip or stainless specification on the connector listing. If the box says electro-galvanized, the answer's no.
The broader trade-off is laid out in galvanized versus stainless steel for exterior hardware, but your decision still comes down to treatment and exposure, not preference.
Three Checkpoints Before Buying
- Read the treatment stamp: copy the treatment type from the post end tag, don't rely on lumber colour.
- Match coating to the table: confirm hot-dip, G185, or stainless grade in writing on the product listing.
- Confirm connector approval: verify the post base manufacturer approves that fastener for that treatment.
Field-treat cut and drilled treated surfaces with an approved preservative, keep drainage open around post bases, and don't create water traps under washers. Coating choice buys you time. Standing water spends it.
Sizing and Installing Ledger Lag Screws
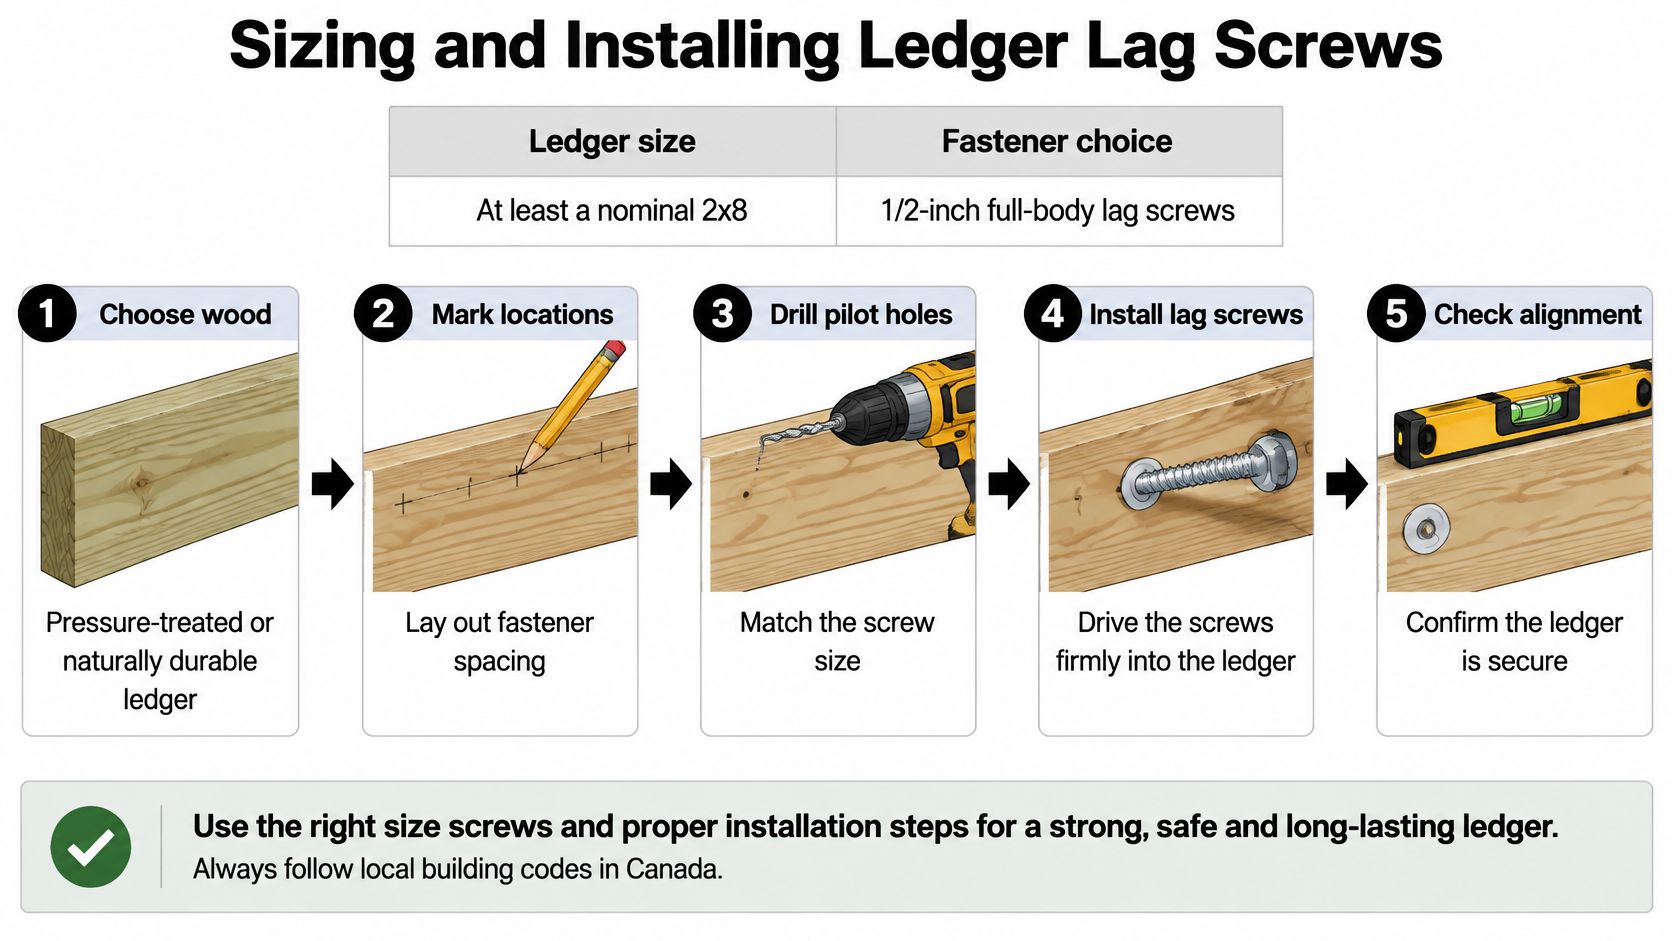
The ledger connection carries deck load into the house, so this is the last place to improvise with a structural screw that looks close enough. Start with the dimensions, then follow the drilling sequence in order. Each hole size has a job, and swapping them defeats the connection.
Ledger lag screw dimensions and hole sizes
| Item | Requirement | Why it matters |
|---|---|---|
| Ledger material | At least nominal 2×8 pressure-treated or naturally durable wood | Resists decay at the exterior wall |
| Lag screw | 1/2 in diameter, full body, hot-dip galvanized or stainless | Carries deck load into the house |
| Clearance hole through ledger and sheathing | 1/2 in diameter | Lets the lag pass without binding |
| Pilot hole in band joist | 5/16 to 3/8 in diameter | Guides threads and reduces splitting |
| Lag penetration | Extends fully beyond the inside face of the band joist | Gives full threaded engagement |
| Washers | Galvanized or stainless, one per lag | Spreads load and resists pull-through |
| Lag spacing | Set by the approved plan for joist span and snow and live load | Set by the approved plan |
Why Two Hole Sizes Matter
The California residential code guidance on exterior deck attachment requires two-stage predrilling for 1/2-inch lag screws. Drill a 1/2-inch-diameter hole through the ledger and any sheathing, followed by a 5/16- to 3/8-inch-diameter pilot hole through the band joist. The lag screw must extend fully beyond the inside face of the band joist, and the provisions specify full-body-diameter lag screws.
That distinction matters in the lumber aisle. A reduced-shank lag or a general-purpose structural screw isn't automatically interchangeable with a full-body lag in an approved detail. Diameter, pilot size, penetration, and body construction all form part of the connection.
Installation Sequence
- Mark and level the ledger. Set the height from the plan and confirm you're fastening into the band joist, not only sheathing or siding. A level line now prevents a sloped frame later.
- Drill the clearance hole. Use a 1/2-inch bit through the ledger and sheathing. The shank should pass without binding so the washer can pull the ledger tight.
- Drill the pilot hole. Switch to 5/16 to 3/8 inch for the band joist. The smaller hole guides the threads and reduces the chance of splitting the structural member.
- Fit one washer per lag. Match it to the lag coating, galvanized with galvanized and stainless with stainless. The washer spreads load across the ledger face.
- Drive to full penetration. Drive with a socket or impact-rated driver until the point extends fully beyond the inside face of the band joist. Check from inside where access allows it.
- Inspect the heads. No lag head should be sunk into the ledger. A crushed pocket around the head means you've over-driven it and damaged the fibres that resist pull-through.
Take lag spacing from the approved plan for your joist span and loading, not from habit and not from the table. If the plan calls for a different fastener system, follow that system complete with its own drilling instructions. Don't mix half of one detail with half of another.
Spotting Failing Post Fasteners Before They Fail
Most failing post connections announce themselves visually long before they let go. You don't need specialty tools for the first pass. You need daylight, a flashlight for the shaded side of the post base, and a willingness to get close enough to see the metal.
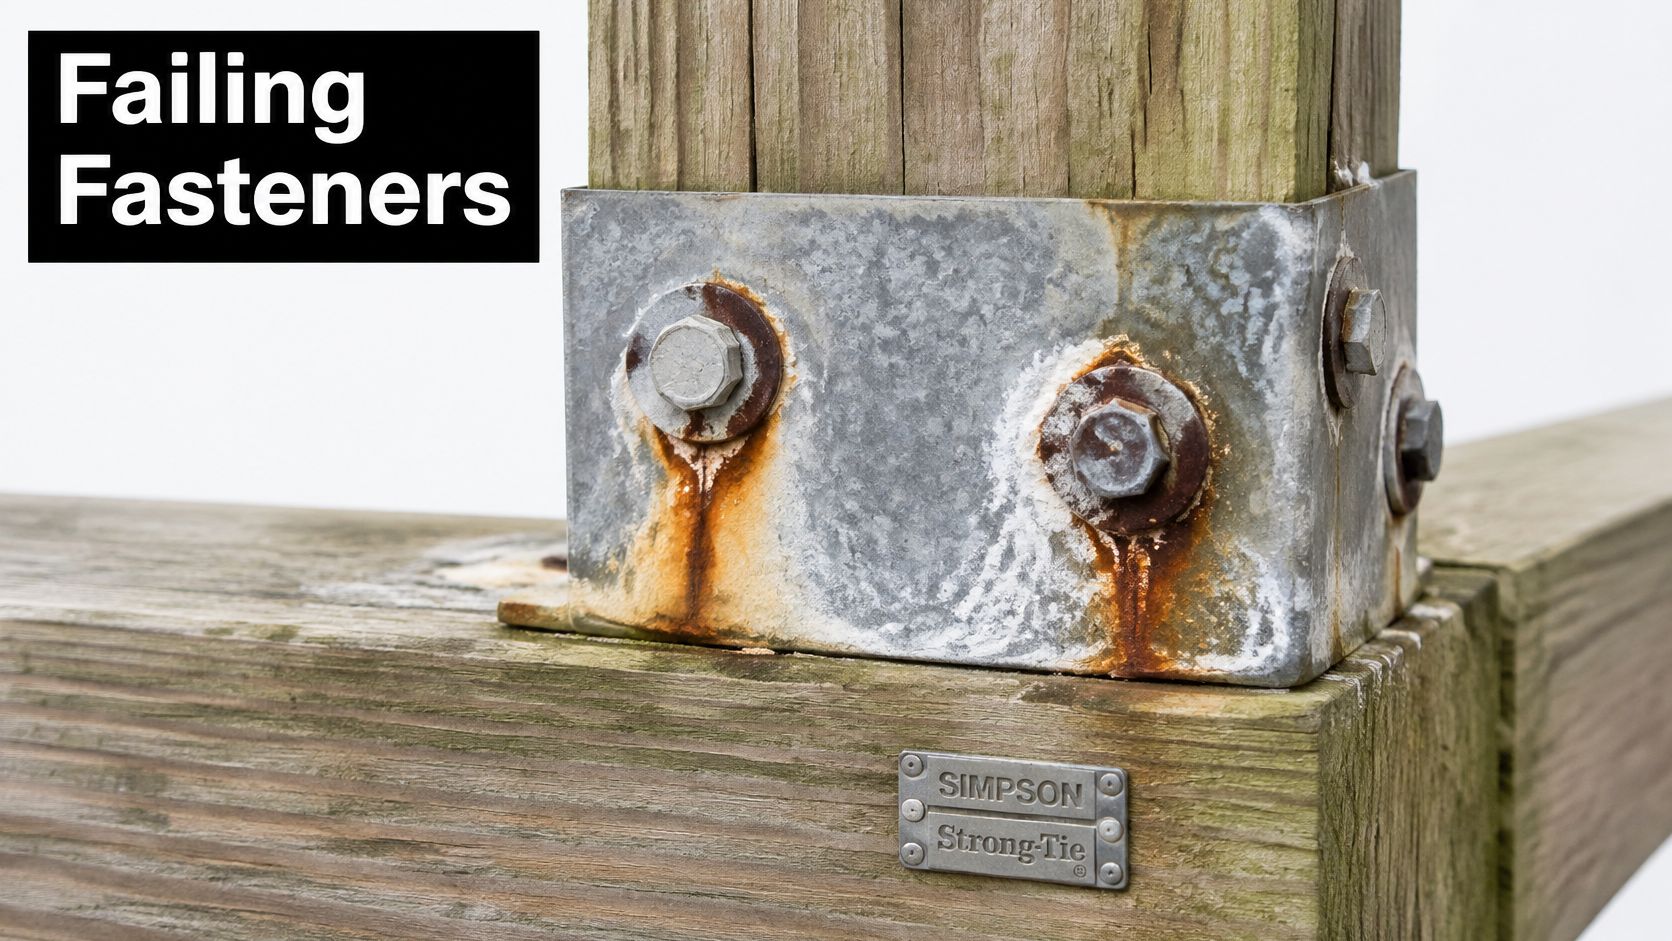
Look at the bracket in this close-up first, then compare it with the bases on your own deck.
Visible Symptoms and What They Point To
- Rust streaks or white crust: corrosion is active around the bracket or fastener, especially on treated wood where the coating and treatment don't match.
- Loose or turned bolts: nuts that spin or sit crooked under the washer show the wood has shrunk, crushed, or started to decay around the hole.
- Shifted post or rocking bracket: the anchor is missing, undersized, or no longer gripping the concrete.
- Hairline cracks around an anchor: the anchor may have been set in weak or uncured concrete, or installed too close to an edge.
- Split ledger or sunken lag heads: the pilot hole was likely too small, missing, or the lag was over-driven.
A seasonal routine catches these early. Pair your own check with a deck inspection checklist for connection points each spring and after major storms. Tighten nuts snugly without over-torquing them into soft wood, look for daylight or water gaps at the post base, and clear mulch, soil, and leaf litter that hold moisture against the post and bracket.
For cleaning, sealing, and surface repairs that protect the wood around hardware, a homeowner's guide to deck upkeep from Flawless Painting gives a practical maintenance sequence you can run alongside the hardware check. Dry wood and intact finishes slow the corrosion cycle at every metal contact point.
Watch a full walk-around inspection before you start yours, paying attention to how each base and ledger fastener is checked by hand.
If there's movement in a post base or ledger, stop loading the deck and have a qualified builder inspect it. Cosmetic rust can wait for a planned repair. Movement can't.
Confirm Your Fastener Choice Before You Buy
Order once, with the whole connection in front of you. Fasteners bought in three trips tend to come back with three different coatings, and the weakest one usually ends up at the wettest post base. Run this five-point check against your drawing before anything goes in the cart.
The Five-Point Pre-Purchase Check
- Post and connector: confirm the actual post size and the approved post base, cap, or strap for that size.
- Treatment and coating: read the treatment stamp and match the fastener coating to the treated wood table, including washers and nuts.
- Salt exposure: decide whether the deck sits within 300 feet of a salt-water shoreline. If it does, specify stainless steel.
- Ledger and lags: confirm ledger size, lag diameter, hole sizes, and spacing from the approved plan, not from your last project.
- Complete count: count every fastener on the drawing against the fastener types table and buy the matched set in one order so coatings stay consistent.
If one line on the checklist has no product listing to match it, you're not ready to order. Find the listing or change the detail with approval.
We sell the hardware those five lines call for. Our fasteners include deck screws, construction screws, lag bolts and anchors, and we sell contractor-grade fasteners, post caps, balusters, gate hardware and deck hardware under our own Decorex Hardware brand, alongside other lines. Xtreme eDeals has sold deck, fence and railing hardware online since 2010, so the catalogue covers both the structural pieces and the finishing hardware for the same build.
Check the current range on our website and match each checklist line to the product listing before adding it to the cart. Confirm diameter, body style, coating wording, and pack quantity on the listing itself. That five-minute check is cheaper than replacing a corroded post base under a finished deck.
Shop XTREME EDEALS INC. for deck screws, lag bolts, carriage bolts, sleeve and wedge anchors, washers, and post caps matched to your checklist. Bring your post size, treatment stamp, and exposure notes to the product pages, confirm the coating on each listing, and order the complete set in one pass.