
You're standing in the yard with a finished gate frame, two posts that looked perfectly straight yesterday, and a pile of hinges, screws, a latch, and a drop rod spread across the grass. The gate is the right colour, but that doesn't tell you whether the hardware can carry its weight, keep it aligned, or close reliably after a wet season.
A gate hardware kit should be treated as a coordinated system, not a bag of parts chosen by finish. Hinges carry and align the leaf, the latch controls closure, the drop rod stabilises a double gate, and the fasteners transfer all that force into the frame and posts. Local rules can override the manufacturer's installation instructions, especially for pool barriers, accessible routes, egress gates, and powered openings.
The Weekend Gate Build Most People Underestimate
By Saturday afternoon, the frame is usually the part that feels like the achievement. The posts are set, the infill is attached, and the opening looks finished from the street. Then the gate gets lifted into position and the homeowner discovers that the latch is too low, the hinge screws land near the edge of the post, or the leaf is heavy enough to pull the posts out of alignment.
That moment is where a weekend project turns into a repair project. A gate can be built square and still fail because the hinges are undersized, the posts aren't stable, or the latch and keeper weren't selected for the same reveal. Finish colour has almost nothing to do with whether the assembly will swing freely.
Practical rule: Choose the hardware around the complete gate leaf, not around the product photograph.
A useful gate hardware kit covers four jobs: pivoting, closing, retaining, and fastening. It also has to match the opening's use. A narrow pedestrian gate has different demands from a broad driveway leaf, a pool barrier, or an egress gate on an accessible route.
Before driving a screw, confirm the gate's material, width, approximate mass, swing direction, post construction, and required clearance. Decide whether one person can safely support the leaf during installation. Heavy gates often need a second set of hands, temporary supports, or a lifting method that keeps fingers away from the hinge line.
The sections ahead focus on the decisions that prevent the usual first-season problems. The aim isn't just to hang a gate today. It's to install a coordinated system that remains adjustable, secure, and appropriate for the rules governing the property.
What a Complete Gate Hardware Kit Actually Includes
A complete kit earns its place by covering the forces acting on the gate. The hinge carries the leaf and controls its movement. The latch brings the closing edge into the keeper and holds it shut. A drop rod, sometimes called a cane bolt, prevents one side of a double gate from drifting. Fasteners secure each component to material strong enough to resist repeated use.
A stripped-down package may include attractive hinges and a latch but leave out the receiver, mounting screws, or hardware needed for the actual frame. That isn't a complete system. Before buying, read the parts list and check whether the listed components suit wood, steel, aluminium, or a framed gate.
| Component | Function | Wood Gate | Metal Gate |
|---|---|---|---|
| Hinges | Carry the leaf and control swing | T-hinges, strap hinges, or adjustable bolt-on hinges sized for the frame | Weld-on, bolt-on, or adjustable hinges with suitable brackets and load capacity |
| Latch | Holds the gate closed | Spring-loaded latch, thumb latch, or self-latching model | Forked, plunger-style, slide, or self-latching latch matched to the frame |
| Drop rod | Anchors one leaf, usually on a double gate | Cane bolt with a ground receiver or keeper | Drop rod with a welded or bolted receiver, selected for the frame and ground condition |
| Fasteners | Transfers load into the gate and posts | Exterior-rated screws, bolts, washers, and backing support where needed | Bolts, nuts, washers, welds, or permanently secured fittings suited to the metal assembly |
Wood gates often allow straightforward surface mounting, but the hinge screws still need sound timber behind them. A thin decorative board won't hold a heavily used leaf by itself. Metal gates may require brackets, through-bolts, welding, or a hinge body designed for a specific frame section.
For a practical comparison of coordinated components, review fence and gate hardware options. The important question isn't whether every item matches visually. It's whether the hinge, latch, keeper, drop rod, and fasteners work together without forcing one part to compensate for another.
A gate that lacks one functional role usually reveals the omission quickly. Without adequate hinge support, the latch starts missing. Without a proper keeper, the latch rubs or fails to engage. Without a drop rod, a double gate moves as two independent leaves instead of acting as a stable opening.
Sizing the Kit to Your Gate's Weight, Width, and Use
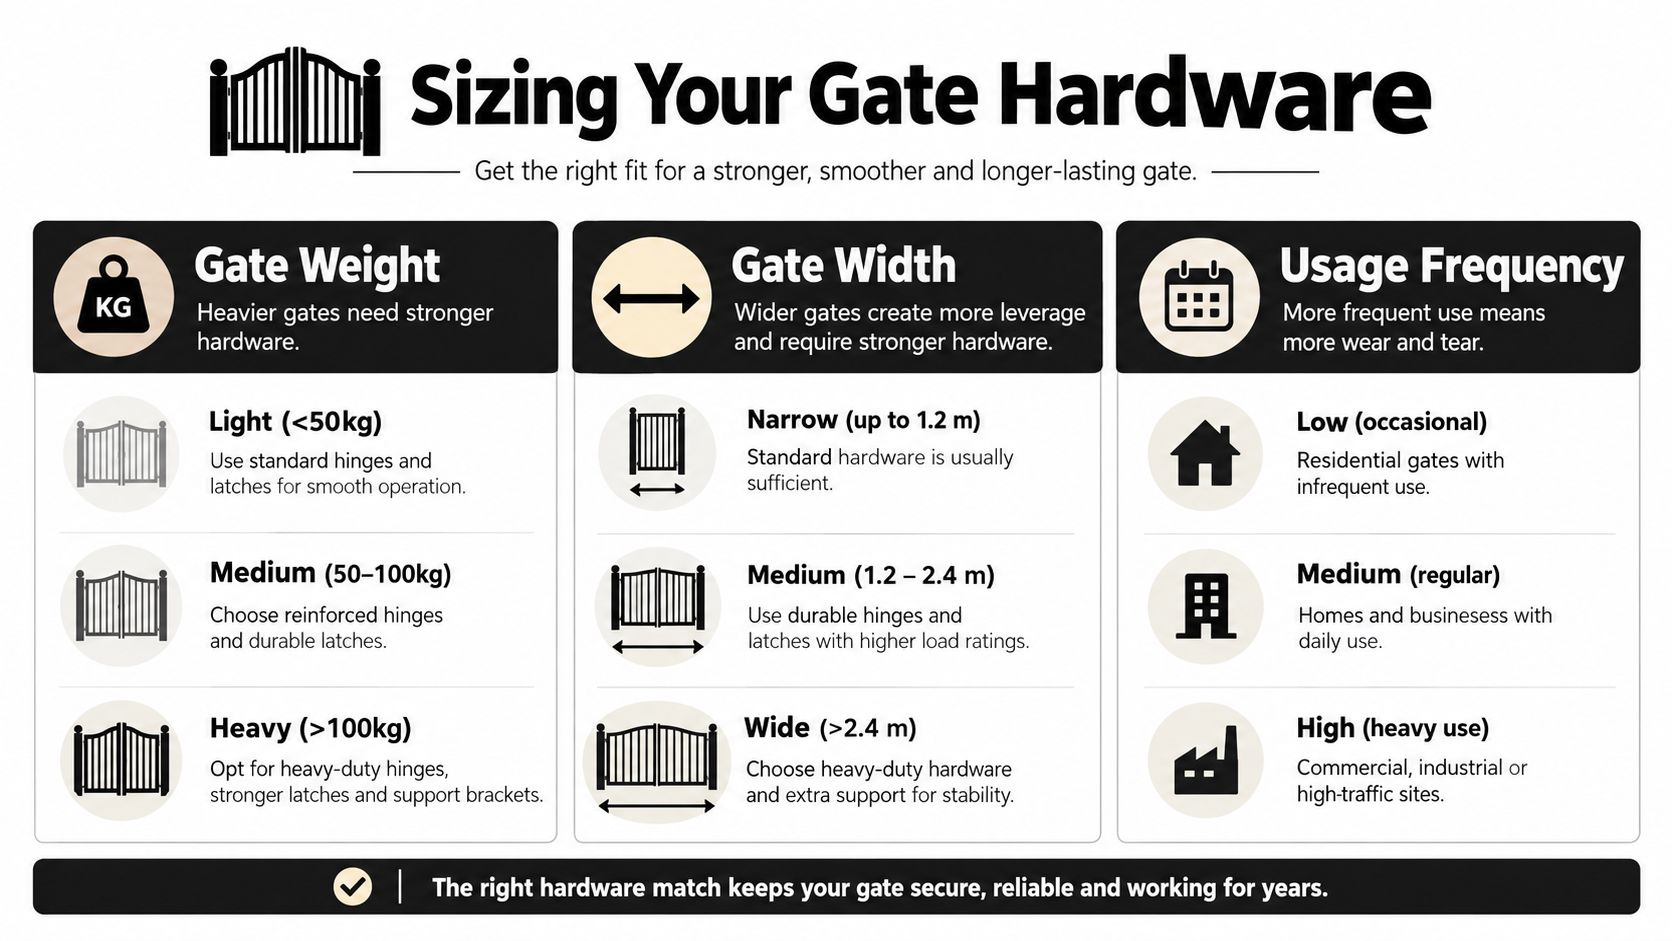
Start with the complete gate leaf, including the frame, cladding, infill, decorative pieces, and any attached hardware. Don't rely on the empty frame's mass. A wide panel can also catch more wind, increasing the force delivered to the hinges and posts even when the gate doesn't look especially heavy.
California-area public-sector specifications provide a useful quality benchmark for swing-gate selection. They favour hinges that support the complete leaf without binding, with non-lift-off designs where security matters, and hardware made from durable materials such as hot-dip-galvanised steel or malleable iron. The same specifications also favour permanently secured fittings rather than exposed clamp-on or bolted components in demanding installations. See the California-area fencing and gate specification for the type of performance language worth looking for in a product listing.
Match capacity to the actual installation
Use this mental checklist before adding a kit to your cart:
- Gate weight: Use the mass of the complete leaf, then select hinge capacity with sensible reserve rather than matching the rating exactly.
- Gate width: Treat a broad leaf as a wind-exposed lever. Width increases stress at the hinge and can amplify post movement.
- Usage: A side-yard gate opened occasionally has a different duty pattern from an entrance used repeatedly by a household, tenants, or customers.
- Material: Wood, steel, and aluminium transfer force differently. A hinge suitable for one frame can be awkward or unsafe on another.
- Post condition: A strong hinge can't correct a post that leans, twists, or moves in unstable soil.
Adjustable hinges are useful when the opening may need fine alignment after installation or seasonal movement. They're not a substitute for adequate posts. If the leaf is heavy, broad, exposed to wind, or used often, consider a more durable hinge arrangement or professional review rather than assuming a decorative upgrade solves the load problem.
Self-closing hardware is worthwhile where the gate must return to a closed position without relying on the user. Pool barriers are a specific safety application, not an ordinary yard gate. California requirements cover a barrier at least 60 inches high, openings that cannot pass a 4-inch sphere, and a self-closing, self-latching gate, with the applicable latch position depending on the governing provision and installation context. Confirm the rule before selecting the closer and latch, using the California Health and Safety Code pool-barrier provisions as the starting point.
Tools, Measurements, and Pre-Install Checks
Installation goes smoothly when the gate is supported before the hinges are asked to carry anything. Gather a tape measure, level, square, drill and correctly sized bits, shims, clamps, sockets or spanners, and a stable temporary support. Keep the hinge and latch instructions nearby, but verify local requirements before treating the supplied layout as final.
Check both posts for plumb in more than one direction. Then inspect footing stability. A post that shifts when you push the gate opening will eventually produce sag, latch misalignment, or hinge binding, regardless of the kit's finish or rating.
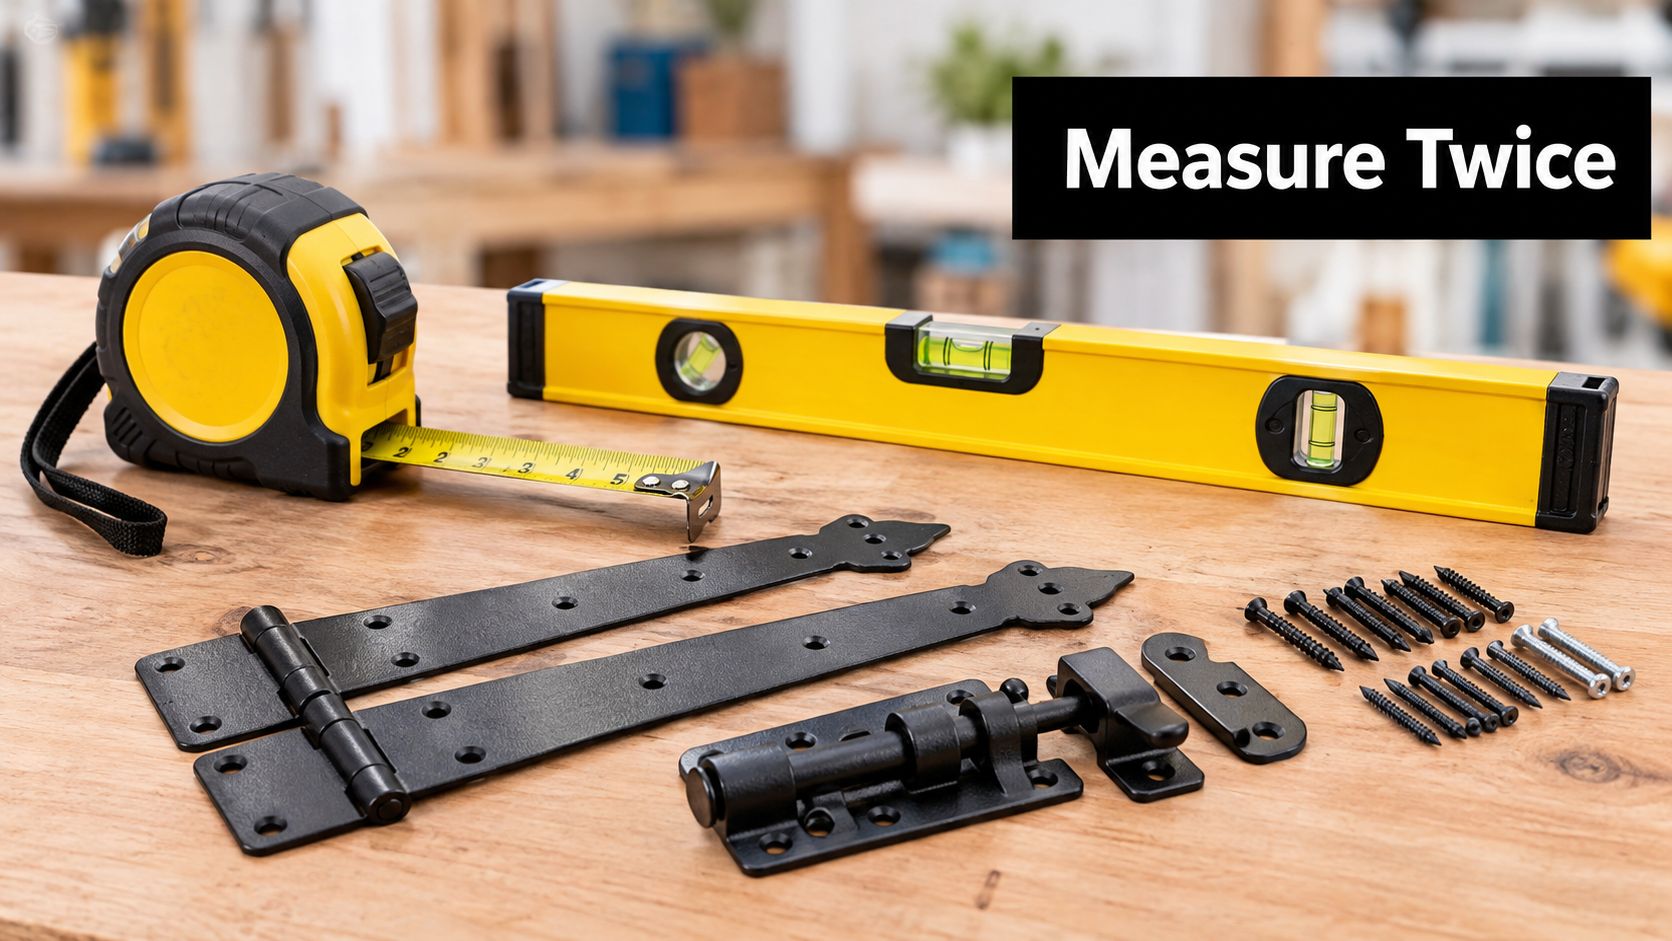
Measure the opening, the gate leaf, hinge locations, latch height, and the intended reveal around the closing edges. Dry-fit the components before drilling. This exposes problems such as a hinge plate landing over a weak section of timber, a latch body colliding with the frame, or a drop rod missing the ground receiver.
Use shims to support the gate at the final working height while you position the hinges. Shims are more forgiving than trying to hold a heavy leaf by hand. A second person should steady the gate while the first marks and drills, especially where the leaf could swing or pinch fingers.
Match drill bits to the fastener shanks and use backing washers where the frame needs load distribution. Check the square of the gate with diagonal measurements, then confirm that the posts and frame remain aligned when the temporary supports are removed.
The pre-install sequence is simple:
- Verify the opening: Confirm width, swing direction, clearance, and surface levels.
- Stabilise the supports: Don't hang a gate from a post that is still moving.
- Dry-fit the hardware: Place hinges, latch, keeper, and receiver before making holes.
- Prepare the support: Use shims, clamps, or a temporary prop so the gate stays at the planned reveal.
- Protect the fasteners: Choose exterior-rated hardware compatible with the gate and post materials.
Installing the Hinges, Latch, and Drop Rod in the Right Order
A common assumption is that a hinge-and-latch set is acceptable if it physically fits the gate. Fit is only the first test. The hardware must carry the complete leaf, preserve alignment, close the gate reliably, and suit the gate's function.
Start with the posts. Confirm that they're plumb and that the footings are stable. Select hinge capacity for the gate's actual weight and projected wind area. For a swing gate that needs full clearance, choose a hinge arrangement capable of approximately 180-degree opening where the site allows it. A non-lift-off hinge is the safer choice for security applications than a removable pin or lift-off design.
Support the gate on shims at the required reveal. Position the hinges, mark the holes, and install them loosely enough for adjustment. Hang the leaf, check level, and compare the frame's diagonals. The gate should swing freely before you fully tighten the fasteners.
Installation shortcut: Tightening everything immediately hides alignment errors. Leave adjustment available until the leaf travels cleanly under its own hardware.
Once the hinges are aligned, tighten the fasteners and check the swing again. Install the latch and keeper only after the closing edge travels to the correct position. The keeper should receive the latch without forcing the gate upward, sideways, or against the post. For a double gate, fit the drop rod after both leaves are aligned. Set the receiver where the rod reaches solid ground without scraping through normal movement, and avoid placing it where seasonal soil movement will trap the rod.
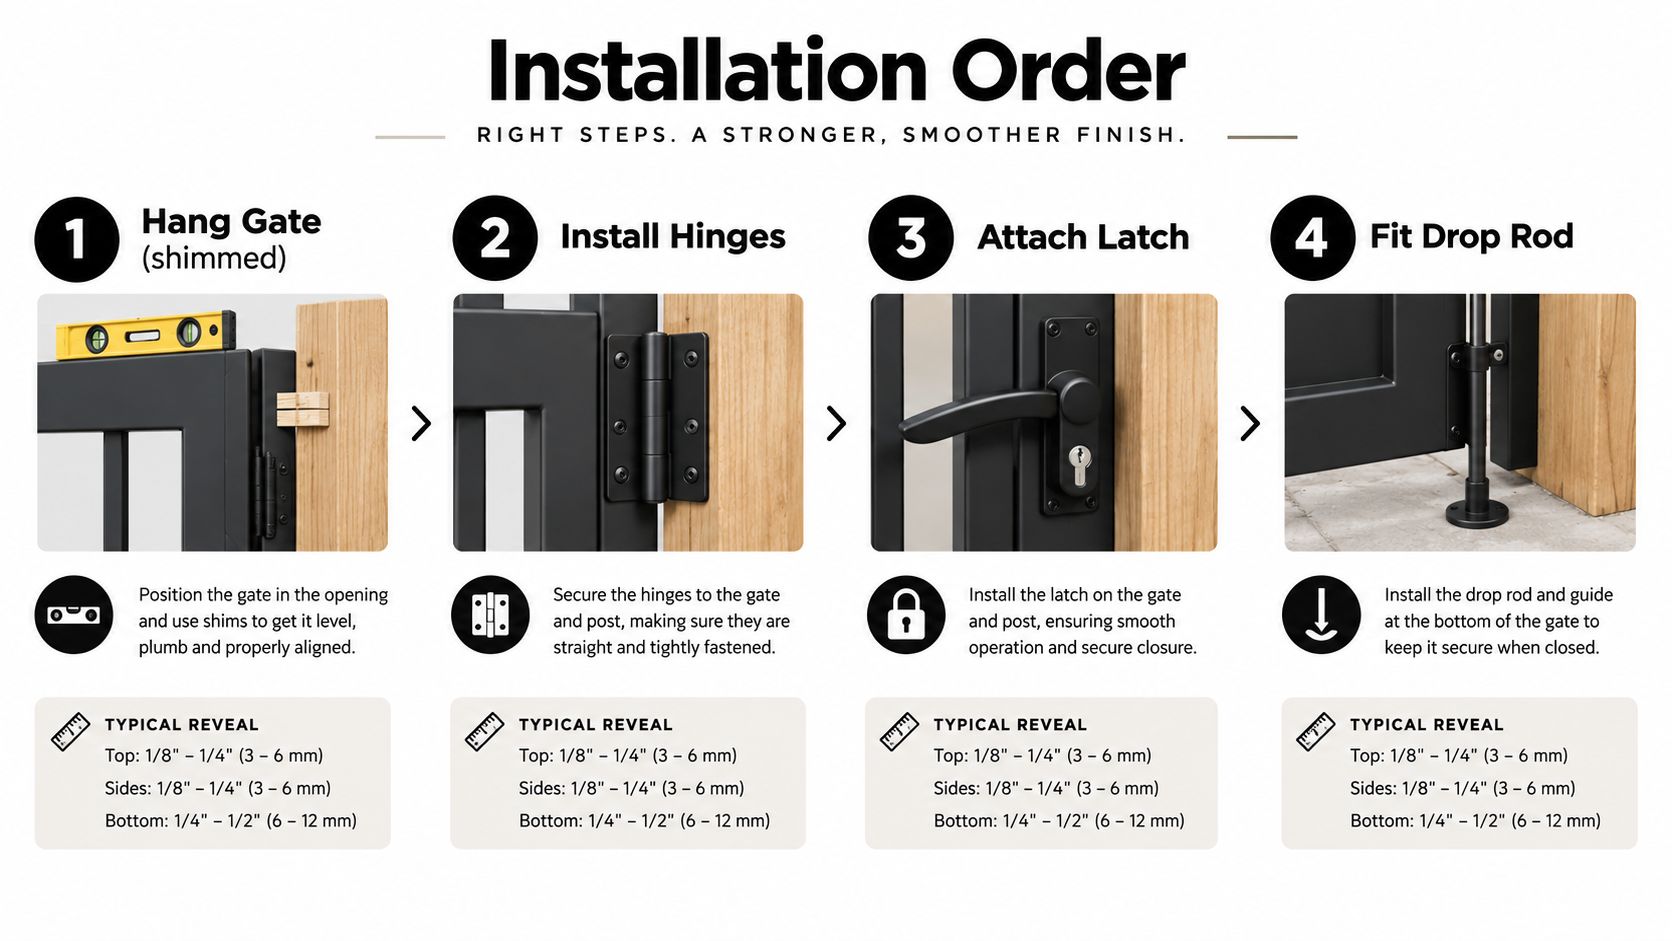
Watch the complete travel under load. Open the gate from different positions, let it close, operate the latch, and check whether the drop rod enters its receiver cleanly. If the gate serves a pool, spa, accessible route, or egress path, local code controls the installation. California pool-barrier provisions can require the gate to swing away from the pool, self-close, self-latch, and place the latch at a prescribed height. California accessibility rules generally place operable gate hardware between 30 and 44 inches above the finished floor or ground, while pool-barrier release provisions can allow a different height under specified conditions. Review the applicable California gate hardware reach and operation provisions before drilling.
For an accessible gate, the assembly may also need a clear opening of at least 32 inches when positioned at 90 degrees, with the gate generally at least 36 inches wide and 80 inches high under the cited California provisions. A kit that fits the frame can still intrude into the required clearance.
If the gate is unusually heavy, automated, part of an egress route, or difficult to control during testing, use the guidance on when to hire a fence pro as a practical decision point. The gate hinge installation guide can help with the mechanical sequence, but it can't replace a site-specific code or engineering decision.
Where Kits Commonly Fail and How to Read the Warning Signs
Most gate failures have a visible cause. A latch that misses by a small amount usually points to sag, post movement, a misplaced keeper, or a reveal that was never established. Grinding hinges usually indicate binding, excess load, poor alignment, or fasteners tightened before the leaf was allowed to settle into position.
Read the symptom before replacing parts
A sagging closing corner doesn't automatically mean the hinges are defective. Check whether the hinge capacity suits the complete gate, whether the posts move, and whether the frame has adequate diagonal support. An anti-sag cable and turnbuckle can help a suitable wood gate, but it won't rescue a weak post or an overloaded hinge.
A lift-off hinge may be convenient on a garden gate, but it's a poor choice where security or uncontrolled removal matters. Clamp-on fittings and exposed bolts can also become weak points on high-load gates, particularly where repeated movement loosens the connection.
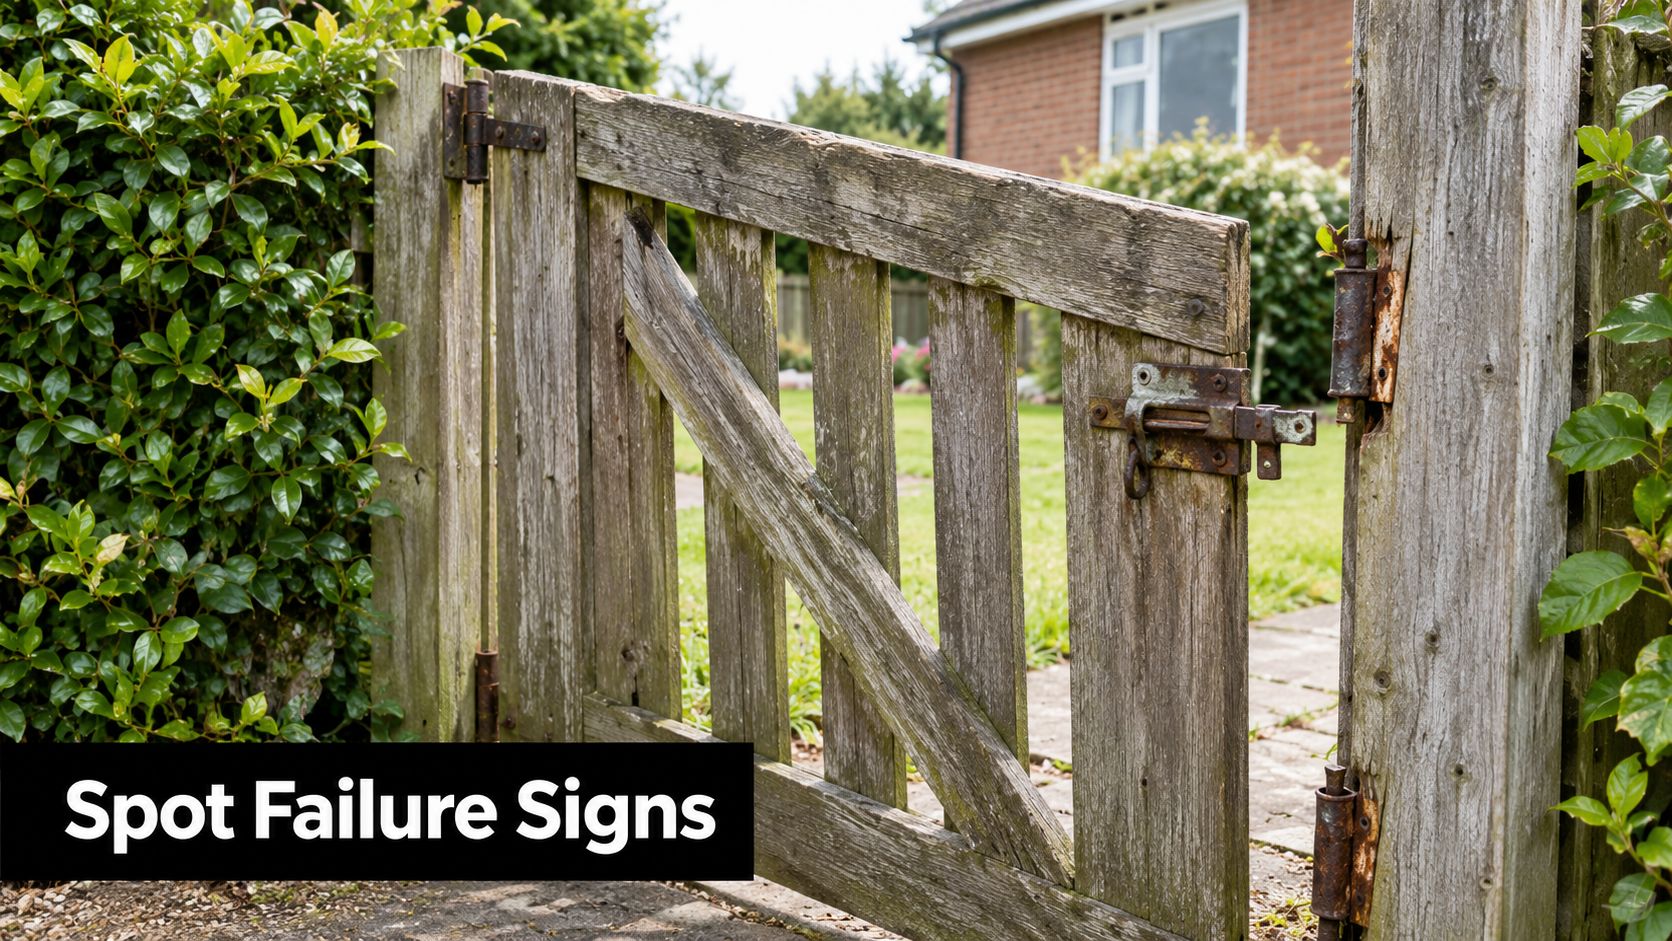
Use this diagnosis table at the gate rather than guessing from appearance:
| Warning sign | Likely cause | Correct response |
|---|---|---|
| Closing edge drops | Undersized hinges, weak frame, or moving post | Check full gate mass, brace the frame, and stabilise or reset the post |
| Latch misses the keeper | Sag, shifted post, or incorrect reveal | Confirm level and diagonals, then adjust the keeper after the gate is stable |
| Hinge binds | Misalignment or over-tightened fittings | Loosen, realign under support, and retighten only after free travel |
| Drop rod drifts | Receiver location, loose hardware, or ground movement | Secure the receiver in stable ground and check the rod's straight travel |
| Gate moves unpredictably | Excessive mass, wind exposure, or uncontrolled travel | Add appropriate stops and seek an engineered or permitted solution where needed |
A stronger-looking hinge or decorative latch isn't automatically safer. California occupational-safety rulemaking materials published in 2025 proposed coverage for certain horizontal sliding and swinging gate panels exceeding 100 pounds, 12 feet wide, or 4 feet tall, with attention to travel limits and uncontrolled movement. Review the California gate safety rulemaking material when a project approaches those conditions.
Maintenance Routine and Final Pre-Purchase Checklist
A working gate needs occasional attention because posts, soil, timber, fasteners, and hinges respond differently to weather and use. Lubricate hinge points annually with a product appropriate for the hardware, inspect the latch and keeper, and check that the closing edge still meets the receiver without lifting or dragging.
After the first seasonal movement, realign the latch if needed and retighten accessible fasteners. Check the drop rod for straight travel and inspect its receiver for packed soil, corrosion, or movement. Run a quick sag check by looking at the top and bottom reveals while the gate is closed. If the gaps have changed, determine whether the frame, hinge, post, or ground is responsible before adjusting the latch.
Use this pre-purchase checklist before choosing a kit:
- Gate dimensions: Record height, width, frame depth, swing direction, and required clearances.
- Complete mass: Include cladding, infill, decorative parts, and the hardware that will remain attached.
- Gate material: Confirm whether the kit suits wood, steel, aluminium, mesh, or a framed composite assembly.
- Hinge arrangement: Check capacity, adjustment, opening range, and whether a non-lift-off design is needed.
- Closure function: Decide whether the gate needs a standard latch, self-closing action, self-latching operation, or lock provision.
- Double-gate control: Add a compatible drop rod, receiver, and ground clearance plan where two leaves meet.
- Site rules: Check property-line, sidewalk, right-of-way, zoning, permit, pool-barrier, accessibility, egress, and electrical requirements before purchase.
- Post support: Verify plumb, footing stability, fastening surface, and backing material.
- Service plan: Confirm that hinges, latch parts, fasteners, and adjustment points can be inspected later.
California's permit infrastructure shows why the wider project context matters. The Department of Finance publishes construction-permit indicators, while the U.S. Census Bureau Building Permits Survey provides monthly, year-to-date, and annual information at state, county, and local levels. A recent California compilation based on that survey reported 8,285 residential units authorised in July 2026 and 110,772 units authorised over the preceding 12 months, although those permits don't isolate gate-hardware purchases. Review California construction-permit data when comparing local building activity rather than assuming every region has the same project mix.
For troubleshooting after installation, use a structured hardware troubleshooting guide and inspect the post before replacing a hinge. The durable choice is rarely one premium component. It's a coordinated set of hinges, latch, drop rod, and fasteners sized for the complete gate and installed around the site's actual rules.
XTREME EDEALS INC. offers gate combo kits, Nuvo Iron adjustable gate frame kits, anti-sag gate kits, hinges, latches, drop rods, brackets, and compatible fasteners for DIY and trade projects. Visit XTREME EDEALS INC. to match the components to your gate's material, weight, and intended use before you start drilling.