
You're standing on a slab with a drill in one hand, a sleeve anchor in the other, and a decision to make. Maybe it's a fence post base, a ledger attachment, or a piece of equipment that needs to stay put, but you still want the job to move fast and look clean. The trick is knowing when sleeve anchor installation is a simple drill-and-tighten task, and when it needs to be treated like a documented structural connection.
That split matters more in Canada and California than most DIY guides admit. On one side, sleeve anchors are a practical medium-duty fastener for concrete, brick, and block. On the other, California project guidance treats post-installed anchors, including sleeve anchors, as a regulated structural activity in special-inspection settings, with torque verification and sampling requirements tied to the anchor's use and application type (SEAONC proof load testing guidance).
Why Sleeve Anchors and When They Make Sense
The first question on any jobsite isn't how to tighten the anchor. It's whether a sleeve anchor is the right fastener at all. If you're fastening a fence post base plate to concrete, hanging a fixture where you may need to remove it later, or working with brick or block that won't suit a wedge anchor, a sleeve anchor is often the more forgiving choice.
That forgiveness comes from how it works. The bolt expands a split sleeve against the hole wall, so it can tolerate a little more irregularity than a wedge anchor. That doesn't make it stronger, it makes it more adaptable. For removable, medium-duty work, that trade-off is often exactly what you want, especially when the substrate isn't perfect and the load isn't extreme.
Practical rule: choose a sleeve anchor when you want a mechanical hold, but you're not trying to solve a cracked-concrete, high-seismic, or heavy dynamic-load problem.
Where it fits, and where it doesn't
A sleeve anchor makes sense for static attachments, small fixtures, and situations where the hole quality isn't laboratory-perfect. It's a common fit for work in concrete, brick, and block, which is one reason it shows up so often in deck, fence, and light mounting applications. XTREME EDEALS INC. carries sleeve anchors for that kind of practical hardware work, which is useful when you're sourcing fasteners alongside other deck and fencing parts.
It's a poor choice when the connection will see vibration, overhead loading, or conditions that demand a higher level of engineered verification. California's special-inspection environment is a good reminder here, because state guidance ties torque-controlled anchors to testing and code compliance rather than casual installation. In that world, “tight enough” is not a meaningful finish line (California HCAI anchor guidance).
If you're deciding between a sleeve anchor and a wedge anchor, this side-by-side comparison helps frame the trade-off without guessing.
The jobsite reality
The shortcut version is simple. Drill the right hole, clean it properly, seat the anchor, and torque it correctly. The engineered version is the same sequence, but every step gets checked against a product listing, a load requirement, and sometimes a special-inspection protocol.
That's why sleeve anchors are best treated as a practical fastener with a clear lane. Use them where their geometry and expansion style help you, not where you're trying to force them to behave like a structural anchor system built for a different job.
Tools, Bits, and Prep Before You Drill
Good sleeve anchor work starts before the hammer drill ever touches the slab. If the kit is wrong, the anchor job goes sideways fast. A matched carbide bit, a rotary hammer or SDS-plus drill, a vacuum or blow-out bulb, a wire brush, a hammer, a torque wrench, and proper eye and hearing protection are the basic setup.
The bit matters more than is commonly thought. A carbide-tipped bit sized to the anchor diameter gives the sleeve room to expand the way it was designed to. Round up on the bit size, and the anchor won't bite the way it should. Drill too small, and you'll fight the install while destroying holding power.
Before drilling, check the fixture thickness and anchor length together. The anchor has to clear the part you're fastening and still reach the required embedment in the base material. Mark the depth on the bit with tape so you stop where you meant to stop, not short of depth or deeper than needed.
The surface prep matters too. Clear dust, pebbles, paint flakes, and loose slurry from the area so the fixture sits flat. On reinforced slabs, use a scanner if there's any chance you're near rebar. On a real job, that quick check is cheaper than hitting steel and abandoning the hole.
Lay out the tools on a tarp or bucket lid before you drill. Chasing a dropped sleeve across a patio burns more time than the prep ever saved.
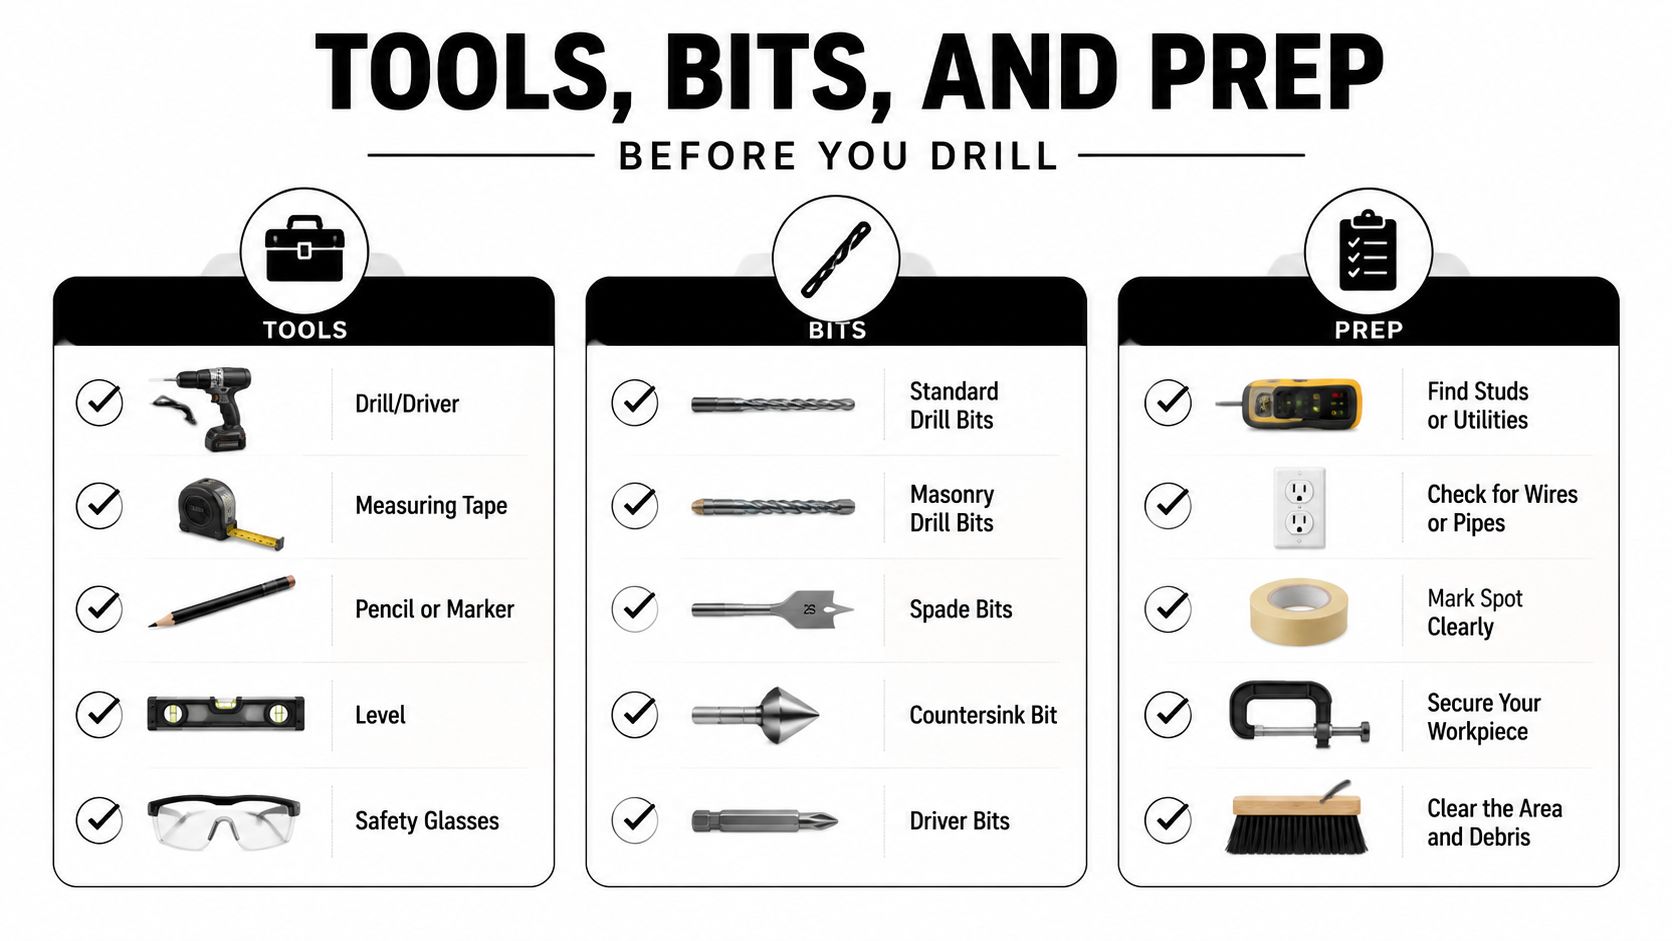
The prep checklist that actually saves time
A clean setup is about more than convenience. It keeps the hole diameter true, which helps the sleeve expand evenly instead of binding in one spot. It also makes the torque step predictable, because a clean, straight hole gives the anchor the same conditions from one install to the next.
For the actual drill fit-up, keep the hole diameter matched to the anchor size and confirm the embedment depth against the hardware you're using. Manufacturer guidance consistently points to matching the drill diameter to the anchor diameter, drilling to at least the embedment depth, and sometimes going a bit deeper to leave dust space (Eugene Fast sleeve anchor installation guide).
A small note on the right fastener family
If you're comparing sleeve anchors with wedge anchors, remember the hole quality tolerance and the use case aren't the same. A sleeve anchor is usually the more forgiving choice in masonry and mixed conditions, while a wedge anchor is the heavier option for solid concrete when the substrate and load call for it. The two are similar only at a glance, not in the way they behave after tightening (wedge anchor comparison).
Drilling, Seating, and Setting the Anchor
The drill should stay square to the surface. If you lean the tool, you create a hole that's out of line and a sleeve that doesn't expand evenly, which is how a fastener that looked tight on installation day starts wobbling later. Let the bit cut, don't force it with heavy pressure that burns the carbide or with such light pressure that it just polishes the hole.
Clean the hole like it matters
Once the depth mark is reached, back the bit out while it's still running so the flutes carry debris away. Then clear the hole. A few sharp blasts or a vacuum nozzle works, but the wire brush is the part people skip, and that's the mistake that leaves dust packed against the wall.
Blow, brush, then blow again. That second cleaning pass is what separates a clean seat from an anchor that spins.
Drop the sleeve into the hole by hand. It should sit flush without being hammered in. If it needs force to enter, something is off, usually the diameter, the debris level, or both. Forcing it in damages the sleeve and makes the next steps unreliable.
Seat, then torque, then stop
Slide the fixture over the bolt, add the washer and nut, and tighten with a torque wrench. The goal isn't “snug.” The goal is to reach the manufacturer's torque value and stop there. Tightening in little increments helps the sleeve expand evenly and lets the fastener settle before the final pull.
The practical range most installers work from is 20 to 25 ft-lbs for 3/8 inch anchors and 40 to 50 ft-lbs for 1/2 inch anchors, but the manufacturer's instruction wins whenever it differs. California guidance for torque-controlled anchors makes that point very clearly, because the test load and inspection process depend on the installation torque being tied to the research report and printed instructions (SEAONC proof load testing guidance).
| Sleeve Anchor Torque and Embedment Reference | |||
|---|---|---|---|
| Anchor Diameter | Bit Size | Min. Embedment | Installation Torque |
| 3/8 in | 3/8 in | Match manufacturer spec | 20 to 25 ft-lbs |
| 1/2 in | 1/2 in | Match manufacturer spec | 40 to 50 ft-lbs |
If you're comparing how sleeve anchors feel against wedge anchors during tightening, the main difference is that the sleeve tends to be a little more forgiving in mixed masonry, while the wedge setup is more aggressive in solid concrete. That distinction is useful when you're choosing hardware for the hole you have, not the hole you wish you had.
Adjusting Technique for Concrete, Brick, and Block
Concrete is the straightforward case. Hammer-drill with the matched carbide bit, keep the drill square, and the sleeve usually seats cleanly against a uniform wall. In poured concrete, the main job is consistency, not improvisation.
Brick needs more judgement. The anchor should land in the brick, not in the mortar joint, because mortar is softer and can crush before the sleeve develops a proper grip. On reclaimed or hand-cut brick, density can vary enough that the same torque value feels different from one hole to the next.
Hollow block is the trickiest of the three. The sleeve expands inside a thinner wall and can blow out the back if the cavity is too shallow or the anchor is too close to the cell opening. Back off on torque if the material feels fragile, and check that the fastener is bearing on solid web, not on the thin shell alone.
| Sleeve Anchor Behavior by Substrate | |||
|---|---|---|---|
| Substrate | Placement Target | Drilling Notes | Torque Adjustment |
| Concrete | Uniform base material | Hold drill square, use matched carbide bit | Use manufacturer spec |
| Brick | Brick face, not mortar | Avoid weak joints and damaged units | Keep torque controlled |
| Block | Solid web, away from cavity edge | Watch for blowout and thin walls | Reduce torque if needed |
Canadian product guidance also pushes installers to respect the material they're fastening into, including assumed concrete strength and full-contact support under post bases (Peak RailBlazers anchorage guidance). That lines up with what happens on site. A sleeve anchor that behaves nicely in a solid slab can feel completely different in older masonry or hollow block, so the technique has to follow the substrate.
Common Installation Mistakes That Kill Holding Power
The failures that matter most are usually the ones you don't notice during installation. The anchor looks seated, the nut turns, and the fixture feels fine until the load arrives later. At that point, the problem is already built into the hole.
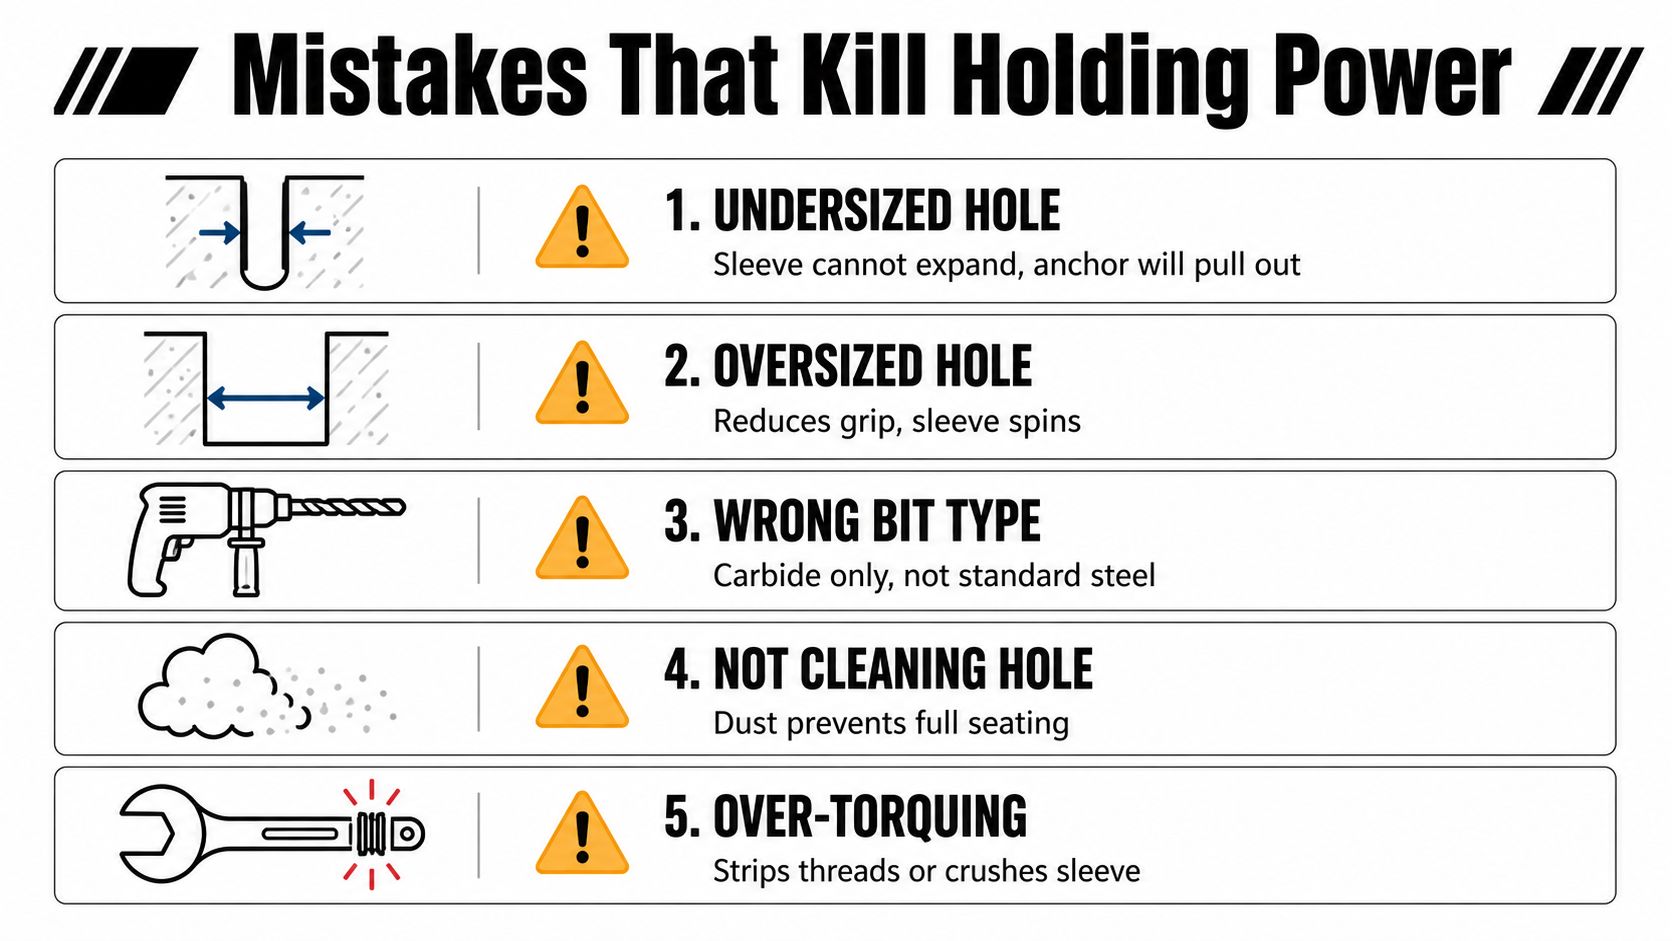
What usually goes wrong
An undersized hole is the classic error. The sleeve can't expand fully, so torque climbs and the installer thinks the anchor is tight when it's binding. The visible sign is high resistance before proper seating, and the fix is simple, replace the bit and redrill to the correct diameter.
An oversized hole creates the opposite problem. The sleeve spins instead of gripping, and no extra tightening will cure it. Once the wall is too loose, the fastener has lost the surface contact it needs.
Dust in the hole is another quiet killer. Debris acts like a separator between the sleeve and the substrate, which blocks full seating and can let the anchor spin under load. Brush and blow the hole clean every time, not just when the drill cut looked messy.
Over-torquing is just as bad as leaving it loose. Technical guidance warns that too much torque reduces pullout and shear capacity, and in softer material it can crush the hole wall or shear the sleeve. The wrench should click, then stop. That's the finish line.
Wrong depth or a worn bit rounds out the list. A tapered hole from a dull bit or a shallow hole from careless drilling both reduce the sleeve's ability to develop even expansion. Re-using a stripped hole is usually a dead end unless the product specification allows a repair method, which most DIY work won't need or have.
The field fix
If the anchor feels wrong while you're setting it, stop. Don't “save” a bad hole with more torque. Redrilling in the right place takes less time than repairing a failed fixture later, and the structural difference is obvious once the fastener has something to grip.
California verification guidance reinforces why these details matter. In special-inspection settings, torque-controlled anchors can be checked through a testing program, and the installation itself has to line up with the required torque and test method rather than just looking acceptable on the surface (SEAONC proof load testing guidance).
Corrosion, Finishes, and Matching the Environment
Finish choice is structural, not cosmetic. A zinc-plated sleeve anchor is fine for dry, interior work, but it doesn't belong in wet, coastal, or chemically aggressive settings where rust starts eating away at the connection. If the anchor has to survive outdoors, the coating and base material matter as much as the hole.
Hot-dip galvanised hardware is the practical step up for many exterior jobs. It gives you a thicker sacrificial layer and is commonly used where the anchor sees weather exposure, including many Canadian residential conditions. Stainless steel is the stronger choice when moisture, de-icing salts, or chloride exposure are part of the picture, especially close to saltwater.
Match the anchor finish to the connected hardware as well. Dissimilar metals can accelerate corrosion even when the anchor itself looks right on day one.
Finish choice by environment
| Choosing Sleeve Anchor Finish by Environment | |||
|---|---|---|---|
| Finish | Best Environment | Avoid Using In | Notes |
| Zinc-plated | Dry interior spaces | Coastal, wet, treated lumber exposure | Economy choice |
| Hot-dip galvanised | Exterior installations, many residential jobs | Severe chloride exposure | Thicker protective layer |
| Stainless steel | Wet, salty, or corrosive environments | Budget-sensitive dry interior work | Better long-term corrosion resistance |
For exterior deck and fence work, matching the finish to the setting is part of the installation, not a later upgrade. XTREME EDEALS INC. also carries related hardware like washers, bolts, and anchors, which helps keep the fastening package consistent instead of mixing metals and finishes without thinking it through.
If you're comparing galvanised and stainless options for outdoor work, this material comparison guide is a useful reference before you place the order.
Quick Reference and Final Checks Before You Load It
The last check happens before the fixture sees real service. Confirm the anchor is flush, the fixture sits flat without a gap, the threads protrude enough for the nut, and the torque wrench clicked at the specified setting. If any of those aren't true, the anchor isn't finished yet.
That final pause matters because sleeve anchors aren't a casual removable fastener once they're installed into the substrate. If the hole is wrong, the spacing is off, or the edge distance doesn't match the spec sheet, that's the moment to correct it. After the load goes on, the easy fix is gone.
| Sleeve Anchor Quick Reference | |||||
|---|---|---|---|---|---|
| Anchor Size | Hole Diameter | Min. Embedment | Concrete Torque (ft-lbs) | Brick Torque (ft-lbs) | Block Torque (ft-lbs) |
| 3/8 in | 3/8 in | Manufacturer spec | Manufacturer spec | Manufacturer spec | Manufacturer spec |
| 1/2 in | 1/2 in | Manufacturer spec | Manufacturer spec | Manufacturer spec | Manufacturer spec |
The cleanest way to think about sleeve anchor installation is this. Match the hole, clean it properly, seat the anchor flush, and torque it to spec. In California and other inspection-heavy settings, that same sequence also has to stand up to verification and code compliance, which is why sloppy prep always costs more later than it saves upfront (California HCAI anchor guidance).
XTREME EDEALS INC. carries sleeve anchors, washers, bolts, and related deck and fencing hardware that fit the kind of concrete fastening work covered here. If you're matching fasteners for a post base, a small fixture, or a repair job, visit XTREME EDEALS INC. and choose hardware that fits the substrate, the finish, and the load you're working with.