

You're on the deck with a tape measure in one hand and a hanger in the other, and the box says 2×8, but the joist you just measured is 2×10. That is the point where the simple question, what size joist hangers do I need, turns into a real jobsite decision, because the answer is not just about whether the metal fits. It is about whether the connector matches the joist size, the load rating, and the bearing surface it is fastening to.
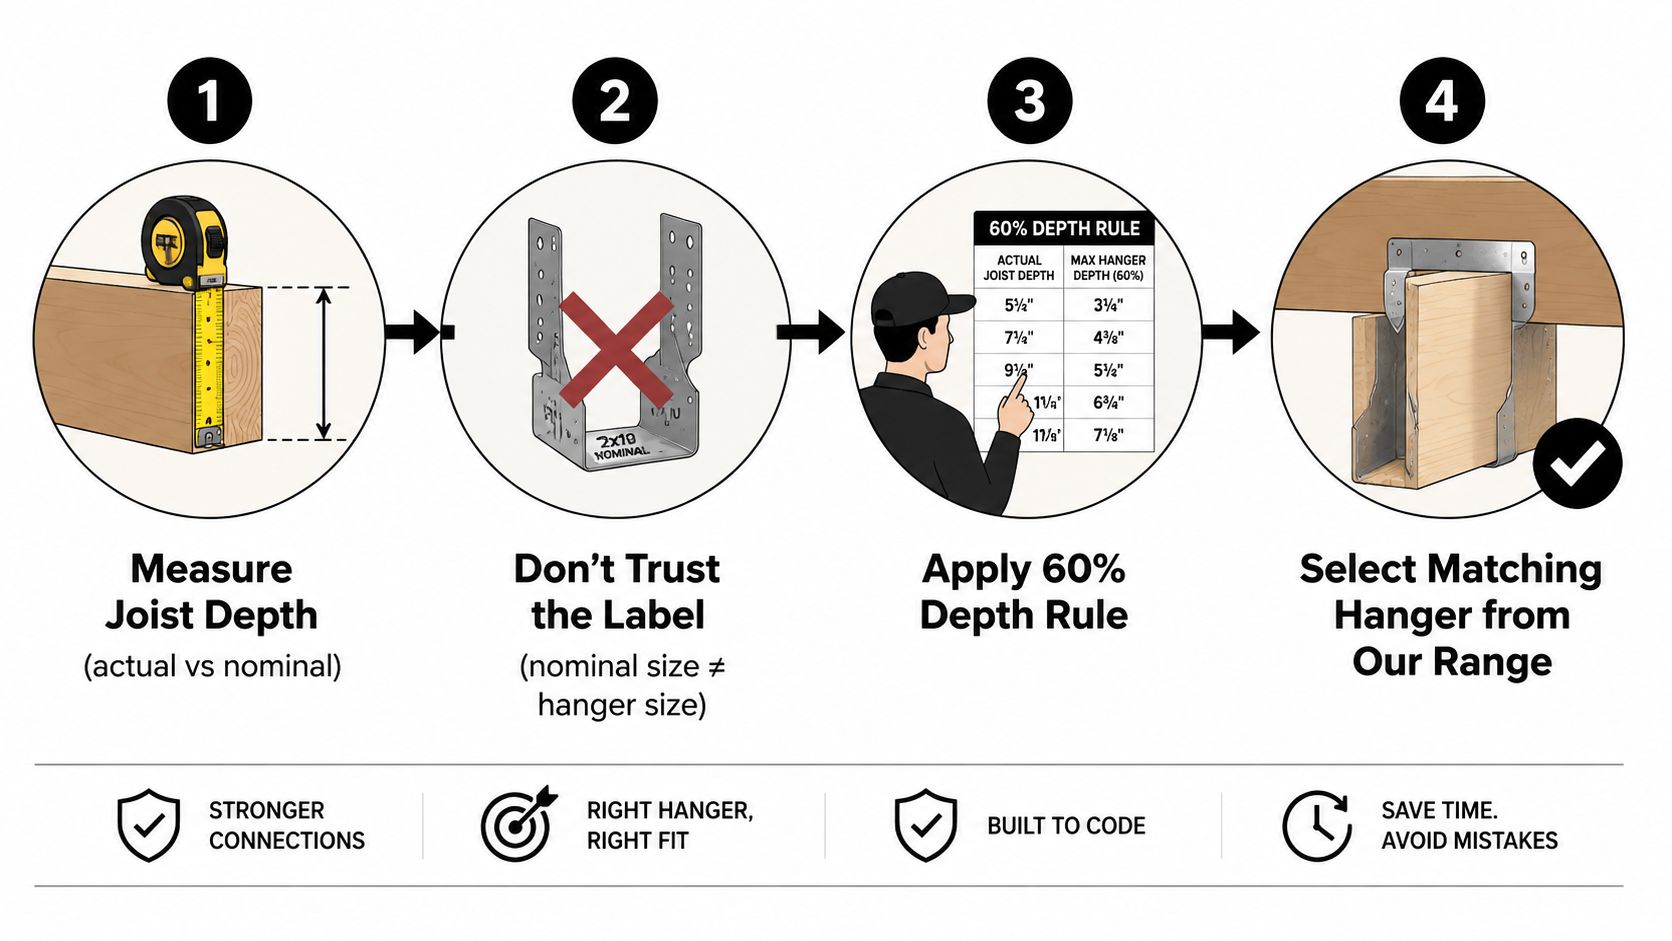
A hanger can look close enough and still be wrong. In California, that matters even more because connector selection is tied to approved tables and actual member dimensions, not guesswork from span alone, and the hanger depth has to line up with the joist load path, not just the label on the box (California code sizing rule reference). A 2×10 joist is not close enough to a 2×8 hanger just because the hanger will physically catch wood. The connector has to be a listed part with a capacity that fits the load and the member dimensions used in the design.
Three measurements that matter
The first measurement is thickness, the narrow face of the joist. That tells you the seat width the hanger needs. The second is depth, the tall face of the joist, which drives hanger height. The third is whether you are looking at actual or nominal lumber, because a 2×8 is not 2 inches by 8 inches, it is smaller in actual size, and the hanger is built around that real dimension.
That is why hanger sizing is not a one-number lookup. A hanger for a nominal 2×8 is engineered to be a little shorter than the joist depth so the member seats cleanly and the connection behaves the way the manufacturer tested it. JLC's deck-framing guidance says joist hangers are typically about 1/2 inch shorter than the nominal joist size, and gives the example that a 2×8 hanger is about 6-5/8 inches tall (JLC deck hanger guidance).
Practical rule: measure the actual joist, match the nominal hanger family, then verify the published capacity before you buy.
Engineered members change the fit
Dimensional lumber is only half the story. If you are working with TJI, I-joists, or LVL, the hanger has to be matched to the exact product family, not just the depth. MiTek's engineered wood guidance requires much more than a casual fit, including proper flange support and bearing checks, because the hanger has to work with the joist's shape and load path, not just its height (MiTek engineered wood guide).
That is the part a lot of jobsite charts skip. A hanger can fit an engineered member and still be wrong if the seat width, bearing length, or product family do not line up. When the question is really about a retrofit, an addition, or a modern deck with engineered framing, the right answer is often to match the exact hanger table for the exact member.
Matching Nominal Joist Size to Standard Hanger Models
On a real deck job, hanger sizing starts with three checks, not one. First is the nominal joist size. Second is the load rating on the connector. Third is the bearing surface the hanger gives the member. If those three do not line up, the part may look close and still be wrong at inspection.
The common hanger families are familiar, 2×6, 2×8, 2×10, and 2×12, but each one is tied to a specific seat depth, height, and published load range. A hanger is not just a metal pocket that “mostly fits.” It is a rated connector built for a particular joist size and connection detail, and that is where shortcuts usually fail.
A practical reference is below. It keeps the sizing conversation tied to the actual part family instead of a loose visual match.
| Standard Joist Hanger Size Reference | |||
|---|---|---|---|
| Joist Size | Hanger Height | Typical Min Capacity | Common Use |
| 2×6 | About 1/2 inch shorter than nominal depth | About 500 lb minimum capacity | Smaller deck or floor framing |
| 2×8 | About 1/2 inch shorter than nominal depth, about 6-5/8 inches tall | About 500 to 600 lb minimum capacity | Common deck and floor joists |
| 2×10 | About 1/2 inch shorter than nominal depth | About 600 to 700 lb minimum capacity | Deeper joists carrying higher reactions |
| 2×12 | About 1/2 inch shorter than nominal depth | About 700 to 800 lb minimum capacity | Larger spans and heavier framing |
Those capacity ranges follow manufacturer tables used in California-oriented guidance, and the exact model still depends on the connector line and local approval. The part number matters because a 2×10 hanger is not just a taller 2×8 hanger, it is a different connector with a different tested load path.
The step-down option people miss
There is one detail that can save material and still keep the frame clean. A smaller hanger can sometimes accept a larger joist if the published load is still adequate and the bearing conditions work out. That is why I check the table instead of assuming same-size parts only.
Inspection charts also show a useful fitment allowance. A 2×6 hanger can accommodate a 2×8 joist, and a 2×8 hanger can accommodate a 2×10 joist in some cases, which is why the hanger family and rating matter more than a rigid same-size rule (inspection sizing chart). The catch is that this only works when the connector table supports it and the seat still gives proper support.
That same sizing judgment comes up on exterior builds and retrofit work, including modern patio cover systems, where the framing package can mix standard lumber with specialty connections. For smaller stock and quick part matching, joist hangers for 2 x 4 applications are a separate category and should be treated that way, not mixed into a generic hanger pick.
Match the nominal size first, then confirm the listed load and bearing. If those do not line up, the hanger is the wrong one even if it looks right on the ledger.
Load, Span, and the 60% Depth Rule That Separates Joists from Hangers
A hanger that fits the joist profile still may not be the right connector. The sizing decision has to account for nominal joist size, the load rating on the connector, and the bearing surface the hanger gives the member. In the field, I check those three things together because the hanger has to carry the joist reaction, the force the joist puts into the hanger and ledger, and that reaction has to stay within the connector's allowable load. If any one of those pieces is off, the hanger choice is off too.
The 60% depth rule is the fast field check that keeps a hanger from looking right while still being wrong. Inspection guidance says a joist hanger should be at least 60% as large as the joist so it gives proper depth engagement and lateral restraint. That rule catches the hanger that grabs the lumber but leaves too much of the joist unsupported or able to twist under load.
What the load check really means
A hanger can match the joist depth and still fail if its allowable load is too low for the span it is carrying. Manufacturers publish those load values for a reason, and the right hanger is the one whose rated capacity exceeds the reaction delivered by the joist at the support. The usual workflow is straightforward, identify the joist, select the hanger from the table, then verify that the joist load is less than the hanger's allowable load.
The span matters because it drives the reaction in the first place. A longer span, a heavier deck surface, or a tighter framing layout can increase the demand on the connector even when the joist size stays the same. That is why I do not treat hanger sizing as a simple depth match, I check the load path first and the hanger family second.
The depth rule still matters when the framing shifts into engineered lumber. For I-joists, MiTek's guidance calls for at least 1/8 inch contact for hangers supporting the top flange of I-joists without web stiffeners, and 60% of joist depth for I-joists with web stiffeners unless rotation is handled another way. That is a different fitment test from sawn lumber, and it is where a generic hanger assumption gets people in trouble.
Compare the families before you buy
A quick comparison keeps the purchase tied to the actual load and depth conditions:
- 2×6 hangers suit lighter joists and lower reactions when the table says they are enough.
- 2×8 hangers are the common middle ground for deck and floor work.
- 2×10 hangers step up when the joist reaction increases.
- 2×12 hangers handle deeper members with higher allowable loads, depending on the approved model and the jurisdictional table.
The hanger family has to line up with the load, but the bearing surface still matters. If the connector does not control twist at the joist end, the connection can look acceptable and still move the wrong way under load. In California work, that means checking the connector sizing against the local code table and the manufacturer data together, not relying on the depth of the metal alone.
Ledger Conditions, Fasteners, and the Connection That Holds
A hanger can be the right size on paper and still fail in the field if the ledger, header, or rim joist is weak. The connector only works when the wood behind it is sound and the fasteners follow the manufacturer's schedule. I've seen plenty of jobs where the bracket was correct, but the install details turned it into the weak point.
A face-mount hanger, top-flange hanger, and skew hanger each handle a different framing condition. The geometry changes how load enters the support, and that changes what the connector needs at the joist end. If the fastener choice is wrong, or the holes are only partly filled, the hanger loses the rating the table gave it.
Fasteners are part of the rating
The Simpson Strong-Tie fastener guidance is direct about this, use the specified fastener type and size, do not mix nails and screws unless the load table allows it, and match corrosion resistance to the environment and connector finish (Simpson Strong-Tie fastener guidance). For joist hangers, that means the manufacturer-specified hanger nails are not interchangeable with whatever deck screw is closest at hand.
If you want the connection to perform the way the table says it will, install the full fastener set and fill every required hole pattern the connector calls for. The hanger loses capacity when the wrong fastener goes in. That is the difference between a tested connector and an improvised one. For buyers trying to match the hanger and the screw schedule before the order goes in, joist hanger screws and hardware need to be selected as one package, not as afterthoughts.
Do not treat the hanger as a standalone part. The hanger, fasteners, and ledger work as one system.
Corrosion is the other point crews underestimate. Exterior decks, treated lumber, and coastal exposure all raise the stakes, because the connector finish and the fastener finish have to work together so the metal does not degrade before the structure does.
One practical buying habit
If you are ordering hardware for a current project, buy the hanger and its matching fasteners together instead of piecing them out later. XTREME EDEALS INC. carries the hanger hardware side of that equation, including joist hanger products and matching connector fasteners, which helps keep the install aligned with the published tables rather than the contents of a random toolbox. For builders, that avoids the common mistake of mixing the right bracket with the wrong fastening pattern.
When the Joist Is Not Sawn Lumber and the Hanger Cannot Be Generic
A lot of hanger charts assume a clean, standard job, a 2×6, 2×8, 2×10, or 2×12 laid out the way the book shows it. That is not reality on many California retrofits, additions, or multifamily repairs. The joist may be an I-joist or an LVL, and once that happens, a generic hanger can stop being a safe guess.
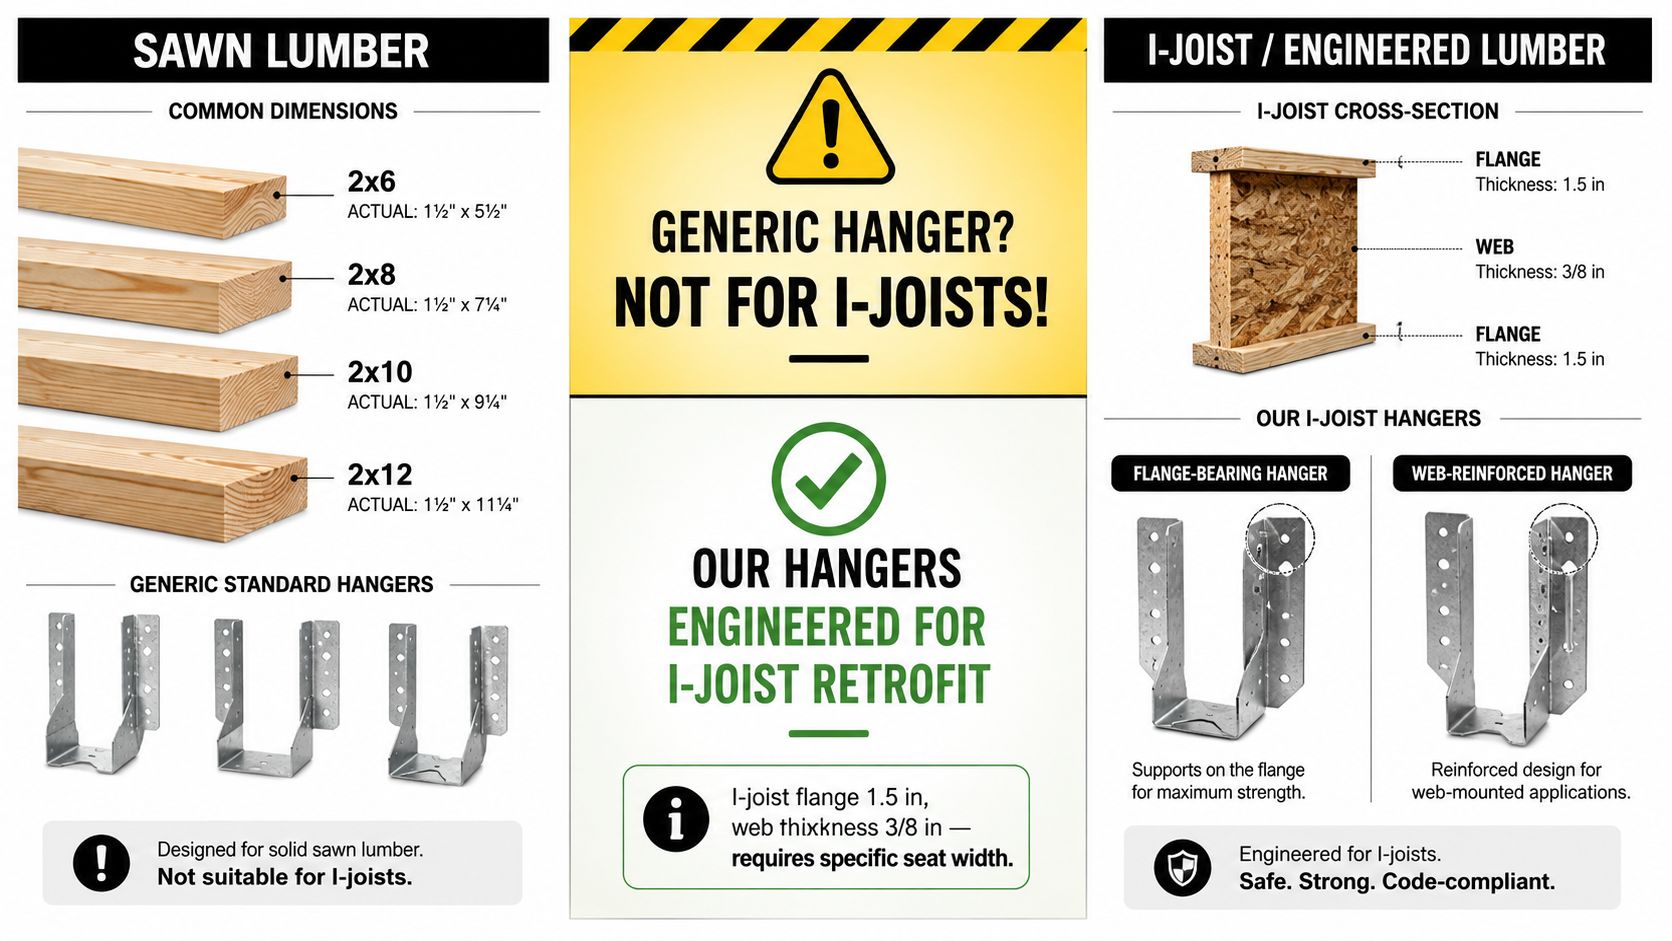
Engineered members change the sizing problem because flange geometry, web thickness, and bearing details do not line up neatly with a sawn-lumber hanger chart. MiTek's engineered wood guide is a useful reminder that the hanger has to support the flange correctly and provide the right bearing contact, and that the bearing length has to be checked against the joist manufacturer before approval (MiTek engineered wood guide).
Why nominal size is not enough here
A hanger can match the nominal depth and still miss the seat width or the flange support requirement. That is why engineered-lumber fitment needs a manufacturer-specific hanger family, not a generic connector that only looks close on paper. If the joist is a TJI, the right hanger is the one listed for that product family, not just any hanger with the same overall height.
There is also a practical exception that gets overlooked in basic charts. The hanger does not always need to match the joist nominal size if the smaller connector still meets the load and bearing conditions. Inspection guidance notes cases where a 2×6 hanger can work on a 2×8 joist, and a 2×8 hanger can work on a 2×10 joist when capacity is adequate (inspection sizing reference).
The retrofit reality
That flexibility matters most on retrofit work, where the framing already exists and the repair has to fit what is already on site. With standard lumber, the hanger table is usually enough. With engineered lumber, the bearing contact and the product family decide whether the hanger passes.
California jobs add another layer because the framing inspector is looking at the member, the connector, and the load path together. A hanger that looks close is not enough if the joist manufacturer wants a specific seat detail or a specific hanger series. The three things that matter are the nominal joist size, the load rating, and the bearing surface. If one of those is off, the hanger may fit the opening and still fail the job.
Common Field Mistakes That Fail Inspection Even with the Right Size
A hanger can be the right height and still get flagged. I've watched clean-looking installs fail because the crew guessed on fasteners, left the seat short, or picked the wrong corrosion finish for the jobsite.
The mistakes that get cited
- Using deck screws instead of connector nails. Joist hanger nails are part of the rated assembly, and the manufacturer's schedule controls what goes in the holes. If the nails are wrong, the connection is wrong, even when the hanger looks perfect.
- Leaving holes partially empty. An under-fastened hanger cannot carry the load shown on the table. Inspectors check the pattern, not just the part number.
- Hanging the joist too high. If the joist does not bear fully in the seat, the hanger loses support and can start to twist under load.
- Ignoring rotation control on deeper members. Deep joists and engineered members need the right restraint so the top edge does not roll over time.
- Skipping corrosion requirements. Treated lumber and coastal exposure call for the right connector finish and the right fasteners.
The fastener issue comes up a lot because the published load assumes the specified nail pattern. Joist hanger nails and connector fasteners are not interchangeable with whatever is in the pouch on the truck. If the schedule calls for one type and the crew installs another, the hanger may be the correct size and still fail the inspection.
California raises the inspection bar
California's adoption of the 2022 Building Standards Code puts more attention on connector capacity, corrosion resistance, and installation details, especially on exterior decks and raised structures exposed to weather. The inspector is looking at the connector as part of the structural system, not just a piece of metal that fits the joist.
If the hanger table, fastener schedule, and corrosion finish do not all agree, the job is not ready for inspection.
The fix is usually straightforward. Recheck the part number, verify the nail pattern, confirm the hanger is seated fully, and make sure the finish matches the exposure. That is the kind of field discipline that keeps a small connector from turning into a rework day.
Quick Checklist and Final Answers Before You Buy
Before you buy, line up three checks, not one. The hanger has to match the nominal joist size, carry the load rating the framing calls for, and provide enough bearing surface for the member sitting in it. If those three do not agree, the part may fit on paper and still be wrong in the field. That is how good-looking work turns into a failed inspection.
| Pre-Purchase Joist Hanger Checklist | ||
|---|---|---|
| Check | What to Verify | Where to Confirm |
| Joist size | Actual depth and nominal size match the hanger family | Tape measure, lumber stamp, hanger label |
| Load rating | Hanger allowable load exceeds the joist reaction | Manufacturer table, project design |
| Joist type | Sawn lumber, I-joist, or LVL | Framing plan, member markings |
| Fastener schedule | Nail type, size, and spacing match the connector guide | Connector instructions, nail package |
On site, I also check the hanger seat and the way the joist bears in the pocket. A connector can be the right depth and still be a poor choice if the bearing surface is too short, or if the member is not the type the hanger was designed for. California inspections tend to look hard at that combination, especially on deck framing and raised exterior work, because the code lens is not just size, it is fit, capacity, and exposure.
Fast answers to the questions people ask most
Can a smaller hanger be used on a larger joist? Sometimes, yes, if the hanger table allows the joist to sit correctly and the load rating still works. A 2×6 hanger on a 2×8 joist, or a 2×8 hanger on a 2×10 joist, can be acceptable in some layouts when the listed conditions line up, as shown in the inspection sizing reference.
Can hangers be reused? Only when the connector is still in good condition and the manufacturer, and the inspector, accept it. In real framing work, bent metal, corrosion, or rough removal usually means the hanger gets replaced. A reused part that looks fine can still lose the seat, the nail holes, or the plating that the job depends on.
What if the wrong hanger was installed and the job is being re-inspected? Pull the wrong connector, install the listed hanger that matches the joist and load, then fasten it exactly the way the manufacturer calls for. That is the cleanest fix, and it keeps the conversation with the inspector focused on the corrected connection instead of a guess.
If you are buying for a deck, porch, or repair, start with the joist size, then match the hanger family, the load requirement, and the fasteners together. XTREME EDEALS INC. carries joist hangers and matching hardware that let you match the part to the framing instead of guessing at the yard. Visit XTREME EDEALS INC. to find the connector and fastener combination that fits your project, then take the part number with you to the lumber yard or inspection office.