
You're standing on a jobsite with a sign that needs to go up fast, the holes don't quite line up, the ground is harder than you expected, and the customer wants it to look clean enough to forget the hardware is there. That's where U Channel sign posts earn their keep. They're plain, standardized, and usually the fastest path from empty ground to a sign that stays put.
For residential drives, commercial lots, and municipal streets, this is the post style that keeps showing up because it solves the same problems over and over without a lot of fuss. The challenge isn't understanding the shape, it's choosing the right weight, setting the right depth, and avoiding the failures that show up after the first storm, collision, or salt-heavy season.
What U-Channel Sign Posts Are and Why They Remain the Default Choice
A lot of projects meet U Channel sign posts long before anyone plans on buying “specialty” hardware. A homeowner needs a driveway marker, a contractor has to replace a parking sign, or a municipal crew is pulling out a bent warning post and putting in a new one. The same steel profile keeps coming back because it is easy to stock, quick to install, and straightforward to replace without reworking the entire support.

The shape does the work
A U-shaped steel cross section gives the post its name and most of its usefulness. The perforated length lets crews set sign height without cutting or drilling in the field, which saves time on residential driveways, commercial lots, and municipal work where the same installation details repeat all day.
That standard layout is why the format has stayed common. FHWA guidance treats U-channel as a standard support for local and rural traffic signs, and the post's long service life comes from simple field installation, not a custom foundation system. FHWA maintenance and sign-support guidance
Where it fits best
On smaller California projects, the appeal is practical. You can mount regulatory, warning, and guide signs around parking areas, along roads, or at property edges without turning the job into a fabrication exercise. That keeps the support easy to stock, easy to understand, and easy to replace after damage.
Practical rule: if the sign needs to be swapped often, U-channel usually beats fancier supports because the hole pattern saves time at the post and on the truck.
It also stays in the default slot because maintenance crews can work with it fast. The format is inexpensive, standardized, and built for repeated field use, which matters more than appearance when the job is to keep signs upright and readable.
Materials, Weights, and Sizes That Matter for Your Project
The first decision that matters is the weight class. Common U-channel posts come in 2 lb per foot and 3 lb per foot versions, and that choice affects how the post behaves once it is in the ground. A heavier post gives more rigidity, which helps in exposed locations, around larger sign faces, and anywhere crews handle the post often enough to expose a weak section.
Picking the right weight
A 2 lb per foot post is usually enough for lower-exposure residential or light commercial work. A 3 lb per foot post makes more sense where the sign face is larger, the site gets more wind, or the post needs to feel stiffer in service.
The mistake I see most often is buying the cheapest post for a location that clearly needs the heavier one. The post may stand straight on day one, then start to flutter, loosen, or lean once weather and traffic wear start working on it. Match the section to the exposure instead of assuming every sign deserves the same support.
There is also a real trade-off on durability. The lighter post is easier to handle and cheaper to stock, which matters on small residential jobs and quick replacements. The heavier post costs more and takes a little more effort to set, but it usually pays back when the site sees wind, repeated touch points, or a sign face that puts more load on the steel.
Length and hole pattern
Commercial supply matters too. 8-foot steel U-channel posts are a common stocked length for roadway and parking-lot work, and the standard perforated design stays popular because it supports single- or double-sided mounting without custom fabrication. That matters when you are standardizing across several properties or keeping a municipal stock list simple.
The hole pattern is what keeps the format practical. If the mounting holes do not match your sign face or bracket plan, you lose the point of the system and end up drilling on site, which is exactly what U-channel is meant to avoid. For concrete-mounted details, wedge anchors for concrete can be part of the hardware plan when the install calls for a fixed base instead of a driven post.
A post that looks “close enough” usually becomes the expensive choice after the crew spends half an hour forcing hardware to fit.
For mixed residential and commercial work, keep the post weight and the sign size together in mind. A light post under a large panel can bend sooner than expected, while an oversized post on a small sign adds cost and can be harder to handle than the job really needs.
Load Capacity, Wind Considerations, and Embedment Depth
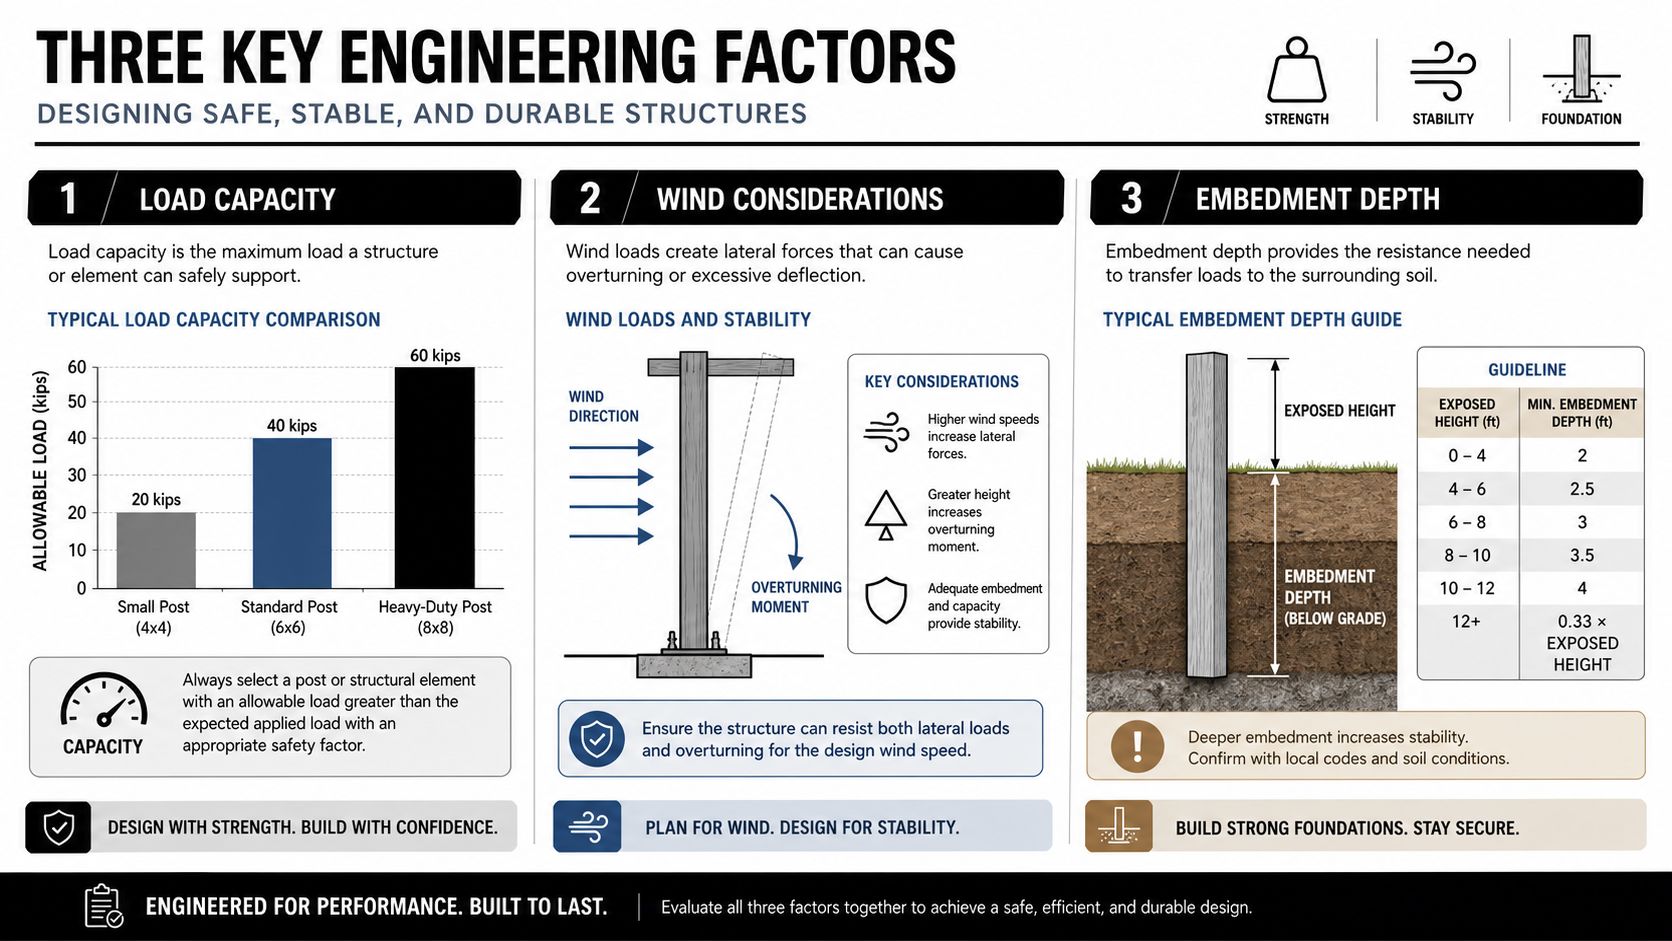
A U-channel post usually fails because the setup was mismatched to the site. Post weight, soil, wind exposure, and embedment depth all have to work together, especially on installs where the sign sits in open air or gets hit by regular maintenance traffic. I trust the height-based installation guidance more than field guesses, because a post that is set too shallow will show it fast.
Depth has to follow height
Embedment should track the post height. 4-foot posts need 1.5 to 2 feet in the ground, 6- and 7-foot posts about 2.5 feet, and 8- to 12-foot posts about 3.5 feet. That depth pattern is a practical baseline, not a guess, and it lines up with the way the post loads the soil as the sign gets taller. FHWA maintenance and sign-support guidance
California sites deserve extra attention because wind, soil conditions, and regular maintenance all affect how long the installation stays straight. A shallow embedment can start with a little movement, then turn into visible lean, loosening at the base, and a sign that drifts out of alignment after repeated gusts.
Why stiffness matters more than brute force
A heavier post helps, but weight alone does not solve a weak install. Section stiffness, sign area, and how exposed the site is all play into the result, and a stiff post can still perform poorly if the soil is soft or the hole is rushed. For routine sign work, the goal is a support that stays put under wind and traffic turbulence without adding more steel than the job needs.
The perforated web still matters because it gives you mounting options without forcing field drilling or ugly cuts that weaken the member. That is one reason crews can replace signs quickly and keep the job clean instead of treating every install like a custom fab project.
If the job includes fixed hardware in concrete, use the right fastener for that base instead of improvising at the post. For those concrete-mounted details, wedge anchors for concrete are often the cleaner choice when the application calls for a secure fixed connection.
On quasi-roadside installs, the sign itself can matter as much as the post. If you need to order custom safety signs, size and mounting should be planned together so the face does not outrun what the post can comfortably carry.
Code Compliance, Breakaway Requirements, and Permit Considerations
A sign can look solid on day one and still be wrong for the site. Near a roadway, driveway edge, or any public-facing boundary, the question is not only whether the post holds the sign. It is whether the support behaves the way the local rules expect if a vehicle clips it or a crew has to remove it later.
Breakaway rules matter
The Manual of Traffic Signs notes that U-channel has lower loading capacity, and it says no more than three U-channel posts should support a single sign without a breakaway feature. Transportation research on sign-support safety treats impact behaviour separately from simple holding strength, and that difference matters on curb lines, driveways, and property edges where a sign may sit close enough to create collision risk. Traffic sign post guidance
FHWA says a re-rolled rail-steel U-channel post weighing 3 lb/ft or less meets breakaway requirements by itself, and it should be driven rather than concreted so damaged posts can be removed more easily. That matters on roadside work where the install method can decide whether the post behaves like breakaway hardware or a fixed obstruction. FHWA maintenance and sign-support guidance
Permits and review
Private-property installs usually move faster, but anything near a public right-of-way can bring local review into the job. Small contractors get caught by this all the time. The sign may read like a simple property marker, yet if it sits close enough to the street edge, the agency can treat it like roadside hardware and ask for details on placement, support type, and mounting method.
For jobs where the message matters as much as the post, the sign face should be set before the hardware choice gets locked in. If you need a custom message for a controlled-access or work-zone setting, order custom safety signs can help you source the face while the mounting details are still being sorted out.
The simplest compliance habit
Don't concrete a post just because the hole is convenient. If the site needs breakaway behaviour, the base detail is part of the safety design, not an afterthought.
That habit avoids expensive rework. The better field check is simple, confirm whether the location is being treated like roadside hardware before the crew starts driving steel. For bracket compatibility and clean attachment hardware around similar metal supports, fence brackets for metal posts are a useful reference when a project needs tidy mounting details.
U-Channel Posts Compared to T-Posts, Concrete Bases, and Decorative Alternatives
Choosing the right support is mostly about trade-offs. I look at cost, speed, breakaway behaviour, sign-height flexibility, and maintenance, because those are the things that decide whether a job goes smoothly or becomes a callback.
The practical comparison
| Post Type | Best For | Breakaway Compliant | Installation Speed | Cost Range |
|---|---|---|---|---|
| U-Channel | Traffic, parking, and property signs | Often, when specified correctly and driven | Fast | Moderate |
| T-Post | Light-duty marking | Not the usual roadside choice | Very fast | Lower |
| Concrete-Embedded Post | High rigidity, permanent placements | Usually not the right choice for breakaway needs | Slow | Higher labour |
| Decorative Metal Post | Aesthetic property signage | Depends on the system, not standard by default | Varies | Higher finish cost |
U-channel sits in the middle for a reason. It's more adaptable than a T-post, much easier to replace than a concrete-embedded support, and better suited to standard sign mounting than decorative posts that prioritise appearance over field efficiency. For bracket compatibility and mounting accessories, fence brackets for metal posts are a useful reference point when a project needs clean attachment hardware around similar metal supports.
Where each option breaks down
T-posts can be handy for light markers, but they don't give you the same mounting flexibility or same sign-facing consistency. Concrete bases feel permanent, and they are, but that's exactly why they're poor fits where breakaway behaviour matters or where future replacement has to happen fast.
Decorative posts do their job in nicer-looking settings, yet they're usually the wrong answer for repetitive traffic or parking work because the hole pattern and hardware standardisation aren't built in the same way. That extra visual polish often comes with more time, more custom parts, and more maintenance friction.
Step-by-Step Installation and Best Practices for Drivers and Contractors
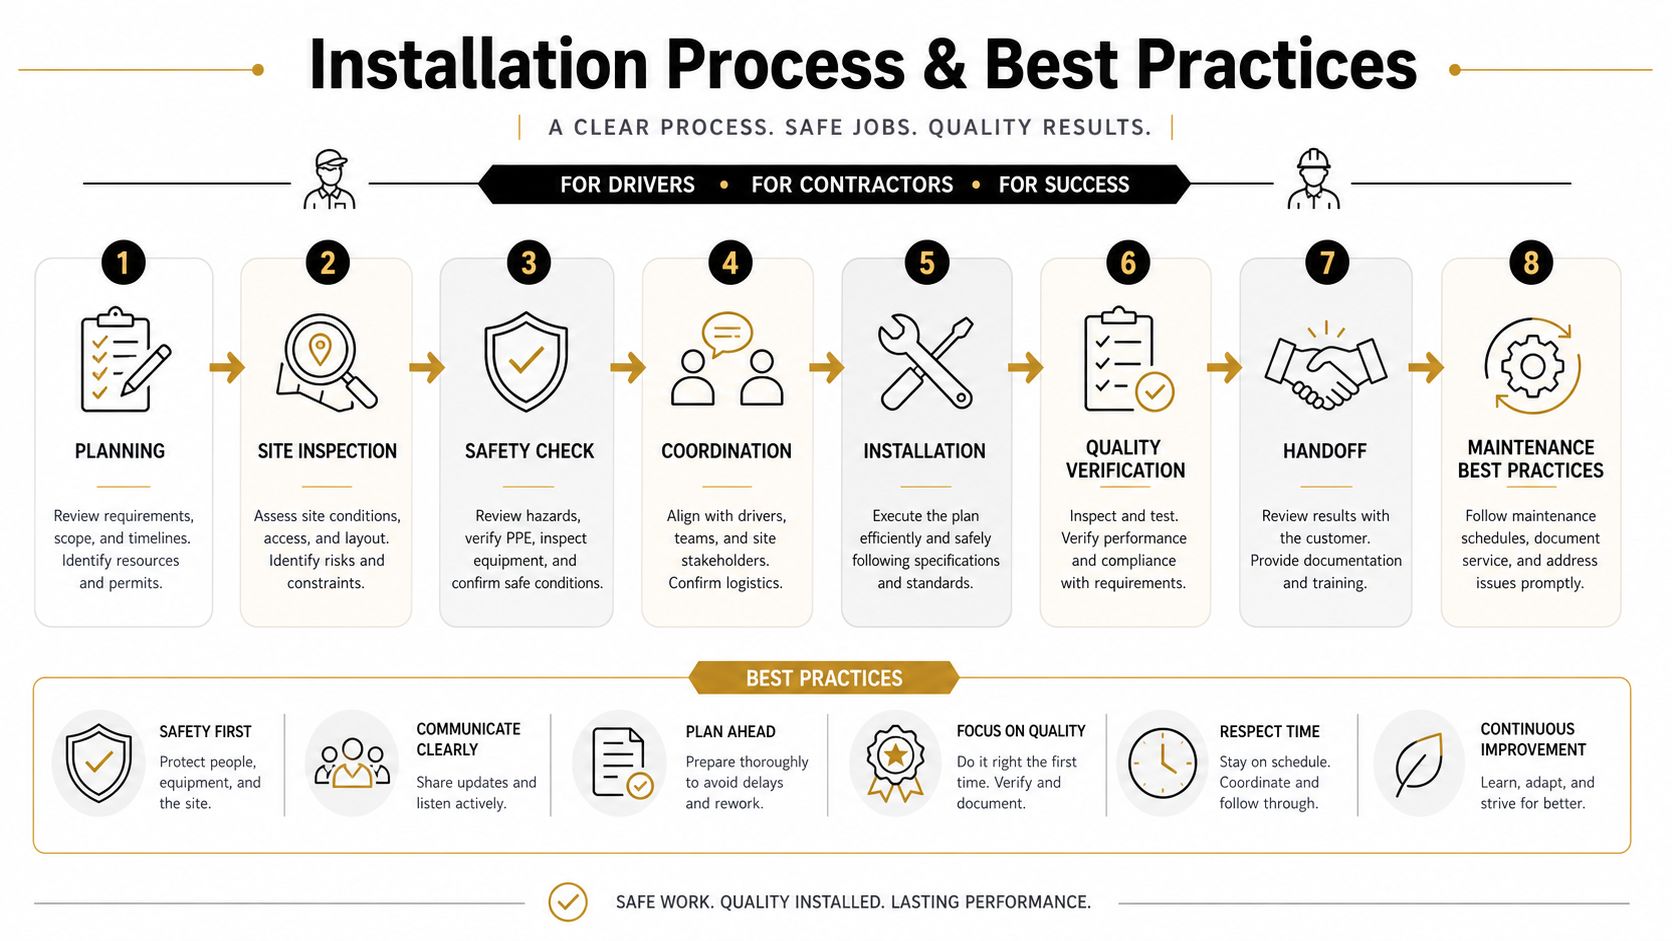
A good U-channel install starts before the post touches the ground. The site has to be marked, the sign location checked against traffic flow or parking layout, and the height planned so the face doesn't end up too low, too high, or hidden by landscaping.
Drive it straight, then check it again
Use a hydraulic or manual post driver and check plumb as you go. If the post starts to wander, correct it early, because once it's seated deep enough, small errors become permanent errors.
A scrap bolt is a simple field trick that saves time. Test the hole alignment with the bolt before mounting the sign, then tighten with the correct fasteners once you know the face sits where it should. That habit avoids the classic “almost fits” problem that turns into elongated holes and ugly hardware.
Hardware that actually belongs on the job
Use the right fasteners for the surface and the support. Carriage bolts, lag bolts, washers, and wedge anchors all have their place, but they're not interchangeable. The post and the substrate should tell you which one belongs where, not the box on the truck.
For installs that tie into property-management work, crews often want the post set cleanly alongside other site improvements. That's one reason property teams looking at commercial landscaping in Texas end up caring about sign hardware too, because the sign support has to fit the wider site presentation and maintenance plan.
A few field habits that save time
Keep a level on the post while it's being driven. Catching lean early is easier than fighting it after the driver has done the hard work.
Use the manufacturer's hole pattern instead of making your own logic in the field. And if you need concrete-adjacent fastening details for the full hardware package, anchoring posts to concrete is the kind of reference that helps keep the whole installation consistent.
Maintenance, Corrosion Protection, and When to Replace Your Posts
A post can look serviceable from the truck and still be near the end of its life. The finish, the base, and the fasteners usually tell the story, especially on sites where weather, road spray, and salt keep working the steel year after year.
Coastal sites need a different mindset
California's coastal counties and high-humidity corridors put more stress on steel than inland sites do. Lifecycle cost matters more than sticker price in those locations, and a casual “galvanised is galvanised” approach can get expensive later. Generic product pages often focus on size and gauge, but they usually say too little about replacement timing or finish choice for marine exposure. As noted in the U-channel sign-post product notes, finish and use case need to be matched to the site, not just the catalog spec.
What to inspect
Annual checks should focus on the areas that fail first.
- Coating damage: Look for chipped galvanising, worn enamel, or rust starting at cut edges and around mounting points.
- Fastener loosening: Wiggle the sign face and check for movement at the bolts or brackets.
- Base movement: A post that starts to lean or twist usually needs attention before it becomes a replacement job.
- Surface wear from impacts: Dents, bends, and scuffs near the lower section often show the post has already taken abuse.
If the coating damage is only local, touch-up paint or a zinc-rich repair may buy time. If the post has bent, lost rigidity, or started rusting in a structural way, replacement is usually the better call.
Finish choices that pay off
Supplier guidance notes that galvanised finish and green enamel coating help resist rust and corrosion, and that is the direction I'd lean for exposed locations. For crews that handle repeat maintenance, the goal is not just stopping rust today, it is reducing how often the site has to be revisited.
For projects where corrosion resistance matters more, Titan Coatings corrosion resistant solutions is one resource to review alongside the post spec, especially if the environment is harsher than a typical inland install.
Buyer's Checklist for DIY Homeowners and Professional Contractors
A smart order starts with the site, not the catalogue. For a driveway marker or a single property sign, check the exposure, choose the post weight that matches the wind and visibility, and make sure the hole pattern fits the sign face without drilling. For roadside-adjacent work, verify breakaway expectations before anything gets driven.
For contractors, the checklist is broader. Confirm the 2 lb per foot or 3 lb per foot post class, match the length to the embedment plan, and keep the hardware package consistent with the mounting pattern. If the job includes post caps, decorative finials, fastener packs, or anchoring systems, bundle those parts before delivery so the install doesn't stall over a missing washer or bracket.
Buy once, install once: the cheapest post is expensive if it bends, fights the hardware, or forces a return trip.
Common mistakes are easy to avoid. Don't overbuild with concrete where breakaway behaviour is needed. Don't underbuild with a light post in an exposed location. And don't assume every sign post uses the same fasteners, because the hole spacing and support type decide that for you.
XTREME EDEALS INC. carries hardware that fits this kind of work, including post caps, fasteners, bolts, washers, and anchoring components that help you complete the whole order in one place. If you're setting up a sign project and want the mounting pieces lined up before you leave the shop, visit XTREME EDEALS INC. and build the order around the post, the sign, and the fastening system together.