

The usual moment this project starts is after sunset. You step out onto the deck, you can still feel the warmth in the boards, and then you notice the problem right away. The stairs fade first, the rail line disappears next, and the whole space that looked finished in daylight suddenly feels unfinished.
That's where low-voltage post lighting earns its keep. Good deck post lights low voltage systems don't just add glow. They define edges, make movement easier after dark, and turn the deck into a place you'll keep using in the evening instead of heading back inside. The difference between a clean-looking installation and a messy one usually has very little to do with the final wire connection. It comes from planning, fit, layout, and how carefully the wires disappear into the structure.
Illuminating Your Outdoor Living Space
After dark, a deck either feels finished or it doesn't. The boards can be perfect, the railing can be solid, and the furniture can be well chosen, but if the post line disappears at night, the whole space loses definition.
Low-voltage post-cap lighting fixes that in a clean, controlled way. It marks the perimeter, makes steps and level changes easier to read, and adds enough glow to keep the deck comfortable without washing it out. The best results come from restraint. Too much brightness makes a deck feel harsh, while a warm, lower-output fixture keeps the space usable and still lets the structure itself stand out.
That balance starts with product selection, not just wiring. A square cap with a simple profile usually suits modern railings better than an ornate fixture. Traditional decks can carry a more decorative cap, but only if the post size, railing style, and finish all agree. Xtreme eDeals gives you a practical reference point here because the catalogue lets you compare cap styles against the kind of look you're trying to build, whether you want understated post lighting or a more defined architectural line. If you're still shaping the full look of the deck, these outdoor living space ideas help you place lighting within the broader design instead of treating it like an add-on.
I always judge post lights in daylight first.
If the cap looks oversized, sits proud of the post, or clashes with the railing hardware, the installation will never look fully professional, even if the electrical work is flawless. Good lighting should disappear into the deck design during the day and give it structure at night.
For a straightforward installation, many homeowners can handle the work themselves. If the transformer location is awkward, the receptacle setup is questionable, or the run layout gets complicated, getting input from an outdoor lighting electrician is a smart move before drilling into finished posts or trimming rail components.
The high-end look comes from a few early choices made correctly. Match the cap to the post, keep the light output consistent across the rail line, and plan for hidden wire paths from the start. That is what makes deck post lights low voltage systems look built in, durable, and worth keeping for years.
Planning Your Low-Voltage Lighting System
A low-voltage lighting job usually goes wrong before any wire is cut. The common failures are easy to spot later. Caps look mismatched, some posts glow brighter than others, the transformer is undersized, and the cable path ends up visible from the yard. The clean installs start with a measured plan that accounts for fixture style, load, layout, and concealment before a single post cap is mounted.

Start with the fixture style
Choose the cap the same way you would choose railing hardware. It needs to belong on the deck in full daylight, not just look good after dark. A simple pyramid cap usually suits a modern rail line. A more traditional deck can carry a rounder or more decorative profile without looking busy.
Fit matters just as much as style. Measure the actual post, including any sleeve or wrap, because nominal sizing is not always what you have on site. A cap that is slightly loose or overhangs by a small amount will still look off every time you walk past it. If you want a quick way to compare proportions before committing to a wired setup, these solar deck post light options are useful for judging cap shape, finish, and post compatibility.
Size the transformer from the load, not a guess
Start with the fixture wattage and the number of lights. Add them together, then leave headroom for wire loss and future changes. I do not like planning a transformer right at its limit because small additions later, like lighting one more stair post or gate section, can force a replacement.
A simple example is ten post caps rated at 3 watts each. That gives a 30 watt fixture load. Add a margin, and the right transformer is the next size up, not the exact total on paper.
That one decision affects reliability more than people expect.
Plan the wire route before you order materials
Wire planning is what separates a tidy installation from one that always looks retrofitted. The goal is a route that stays hidden, stays protected, and gives you access if a fixture ever needs service. On a straightforward deck, that usually means one main run in a consistent direction with short branch connections to each post. On a larger deck with stairs or multiple levels, split the layout into logical sections so troubleshooting later does not turn into chasing cable through the whole frame.
Keep the transformer location in the plan from the start. A good mounting spot is close enough to the run to avoid unnecessary cable length, but still accessible for timer settings and service. If the nearest power source forces a long path across the house and out to the deck, account for that before buying wire.
Many deck lighting kits simplify this part by using a main line with short fixture leads and splitters. That format can work well on a standard residential deck. Guidance discussed through Jolt Electric's lighting expertise is a good reminder that the layout still has to suit the kit. A pre-packed system is only convenient when the deck shape and post spacing match it.
Lay out the lighting pattern from the yard, not only from the deck
Even spacing on paper does not always look even in real life. Mark every post you plan to light, then step back into the yard and study the whole rail line. Corners, stairs, and long straight runs need different treatment. Stair posts usually deserve priority because they help with footing and draw the eye. Open perimeter sections can often be spaced more straightforwardly.
Use a rough sketch and mark these points before installation day:
- Every post that will get a light
- The transformer location
- The main wire path
- Any branch connections
- Where the wire enters or passes through each post or rail section
That sketch saves time, but more importantly, it keeps the final result consistent. Professional-looking deck post lights low voltage systems are planned so the hardware, light output, and wire path all work together. The fixtures are only part of the job. The design choices made before installation are what make the finished deck look built in and hold up over time.
Gathering Your Tools and Materials
A low-voltage lighting job usually goes wrong before the first fixture is mounted. The trouble starts when the cap size is off by a fraction, the wire run needs one more branch connector, or the transformer was bought on a guess and leaves no room for future additions. Good prep prevents all three.
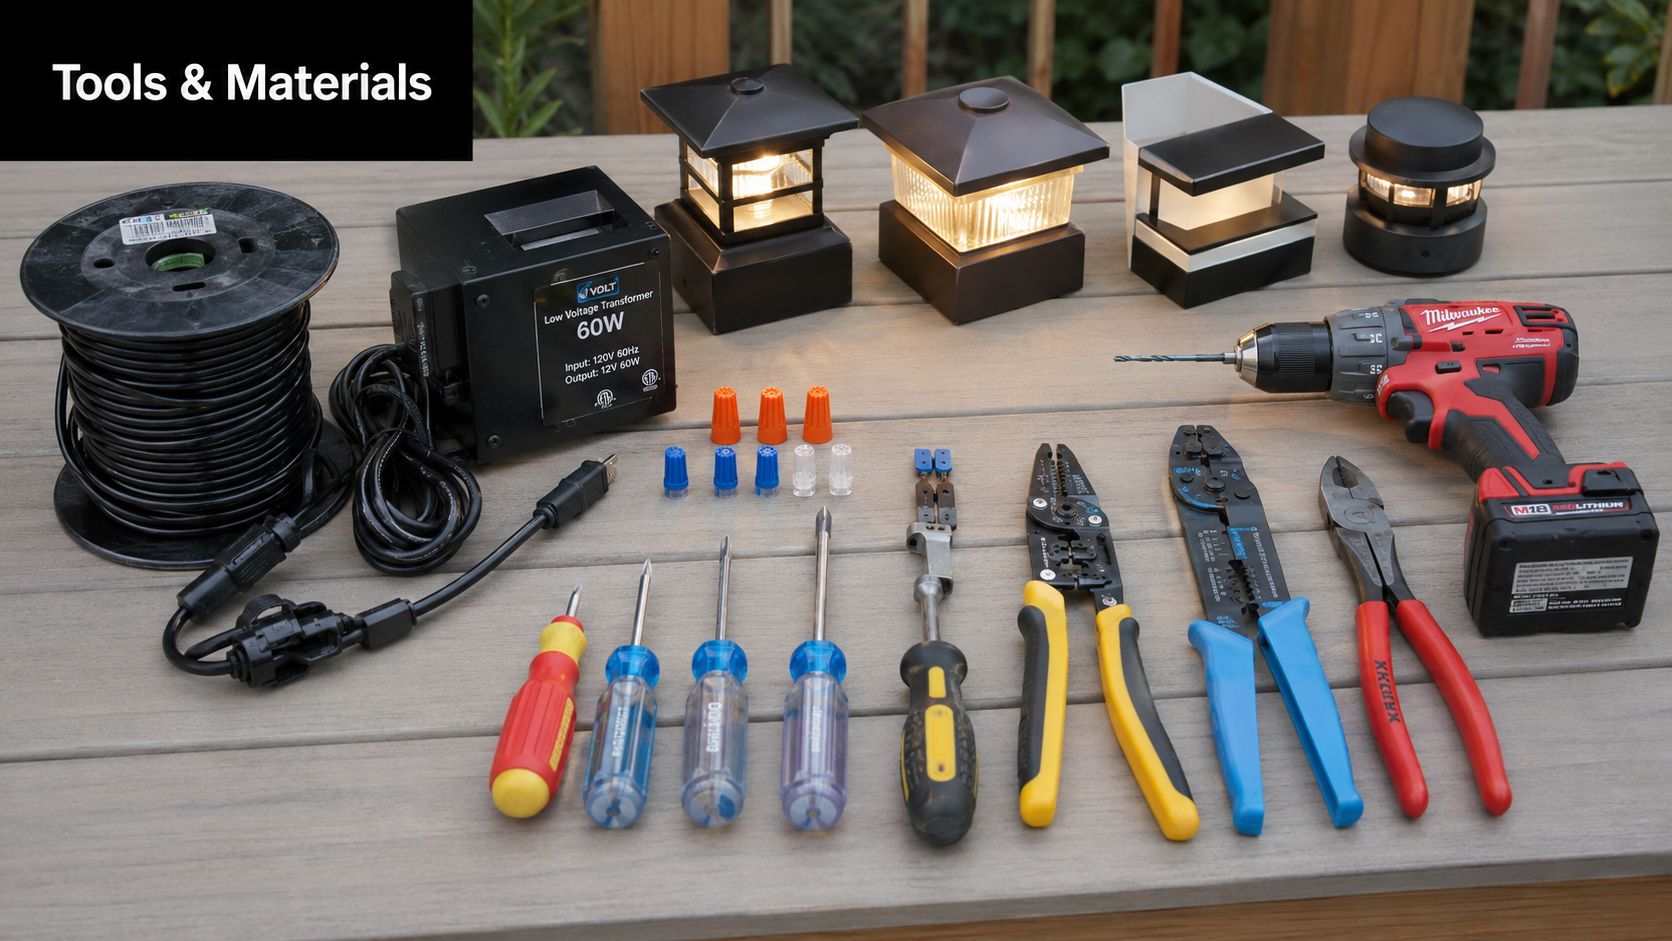
Core components
Buy materials to fit the deck you built, not the one shown on the package.
- Post-cap light fixtures: Confirm the true post size before ordering. A nominal 4×4 post often measures differently once sleeve systems, trim, or caps are involved. If the fixture sits proud, rocks, or leaves a crooked reveal, the whole rail line looks off.
- Low-voltage transformer: Size it to the planned fixture load with spare capacity for one or two future additions. An undersized transformer leads to weak performance and limits your options later.
- Outdoor-rated low-voltage wire: Choose a cable gauge that suits the run length and fixture count. Buy enough to route the wire neatly along framing, through posts where needed, and still leave working slack at connections.
- Connectors or splitters: Use the connection method the fixture system was designed for. Mixing connector styles is a common DIY shortcut, and it often creates loose fits or bulky splices that are hard to hide.
XTREME EDEALS INC. carries deck and fence post caps in multiple sizes and finishes, which helps when the lighting needs to match the railing style instead of looking like an afterthought.
Tools that help you work cleanly
The difference between a professional-looking install and a messy one is often a small pile of basic tools used at the right time.
- Cordless drill and sharp bits: Clean holes matter, especially on visible post faces and cap mounting points.
- Wire strippers and cutters: Clean copper makes stronger connections and faster troubleshooting.
- Fish tape or pull tool: Useful for concealed runs through hollow posts, sleeves, or tight framing bays.
- Driver bits and correct fasteners: Use hardware that fits the fixture and exterior conditions. Stripped screws and mixed fastener heads make a simple job look patchy.
- Measuring tape and pencil: Mark first. Drilling twice into a finished post is a mistake everyone notices.
- Low-voltage cable staples or clips: Support the wire without pinching the jacket.
I also keep a small tray or pouch for connectors, screws, and caps. It saves crawling around looking for dropped parts under the deck.
Safety and finishing supplies
Small supplies decide how well the job holds up through weather and cleaning.
Keep these on hand:
- Protective gloves and safety glasses: Especially for drilling overhead, pulling cable, or working around pressure-treated lumber.
- Waterproof wire nuts or approved weather-resistant connectors: Outdoor splices need to stay tight and dry.
- Silicone sealant: Helpful at select penetrations where water could track into a post or protected cavity.
- Rag and soft brush: Wipe sawdust from lenses, cap interiors, and finished surfaces before final testing.
The installers who get the cleanest result usually are not faster with a drill. They are better prepared before they start.
Installing Your Deck Post Lights Step by Step
A clean install starts before the first screw goes in. The difference between a deck that looks custom-lit and one that looks pieced together usually comes down to placement, wire routing, and fixture alignment.
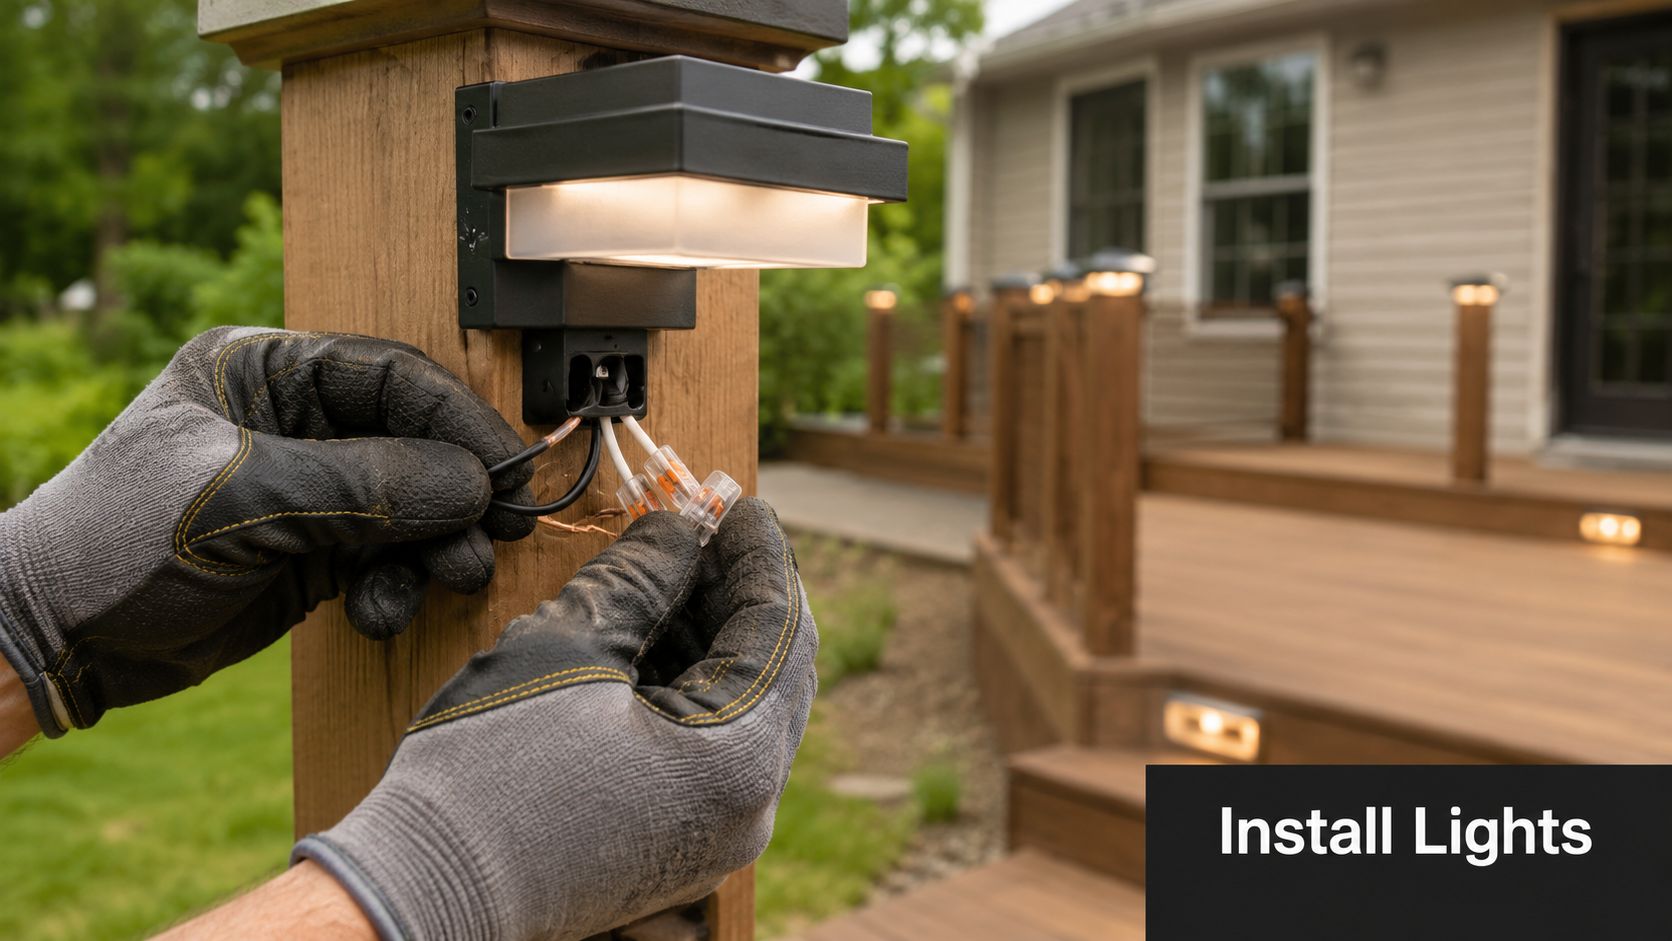
Mount the transformer first
Start at the power source and work outward. That keeps the cable path honest and prevents the common DIY mistake of setting every cap first, then realizing the wire run looks awkward from below.
Mount the transformer where it stays accessible for testing, timer changes, and seasonal service. Keep it close enough to the main cable path that you do not need a sloppy exposed run to reach the framing. As noted earlier, the outlet setup needs to be correct before the lighting install begins.
Run the main cable where it disappears
Fasten the low-voltage cable along the deck framing, using inside faces and shadow lines to keep it out of sight from normal standing and seated views. On a high-end build, people notice the light effect first and the hardware last.
Three habits help here:
- Follow joists or beams instead of cutting across open spans
- Keep the wire supported at regular intervals without crushing the jacket
- Leave planned branch points near each post instead of guessing as you go
I also leave a little service slack at fixture locations, but not enough to sag. Extra wire stuffed under a cap or hanging below a joist ruins the look fast.
Dry-fit each post cap before making connections
This step saves rework. Set each lighted cap in place, confirm orientation, and check that the wire entry point lines up with the actual cavity or drill path in the post.
That matters even more if you are mixing styles or post sizes. If you are matching the lighting to deck post caps for wood and composite railings, confirm the cap footprint and skirt depth before final fastening so the finished line stays consistent from post to post.
Drill access holes with the finished view in mind
Drill from the least visible face whenever possible. A neat hole on the inside of the rail is easier to hide than a ragged one on the traffic side of the deck.
Use a sharp bit sized for the cable and connector you need to pass through. If the post is hollow or sleeved, fish the wire before mounting the cap permanently. If the post is solid, plan the shortest protected path and avoid drilling where fasteners for the rail or cap already sit.
Connect one fixture at a time
Low-voltage post lights are manageable for a careful DIY installer because each connection is small and repeatable. Treat them that way. Make one branch connection, test it, tidy it, then move to the next post.
For a visual walkthrough, this installation video is worth watching before you start routing cable through the posts.
Do not build the whole system first and hope the last test solves everything. If one light fails in the middle of the run, isolating the problem is much easier when only one new connection was added.
Seat and align the caps carefully
Once the light works, fasten the cap fully and check it from a few angles. Small alignment errors stand out more at night because the glow makes every crooked cap easier to spot.
Stand back and sight down the rail line from both ends. Adjust before tightening all fasteners. On darker cap finishes and metal-accent styles, even a slight twist is visible.
Protect every splice from weather
Outdoor lighting fails at connections more often than at the fixture body. Use approved weather-resistant connectors and keep splices tucked in protected locations whenever the product design allows it. If you need a refresher on keeping those connections dry, these practical tips for electrical waterproofing are worth reviewing before you close everything up.
A professional-looking result comes from these small decisions. Straight caps, hidden cable, dry connections, and clean sightlines make low-voltage deck post lighting look built into the deck instead of added after the fact.
Essential Safety and Finishing Touches
The final stage is where a decent job becomes a durable one. This is also where rushed installers make preventable mistakes. They get the lights working, declare victory, and skip the details that keep the system reliable through weather, cleaning, and seasonal use.
Protect the power source properly
The transformer belongs on a GFCI-protected outlet. That isn't a nice extra. It's the correct foundation for this type of outdoor setup, as noted in the earlier installation guidance.
If the outlet arrangement is questionable, stop there and sort that out first. Don't build a clean low-voltage lighting system on top of a poor power connection. The neatest wire run on the deck won't compensate for a bad starting point.
Finish the wire management like a pro
Loose cable is one of the fastest ways to make the install look amateur. Once the lights are confirmed working, secure every visible run so it stays out of traffic areas and away from spots where yard tools or stored items can damage it.
Focus on these finishing checks:
- Secure the cable neatly: Use the right staples or fasteners for low-voltage wire and avoid crushing the insulation.
- Keep runs off walking surfaces: Nothing should cross open tread or deck areas.
- Support connectors properly: Don't let a splice hang under its own weight.
- Leave service slack where needed: A little extra at the right spot helps later maintenance. Too much everywhere looks messy.
Seal and weatherproof vulnerable points
Outdoor wiring failures often start at the connection, not at the fixture. Any drilled opening or exposed connection point deserves attention before you pack up. If you want a good practical refresher on sealing methods and connection protection, these practical tips for electrical waterproofing are useful background.
For the visible finishing side of the project, matching your caps and trim details matters as much as the electrical work. Browsing post caps for decks can help you compare shapes and finishes if you're still refining the look of the railing line.
Small finishing details decide whether the system still looks good after a wet season.
Do a final evening check
Always inspect the deck after dark. Daylight hides uneven output, misaligned caps, and stray cable shadows. Walk the stairs, stand at the gate, sit in the main seating area, and look back at the rail line from the yard.
If one cap sits crooked or one section feels dimmer, fix it now. The last half-hour of inspection usually does more for the final result than the first half-hour of installation.
Troubleshooting and Maintaining Your System
Even a careful install can develop issues over time. The upside with low-voltage deck lighting is that most problems are traceable if the system was laid out neatly to begin with. When something goes wrong, resist the urge to start replacing random parts. Follow the path logically.
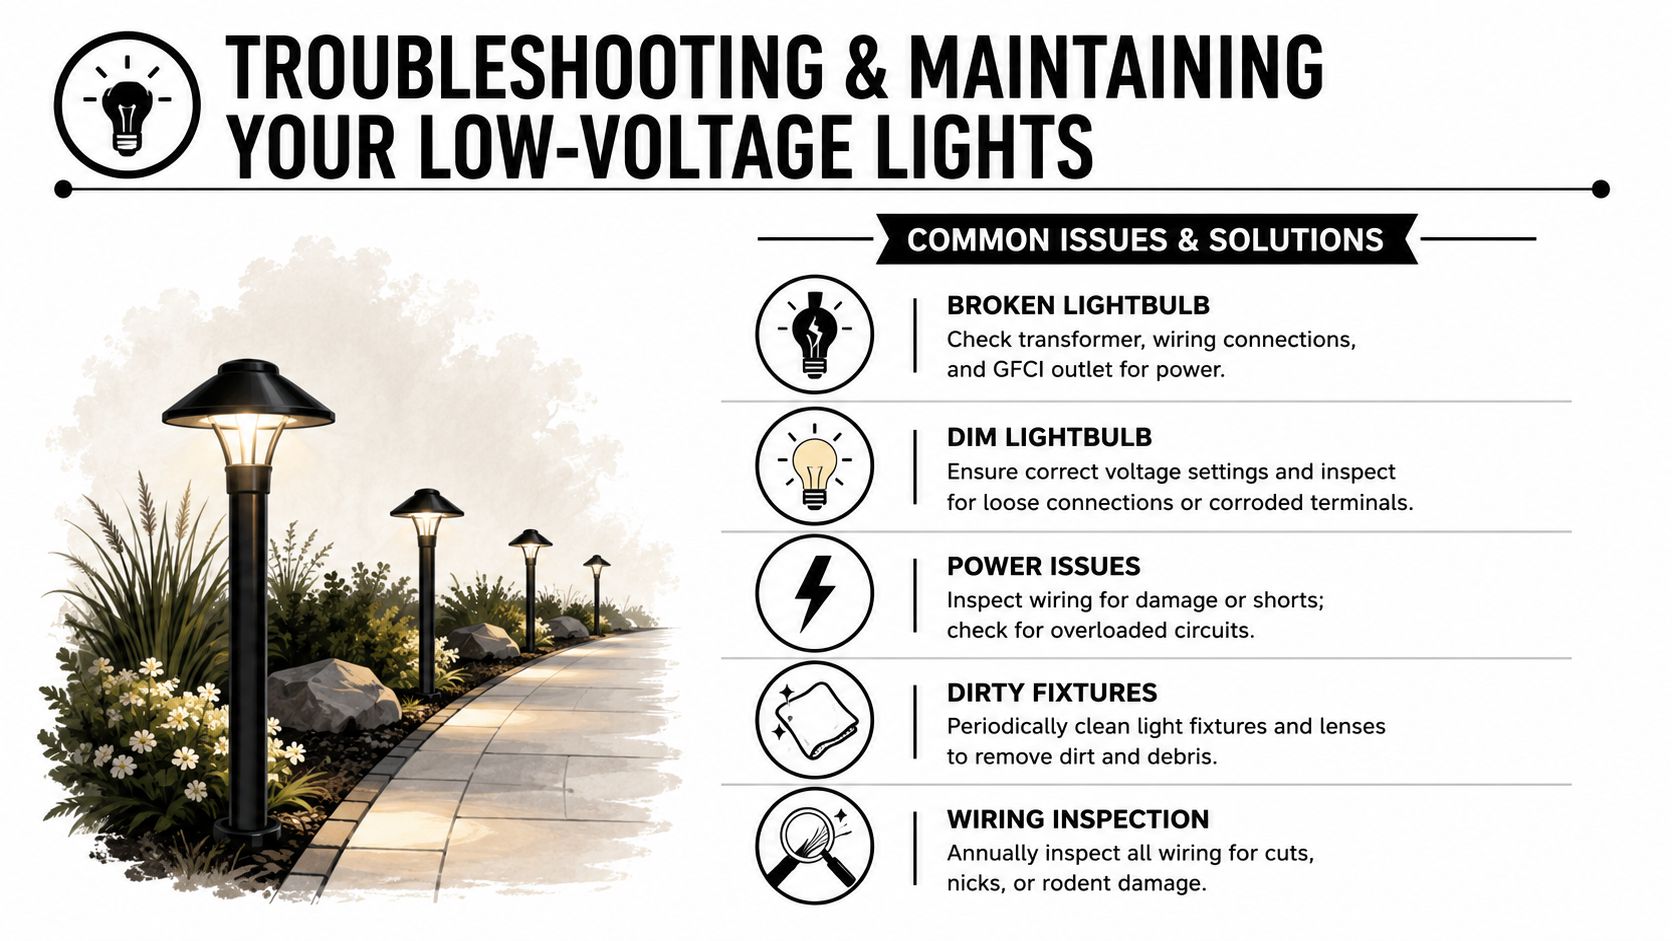
If one light is out
When a single fixture fails and the rest of the system works, start at that fixture. In most cases, the problem sits close to the light itself.
Check in this order:
- Fixture connection: Make sure the light's lead is still firmly connected to the main line or splitter.
- Wire damage near the post: Tight bends, pinched cable, or movement at the cap can interrupt one fixture.
- Moisture at the connection point: Outdoor connections need to stay protected.
- Fixture condition: If the wiring is sound, the issue may be inside the light assembly.
A single dark cap usually points to a local fault, not a whole-system problem.
If a whole section goes dark
A dead section usually means power is being lost somewhere upstream in the run. Start at the last working light and move toward the first failed one. That transition point is often where the issue lives.
Use this approach:
| Symptom | Most likely place to check first | Why |
|---|---|---|
| Several lights after one point are out | Connection after the last working fixture | Power likely stops there |
| End of run is dark | Branch connection or damaged cable near the section start | The earlier connection feeds everything after it |
| Entire system is dark | Transformer, outlet, or main feed | Start at the source |
If lights flicker or look inconsistent
Flickering usually means one of three things. A loose connection, moisture affecting a connection, or a system that was put together untidily enough that movement or strain is interrupting contact.
Walk through these checks:
- Transformer connection: Confirm the system is firmly connected at the power source.
- Connector security: Tug gently on suspect connections. Nothing should feel loose.
- Cable strain: A wire under tension can make intermittent contact over time.
- Corrosion or contamination: Dirt and moisture around connectors can create unreliable performance.
Most flickering problems are connection problems until proven otherwise.
Build a simple maintenance routine
Low-voltage deck lights don't need constant attention, but they do benefit from occasional inspection. Dirt on lenses dulls the effect. Debris around caps and railings traps moisture. A quick check once in a while prevents small issues from becoming weekend repairs.
A useful routine includes:
- Clean the fixture lenses: Wipe off grime, pollen, and surface buildup.
- Inspect exposed wire runs: Look for cuts, rubbing, or chew damage.
- Check cap alignment: Freeze-thaw movement and vibration can shift parts over time.
- Test the system after seasonal clean-up: Especially if furniture, planters, or tools were moved around the deck.
Keep the layout serviceable
The best maintenance decision is made during installation. Keep the system readable. If cables are bundled without order, connectors are hidden randomly, or extra wire is jammed into every corner, future troubleshooting becomes slow and annoying.
When deck post lights low voltage systems are installed cleanly, repairs stay manageable. You can follow the route, inspect each branch, and isolate the problem without tearing the deck apart. That's one of the practical advantages of doing the original install carefully instead of just getting the lights to turn on.
If you're choosing fixtures, post caps, or deck hardware for a new lighting project or an upgrade, XTREME EDEALS INC. is a practical place to compare deck and fence finishing components alongside the hardware that supports the overall build.