

You're usually looking at solar deck post lights at one of two moments. Either the deck is finished and feels flat after sunset, or you're in the middle of a build and trying to avoid the cost, mess, and planning that come with wired lighting. Both situations are common, and both have the same goal. You want the railing line, stairs, fence, or gate posts to feel finished at night without turning the project into an electrical job.
That's where deck post lights solar options make sense. They're simple, clean, and easy to retrofit. They also come with real limits, especially in Canadian climates where winter daylight is short, snow can bury the panel, and freeze-thaw cycles expose every weak seal and cheap battery. A lot of buying advice skips that part.
This guide looks at solar post lights the way a deck builder does. Not as a catalogue feature, but as a product that has to survive weather, fit the post properly, charge reliably, and still look good after a few seasons.
Why Solar Deck Post Lights Are a Smart Upgrade
A deck can look complete in daylight and unfinished at dusk. The structure is there, the furniture is there, maybe the planters are in place, but once the sun drops, the perimeter disappears. Corners get hard to read, stair entries lose definition, and the whole space stops inviting people to stay outside.
Solar post lights solve that in a very direct way. They add a low, steady glow to the outline of the deck, fence, or patio without opening up boards, fishing wires, or setting a transformer. For most homeowners, that's the difference between doing the upgrade this season and putting it off again.
They also fit the way many outdoor projects often happen. A lot of decks are upgraded in stages. First the boards, then the railing, then the cap details and accessories. Solar caps let you add lighting late in the process without tearing into finished work. If you're gathering ideas for your outdoor living area, lighting is one of the simplest changes that makes the whole space feel more intentional.
A practical advantage is operating cost. Solar fixtures use stored daylight, so there's zero operating electricity cost for the light itself, which is one reason they appeal to homeowners looking for lower-cost exterior upgrades in markets where energy savings matter, as discussed in this overview of outdoor post cap lighting and housing use patterns in California from Weatherables.
Practical rule: If you want atmosphere, edge definition, and easy installation, solar post caps are a smart upgrade. If you expect them to light a whole deck like floodlights, they won't.
For homeowners who like efficient products more broadly, the same thinking shows up in other categories too, from lighting to backup essentials and household gear, which is why guides on eco-friendly products that save money and support self-sufficiency tend to resonate with the same audience.
Choosing Between Solar and Wired Deck Lighting
The first decision isn't style. It's power source. Solar and wired systems do different jobs well, and the right pick depends on what matters more on your project: ease, brightness, or year-round consistency.
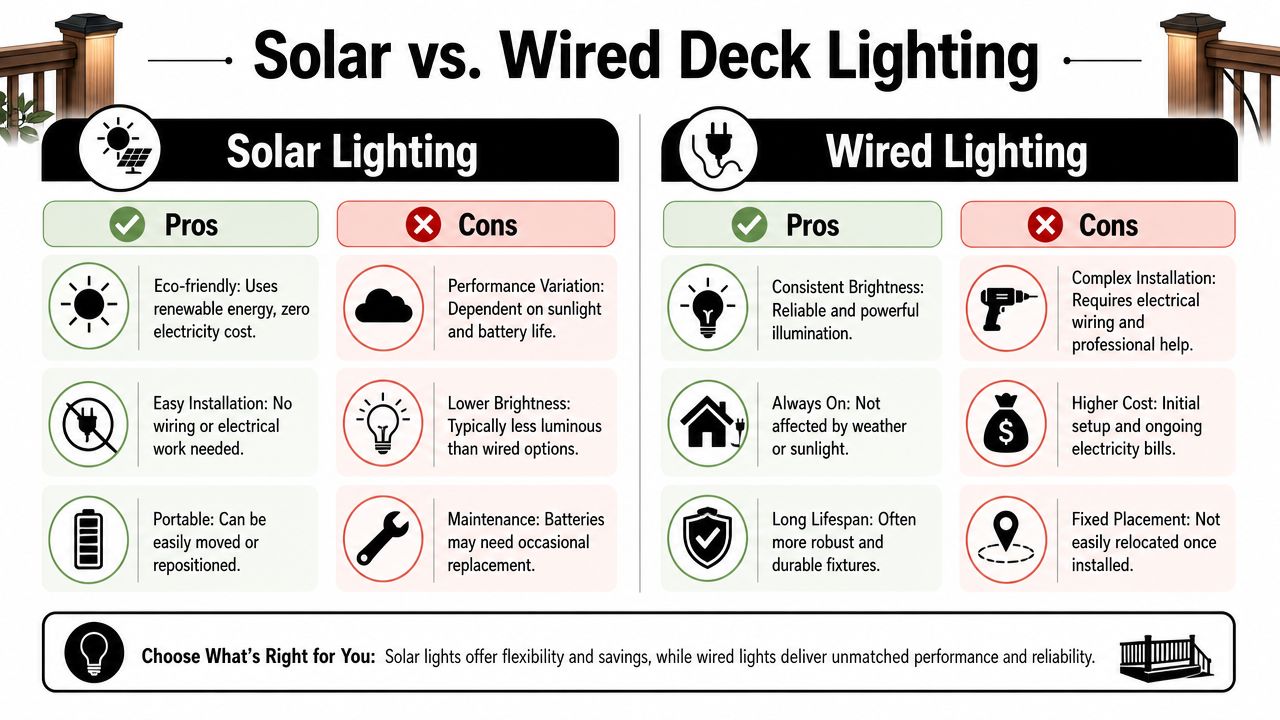
Where solar wins
Solar is the easier path when the deck is already built or when you want a straightforward weekend install. You don't need cable runs, a transformer, or a plan for hiding wire under framing. Cap-mounted units are especially useful on fences, gates, and standalone posts where wired lighting starts to feel disproportionate to the job.
California's efficiency rules are one example of why this kind of lighting has become more mainstream. Exterior lighting rules there require automatic shutoff controls for many outdoor applications, and Title 24 has been updated repeatedly to reduce electricity use in residential and commercial construction. Solar fixtures align with that direction because they operate independently and avoid hardwired circuits, which is part of why they're described as a practical fit for homeowners seeking smarter outdoor lighting in this Title 24 and solar lighting guide.
Solar also gives you flexibility. If you decide the end posts need the lights more than the stair run, you can move them. That's not true once wired fixtures are installed.
Where wired still has the edge
Low-voltage wired lighting is better when the brief is simple: brighter output and more predictable performance. It's the stronger option for stair safety, long deck runs, or spaces used heavily in winter evenings. You're not depending on the day's charge, the panel being clear of snow, or the battery holding enough reserve after several seasons.
A quick side-by-side makes the trade-off clearer:
| Option | Best for | Main drawback |
|---|---|---|
| Solar post lights | Retrofits, DIY installs, decorative perimeter glow | Output varies with weather, placement, and battery condition |
| Wired low-voltage lighting | Consistent illumination, stairs, larger entertaining spaces | More complex installation and less flexibility once placed |
Wired lighting is for dependable illumination. Solar lighting is for convenience, appearance, and light-duty guidance.
The Canadian climate question
In Canada, this choice gets sharper. A solar light installed on a sunny back deck can perform well from spring through autumn and then struggle during stretches of snow cover and grey weather. That doesn't make it a poor product. It just means expectations have to match the application.
Use solar when you want visible post tops, softer ambience, and no wiring. Use wired when lighting performance matters more than install simplicity.
How to Choose the Right Solar Deck Post Lights
Most disappointment with deck post lights solar products starts before installation. The wrong size gets ordered, the output is too weak for the space, or the battery setup doesn't suit a northern climate. The right fixture is usually the one that matches the job, not the one with the most dramatic marketing photos.
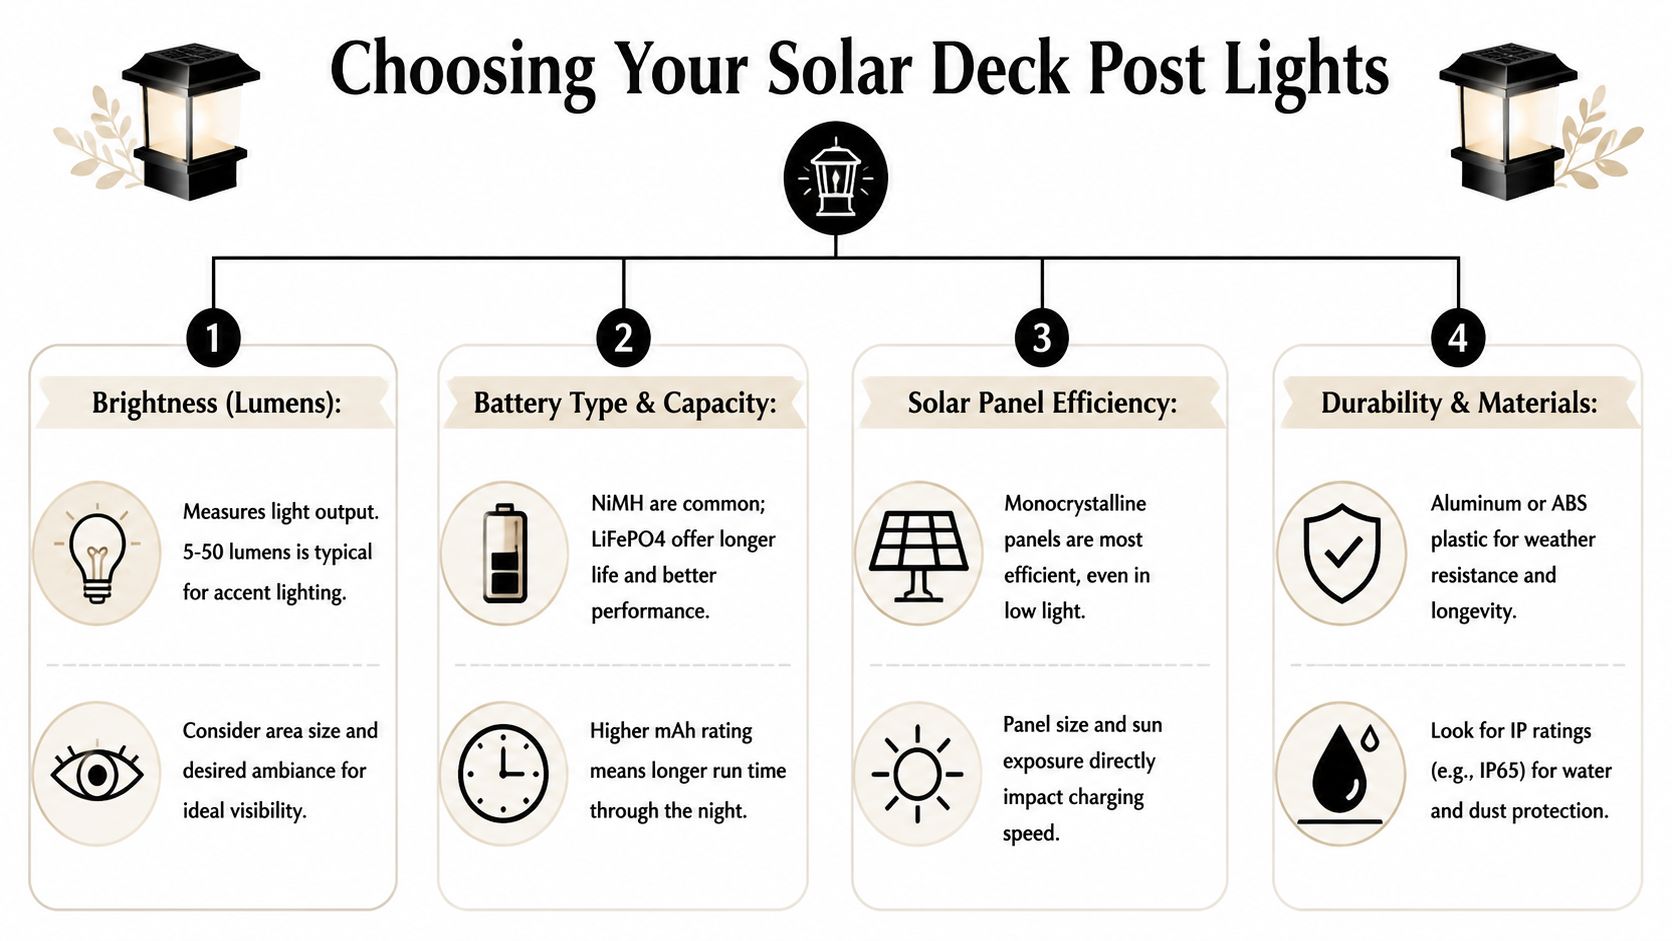
Start with fit, not finish
Before looking at colour or style, measure the post properly. A nominal wood post size and its actual dimensions are not always the same thing, and a loose cap looks bad and fails early. If the cap rocks, leaves a gap, or needs improvised shimming, water and movement usually follow.
When shopping, it helps to compare actual cap sizes and profiles on a dedicated deck post caps collection, especially if you're matching common wood post sizes or trying to keep a consistent look across deck and fence sections.
Check these points before you buy:
- Actual post dimensions: Measure the outside of the installed post, not the label from the lumber yard.
- Mounting style: Some caps sleeve over the post. Others sit on top with a tighter tolerance.
- Railing context: A cap that looks substantial on a perimeter fence may look oversized on a narrow deck guardrail.
Read lumen output the right way
For post caps, brightness isn't about flooding the deck. It's about marking edges, corners, and transitions. Solar deck lights are commonly sold in the 10 to 23 lumen range for ambient marking, and some units offer 3000K warm white and 5000K cool white dual-colour LEDs with 15 lumens per side on all four sides, according to this product specification guide from Nature's Solar Lights.
That tells you two things.
First, many solar caps are accent lights, not task lights. Second, colour temperature changes how bright the light feels. Cool white usually reads sharper around edges and stairs. Warm white feels softer and more decorative.
A simple way to choose:
- Warm white: Better for patios, pergolas, and relaxed seating areas.
- Cool white: Better where you want clearer edge definition.
- Moderate output: Usually the safer pick than chasing the brightest cap available, because the panel and battery still have to support it.
Battery setup matters more than most buyers realise
A solar post cap is only as useful as the battery that got charged during the day. In real use, a fully charged fixture typically delivers about 6 to 10 hours of light per night, while the rechargeable battery often lasts only 1 to 4 years, even though the fixture itself can last over 6 years, based on this solar post cap technical guide from Decks.com.
That service-life gap matters even more in Canadian conditions. Cold weather exposes weak batteries fast. A light that worked acceptably in summer can become dim, erratic, or short-lived once autumn arrives.
Look for these features:
- Replaceable batteries: This is one of the strongest buying signals for long-term value.
- Accessible battery compartment: If opening the fixture is awkward, maintenance often gets ignored.
- Simple switch access: Useful for testing and seasonal shutdown when needed.
Buy the fixture you'll still be willing to maintain in three winters, not just the one that looks good on delivery day.
Materials decide how long the light stays attractive
Post cap lights spend their life in UV, rain, frost, and temperature swings. Cheap plastic becomes brittle. Clear lenses yellow. Thin finishes chalk and fade.
Material quality often matters as much as initial output. Polymer housings, polycarbonate lenses, and powder-coated aluminum trim are all worth preferring when you expect the fixture to stay outdoors full time. In coastal or high-exposure conditions, corrosion resistance and seal quality become part of lighting performance because once moisture gets inside, brightness and reliability usually slide together.
Popular Styles and Material Choices
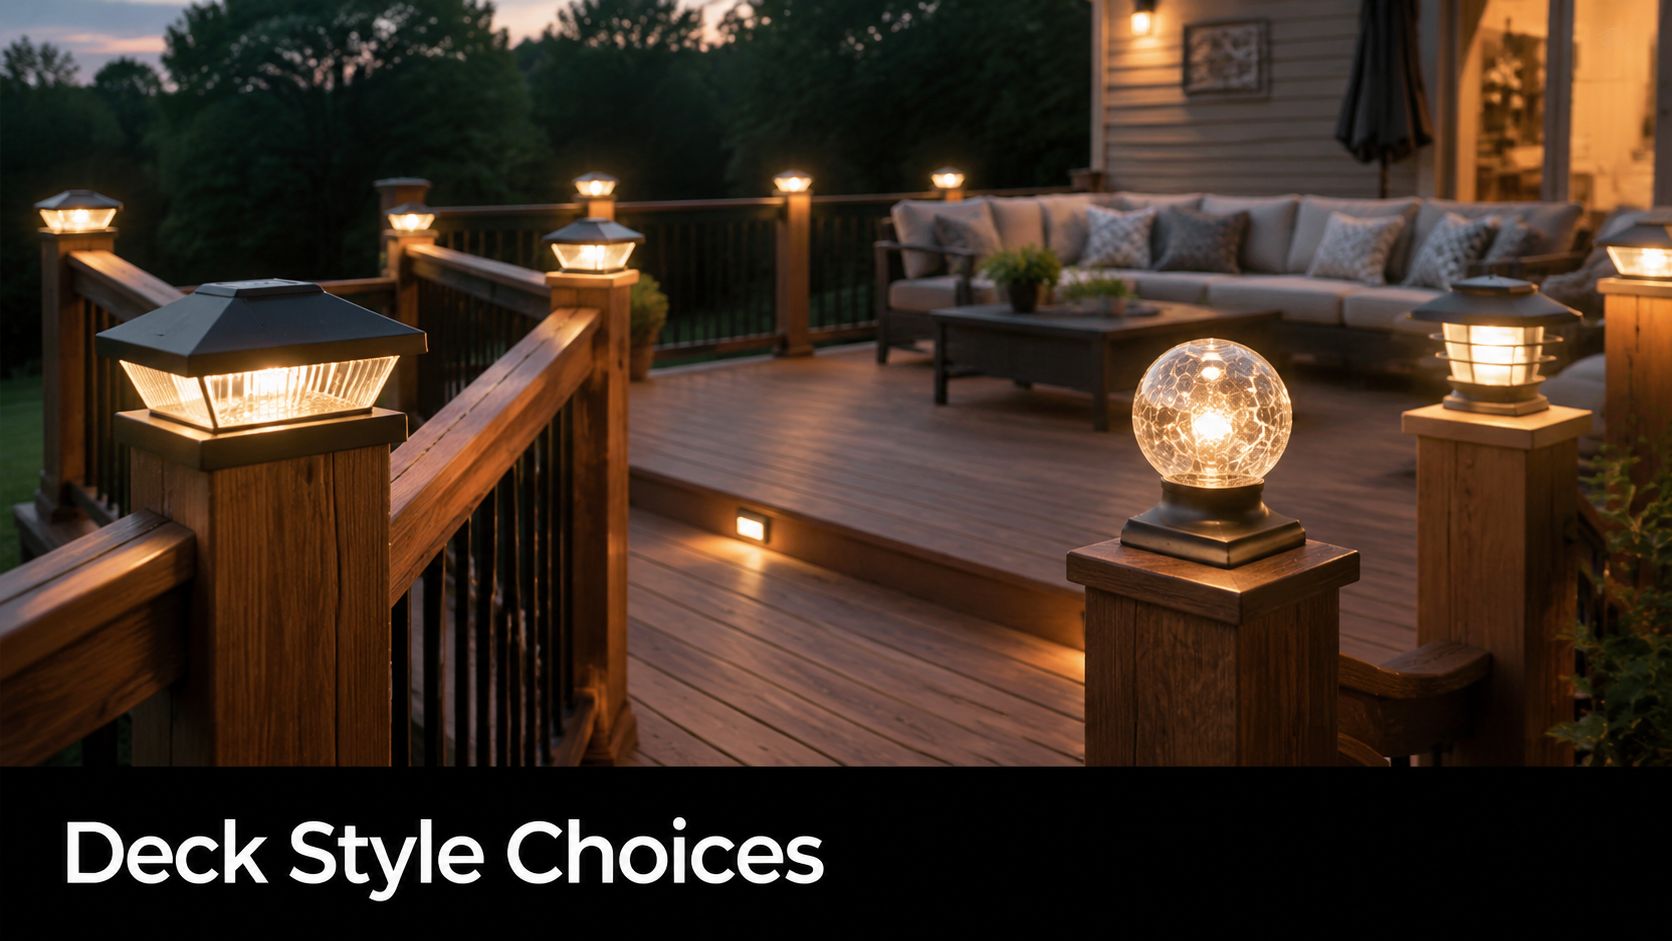
Style matters more with post caps than with many other hardware choices because the fixture sits at eye level. People notice it in daylight before they ever notice the light at night. A cap that clashes with the railing, balusters, or fence profile can make a good deck look pieced together.
Common looks that work well
Pyramid caps remain the safest choice for most decks. They suit traditional wood railings, don't fight with other trim details, and shed water cleanly. Ball-top styles are more decorative and often fit better on formal fences or gate posts than on a contemporary deck.
Low-profile caps are usually the cleanest match for modern railing systems. If the deck has black balusters, square lines, and minimal trim, a chunky ornamental cap can look out of place. In that setting, lower, sharper profiles usually sit better visually.
A useful way to think about style is by the surrounding architecture:
| Style | Best visual match |
|---|---|
| Pyramid | Standard wood decks, cottage properties, classic fences |
| Ball top | Decorative gates, garden fencing, more traditional exteriors |
| Low profile | Contemporary decks, metal accents, cleaner railing lines |
Material trade-offs in real weather
Powder-coated aluminum generally gives a more finished look and holds shape well. It tends to suit premium deck builds and pairs nicely with black hardware, metal balusters, and darker railing packages. Vinyl or PVC caps can be a practical fit when low maintenance matters more than a heavier architectural feel.
For Canadian climates, the finish and seal matter as much as the base material. Snow sitting on top of the cap, then melting and refreezing, tests seams and lens joints quickly. A light can still function while looking rough if the housing discolours, crazes, or traps condensation.
If you're planning the broader yard, it can help to look at how lighting style ties into hardscape and planting design. This guide on creating stunning Austin yard lighting is useful for understanding how fixture shape and light tone influence the overall look, even though your climate and product requirements may differ.
Matching product style to the build
On practical projects, I usually match the cap to the deck's strongest existing cue. If the railing is the focal point, keep the cap restrained. If the posts are substantial and exposed, the cap can carry more visual weight. Decorex Hardware-style aluminum and vinyl post cap formats fit that approach well because they cover the common visual directions most homeowners use.
Your Step by Step Installation Guide
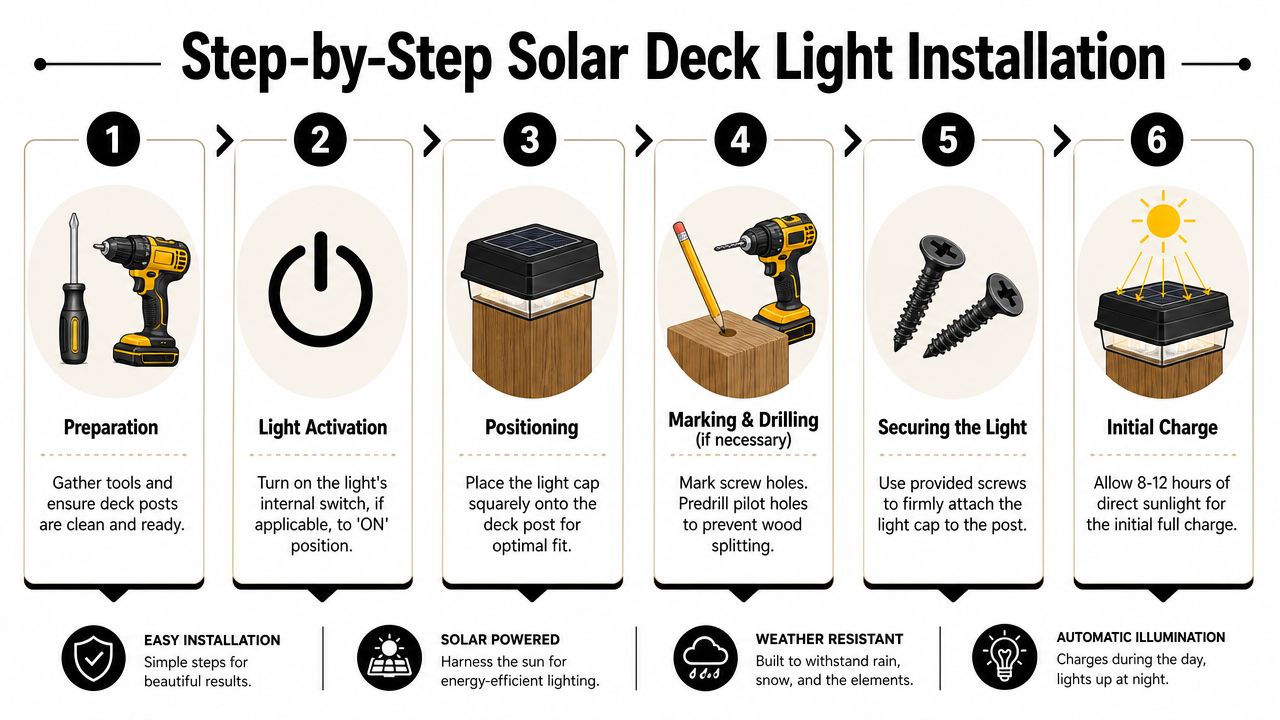
Solar post caps are one of the easier deck accessories to install, but the result still depends on prep. A crooked cap or a weak mounting method stands out immediately. On a new build, installation is quick. On an older deck, the extra time usually goes into correcting post tops that aren't perfectly square, weathered, or level.
Start with the visual guide below, then use the field notes that follow.
Tools and prep
For most installs, you don't need much:
- Basic tools: Tape measure, pencil, drill/driver, small drill bit for pilot holes, screwdriver.
- Surface prep: Clean rag and mild cleaner to remove dust, pollen, and saw residue.
- Mounting hardware: Use the supplied screws if they're decent quality. If they look soft or undersized, swap them for a better exterior-rated fastener of the same fit.
If the post top is rough, sand it flat enough for the cap to seat properly. Solar caps don't hide bad cuts well.
For deck builds where posts need added stability or retrofitting at the base, proper anchoring hardware also matters. If you're sorting out support details before the finishing stage, decking post anchors are one of the components worth checking so the post itself is solid before any cap goes on top.
Screw-mounted installation
Screws are the better option in most Canadian conditions. They handle expansion, contraction, and wind better than adhesive-only installs.
Use this sequence:
- Test fit first: Place the cap on the post and check that it sits fully down with even contact.
- Activate the fixture: Many solar caps have a small on/off switch under the top. Turn it on before securing the unit.
- Mark holes carefully: Keep the cap square to the post before marking.
- Predrill pilot holes: This matters on dry or older wood, where splitting around the top edges is common.
- Drive screws snugly: Tight is good. Overtight is not. You don't want to distort the cap base.
After installation, give the fixtures a proper initial charge in direct sun. The common recommendation is 8 to 12 hours for the first full charge, as shown in the installation visual above.
A quick video can help if you want to see the process before starting:
Adhesive-only installs and when to avoid them
Adhesive can work on some caps, especially in mild conditions or where you don't want visible fasteners. I'm cautious with it in freeze-thaw climates. Adhesive joints can weaken when moisture gets involved, and cap-mounted lights are exposed at exactly the point where snow and rain sit longest.
Use adhesive only when all of the following are true:
- The manufacturer allows it
- The post top is flat and clean
- The cap fit is already snug
- The location is sheltered
If the cap is expensive, the post is exposed, or the winter is harsh, fasten it mechanically.
Placement affects performance more than people expect
A perfect install won't fix poor solar exposure. Before final placement, look at where the post spends the day. Tall privacy screens, nearby trees, and house walls can reduce charging enough to change nightly run time.
That's why layout should consider sun path, not just symmetry. If a heavily shaded rear corner matters for visibility, that's often where wired lighting earns its keep. For broader layout ideas on layered exterior lighting, this overview of expert landscape lighting design is useful as a planning reference.
Maintenance and Troubleshooting Tips
Most solar post lights don't fail all at once. They get weaker. The run time shortens, one side looks dimmer, condensation appears under the lens, or one fixture starts turning on later than the rest. If you catch those signs early, you can usually extend the life of the light rather than replace the entire set.
What to do each season
A basic maintenance routine goes a long way:
- Clean the panel surface: Dust, pollen, grime, and bird droppings cut charging performance.
- Check for standing moisture: Fogging inside the lens or battery chamber usually means the seal is compromised.
- Clear snow and ice promptly: A buried panel can't recharge, and packed ice can stress weaker housings.
- Inspect mounting screws: Loose caps move, and movement often leads to water entry.
In Canada, I'd treat late autumn and early spring as the two key inspection windows. That's when you'll usually spot seal problems, weak batteries, or finish damage.
Battery replacement is part of ownership
This is the maintenance point buyers should assume from the start, not discover later. A well-built solar post cap fixture can last over 6 years, but its rechargeable batteries usually last only 1 to 4 years, which is why replaceable battery designs matter so much, as noted in the earlier technical guidance from Decks.com.
Common signs the battery is nearing the end of its life include:
- Short run time after a sunny day
- Noticeably weaker output than matching fixtures
- Intermittent operation
- Failure to turn on even after panel cleaning and full exposure
When one unit dims early, compare it to another fixture in the same exposure before blaming the battery. Sometimes the problem is shade, dirt, or a switch that was accidentally left off.
When the fixture itself is the problem
If a new battery doesn't restore performance, the issue is usually elsewhere. Look for water intrusion, corrosion on battery contacts, failed solar cells, or a cracked lens housing. At that point, replacement is often more practical than repair unless the fixture was designed for service.
Good solar lighting maintenance is mostly simple housekeeping. The expensive mistakes usually come from ignoring water, weak batteries, or poor fit.
Frequently Asked Questions About Solar Deck Lights
Will solar deck post lights work in a Canadian winter
Yes, but not at the same level you'll see in summer. Shorter days, low sun angle, snow cover, and overcast stretches all reduce charging. If the panel is covered in snow or mounted where winter shade is heavy, performance drops quickly. For decorative post-top glow, that may be acceptable. For dependable night lighting, it usually isn't.
Are solar post lights bright enough for stairs or safety lighting
Usually not on their own. Many solar caps are built for perimeter marking and ambience, not strong downward task lighting. Some buying guides praise solar efficiency but don't fully address short winter days, shade, haze, and the gap between product claims and real-world output. The same discussion also notes that low-voltage systems deliver more consistent “stellar illumination,” while solar performance varies in actual use, as outlined in this guide to solar post light performance trade-offs.
Can you replace the LED bulb inside a solar post cap
Usually no. In most solar post caps, the LED is integrated into the fixture. The service item is normally the battery, not the light source. That's why battery access matters so much at the buying stage.
What matters more in Canada, battery type or housing quality
Both matter, but if forced to choose, I'd prioritise housing quality and a replaceable battery design. A strong battery in a poor housing still fails once water gets in. A durable housing with a serviceable battery gives you a much better chance of getting useful life out of the fixture through multiple seasons.
If you're comparing cap sizes, finishes, and hardware for a deck or fence project, XTREME EDEALS INC. is one practical place to browse post caps, fasteners, and related outdoor hardware in one catalogue. That's useful when you want the lighting and the post details to fit the same build instead of piecing products together from unrelated sources.