

You're usually looking for a post cap 5×5 at the very end of the job. The fence is up, the deck posts are set, the lines look good, and now you want the top to look finished and stay protected. That's exactly when people make the wrong buying decision, because they order by the label on the shelf instead of the post they have.
A 5×5 cap sounds simple. It often isn't. Different manufacturers use nominal sizing, actual sizing, and different fit tolerances. Wood moves. Vinyl sleeves vary. Composite systems can be closer to true size, but not always. If you get this one detail wrong, the cap either won't seat fully, cracks during install, or rattles loose later.
The job goes much better when you treat fit as the first priority and style as the second. Once the cap matches the post dimensions, the rest of the choices get easier.
The Most Important Step Measuring for a Perfect 5×5 Fit
The most common mistake is buying for the words 5×5 instead of measuring the post. That's where most bad fits start.
Some sellers describe 5×5 caps as fitting posts up to 5 inches, while others say the cap may be intended for posts measuring about 4 1/2 to 4 5/8 inches, which is exactly why buyers get tripped up across wood, vinyl, and metal options, as noted in this 5×5 cap sizing reference.
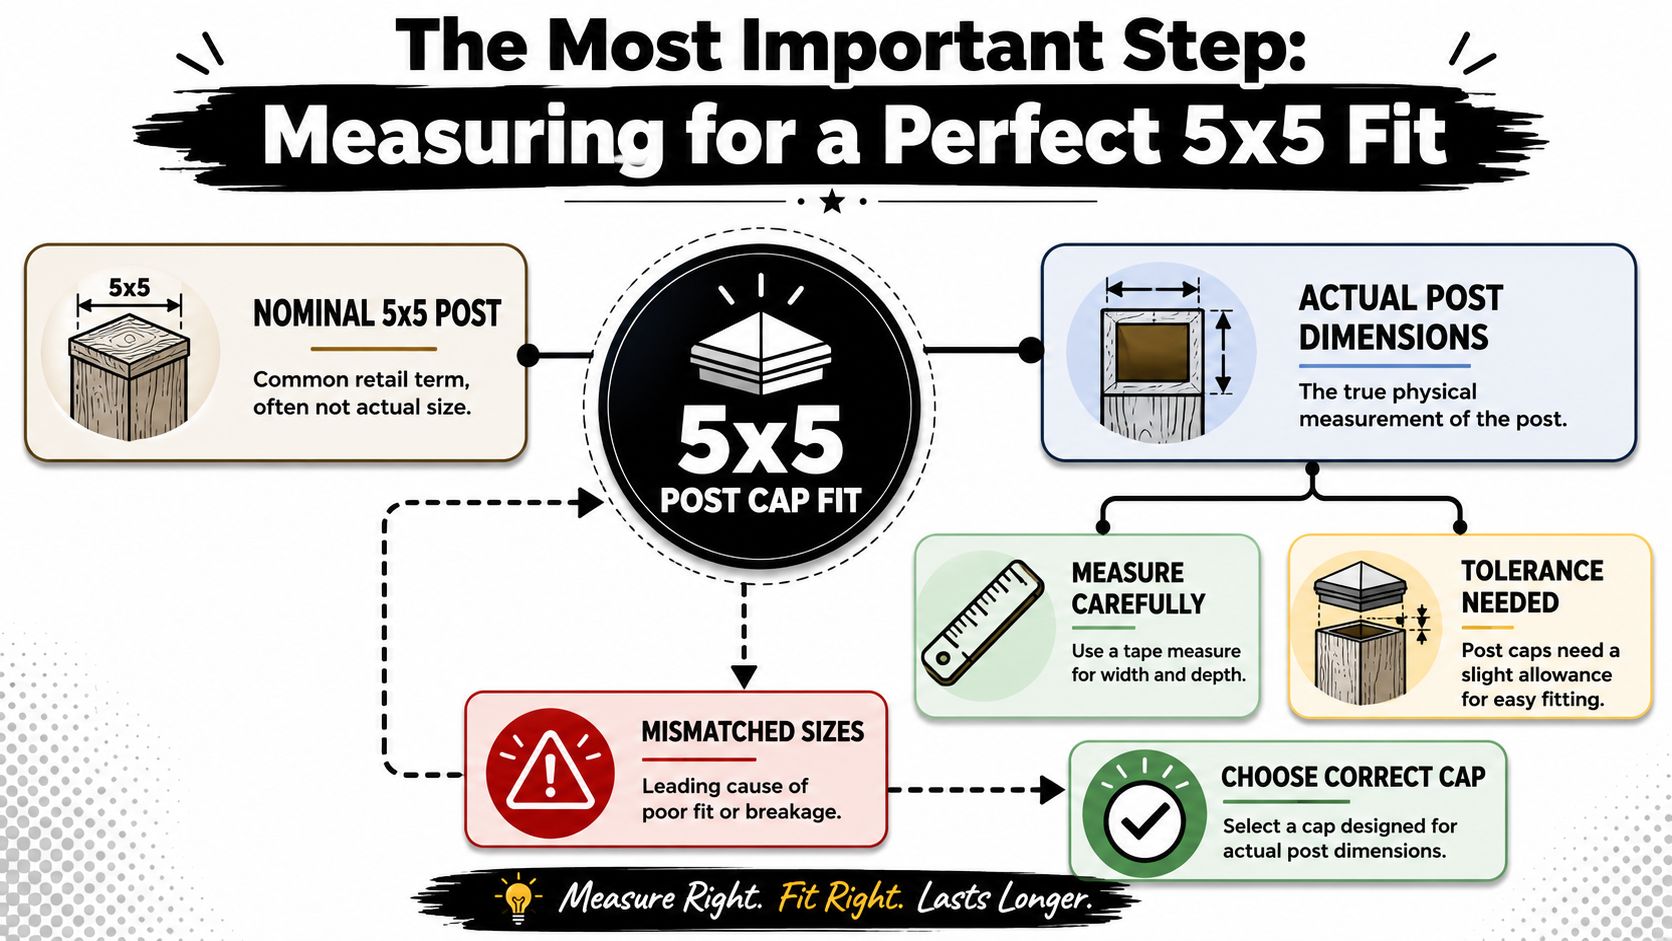
Start with actual outside dimensions
When I'm checking a post for a cap, I don't care what the order sheet called it. I care about the outside width and outside depth at the very top of the installed post. That's the part the cap has to fit over.
Wood posts create the most problems. A post may have started one size at the yard, then picked up moisture, dried unevenly, or carried a little mill variance. Vinyl and composite can be more consistent, but the same rule applies. Measure the installed post, not the catalogue description.
Practical rule: If you haven't measured the top of the post with a tape, you're still guessing.
A simple three-step measuring method
Use a tape measure. A combination square helps, but it isn't required.
Measure the width across the top
Place the tape across one outside edge to the other. Don't measure lower down the post if the top is weathered, wrapped, or slightly flared.Measure the depth on the adjacent side
Turn the tape ninety degrees and measure the second dimension. Don't assume the post is perfectly square. Plenty of them aren't.Check the corners and surface condition
Look for paint build-up, rough grain, swelling, mushrooming at the top, or a vinyl sleeve that's slightly out of square. A cap can look correct on paper and still bind on one corner.
That's enough to choose far more accurately than most shoppers do.
What works for each post type
A wood post needs the closest inspection. If the top has split fibres or raised grain, sand or trim the top before test-fitting. Forcing a tight cap over rough wood is how vinyl caps crack and painted finishes get scarred.
A vinyl post or sleeve often looks uniform, but internal structure and sleeve thickness can change the outside dimension slightly. Measure the part the cap covers, especially if a skirt or moulded top detail is nearby.
A composite or wrapped post can fool people because it looks factory-perfect. Still measure it. Wrap systems sometimes add just enough material to change whether a friction fit works cleanly.
For browsing options, a focused fence post cap category is useful only after you've got those real measurements written down.
Signs you're ordering the wrong cap
A bad fit usually shows up before installation.
- Too tight on paper: If your measured post is already very close to the stated inner fit, don't assume it will “just go.” Outdoor posts rarely get smaller after exposure.
- Too loose by design: A cap that drops on with obvious side play may stay put with adhesive, but it won't look crisp and can shift out of alignment.
- Nominal-only listing: If a product page says 5×5 but doesn't help you understand actual fit, slow down and verify before ordering.
The goal isn't a cap that has to be hammered on. The goal is a cap that slides on cleanly, seats fully, and stays aligned.
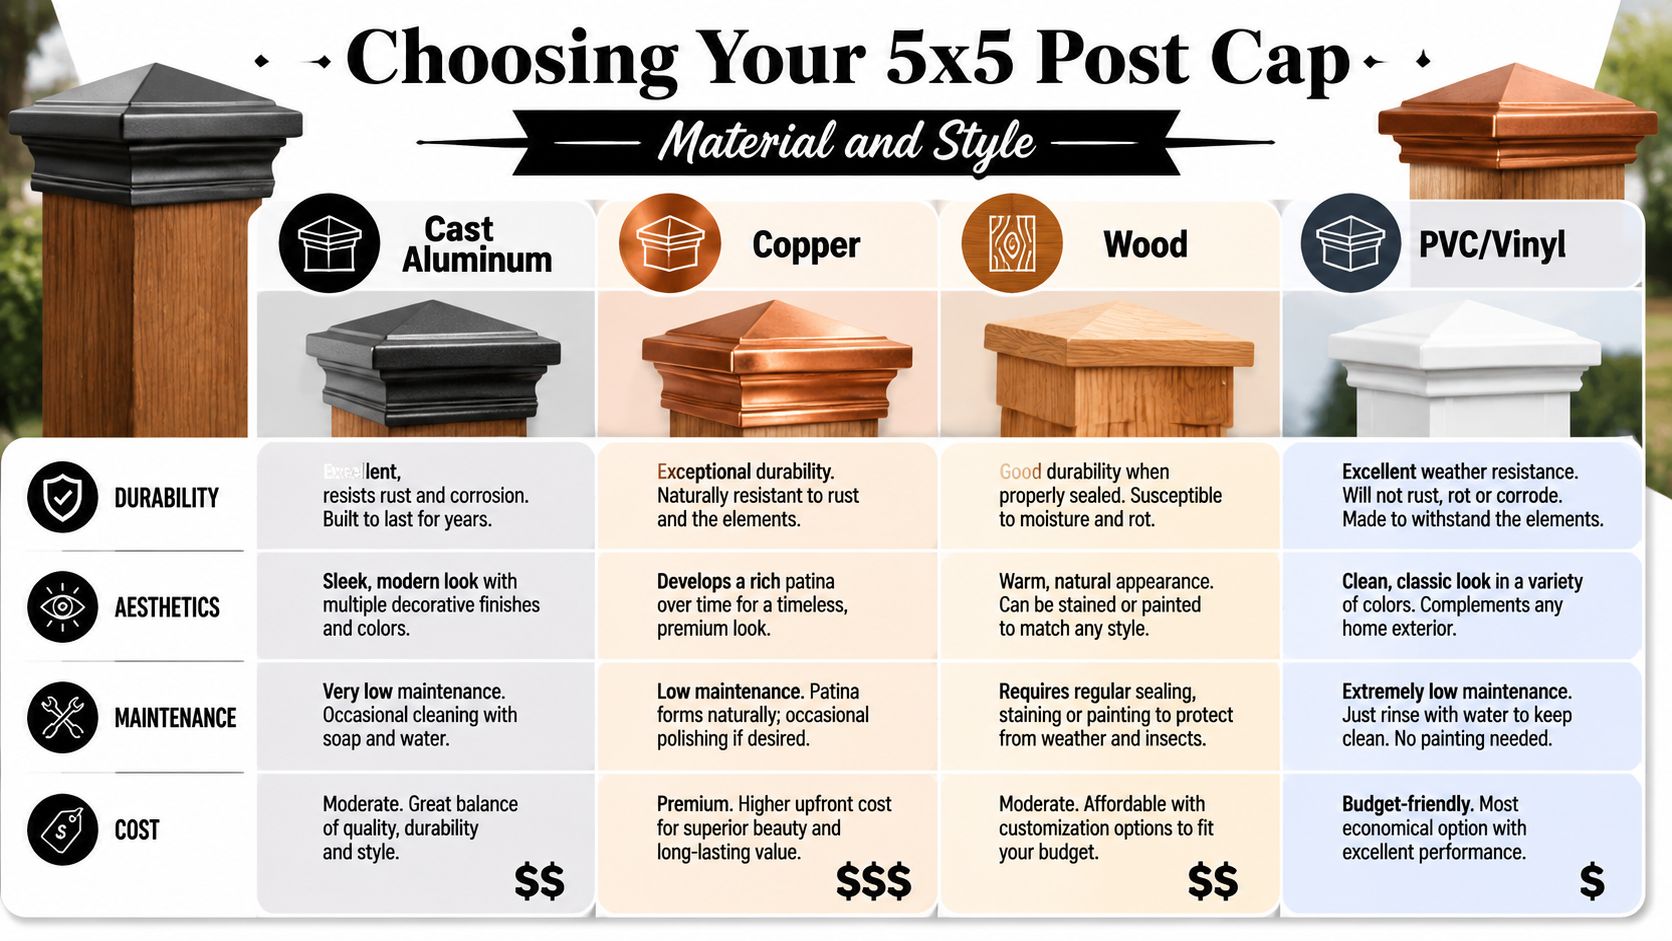
Choosing Your 5×5 Post Cap Material and Style
Once the fit is sorted, material becomes the main decision. It is then that appearance, maintenance, and service life separate.
Retail specs show PVC/vinyl 5×5 caps are marketed as fade- and yellow-resistant, while Nuvo Iron's 5" x 5" pyramid cap uses black aluminum for an ornamental cap that avoids polymer UV embrittlement and can better tolerate impact and temperature cycling, according to this material comparison reference.
Aluminium, vinyl, and wood in real use
Here's the practical view from installation and maintenance.
| Material | Where it works well | Watch for |
|---|---|---|
| Aluminum | Fences and decks where you want rigidity, crisp lines, and less worry about long-term colour stability | Higher upfront cost than basic vinyl options |
| PVC/Vinyl | Standard residential jobs where easy upkeep and a clean look matter most | Can be damaged by forcing a too-tight fit |
| Wood | Projects where you want a natural match with surrounding timber and plan to maintain the finish | Requires ongoing surface care |
Aluminum is a good match for exposed sites and for jobs where the cap is also part of the finished look, not just a protective cover. Decorative black pyramid caps are a common choice because they work on both modern and traditional fences.
Vinyl is often the easy answer for white fencing, low-maintenance deck rails, and jobs where you want a tidy, uniform top detail. It installs cleanly when the sizing is correct. It installs badly when the sizing is guessed.
Wood caps make sense when you want everything to read as one timber assembly. On the right build, they look excellent. They also ask more from the owner, because the finish needs attention.
A cap material should match the post, the exposure, and how much upkeep the owner will actually do. Not the upkeep they say they'll do.
Style changes the visual weight of the post
The cap shape affects how heavy or light the post looks.
- Pyramid caps suit most fences and deck posts. They shed water visually and work with almost any design.
- Flat caps look cleaner and more architectural. They suit contemporary layouts.
- Ball tops and decorative profiles make more sense on formal fencing, gates, and feature posts.
- Solar caps add function, but only when the lighting plan and post layout support them.
A small cap still changes the whole top line of a fence. If the rails and pickets are simple, a cap can become the detail people notice first.
Product selection without overbuying
Don't buy a premium material just because it sounds tougher. Buy it because the job calls for it.
If the fence is purely functional and the owner wants a straightforward finish, vinyl is usually the sensible lane. If the post cap is part of a feature entrance, gate run, or higher-end deck perimeter, aluminum usually looks sharper and stays sharper. If the build already leans heavily on stained timber and natural grain, wood keeps the language consistent.
For shoppers comparing decorative hardware, Decorex Hardware and Nuvo Iron are the types of brand lines that make the differences easy to see because the profiles, finishes, and fit styles are more defined than generic no-name caps.
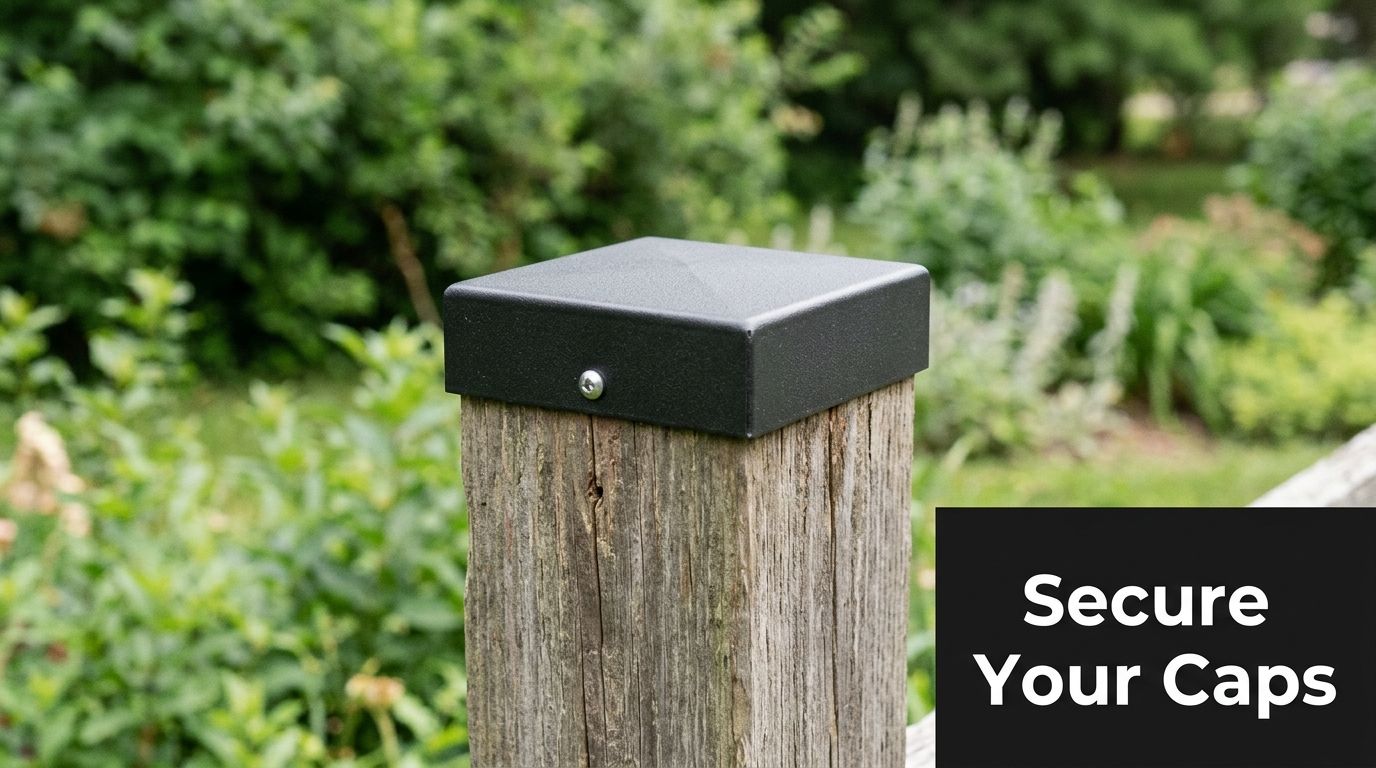
Secure Mounting Options for Your Post Caps
A good fit matters first. The fastening method decides whether the cap stays put through weather, vibration, and day-to-day use.
Adhesive when you want a clean look
Exterior-grade adhesive works well when you don't want visible fasteners. It suits vinyl caps, many decorative metal caps, and posts where future removal isn't a priority.
Use a small, controlled amount. Too much adhesive squeezes out, traps mess at the edges, and makes future replacement harder than it needs to be. Test-fit first, then apply adhesive only after the cap seats properly.
Adhesive is a poor way to solve a sizing problem. It holds a cap in place. It doesn't fix a cap that rocks or one that has to be forced over the post.
Screws when serviceability matters
Screws are the right answer when you may need to remove the cap later for repairs, repainting, post replacement, or access to a lighting component. They also give a more positive mechanical hold on windy sites and on caps that aren't designed as a strict friction fit.
A few rules matter:
- Pre-drill brittle materials: This helps prevent cracking in vinyl and avoids damaging coated finishes.
- Don't over-tighten: The cap should be secure, not distorted.
- Choose the fastening point carefully: Put screws where they hold the cap square without pulling one side down harder than the other.
If you're fastening near masonry or adjacent concrete work, the same planning mindset applies as it does with wedge anchors for concrete. Use the right anchoring method for the base material instead of trying to make one fastener solve every problem.
Friction fit when the cap is engineered for it
Some caps are made to seat snugly and stay put with little or no extra fastening. That can work well on stable, uniform posts with a well-matched cap.
It doesn't work well on:
- Rough wood tops
- Swollen lumber
- Out-of-square sleeves
- Any cap that only grabs on one side
If a cap only fits after pounding it down, stop. Either the post needs prep work or the cap is the wrong size.
For vinyl caps especially, forcing the install is where damage starts. For metal caps, a poor fit often shows up as uneven reveal lines around the top.
How to Install and Maintain Your Post Caps
Post caps started as a functional piece, not just a finishing detail. Fence post caps have been in common construction use for nearly 100 years, and their original job was protecting the top of the post from weather and decay. Industry guidance also notes that caps help prevent cracking at the top of the post and shield posts from sun, rain, snow, ice, pests, and rot, as explained in this history and function overview.
That's why installation quality matters. A cap that sits crooked, leaves gaps, or traps moisture at a damaged top edge won't do the job properly.
For a quick visual walkthrough, this installation guide helps: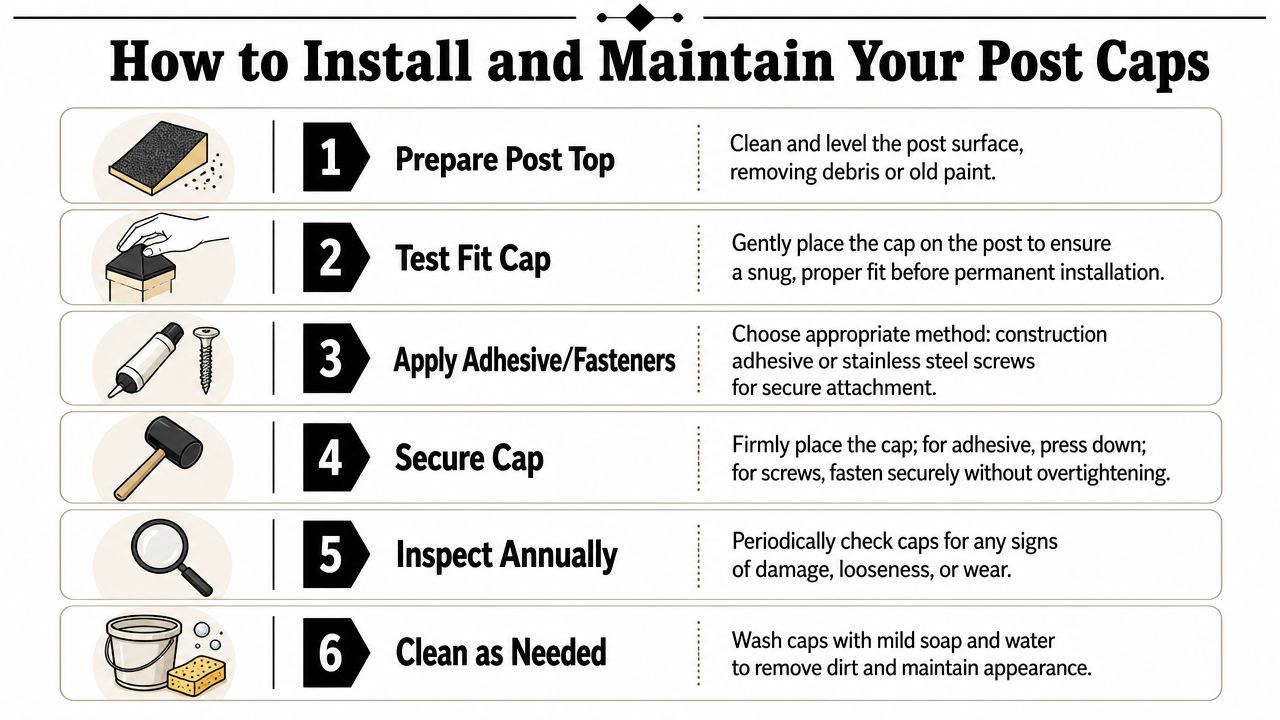
A clean installation sequence
Use a simple order and don't rush it.
Prep the top of the post
Remove dirt, old adhesive, flaking paint, and raised grain. If the top is uneven, flatten it before fitting the cap.Dry-fit the cap
Set the cap on without adhesive or screws. Check that it seats fully and sits square.Choose the fastening method
If the fit is tidy and permanent installation is fine, adhesive is often enough. If you may remove it later, use screws.Seat the cap fully
Press it down evenly. Don't strike a vinyl cap directly with a hard tool. If a light tap is needed, protect the surface.Check alignment from more than one side
A cap can look straight from the front and still be off at the side. Walk around the post.
Maintenance by material
Maintenance doesn't need to be complicated, but it should match the cap material.
- Vinyl caps: Wash with mild soap and water. Don't use aggressive scraping tools on the surface.
- Aluminum caps: Clean off dirt and residue before it builds up around seams and edges. Check coated finishes for scratches.
- Wood caps: Re-stain or reseal when the finish starts to wear. Don't let exposed end grain stay bare.
A yearly inspection catches most issues early. Look for looseness, trapped debris, finish wear, and water sitting where it shouldn't.
What usually goes wrong
Most installation failures come from one of three things.
| Problem | What causes it | Better approach |
|---|---|---|
| Cap won't seat | Wrong size or rough post top | Re-measure and prep the post |
| Cap cracks during install | Forced fit, usually on vinyl | Stop and correct the sizing issue |
| Cap loosens later | Weak fastening or poor surface prep | Reinstall on a clean, dry, square surface |
A post cap 5×5 should finish the post, not become another repair item.
Your Smart Buying Guide for 5×5 Post Caps
If you're buying carefully, the spec line that matters most is the one that tells you how the cap fits in real life. For example, Lowe's lists a 5.0-in W x 5.0-in L vinyl cap with an actual length of 5.17 in, while Nuvo Iron's 5"x5" ornamental aluminum cap is engineered to fit a true 5" x 5" nominal post directly and can also fit 4" x 4" rough lumber with an included adapter liner, as shown in this 5×5 fit example from Lowe's.
That tells you something important. Dimensional tolerance matters more than the name of the size.
A short buying checklist that prevents mistakes
- Measure first: Write down the actual top dimensions of every post type on the job. Don't assume all installed posts match.
- Match material to exposure: Pick vinyl, aluminum, or wood based on the look you want and the maintenance you'll accept.
- Check the fastening plan: Decide before ordering whether you want adhesive, screws, or a friction fit.
- Read the fit language carefully: Terms like nominal, true, adapter, liner, and actual opening are where good decisions happen.
- Keep supply simple: If you need caps and related hardware in one order, a dedicated deck post cap collection can make comparing sizes and styles more straightforward.
For retailers and marketplace sellers, product fit language is also where returns are won or lost. If you work on the supply side, this guide to selling hardware on Amazon is useful because it shows how category listings, compatibility details, and buyer expectations affect conversion and post-purchase friction.
There's also a practical reason post caps are such a common add-on. Industry pages describe them as available in materials such as wood, vinyl, and ASA resin, with standard caps commonly priced around $1 to $5 each, which helps explain how widely they're used on residential projects, according to this post cap market overview.
XTREME EDEALS INC. carries post caps along with related deck and fence hardware, which is useful when you're trying to source caps, fasteners, and finishing parts in the same order rather than piecing a job together from multiple suppliers.
Frequently Asked Questions About 5×5 Post Caps
Can you paint a vinyl or aluminum post cap
You can, but factory finishes usually look better and last more predictably than a site-applied coating. If you do paint, clean and prep the surface properly and use a finish made for that material.
How do you remove an old glued-on cap
Work slowly. Score the adhesive line, apply gentle prying pressure evenly, and avoid twisting one corner hard enough to split the post top. If the cap is being discarded, cut it apart carefully instead of damaging the post.
Do you need an adapter for a slightly undersized post
Sometimes, yes. If the cap system offers a liner or adapter, that's usually cleaner than trying to shim a loose fit with random filler.
Is a tight cap always better
No. A cap should fit snugly, but it should still seat without force. If it has to be driven on aggressively, the fit is wrong or the post needs prep.
If you've measured your posts and you're ready to order the right cap the first time, browse XTREME EDEALS INC. for post caps, deck and fence hardware, and related installation components that fit both DIY projects and contractor supply needs.