
A lot of decks and fences get built well, furnished well, and then abandoned after sunset. The barbecue cools off, the steps disappear into shadow, and the corner by the gate becomes the place everyone avoids. That usually isn't a design problem. It's an outdoor lighting installation problem.
The fix isn't merely adding more fixtures. Good exterior lighting changes how the space works. A stair tread light can make the route to the yard safer. A row of post cap lights can give a fence line shape after dark. A properly aimed wall light can make a seating area feel finished instead of harsh. When the hardware, mounting method, and wiring are handled properly, the result looks intentional instead of patched together.
Illuminating Your Outdoor Living Space
A common weekend project starts the same way. The deck looked excellent during the build, the railing lines were clean, the fence posts were straight, and the boards were freshly stained. Then evening came and the whole space flattened into one dark mass. The back door light helped a little, but it threw glare in one spot and left the stairs and perimeter barely visible.
That's where outdoor lighting starts paying for itself in daily use. The right setup gives you three practical wins at once:
- Safer movement for steps, gates, transitions, and edges
- Longer use of the space for dinners, conversations, and late evenings outdoors
- Better appearance because the deck, fence, and landscaping still read clearly after dark
For homeowners who want a solid overview of fixture types, controls, and general planning, DLG Electrical's lighting installation guide is a useful companion read. For the bigger-picture side of how lighting fits into a backyard upgrade, these outdoor living space ideas help tie the project back to how the space is used.
A good lighting plan doesn't make every surface bright. It makes the important surfaces readable.
That matters on decks and fences more than most DIY guides admit. You're not just placing lights. You're choosing where people look, where they walk, and what the eye notices first. A warm line of post lights along a fence can define the yard boundary without turning it into a stadium. A few under-rail or stair fixtures can do more for function than one oversized floodlight ever will.
The best installs start with that mindset. Build for movement first, then mood, then visual detail.
Planning Your Lighting Layout and Power
The planning stage decides whether the install feels clean or frustrating. Before buying fixtures, map the space like a contractor would. Mark the stairs, gate latch side, changes in level, cooking area, seating area, and any dark approach from the house or driveway. Those are your functional zones. Accent lighting comes after that.
Start with sightlines and mounting points
Walk the deck and yard at dusk and look from the places people stand. Check the view from the back door, from the bottom of the steps, and from the seating area. A fixture that looks fine on paper may shine directly into someone's eyes once it's mounted to a post or fence rail.
Use a sketch, even if it's rough. Mark where the cable can hide, where a transformer can mount, and which posts or fence sections are structurally worth using. This is also the point where many people realise they need fewer fixtures than they thought, but better placement.
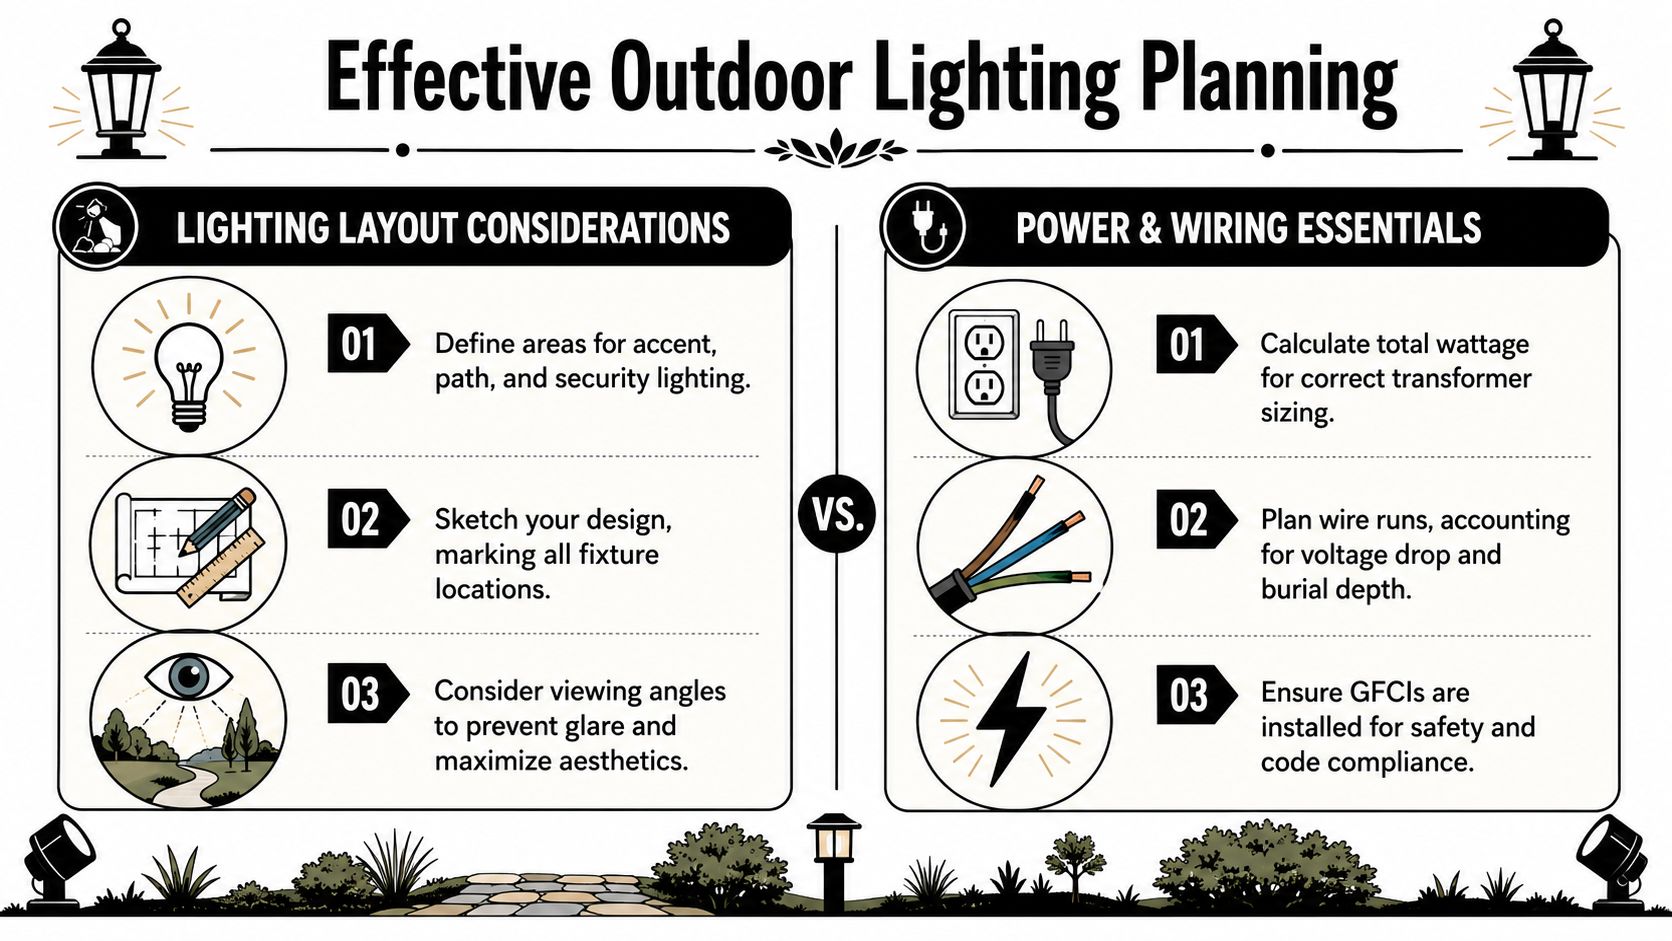
Low-voltage or line-voltage
For most capable DIY homeowners, low-voltage lighting is the practical choice. It's easier to route, easier to expand, and much easier to integrate into decks and fences where concealment matters. Line-voltage has its place, especially for larger wall fixtures and some permanent architectural lighting, but it raises the complexity fast.
| Feature | Low-Voltage (12V) | Line-Voltage (120V) |
|---|---|---|
| DIY suitability | Better for most homeowners | Usually better left to a licensed electrician |
| Shock risk | Lower | Higher |
| Best uses | Post lights, path lights, stair lights, accent lighting | Hardwired wall lights, larger fixtures, existing household circuits |
| Wiring flexibility | Easier to route along joists, rails, and fence lines | More restrictive because wiring protection matters more |
| Expansion later | Usually simpler | Often more involved |
| Typical hardware needs | Transformer, low-voltage cable, connectors | Weatherproof boxes, proper cable/conduit, GFCI protection where required |
If you're building around deck posts and railing lines, low-voltage fixtures such as deck post lights for low-voltage systems are usually easier to place neatly because the cable is smaller and easier to conceal behind trim, skirts, and framing members.
Controls matter as much as fixture choice
A lot of DIY installs work electrically but fail operationally. They're either left on too long or they need constant manual switching, so the owner stops using them. Better controls fix that.
According to the 2025 California Title 24 Lighting Code coverage published by Inside Lighting, outdoor illumination must be controlled by automatic scheduling systems that turn lights off during daytime hours, using photosensors or time-based controls, and must be capable of scheduling at least two distinct nighttime periods with independent light levels. Even if you're not bound by that exact rule where you live, it's a strong benchmark for what a well-planned system can do.
Planning rule: If you have to remember to switch it every night, the system won't get used consistently.
Three decisions that prevent rework
Choose the visual hierarchy first
Decide what should read brightest. Usually that's steps, entries, and changes in elevation. Seating zones can sit lower.Match fixture type to mounting surface
A fence post cap, a rail light, and a wall sconce all throw light differently. Don't choose by catalogue photo alone.Reserve space for service
Leave slack in cable runs, avoid burying connectors where possible, and keep transformers and access points reachable without dismantling finished work.
A clean lighting plan saves more time than any shortcut with a drill.
Gathering Your Tools and Materials
A smooth install usually comes down to whether the hardware pile matches the job. Most delays happen because someone has the fixtures but not the fasteners, the right bit, the correct connectors, or a mounting block that fits the surface.
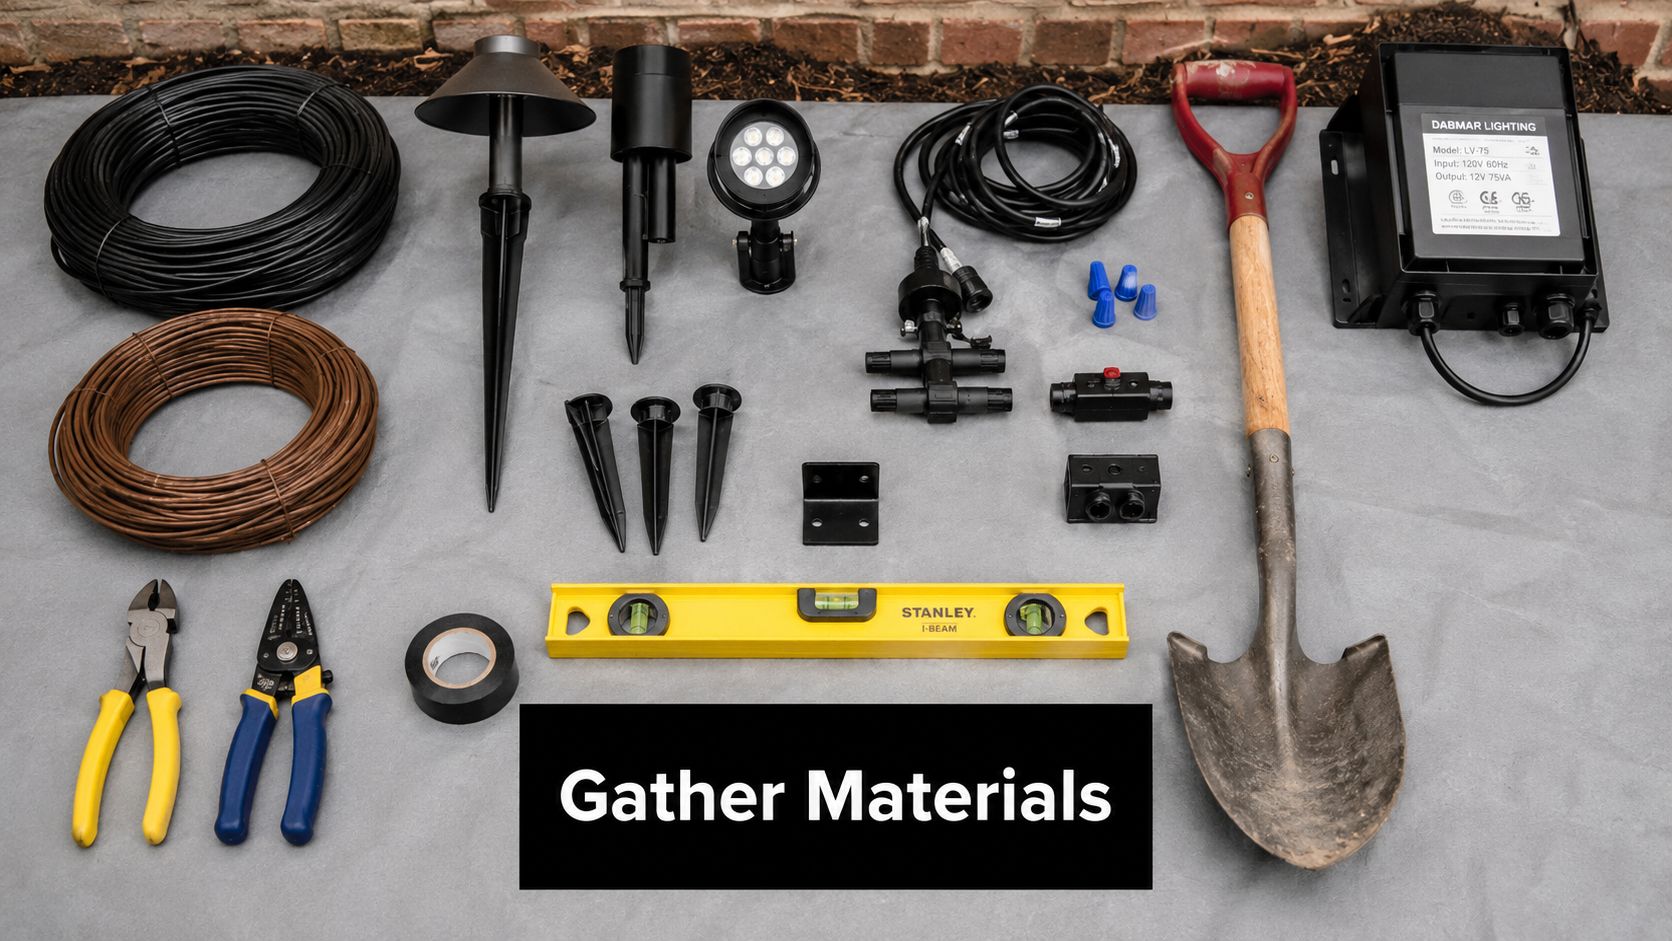
Tools that earn their keep
You don't need a van full of gear, but you do need the right basics.
- Cordless drill for pilot holes, countersinking, and light fastening
- Impact driver for structural screws and stubborn exterior fasteners
- Drill bits and driver bits in fresh condition, because worn bits strip heads and scar hardware
- Tape measure and torpedo level for repeatable fixture height and straight mounting
- Wire strippers and side cutters for low-voltage cable work
- Shovel or trenching spade if any cable will run below grade
- Non-contact tester and multimeter for checking power and verifying connections
- Painter's tape and pencil for marking exact fixture locations before drilling
- Exterior-rated sealant gun if the fixture base or wall penetration needs weather sealing
Materials that shouldn't be substituted
At this critical juncture, outdoor projects either stay tidy for years or start staining, loosening, and cracking.
- Low-voltage cable and transformer sized to the fixture load and layout
- Weather-resistant connectors made for exterior use
- Corrosion-resistant screws and fasteners for any exposed mount
- Mounting blocks or brackets where the surface is uneven, hollow, or not worth drilling directly
- Weatherproof electrical boxes for hardwired fixtures
- Cable clips, clamps, or staples that won't crush the jacket
For deck and fence work, the fixture gets all the attention, but the fastener carries the job. Exterior-rated screws matter because plated interior hardware often leaves rust streaks, binds in treated lumber, or snaps when driven near board edges. Stainless or other corrosion-resistant options are the safer bet outdoors, especially on railings and post faces that catch water.
Where solar post caps make sense
For some fence and deck projects, wire-free lighting is the cleaner answer. Decorex Hardware Solar Post Caps are a practical option when you want visible perimeter lighting on posts without trenching cable or drilling through multiple finished members. They're especially useful on long fence runs, gates, and retrofit jobs where the structure is already complete and you don't want to open it up.
Solar post caps work best when you treat them as surface lighting and boundary definition, not as task lighting for steps.
Use them where the post top gets good daylight and where you want rhythm along the line of the fence or railing. Use wired stair or under-rail lights where foot placement matters.
Running Wires and Making Connections
If the system is low-voltage, this is the part most DIYers can handle confidently with patience and a clean layout. If it's line-voltage, slow down and be honest about the scope. Hardwired exterior lighting raises the stakes on protection, box placement, grounding, and local code compliance.
Running low-voltage cable cleanly
Start at the transformer location and work outward. On decks, keep cable runs tight to framing members, not hanging loosely below boards where they'll snag during maintenance. Tuck the cable along joists, behind fascia where practical, and up through protected drill holes near the fixture mounting point.
For fence runs, use the least exposed route. The back side of a rail, the sheltered side of a post, or a concealed channel behind trim is usually better than stretching wire across open spans.
A few habits keep the install serviceable:
- Leave slack at fixtures so you can remake a connection later
- Avoid sharp bends around brackets and post corners
- Support the cable regularly so it doesn't sag
- Keep connectors accessible where possible instead of burying every splice
Transformer sizing and zoning
Add the wattage of all fixtures on the run and choose a transformer that gives you breathing room rather than landing right at the limit. If a run is long or heavily loaded at the far end, expect some voltage loss and plan the layout to reduce it. Splitting the system into sensible branches often gives better results than one long daisy chain.
In regions with strict energy codes like California, permanently installed outdoor lighting systems must automatically reduce power by at least 40% when areas are unoccupied, and no more than 1,500 watts can be controlled in a single zone, often requiring dimmable transformers and motion sensors, as set out in the California Energy Code Chapter 6 requirements.
Even where that exact code doesn't apply, the takeaway is practical. Separate areas by use. Don't put every light in the yard on one control if stairs, seating, and perimeter lighting have different jobs.
Burial and transitions
If cable must cross lawn or garden beds, trench it neatly and avoid random shallow burial. Route around future digging areas if you can. At deck-to-ground transitions, use a protected path so the cable doesn't get pinched where framing meets soil or concrete.
The cleanest wire run is the one you can still trace a year later without guessing.
When line-voltage belongs to a pro
A line-voltage outdoor lighting installation often needs weatherproof boxes, proper protection for the conductors, and GFCI-aware planning depending on the circuit and location. Mounting a fixture may look simple from the outside, but the hidden part is where mistakes become dangerous. If the project involves tying into house wiring, adding a new circuit, or running protected wiring through finished exterior assemblies, that's usually electrician territory.
That isn't a limitation. It's good judgement.
Mounting Fixtures on Decks Fences and Posts
Mounting quality determines whether many outdoor lighting projects appear professional or improvised. Good mounting isn't only about holding the fixture in place. It controls how the light sits, where water goes, how visible the cable is, and whether the hardware still looks good after seasons of expansion, contraction, and weather.
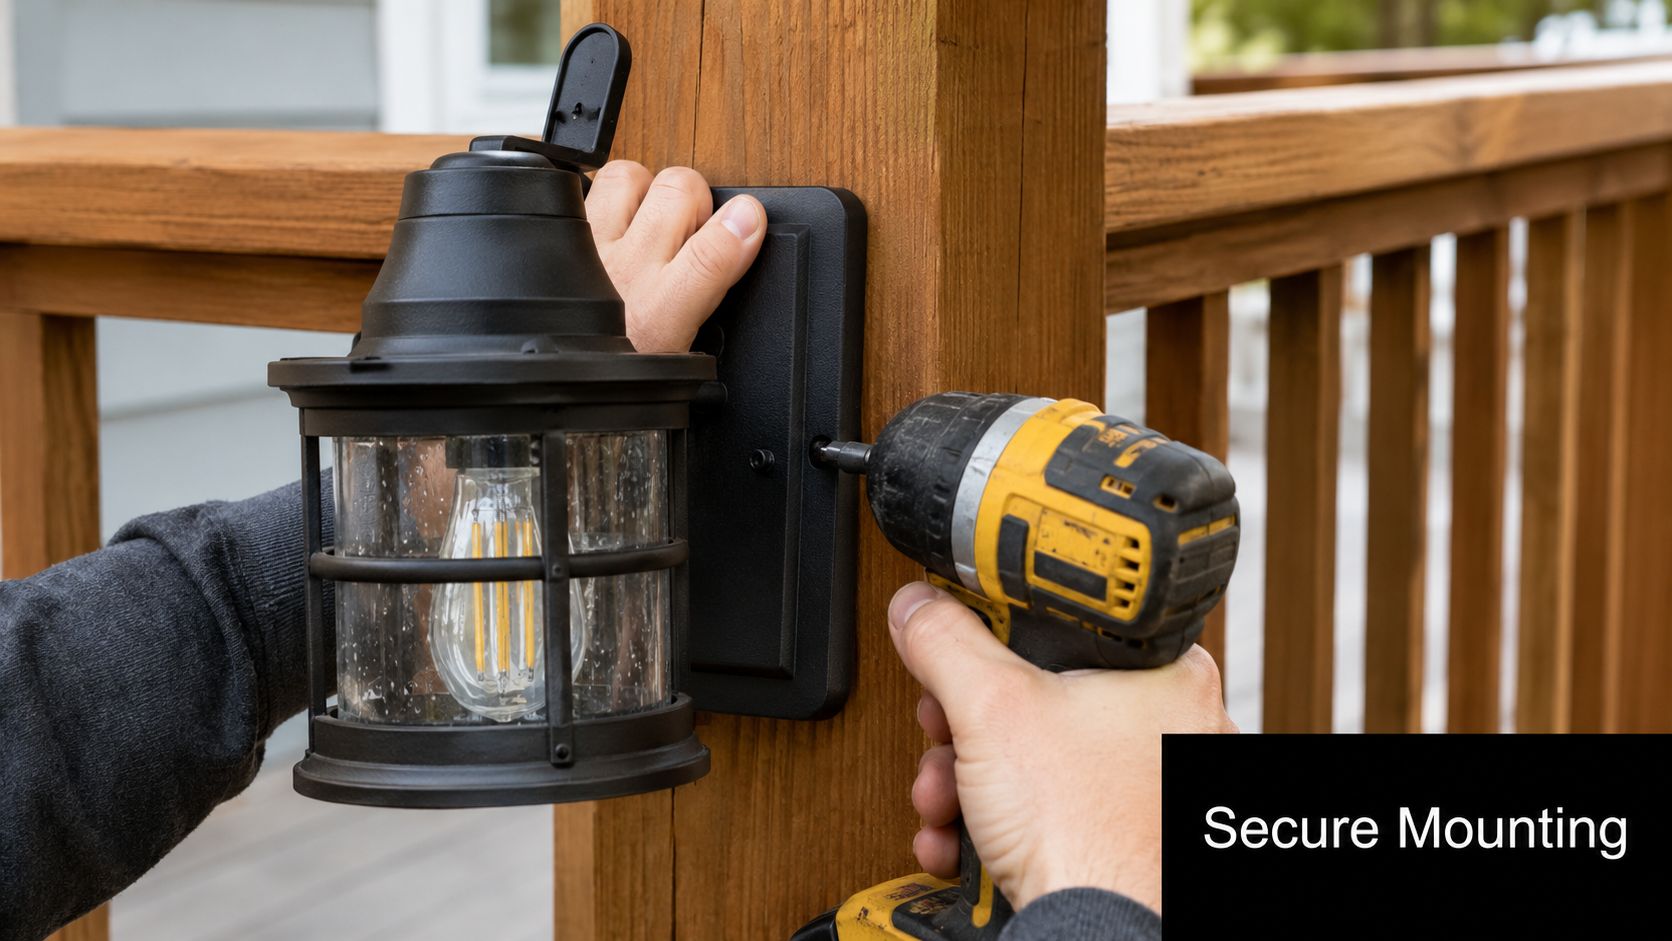
Wood decks and railing posts
Wood is forgiving, but it still splits when rushed. Pre-drill near board ends, especially on railing caps, post faces, and older lumber that has dried hard. If the fixture base has two mounting screws, mark both holes with the fixture held level before drilling the first pilot. One misplaced fastener can twist the whole body out of square.
For wood posts, these steps work well:
- Mark the fixture height from a fixed reference point, not by eye.
- Check for hidden fasteners or structural connectors before drilling.
- Drill a pilot sized for the screw shank and material.
- Seat the fixture without overdriving. Crushing the base gasket creates leaks later.
- Dress the cable so it enters from the least visible side.
For heavier fixtures or awkward surfaces, a dedicated mounting accessory often gives a better result than trying to force the fixture base to sit flat. Purpose-made wall mounting brackets can help when the post face is narrow, the cladding profile is uneven, or you need a cleaner stand-off from the surface.
Composite and PVC fence components
Composite and PVC need a lighter touch than wood. They don't behave well when fasteners are driven aggressively, and some hollow profiles need backing support before they can take a fixture securely. If the panel or sleeve flexes, don't trust it alone. Add a backing block inside the cavity or mount to the structural post beneath the finish layer.
A few mistakes show up repeatedly on composite fences:
- Skipping pilot holes and creating mushrooming or surface cracks
- Mounting only to the skin instead of the structural member
- Using the wrong screw head and dimpling the surface
- Ignoring heat movement on long exposed runs
If the fixture is small, distribute the load with a mounting plate. If it's larger, move the fixture to a location with better support.
Metal posts and brackets
Metal is excellent for rigidity, but it punishes sloppy drilling. Use the correct bit, centre punch the hole location if needed, and deburr the opening before pulling any wire through. Protect conductors from sharp edges. If the fixture body and metal support can create galvanic issues in wet conditions, choose compatible hardware and isolate where appropriate.
Later in the project, this kind of visual walkthrough helps with orientation and positioning before final tightening:
Aiming, levelling, and hiding the evidence
Mounting is finished only after the fixture is aligned and the surrounding surface is still clean. Step back and check the line of several fixtures together. One crooked post light in a row stands out more at night than people expect.
On-site habit: Tighten hardware in stages. Snug it, level it, sight it from a distance, then final-tighten.
For cable concealment, use shadow lines and rear faces whenever possible. Run behind post trim, under rail caps, along the inside of framing, or through drilled passages that won't weaken the visible surface. Don't staple cable across the front of a fence because it's faster. That shortcut announces itself every time the lights come on.
The best mounted fixture doesn't call attention to its screws, its wire, or the compromise that put it there. It just looks like it belongs.
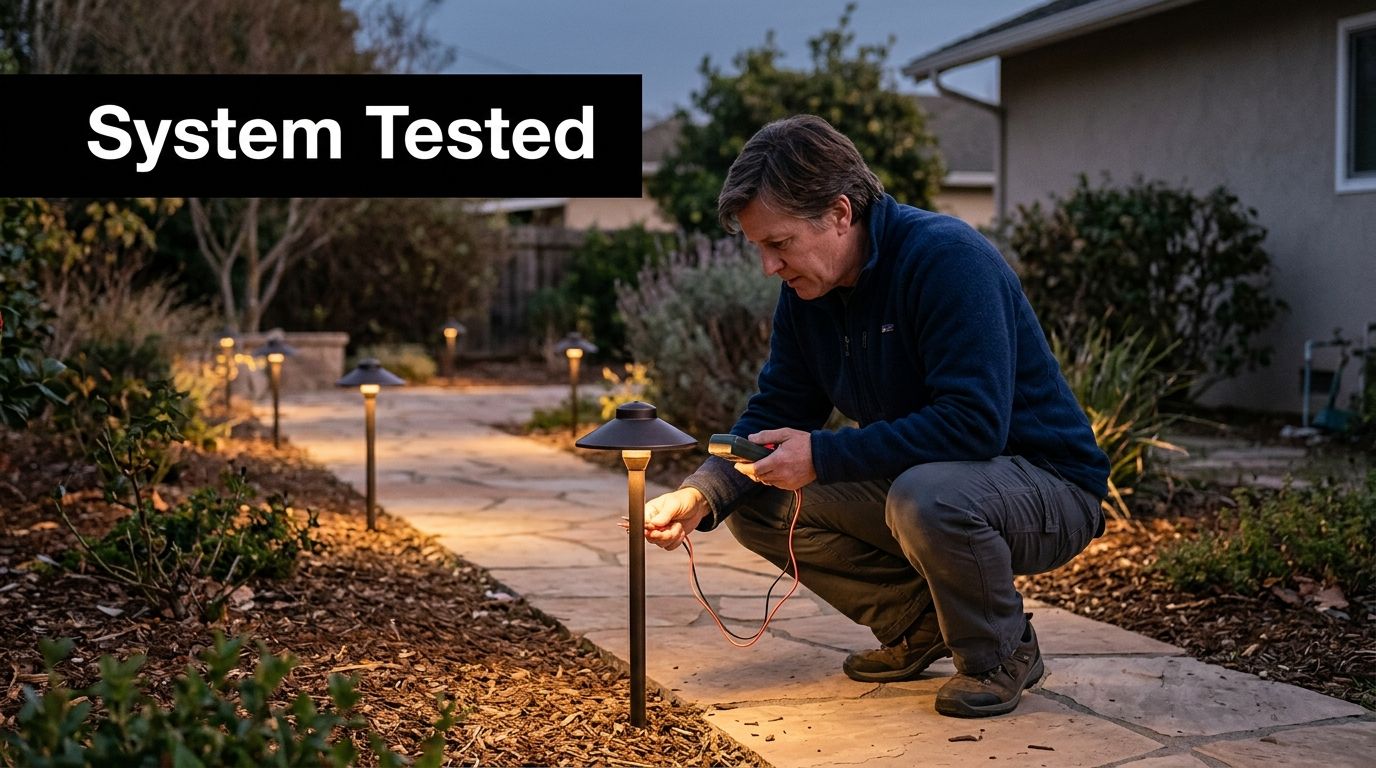
Final Checks Troubleshooting and Maintenance
A lighting job isn't done when the last screw goes in. It's done when the system works reliably at dusk, the light lands where it should, and the installation can survive weather and routine use without constant adjustment.
Test at night, not just in daylight
Daytime testing only tells you whether power is present. It doesn't tell you whether a stair light is too bright, whether a fence light is glaring into a seating area, or whether the last fixture on the run looks weak. Test after dark and walk the site the way you normally use it.
For functional safety, professional standards often call for walkways and parking lots to maintain a minimum illumination of 0.5 foot-candles and an average of 1.0 foot-candles, which is a useful benchmark when checking your own installation on stairs and paths, as noted in the CSU outdoor lighting design guide.
That doesn't mean a backyard needs to feel commercial. It means paths and level changes should read clearly enough that people aren't guessing where to step.
Quick troubleshooting that usually finds the problem
If one fixture is out, check the local connection first. If a whole branch is dark, move upstream.
Single light not working
Check the lamp or integrated fixture connection, then inspect the splice or connector closest to that fixture.End of run looks dim
Look for excessive run length, too many fixtures on one branch, or a weak connection adding resistance.Whole system is off
Check transformer power, timer or photocell settings, and the primary connection before remaking every splice.Intermittent operation
Suspect moisture in a connection, a loose terminal, or a cable that's under tension and pulling partly free.
Seasonal maintenance keeps the install looking intentional
Outdoor lighting ages well when someone gives it basic attention a few times a year.
- Clean lenses and solar panels so dirt doesn't cut output
- Check exposed fasteners for loosening, staining, or movement
- Trim plants back from fixtures and beam paths
- Inspect cable routes where pets, tools, mulch, or weather may have shifted them
- Re-aim adjustable heads after winter movement or deck maintenance
A strong outdoor lighting installation doesn't need constant repair. It needs sensible mounting, protected wiring, and occasional follow-through. If those parts are right, the deck and fence will still work after dark long after the build itself stops feeling new.
XTREME EDEALS INC. makes projects like this easier to finish properly, especially when the job depends on the right post caps, brackets, fasteners, and deck or fence hardware instead of improvised fixes. Browse XTREME EDEALS INC. for deck and fencing accessories, construction hardware, and practical finishing components that help DIYers and contractors build cleaner, longer-lasting outdoor installs.