

You're probably standing at a familiar starting point. There's a patch of yard that could become a deck where people want to sit, or a fence line that needs to stop looking temporary and start looking finished. The hard part isn't wanting the project. It's knowing which steps matter, which shortcuts cause trouble later, and which hardware choices separate a clean build from a frustrating rebuild.
That's where step by step guides earn their keep. Good ones don't just tell you what tool to pick up next. They show you the order that prevents mistakes. On deck and fence work, sequence matters as much as skill. If posts go in wrong, nothing lines up. If the ledger is sloppy, the whole deck carries that weakness. If the finishing details are rushed, the project looks unfinished even when the structure is sound.
In Canada, structured instruction has a strong base. Statistics Canada's 2021 Census counted 5,143,150 people aged 15 to 24 in the country, a large learner and early-career group that often relies on organised tutorials and guided instruction, while the American Statistical Association's STEW programme) offers peer-reviewed lesson plans built around staged learning. That same logic works on a jobsite. Break the work into stages, make each decision deliberate, and the build goes smoother.
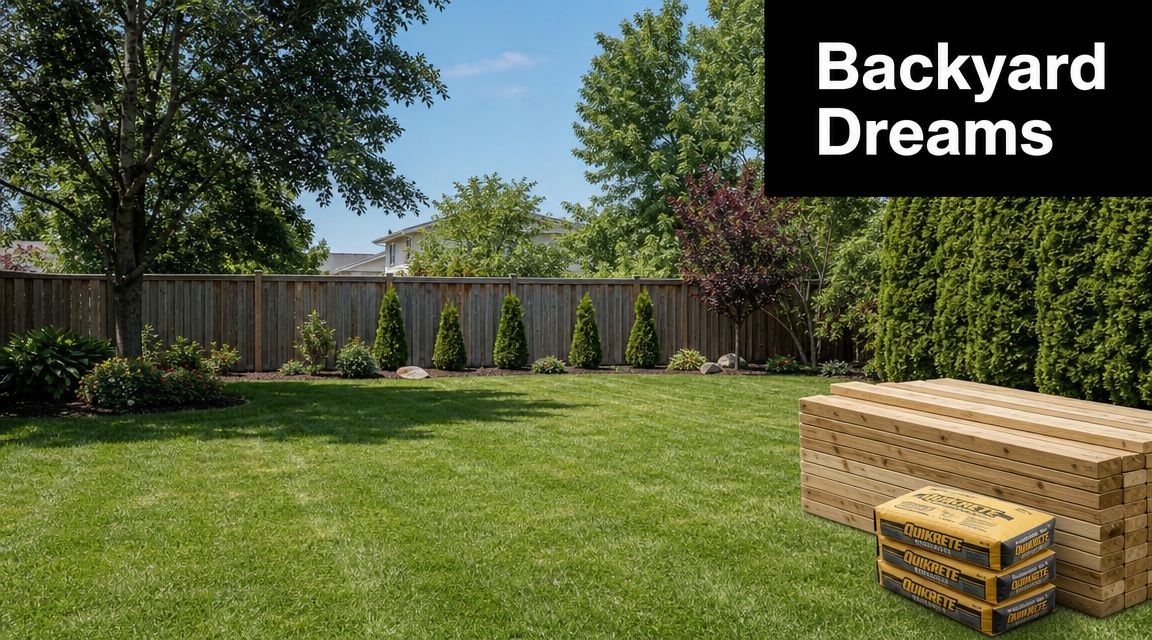
From Backyard Dream to DIY Reality
Most backyard projects start the same way. A rough idea. A tape measure. A few conversations about privacy, shade, seating, storage, and whether the old fence can survive another winter. Then the questions pile up fast. Where do the posts go? What hardware belongs outside year after year? Which parts can be mounted to concrete, and which need to be buried and braced?
A lot of homeowners assume pros work from instinct. They don't. Good builders follow repeatable sequences. They lay out lines before digging. They dry-fit brackets before fastening. They measure actual post sizes instead of trusting nominal lumber labels. That's why step by step guides work so well for deck and fence projects. They replace guesswork with order.
The difference is usually in four moments
The projects that come out square, solid, and clean usually get four things right:
- The planning is specific. The layout matches the site, the grade, the gate swing, and the hardware being used.
- The posts are set properly. Plumb now means less fighting later with rails, panels, and framing.
- The structural connections are chosen correctly. Ledgers, anchors, screws, bolts, washers, and hangers need to fit the load and the exposure.
- The finishing details are treated like real work. Post caps, trim details, and corrosion-resistant fasteners make the build last and look intentional.
I've seen simple backyard builds turn messy because someone rushed the foundation work, then tried to “fix it in the framing”. That rarely works. Wood will forgive a little. Hardware won't.
Practical rule: If a later step has to compensate for an earlier mistake, stop and correct the earlier mistake.
That's the mindset behind reliable step by step guides. You don't need to build like a production framing crew. You do need to move in the right order, use the right parts, and understand why each step exists. If you're still sorting through ideas before you buy materials, this collection of outdoor living space ideas is a useful place to narrow down what belongs in your yard and what doesn't.
Planning Your Project The Right Way
Bad planning shows up as wasted cuts, extra store runs, crooked lines, and hardware that almost fits. Good planning is quieter. You notice it when the holes land where they should, the brackets match the posts, and the build moves without stalling.

Ontario's human-rights data guidance uses a formal six-step methodology: identify the issue, set goals, plan methods, collect data, analyse and interpret, then act on results. It also stresses defining geographic scope, group definitions, and data sources before collection in order to reduce ambiguity and improve reproducibility, as outlined in the Ontario Human Rights Commission's six-step guidance. Construction planning benefits from the same discipline. If you define the site, the goal, the hardware, and the sequence before work starts, fewer surprises reach the build stage.
Start with the site, not the shopping cart
Walk the yard and mark real conditions, not ideal ones. That means:
- Find the boundaries. Don't build to a guessed line.
- Check the grade. Slopes affect fence step-downs, stair transitions, and post heights.
- Mark obstacles. Tree roots, existing concrete, irrigation lines, and low eaves all change the plan.
- Think through access. Carrying posts, concrete, and tools across soft ground or through a side gate affects labour and pace.
A simple hand sketch usually beats a complicated digital drawing if the sketch includes accurate measurements. For homeowners who want help visualising layout options before committing, a tool like backyard design ai can help test different arrangements and sightlines.
Build your materials list by assembly
Don't make one giant shopping list called “deck stuff” or “fence parts”. Break it into assemblies.
| Assembly | Typical items to list |
|---|---|
| Posts | Pressure-treated posts, post bases or concrete, temporary braces |
| Framing | Joists, beams, joist hangers, structural screws, washers |
| Fence runs | Rails, pickets or panels, exterior screws, gate hardware |
| Anchoring | Wedge anchors, sleeve anchors, lag bolts, carriage bolts |
| Finishing | Post caps, adhesive, colour-matched screws, touch-up materials |
This catches omissions early. It also makes substitutions easier when one product is out of stock.
A project usually slows down for one missing connector, not for one missing 2×4.
The planning checklist that actually prevents problems
Use this before any digging or fastening:
- Confirm local requirements. Permits, setbacks, railing rules, and attachment rules vary by municipality.
- Request utility locates. Don't trust memory or old landscaping plans.
- Measure actual lumber. A nominal 4×4 and a true 4×4 aren't the same fit for caps and brackets.
- Match fasteners to exposure. Exterior work needs hardware that can handle moisture and treated lumber contact.
- Lay out post centres on paper first. Then transfer to string lines and the ground.
- Stage tools in advance. Post hole digger, auger if needed, level, string line, clamps, impact driver, spade bit, socket set, framing square, and saws.
A disciplined start feels slower for about an hour. After that, it's faster all the way through.
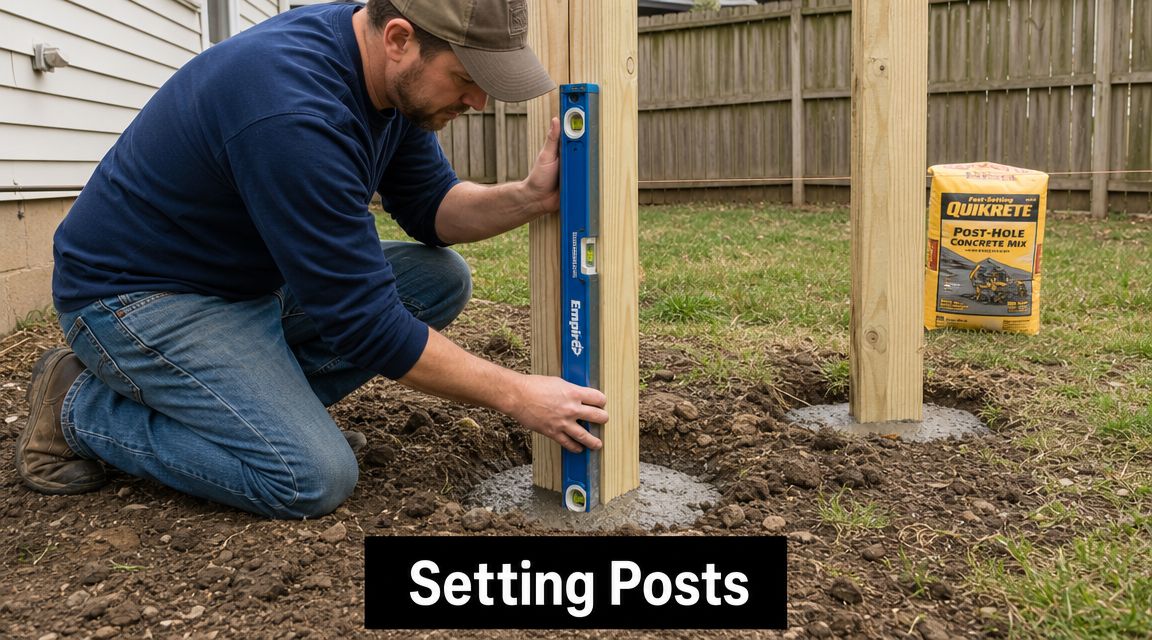
A Step by Step Guide to Setting Posts
Posts carry the alignment of the whole project. When they lean, twist, or drift off spacing, everything above them becomes corrective work. Rails need shimming. Panels need trimming. Gates stop swinging cleanly. Deck framing gets forced into shape instead of built into shape.
Lay out before you dig
Set your corner points first. Run mason's line tight between them. Measure post locations from a fixed reference point, not from a previous hole that might already be slightly off. On fence work, that keeps the run consistent. On deck work, that helps framing land where hangers, beams, and joists belong.
Use marking paint or stakes to show each location. Then stand back and sight the run. A visual check catches bad spacing before the shovel touches the ground.
Decide whether the post belongs in concrete or on concrete
This decision gets missed all the time.
Use an in-ground set when the design and site call for buried posts. Use a post base bracket when you're mounting to an existing slab, curb, or concrete pier that's sound and appropriate for anchoring. If you're fastening wood posts to concrete, this guide on anchoring posts to concrete lays out the key bracket and anchor considerations.
Here's the practical split:
- Buried post with concrete works well for many fences and for structures designed around embedded support.
- Post base bracket on concrete makes sense where excavation isn't practical, where a slab already exists, or where keeping the wood above standing moisture is the better move.
The wrong approach usually creates moisture trouble, instability, or awkward elevations.
The setting sequence that works
I prefer a repeatable order:
- Dig the hole cleanly. Keep the sides as straight as the soil allows.
- Check the bottom. Loose spoil under a post leads to settlement.
- Set the post at height. Mark finish elevations before mixing anything.
- Brace the post in two directions. Use scrap lumber and screws so you can adjust quickly.
- Plumb the post. Check two adjacent faces with a reliable level.
- Place and consolidate the concrete. Don't leave voids around the post.
- Recheck plumb before walking away. Wet concrete gives you a short window to correct.
That order avoids the classic mistake of pouring first and fussing with alignment after the mix has already started to lock up.
Here's a helpful visual reference for the process:
What separates a clean post set from a frustrating one
The details aren't glamorous, but they matter:
- Use temporary braces you can fine-tune. A nailed-on scrap that can't be adjusted is barely a brace.
- Keep the post faces oriented deliberately. If one face will carry rails, brackets, or gate hardware, set that face now.
- Protect the line. Don't let braces or spoil heaps knock your layout string loose.
- Measure post spacing at the tops as well as near grade. A post can be plumb and still be wrong relative to its neighbour.
If the post needs force to “pull it into line” during framing, the post wasn't set properly.
One more point matters in Canada. Frost movement is real, and hole depth needs to reflect local ground conditions and requirements. Guessing here is expensive. Check what applies where you're building before you dig.
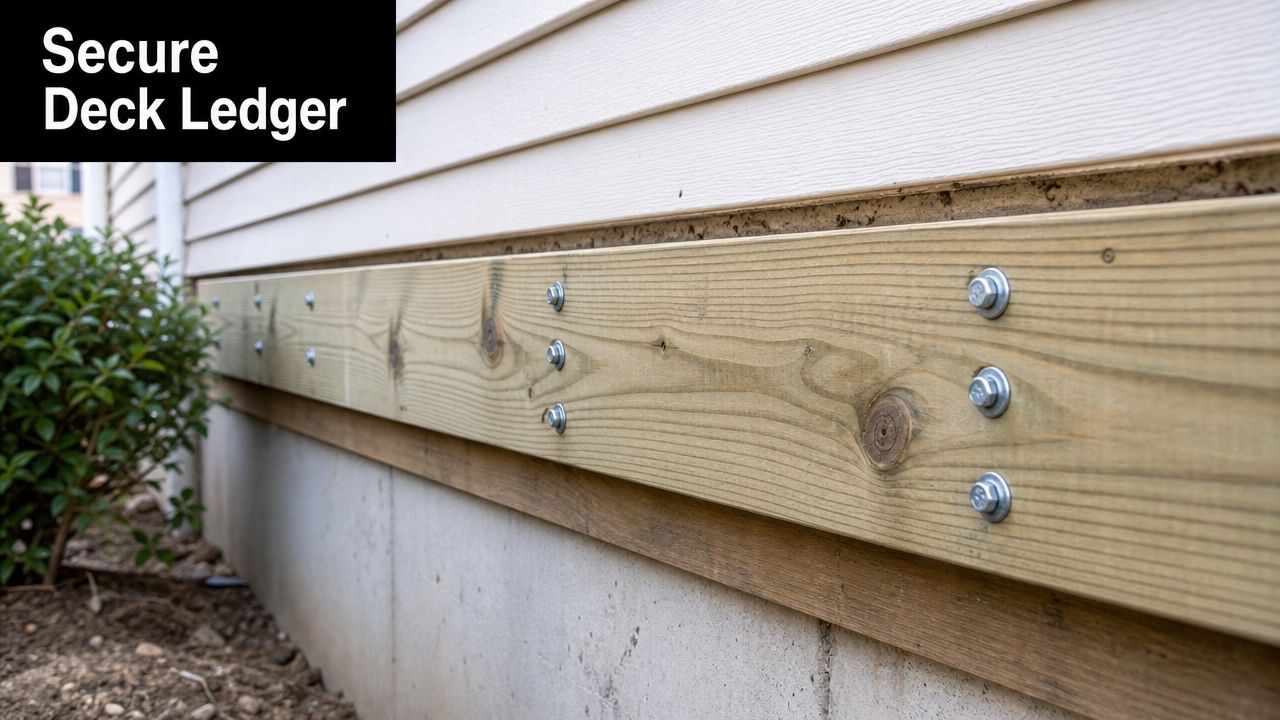
A Guide to Deck Ledgers and Fasteners
A deck ledger is one of those parts that looks simple until it fails. It's just a board against the house, right up until water gets behind it, the wrong fasteners get used, or someone anchors into the wrong substrate. Then it becomes a structural and moisture problem at the same time.
Canada has a long institutional tradition of procedural rigour. Statistics Canada traces its federal roots to the Dominion Bureau of Statistics in 1918, a reminder that careful, ordered methods matter when accuracy matters, as discussed in this step-based statistics reference. A deck ledger deserves the same mindset. Every layer, every fastener, every penetration matters.
Water management comes first
Before fasteners, think water. The ledger must be integrated with flashing and the wall assembly in a way that sheds water out and away. If water sits behind the board, the structure can rot while looking fine from the outside.
That means checking the cladding, the sheathing condition, and how the flashing laps. If the water path isn't clear, don't keep fastening. Stop and correct the assembly.
Choose the right fastener for the job
Not every heavy screw is a structural screw, and not every exterior bolt belongs against treated lumber.
A practical comparison helps:
| Hardware | Best use | Watch for |
|---|---|---|
| Lag screws | Traditional heavy wood-to-wood structural attachment | Proper pilot holes and washers matter |
| Structural screws such as GRK | Strong ledger and framing connections where approved and suitable | Use the correct length and application |
| Carriage bolts | Through-bolted connections on posts and beams | Need proper washers and access to both sides |
| Galvanised or stainless washers | Load distribution under bolt or lag heads | Skipping washers damages wood fibres and weakens the connection |
Galvanised or stainless components aren't optional on exterior deck work. Moisture, treated wood chemistry, and seasonal movement all work against unprotected metal.
Hardware failure usually starts as corrosion, not drama.
Joist hangers are not a place to improvise
Joist hangers need to match the member size and the load path. Don't bend a hanger into shape because it's “close enough”. Don't swap in random screws because they're nearby. Hangers are engineered connectors. They need the correct fasteners in the correct holes.
When using products such as Decorex Hardware joist hangers, check three things before installation:
- The hanger matches the lumber dimension.
- The hanger sits tight and square against the ledger or beam.
- The specified fasteners are used, not leftover deck screws.
The ledger checklist I trust on site
Read this like a stop-go inspection:
- Board position is level.
- Wall condition is sound.
- Flashing is installed to shed water.
- Fastener type matches structural use.
- Washer selection matches the connector and environment.
- Joist hanger placement stays consistent across the run.
A ledger that's installed carefully makes the rest of the framing easier. Rim alignment improves. Joists seat properly. Decking starts flatter. The whole build feels calmer because the structural starting point is solid.
Installing Post Caps and Finishing Touches
A fence or deck can be structurally sound and still look unfinished. That usually happens when the builder treats the last details like decoration instead of part of the build. Post caps are a good example. They protect the top of the post from direct water exposure, and they clean up the look instantly.
The first mistake is sizing. A nominal post label doesn't guarantee the cap fit. You need the actual measurement of the installed post. That's especially important when you're mixing suppliers, replacing old components, or working with rougher treated stock that isn't perfectly uniform.
Why the cap choice matters
Different styles change the feel of the whole project. A Pyramid cap gives a clean, classic line. A Ball Finial pushes the look more decorative and formal. On a simple privacy fence, understated caps usually keep the project looking sharp without feeling busy. On gate posts or entry features, a more noticeable profile can work well.
If you're comparing styles and fits, this collection of caps for fence posts is a practical reference for common shapes and sizes.
The clean installation method
A good cap install doesn't take long, but sloppy work shows forever.
Use this approach:
- Dry-fit first. If the cap rocks or binds, fix the fit before adding adhesive.
- Clean the post top. Sawdust, splinters, and moisture interfere with adhesion.
- Use exterior-grade adhesive sparingly. Excess squeeze-out looks amateur and attracts dirt.
- Add screws only where the cap design calls for them. Colour-matched screws keep the finish tidy.
- Align decorative faces consistently. On a fence run, visual consistency matters more than people think.
A finishing detail only looks premium when it's installed like the builder cared about alignment.
What works and what doesn't
What works is a cap that fits the true post size, suits the style of the structure, and is fastened neatly. Decorex Hardware options are useful here because the line covers a range of common profiles and decorative looks without forcing one style on every project.
What doesn't work is forcing an undersized cap, overdriving visible screws, or ignoring the top of the post because “the treatment will handle it”. Water sits at the top grain. That area needs protection.
The same logic applies to the rest of the finishing stage. Trim exposed cuts where needed. Use compatible exterior fasteners. Check gate hardware alignment. Stand back and inspect the project from the yard, not just from six inches away. That's usually where the final punch list reveals itself.
Frequently Asked Questions for Builders
Some questions only come up once the work starts. That's normal. Deck and fence jobs always have a few field decisions.
What hardware is best for coastal or high-humidity areas
Use Type 304 stainless steel where you need strong corrosion resistance, and Type 316 stainless steel where exposure is more severe. Standard galvanised hardware can work in many exterior applications, but salty air and constant dampness are harder on metal. Match screws, bolts, washers, and connectors to the environment from the start.
How do you install post caps on non-standard post sizes
Measure the actual post. Don't buy by nominal label alone. If the size is odd, use a cap designed for the true dimension when available. If that isn't possible, use a clean wood adapter or a careful shim method that still leaves the cap seated evenly and looking intentional.
Do deck boards need a gap
Yes. Wood moves with moisture conditions, and the deck also needs drainage. A small, consistent gap helps water leave the surface and gives the boards room to behave normally through the seasons. Spacers or a deck screw jig help keep the run looking uniform.
Are wedge anchors and sleeve anchors interchangeable
Not really. Both anchor into concrete, but they're not chosen the same way in practice. The right choice depends on the base material, the bracket, the loads involved, and how permanent the connection needs to be. Check the hardware requirements for the specific post base or connector you're using instead of substituting on the fly.
What's the most common DIY mistake on fences and decks
Rushing layout. Most visible problems start there. Once spacing, lines, and elevations drift, the rest of the build turns into compensation work. The best step by step guides always slow down at layout because that's where the project either stays under control or starts fighting back.
XTREME EDEALS INC. makes it easier to build with the right hardware the first time. If you need post caps, finials, joist hangers, post base brackets, deck screws, anchors, bolts, or other deck and fence essentials, browse XTREME EDEALS INC. for practical products that fit real backyard projects and professional jobs alike.