

You're usually at the same point when post caps become urgent. The deck framing is done, the fence line is straight, the posts are set, and everything looks solid from ten feet away. Then you look at the exposed tops and realise the job still feels unfinished.
That's where a lot of DIY projects stall out. The cap seems like the easy part, so people buy by the label, bring them home, and find out the “4×4” cap doesn't fit the “4×4” post. Too tight. Too loose. Rocking on the corners. Back in the box it goes.
Good post caps for 4×4 do two jobs at once. They clean up the look, and they protect the top of the post where water does the most damage. If you get the size right and choose the right material, they're one of the simplest upgrades on the project. If you get the size wrong, they're one of the most annoying.
The Perfect Finishing Touch for Your Project
A bare post top always gives itself away. You can have straight rails, clean mitres, and tidy fasteners, but the eye still lands on the end grain. That top surface looks unfinished because it is unfinished.
Post caps solve that fast. A simple pyramid cap sharpens up a basic fence. A heavier decorative cap can make plain deck posts feel deliberate instead of purely structural. Even a low-profile flat cap can change the whole look by making the post top feel intentional.
The practical side matters just as much. The top of a wood post takes weather directly, and that exposed grain is where water likes to sit. A cap creates a barrier and, when fitted properly, helps keep the top from becoming the weak point of the whole run.
A post cap is a small part with oversized consequences. It affects fit, appearance, and how much water reaches the top of the post.
The mistake I see most often isn't bad taste. It's buying too early. People pick a style first because that's the fun part, then try to force that style onto whatever dimension their post turned out to be after drying, planing, swelling, wrapping, or paint.
That's why the smart way to shop for post caps for 4×4 starts with a tape measure, not a product page. Once you know the actual dimensions of your post, the rest gets easier. You can choose metal, plastic, or wood with confidence, and you can decide whether a pyramid, ball top, or decorative cap suits the build instead of guessing and hoping.
The Most Important Step Measuring Your 4×4 Posts
The biggest mistake in this category is simple. People trust the lumber name instead of the lumber size.
A nominal 4×4 usually measures 3.5" x 3.5", while a true or rough-cut 4×4 can measure 4" x 4". That mismatch is a real buying problem. 72% of DIYers report purchasing caps that do not fit because of the nominal versus true-size confusion (Atlanta Post Caps sizing note).
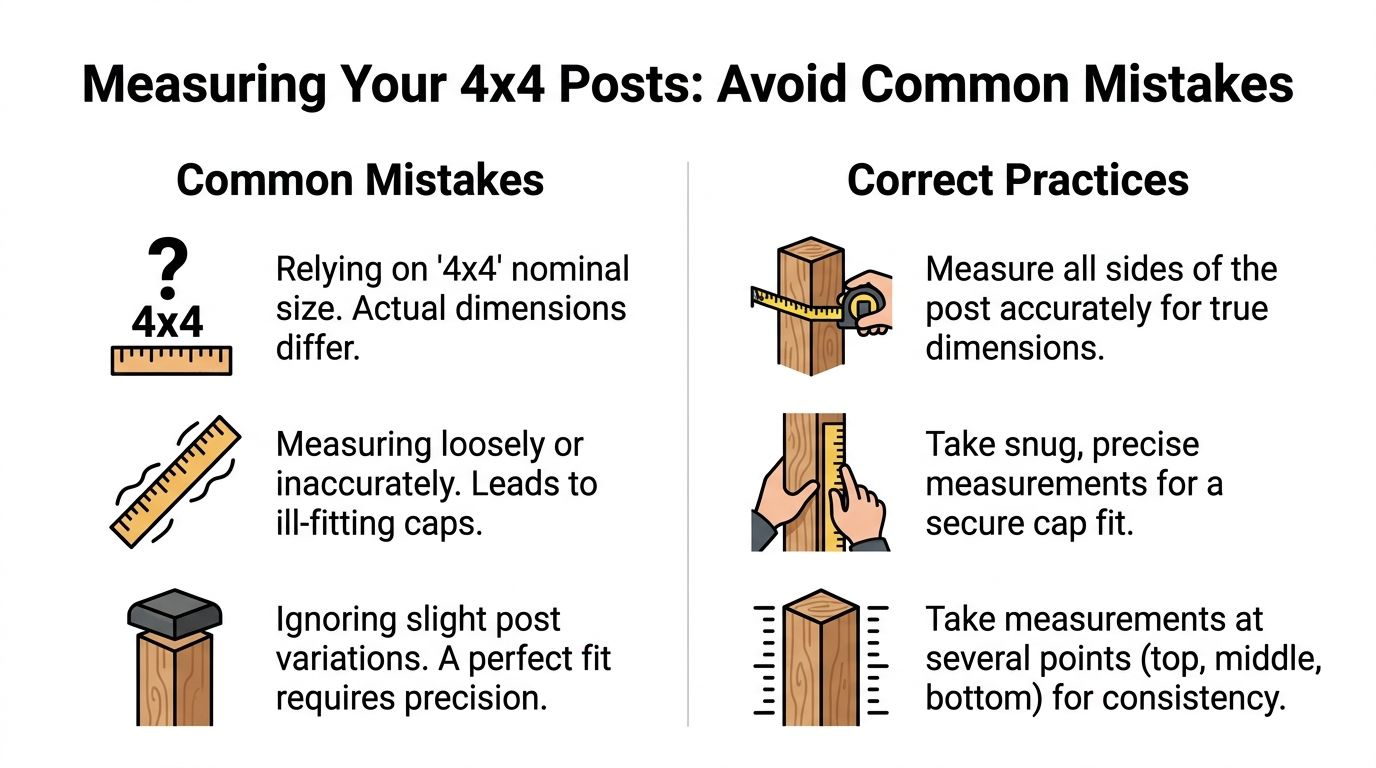
Nominal size is a label, not a measurement
Think of “4×4” the same way you think of a jersey number. It identifies the player, but it doesn't tell you the person's exact height and weight. Lumber labels work the same way. The board or post keeps the trade name, even after milling changes the actual dimension.
That's why one cap fits a pressure-treated fence post and another fits rough-cut lumber or a wrapped post. They can all be sold as 4×4 products, but they are not the same size in actuality.
A standard nominal post cap is commonly built around the actual post size. Some are made to suit posts right around 3.5" x 3.5", and some products are sized to fit standard wood posts up to 3.56" x 3.56" (Classy Caps dimension overview, Threekia fit range).
A simple way to measure properly
Use a tape measure or calipers if you have them. Measure the post itself, not the old cap, not the packaging, and not the lumber receipt.
Measure across the top in both directions.
If the post reads around 3.5", you're in nominal territory. If it's right around 4", you need a true-size cap.Measure more than one spot.
Check near the top edge and just below it. Posts aren't always perfectly consistent, especially if they've been outside for a while.Compare your measurement to the cap's inner dimension.
The inside of the cap is what matters. That's the fit line.
Practical rule: Buy to the cap's inner dimension, not the product title.
If you've got larger wrapped or boxed posts elsewhere on the property, it also helps to compare sizing conventions with other categories, such as 6 x 6 post caps, because the same nominal-versus-actual confusion shows up there too.
What buyers miss on the product page
The outside dimension of the cap tells you almost nothing about fit. Decorative skirts, thick walls, and shape details can make the cap look bigger than the opening is. Always hunt for words like inside dimension, inner size, fits actual post size, or true 4×4.
If that inner measurement isn't listed clearly, skip the guesswork and move on. A cap that “should fit” usually doesn't.
Choosing Your Material Metal Plastic or Wood
Once the post is measured correctly, material becomes the primary decision. At this stage, appearance, maintenance, and climate all start pulling in different directions.
Metal caps for a sharper finish
Aluminium is the practical metal choice for most deck and fence work. It looks crisp, resists rust, and doesn't ask for much once it's installed. Powder-coated finishes also suit modern railings, black hardware, and darker fence lines better than many plastic caps do.
For true-size posts, one example in the market is the 12 Pack of Decorex Hardware True 4″ x 4″ Heavy Duty Aluminium Pyramid Post Caps sold for actual 4" x 4" wood posts. That's the kind of product detail that matters because it states the actual application instead of relying on the generic 4×4 label.
If you're dealing with steel or aluminium posts, there are also heavy-duty aluminium pyramid caps made specifically to fit over true or actual 4" x 4" square metal posts. That's a different use case from wood, and it's another reminder to read the fit notes carefully.
Plastic caps for budget and sun exposure
Plastic covers a wide range. Some low-cost options are fine in mild conditions. Some are not. Material chemistry matters more than people think.
Standard plastic post caps can degrade three times faster under high UV exposure than ASA or other UV-stabilised materials (UV material comparison). If your fence or deck sits in open sun all day, that difference isn't academic. It shows up as brittleness, fading, and cracking sooner than expected.
That's why ASA caps make sense when the project needs a lower-maintenance synthetic option. They don't give you the same cold, crisp edge as metal, but they're often easier on the budget and lighter to handle.
If the build is in harsh sun, don't compare plastic to plastic. Compare standard plastic to UV-stabilised plastic.
Wood caps for a traditional look
Wood caps can look right on cedar fencing, heritage-style garden structures, and rustic builds where metal would feel out of place. The trade-off is maintenance. They need finishing, and they need attention later. If you don't keep up with that, the cap itself can become another weathering point instead of protection.
They also vary more from piece to piece. That isn't always a flaw. On the right project it can be part of the appeal. But if you want uniformity, wood isn't usually the easiest path.
Quick comparison
| Material | What works well | What to watch for |
|---|---|---|
| Aluminium | Clean profile, low maintenance, good match for modern hardware | Finish quality and exact fit still matter |
| ASA or UV-stabilised plastic | Good choice for sunny exposure, lighter and often more affordable | Can look less substantial than metal |
| Wood | Best for rustic or traditional appearance | Needs regular finishing and more upkeep |
| Copper | Distinctive high-end look and natural patina | Higher cost and a look that changes over time |
If you've got custom gates, unusual post sleeves, or fabricated steel details nearby, matching those caps to surrounding metalwork can matter as much as the cap itself. In those cases, a shop that handles custom metalwork and repair solutions can be useful when off-the-shelf hardware doesn't quite tie the whole project together.
Finding Your Style From Pyramid to Decorative
Style is where the project starts to look finished instead of merely built. The cap shape changes the character of the post more than often realized.
Pyramid for almost anything
The pyramid cap is the safe choice in the best sense of the word. It works on backyard fences, deck guard posts, gate posts, pergolas, and privacy screens. The sloped top looks clean and sheds water naturally, and it doesn't fight with the rest of the architecture.
On a simple pressure-treated fence, a black pyramid cap can make the line look straighter and more deliberate. On a deck, the same shape can complement square balusters and simple rails without drawing too much attention.
Ball and finial for a more formal look
A ball top or finial cap pushes the design in a more traditional direction. These caps suit front-yard fences, formal gardens, and properties with older trim profiles or more decorative millwork.
They're not subtle. That's the point. If the fence already has arched gates, ornamental inserts, or a more classic façade, a ball cap can look appropriate rather than fussy.
Flat top and low profile for modern work
A flat top or slim low-profile cap suits current deck designs better than ornate shapes do. If the house has black windows, clean siding lines, or minimalist rails, a bulky decorative top can feel out of place fast.
This is also where solar caps often come into the conversation. They add function without changing the basic silhouette too much, especially on entry posts or deck corners. If you want that mix of light and finish, take a look at solar post cap options and compare the profile before you buy.
A cap doesn't need to stand out on its own. It needs to look right with the rails, pickets, gates, and house behind it.
Decorative caps for focal points
Decorative caps work best when used selectively. Main gate posts, stair landings, and feature corners are good candidates. Every post doesn't need the ornate version. In fact, using decorative caps everywhere can make the fence or deck look busy.
A good approach is to keep field posts simple and dress up only the spots people notice first. That gives you contrast without clutter.
Installation and Attachment Methods
Fit comes first. Attachment comes second. If the cap is the wrong size, no adhesive or screw pattern will make it right.
For a secure fit on oversized lumber, the cap's inner size must match the post. Caps made for true 4×4 or 100 mm posts need an inner dimension of exactly 4" to slip over that larger stock properly (Post Cap Depot sizing detail).
Start with the basic prep shown here.
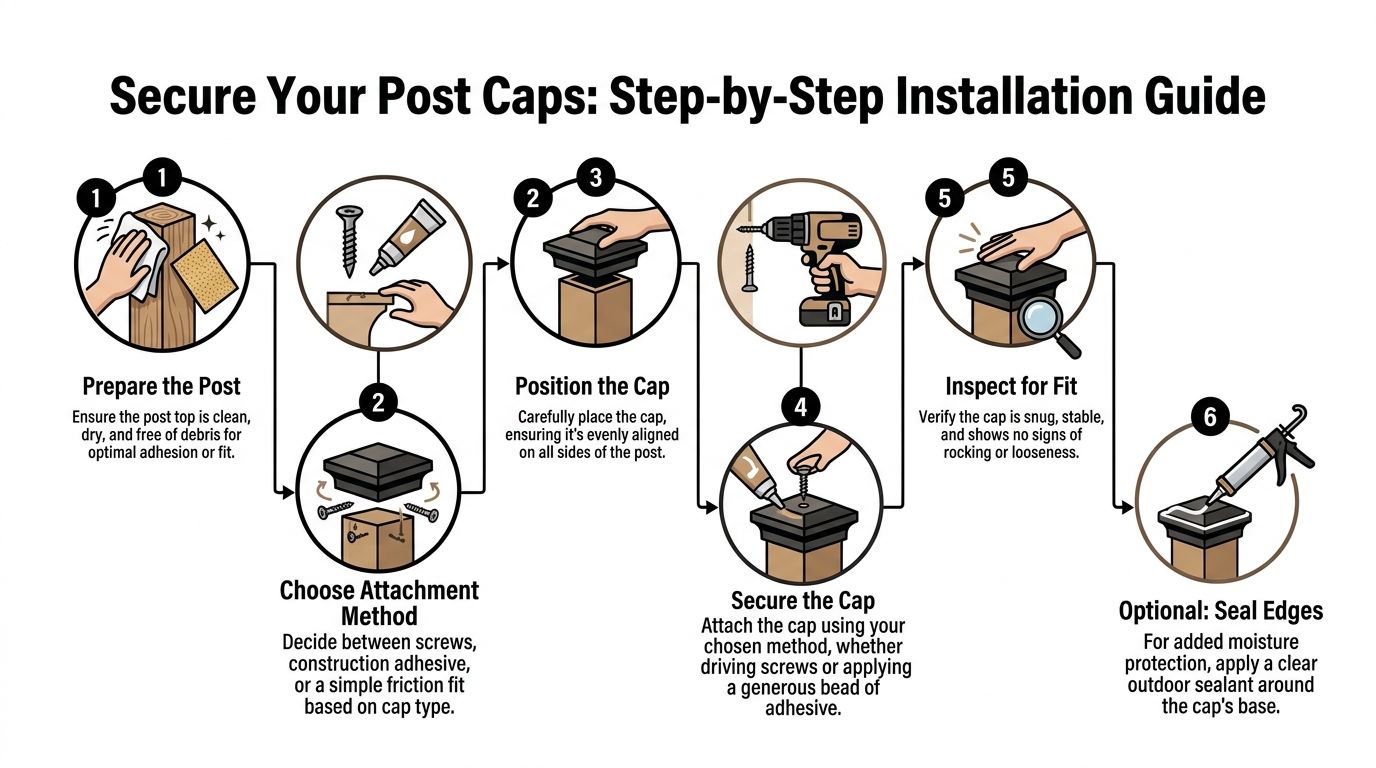
Pressure fit when tolerances are right
Some caps are designed to slip on snugly without much persuasion. That can work well if the post is square, dry, and consistently sized.
Use hand pressure first. If it needs a little help, place a scrap block of wood over the cap and tap the block lightly with a rubber mallet. Don't hammer directly on the cap. That's how finishes chip and corners deform.
Pressure-fit works poorly when the post has swollen, twisted slightly, or carries paint buildup near the top. In those cases, forcing the cap usually creates a future problem.
Adhesive for clean installs
Exterior-grade construction adhesive is a good option when you want a clean look with no visible fasteners. It also helps on caps that fit well but not tightly enough to stay put on their own.
Use it carefully:
- Clean first: Dust, sawdust, and moisture weaken the bond.
- Apply sparingly: A bead near the contact area is enough. Too much adhesive squeezes out and looks sloppy.
- Seat the cap evenly: Twist slightly as you press it down so the adhesive spreads.
This is also the point where people sort out related hardware for the overall post assembly. If the build still needs lower support hardware, matching the cap plan with the post base and anchor setup matters, especially on deck work using 4 x 4 anchor post hardware.
Before choosing between adhesive and screws, it helps to watch the sequence in motion.
Screws for exposed locations
Screw-on caps make sense on taller fence runs, gate posts, and spots that catch more wind or movement. Pre-drill when needed, especially near the edge of hardwood or dry lumber, so you don't split the post or distort the cap skirt.
A few practical habits help:
- Dry-fit before fastening.
- Centre the cap visually from all sides.
- Use corrosion-resistant fasteners outdoors.
- Tighten only until secure. Overdriving can warp thin metal or crack plastic.
If the cap rocks after fastening, stop and correct the post top. A rocking cap is telling you the surface or the fit isn't right.
Weatherproofing and Long-Term Maintenance
A lot of people treat post caps like install-and-forget hardware. That's fine until the first loose corner, failed seal, or water stain shows up. A few minutes of maintenance each season is cheaper than replacing the top of a post later.
In demanding applications, attachment isn't just cosmetic. Proper post cap attachment is a structural requirement in some settings because it helps prevent moisture infiltration and joint failure under high wind or weather loads (Caltrans laminated wood box post memo). Most backyard projects aren't highway hardware, but the lesson still applies. Water gets in where details get ignored.
What to inspect each year
Walk the line and check the caps by hand.
- For metal caps: Look for scratches, loose fasteners, and spots where water may be getting under the skirt.
- For plastic caps: Check for fading, brittleness, or cracking, especially on the sunniest side.
- For wood caps: Look for finish wear, open joints, and softening near edges.
Check the cap after winter and after the hottest part of summer. Those are the two periods most likely to reveal movement or failure.
Small upkeep prevents larger repairs
Wash dirt and pollen off with mild soap and water. Recoat wood caps when the finish starts looking tired, not after it has already failed. If a cap loosens, reset it before water works its way into the post top.
If you already use a seasonal property routine, add post caps to it. A broader seasonal home maintenance checklist is a useful way to catch outdoor issues before they turn into repair work.
Frequently Asked Questions and Buyer's Checklist
A few questions tend to come up after people understand sizing but before they click buy. These are the ones worth answering upfront.
Common questions that matter
| Question | Answer |
|---|---|
| Can I use a slightly oversized cap and fill the gap with adhesive? | You can, but it usually looks sloppy and won't solve movement cleanly. A cap should fit the post properly before any adhesive is added. |
| Are black caps harder to live with than lighter colours? | Black and dark finishes show dust, pollen, and water spots more readily, but they often match modern deck and fence hardware better. It's mostly a maintenance and style decision. |
| Should every post on the project use the same cap? | Usually yes, but feature posts can carry a more decorative version if the rest of the design is restrained. Consistency matters more than variety. |
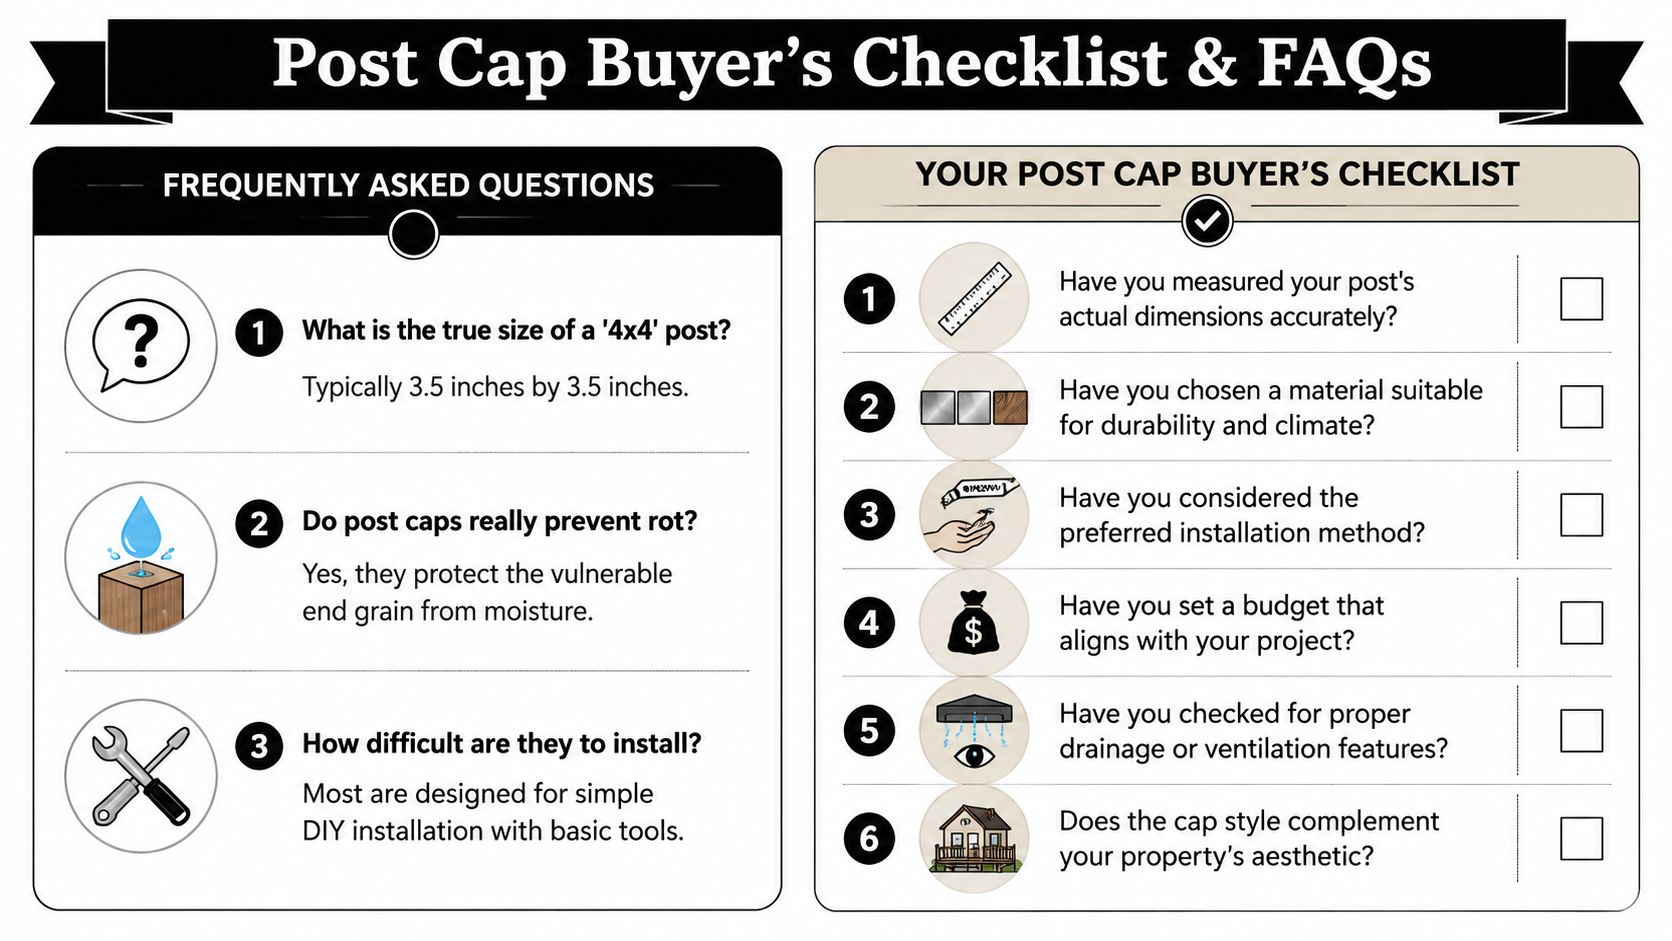
Buyer's checklist before you order
- Measure the actual post: Don't shop by the 4×4 label alone.
- Confirm the cap's inner size: Product titles can be vague. Fit lives in the inside dimension.
- Choose the material for your exposure: Sun, moisture, and maintenance tolerance matter as much as price.
- Match the style to the build: Pyramid, ball, flat, and decorative caps all change the look.
- Pick an attachment method: Friction fit, adhesive, or screws should suit the cap and the location.
- Check the post top condition: A split, crowned, or out-of-square post can ruin even the right cap.
- Think about future maintenance: The easiest cap to own is the one that suits both the weather and your habits.
If you handle those seven checks before ordering, you'll avoid most of the frustration that makes this small finishing detail harder than it needs to be.
If you're comparing post caps for 4×4 and want straightforward product listings with styles such as pyramid, ball, and decorative options for wood and metal posts, XTREME EDEALS INC. is one place to review sizing and hardware choices before you buy.