
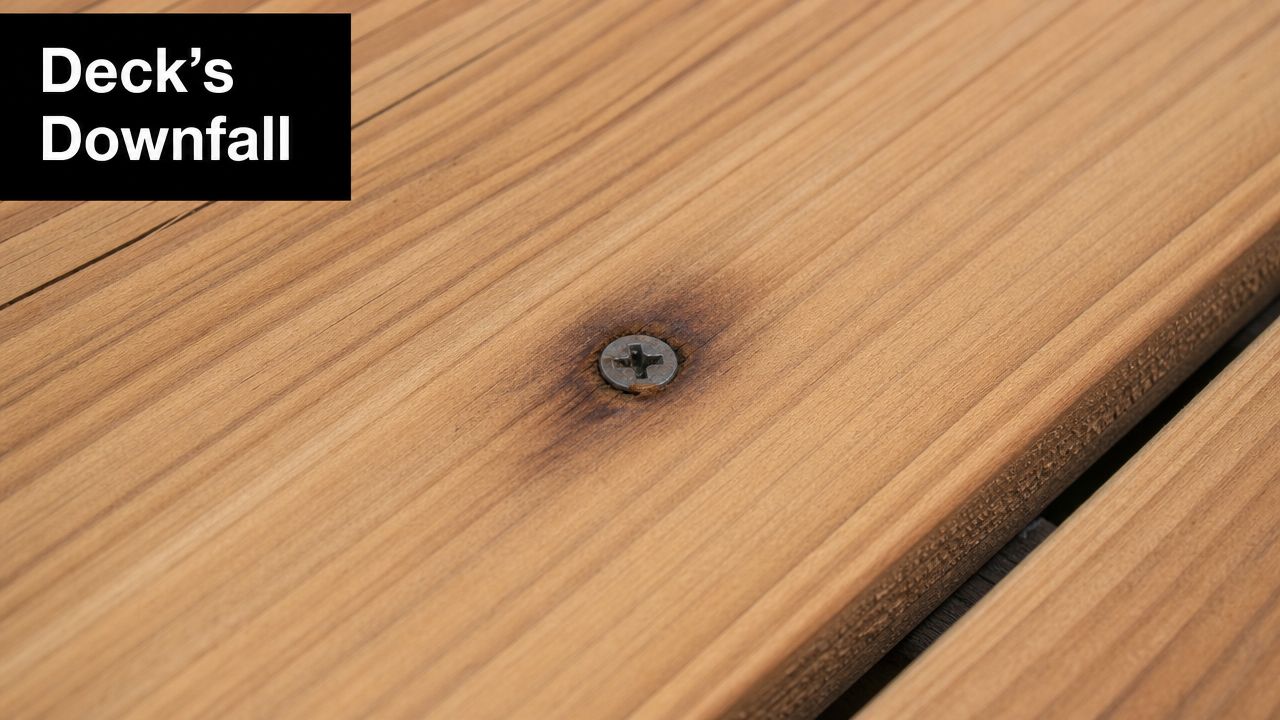
You've probably seen this happen. A cedar deck goes down looking clean, warm, and expensive. A season later, dark streaks start bleeding below the fasteners, a few board ends open up, and the whole surface looks older than it should. Most of the time, the problem isn't the cedar. It's the screws.
Cedar is one of those materials that rewards good decisions and punishes lazy ones. If you match the wood with the right fastener, it stays stable, looks sharp, and ages the way people expect cedar to age. If you use whatever exterior screw is on the shelf, you can create staining, corrosion, and split boards before the deck has even settled through its first wet cycle.
The best deck screws for cedar are chosen around one question first. How will this screw react with cedar's chemistry over time? After that, you look at climate, budget, screw geometry, and installation method.
Why Your Beautiful Cedar Deck Needs the Right Screws
You finish a cedar deck on Friday, hose off the sawdust, and it looks exactly how it should. Clean lines, warm color, no blotches. By the end of the first wet season, dark halos show up around the screw heads and a few board ends start to check harder than expected. That usually traces back to one decision. The wrong fastener went into the right wood.
Cedar costs more than pressure-treated decking because people want the look and the natural durability. The mistake happens at the last stop, in the fastener aisle, where coated, galvanized, and stainless screws can all look close enough if you only read the label.
They are not close enough.
Cedar contains tannins, and tannins react with some metals once moisture gets involved. That reaction is what causes the black staining serious cedar projects get blamed for later. It also starts the corrosion problem. In practice, screw choice is not a finish detail. It is part of the deck's appearance, maintenance load, and service life from day one.
The real choice: good enough or best for life
For an inland deck with decent drainage and a controlled budget, a high-quality exterior coated screw made for cedar or treated lumber can be good enough if the coating is proven and the installation is clean. That is usually the value option.
For coastal builds, high-moisture sites, shaded decks that stay wet, or any project where the owner cares about long-term appearance, stainless steel is the better call. It costs more up front, but it avoids the stain-and-corrosion cycle that ruins the look of cedar faster than people expect.
I give clients a simple rule. If replacing a few boxes of screws now feels expensive, replacing stained cedar boards later will feel worse.
Treat fasteners like a quality-control decision
Good builders check fastener compatibility before they lay the first deck board. Screw material, head design, thread pattern, and corrosion resistance all need to match the wood and the exposure conditions. If you like building from a checklist instead of guessing, FHP Contracting's quality process is a useful example of how disciplined decisions prevent expensive rework.
On cedar, the right screw needs to do three things at once. Resist the tannin-and-moisture reaction, hold without tearing up a soft board, and stay clean-looking at the surface. Miss any one of those, and cedar shows the mistake fast.
Understanding Cedar's Unique Properties
Cedar is easy to work with, but it's not neutral. Two characteristics matter more than anything else when you're choosing fasteners. Tannins and softness.
Tannins cause the staining problem
Cedar contains natural compounds that help make it durable outdoors. That's part of why people choose it in the first place. The trade-off is that those tannins don't play nicely with the wrong metal.
When a lower-grade screw reacts with cedar and moisture, you can get dark bleeding around the head and down the board face. On a fresh deck, that can ruin the appearance quickly. The stain often gets blamed on water or finish failure, but the actual trigger is the metal-wood reaction.
This is one reason surface prep and finish choices matter so much on cedar in general. If you're also thinking about long-term appearance, this guide on preparing and staining cedar shingles is worth reading because it shows how cedar needs product choices that respect the material instead of fighting it.
Softness changes how the screw should cut
Cedar is softer than many other exterior woods, which sounds like it should make fastening easier. Sometimes it does. But softer wood also means the wrong screw can tear fibres, over-compress the surface, or split the board at the ends.
That's why generic “outdoor wood screws” are often a poor fit. A screw that works acceptably in another species can be too aggressive, too brittle, or too crude in cedar.
Here's what that means in practice:
- Wrong point design can wedge the fibres apart instead of cutting cleanly.
- Wrong head style can crush the top surface and leave a rough-looking countersink.
- Wrong thread behaviour can grab hard enough to split thin edges or dry board ends.
- Wrong material can leave staining even if the screw initially drives well.
Cedar doesn't usually fail all at once. It shows small mistakes first. A split near the end grain, a halo around a fastener, a crushed pocket under a head. Those details tell you whether the screw was right for the wood.
Why cedar needs a cedar-specific fastener mindset
Pressure-treated pine often gets discussed in broad “deck screw” terms. Cedar shouldn't. With cedar, you need to think about compatibility first, then driving performance, then appearance.
That's why the best deck screws for cedar aren't just rated for exterior use. They're chosen for cedar's chemistry and cedar's texture. If the box doesn't make you confident about both, keep looking.
Screw Material Showdown for Cedar Compatibility
A cedar deck can look clean at install and still develop dark halos around the fasteners a season later. That usually starts with a bad material match. Cedar contains tannins, and those extractives react with the wrong metals when moisture gets involved. The result is staining, corrosion, or both.
That is why screw material is the first decision, not a box-check at the hardware store.
Cedar Screw Material Comparison
| Material | Tannin Compatibility | Corrosion Resistance | Best Use Case |
|---|---|---|---|
| Stainless steel 304 | Excellent | High | Most inland cedar decks |
| Stainless steel 316 | Excellent | Very high | Coastal cedar decks and salt-air exposure |
| Ceramic-coated | Moderate to good | Moderate to good | Budget-conscious inland projects with lower exposure |
| Hot-dipped galvanised | Moderate | Moderate | Budget builds where some staining risk is accepted |
| Electroplated or low-quality galvanised | Poor | Poor | Not recommended for cedar |
Stainless steel is the long-term answer
If the goal is to build the deck once and stop worrying about fastener stains, stainless steel is the answer. Real Cedar's fastener guidance puts 304 stainless in the standard spot for most cedar work and recommends 316 where salt air is part of the job.
That split matters.
An inland backyard deck in a dry area usually does well with 304. A deck near the coast, or even close enough to get regular marine air and damp morning exposure, deserves 316. Salt does not need direct ocean spray to create trouble. I have seen inland-grade hardware age fast once a site starts staying damp and salty.
For cedar, stainless is the "best for life" option because the metal itself is compatible with the wood's chemistry. You are not relying on a coating to stay intact.
Coated screws are the value option, with limits
Ceramic-coated screws can be a reasonable choice on an inland project where the budget is tight and the exposure is mild. They work best when the deck dries well, airflow is decent, and the owner understands the trade-off. You save money up front, but you accept more risk if the coating gets damaged during driving or if the deck stays wet for long stretches.
That makes coated screws the "good enough" category for cedar, not the premium category.
A simple way to choose is this:
- Choose 304 stainless for most inland cedar decks where you want a clean appearance and long service life.
- Choose 316 stainless for coastal jobs, salt-air exposure, heavy fog, or persistently damp sites.
- Choose ceramic-coated screws only when the project is inland, drainage and airflow are good, and cost matters more than maximum lifespan.
- Skip cheap plated fasteners because cedar exposes their weaknesses quickly.
Hot-dipped galvanised works, but it is a compromise
Hot-dipped galvanised is better than bargain plated hardware, but it still sits in an awkward middle ground for cedar decking. It can serve on a lower-cost build, especially in a less aggressive environment, yet it is rarely my first recommendation for visible deck boards.
The problem is not only corrosion resistance. It is appearance. Cedar telegraphs fastener problems early, and even minor discoloration around the head stands out on a finished surface.
If a homeowner asks for the safest call, I do not spend much time here. I move them to stainless.
What should stay off your material list
Electroplated screws and low-grade galvanised fasteners are poor matches for cedar. They may drive fine on day one. The true test comes after wet-dry cycles start pulling tannins to the surface.
That is when black staining shows up, coatings break down, and the cheap box of screws becomes an expensive repair.
If you want a more detailed breakdown of grades before buying, this guide to stainless steel deck screws is a useful reference.
Buy coated only as an informed budget choice. Buy stainless when appearance, durability, and low maintenance matter.
The Anatomy of a Perfect Cedar Deck Screw
Material is the first filter. Geometry is the second. A cedar screw can be made from the right metal and still perform poorly if the head, drive, tip, or thread design is wrong.
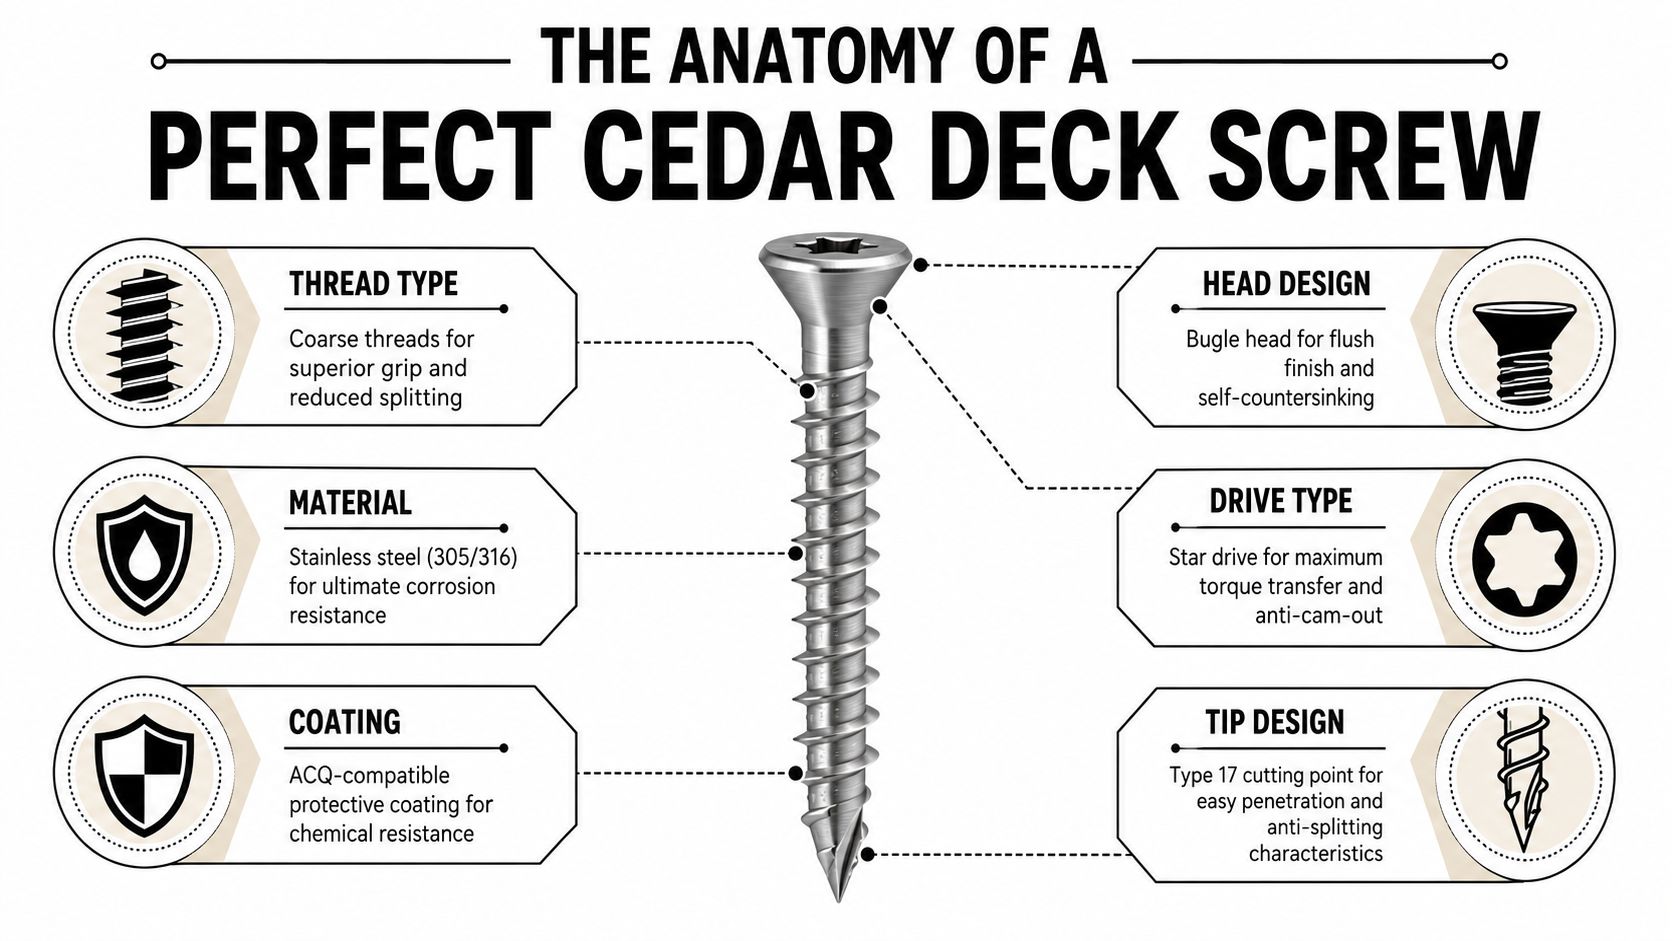
The profile that keeps showing up for a reason
The industry consensus for cedar reflects a shift toward using #10 stainless steel wood screws with a star/T25 drive and a Type 17 tip, a profile described in this cedar fastener guidance. That combination works because it balances corrosion resistance, holding power, and split prevention in tannin-rich softwoods.
That profile isn't marketing fluff. Each part solves a real installation problem.
What each feature actually does
Thread type
Cedar benefits from a thread that bites positively without acting like a wedge. Coarser thread patterns usually make more sense in softwood decking because they hold well without requiring excessive driving force.
A screw that grabs too abruptly can distort the board face or raise the chance of splitting near the edge. A well-designed coarse thread feels smoother going in and leaves a cleaner seat under the head.
Tip design
Type 17 points matter on cedar. They cut fibres instead of just forcing them apart.
That reduces splitting, especially when you're working near board ends or dealing with drier stock. It doesn't replace pilot holes in every situation, but it does reduce how often the screw creates stress before it bites.
A quick visual reference helps here:
Drive type
Use a star drive, commonly T25, whenever possible. It gives better bit engagement and better control under load. That matters with stainless, because clean driving technique helps you avoid stripping the recess or wobbling off-line.
Phillips drive is the wrong place to save effort. On a cedar deck, stripped heads slow the job and make the finished surface look amateur.
Head design
For most face-fastened cedar decking, a bugle or decking-style head gives a controlled, flush finish without shredding the top fibres. Some projects benefit from trim-head styles when appearance matters more than broad bearing surface, but you need to match head style to the board and the load.
The goal is simple. The head should seat neatly, sit flush, and not leave a crater.
The cedar-friendly checklist
When I'm checking whether a screw belongs in cedar decking, I look for these features:
- Stainless material for long-term compatibility.
- Star/T25 drive for positive engagement.
- Type 17 tip to help reduce splitting.
- Coarse thread for reliable grip in softwood.
- A head that seats cleanly without crushing the surface.
Get those five right and you've eliminated most of the common deck-fastener mistakes before installation even starts.
Choosing the Right Screw Size and Spacing
A cedar deck often looks great on day one, then starts showing avoidable mistakes after the first wet season. Boards split at the ends, screw lines wander, and dark stains appear around fasteners that looked fine in the box. Size and spacing decisions play a big part in that.
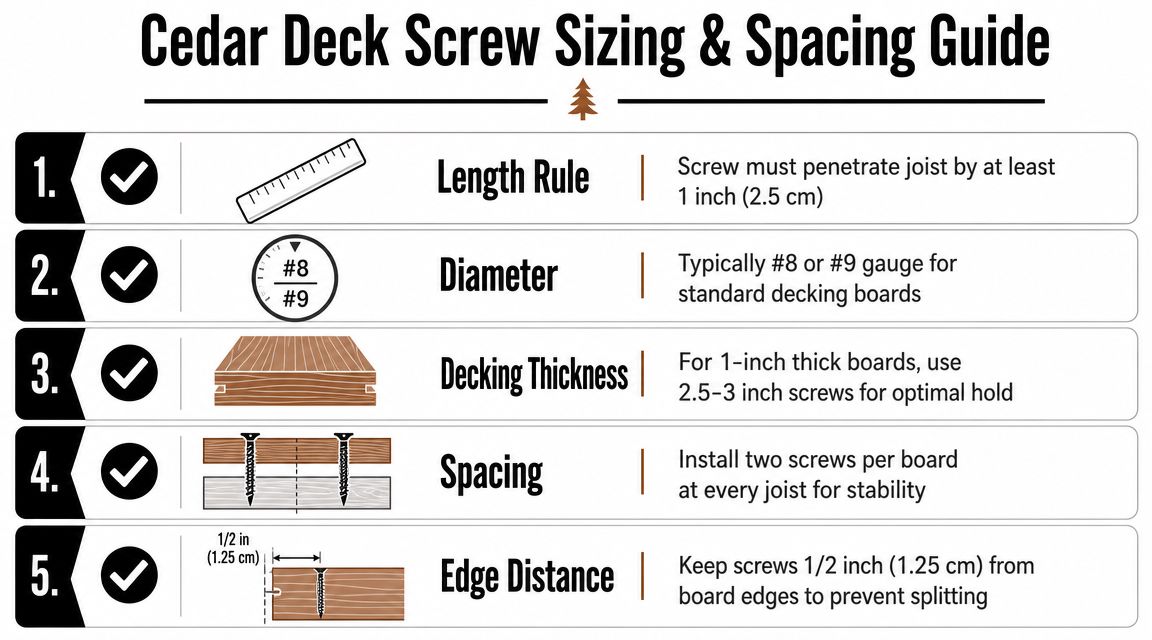
Start with screw length that matches the board and the joist
For most cedar decking, a #8 or #10 screw in a 2-1/2 to 3 inch length handles the job well. The goal is simple. Get solid bite into the framing without using a screw so heavy that it forces the board apart during installation.
In practice, #8 x 2-1/2 in. works for many standard deck boards, especially where appearance matters and the cedar is on the softer side. #10 x 3 in. makes more sense for thicker decking, stairs, and parts of the build that see more abuse. If you want a size-specific reference point, this guide to choosing the right 8 x 3 deck screws is useful for comparing where that common format fits.
The material still matters here. Cedar's tannins can react with lower-grade fasteners and leave black staining around the head and shank. So the size decision sits behind the material decision, not above it. Inland, a quality coated screw can be good enough if the coating holds up and the deck is maintained. Near the coast, or anywhere the deck stays wet, stainless is usually the better long-term call even if the upfront cost stings.
Use a spacing pattern that controls movement without inviting splits
Most face-fastened cedar deck boards get two screws at each joist. One screw near each side of the board keeps the board flatter and reduces the chance of edge lift as the seasons change.
Placement is where many DIY jobs go wrong.
- Keep each screw far enough from the board edge that the cedar does not crack during driving.
- Stay back from board ends and pre-drill when you are close to the end grain.
- Run straight, consistent rows so the surface looks clean and intentional.
- Match the screw position from board to board instead of adjusting by eye every time.
A bigger screw does not fix poor layout. It usually makes the damage worse.
Choose “good enough” or “best for life” based on exposure
For a budget-conscious backyard deck in an inland setting, coated deck screws in the right size can perform well if they are rated for exterior use and driven carefully. For a high-end cedar deck, a waterfront build, or a project you do not want to revisit, stainless in the same general size range is the safer choice because it avoids the cedar-tannin reaction that causes staining and corrosion headaches.
That same material-matching logic shows up in other exterior work. If you want another example, get professional siding screw advice for fiber cement fastening. Different cladding, same lesson. Match the fastener to the material and the environment.
For fascia, trim, and narrow cedar parts, I usually step back and ask what matters more there: holding power or surface appearance. Narrow pieces often benefit from a smaller, cleaner screw profile and careful pre-drilling. Rail parts and stair components usually justify a heavier fastener and more caution at the ends.
The right size is the one that drives cleanly, grips the framing well, and does not leave you patching splits or staring at black halos around every head.
Installation Tips to Prevent Splitting and Stains
Even the best deck screws for cedar can look bad if they're installed carelessly. Cedar tells the truth about your technique. If your pressure is uneven or your alignment is poor, the finished deck shows it.
The habits that prevent trouble
Pre-drill near board ends. Yes, even when the screw has a cutting tip. Self-drilling features help, but they don't make cedar immune to splitting where the wood is most vulnerable.
Set the driver so you can stop flush. Over-driving creates a little dish around the head, damages the fibres, and gives water a place to sit. Under-driving leaves the head proud and catches bare feet, dirt, and finish.
Use a fresh bit. A worn bit slips earlier, especially with stainless fasteners, and once it chews up the recess you've created a removal job nobody wants.
Keep the layout controlled
Straight screw lines make a cedar deck look professional. A chalk line or consistent guide block saves you from wandering rows that make an otherwise nice deck feel homemade in the wrong way.
Also keep your board spacing consistent as you go. Fastener layout and board spacing work together visually. One neat and one messy still looks messy.
If you want another example of how material-specific fastening choices matter on exterior cladding, get professional siding screw advice from Atomic Exteriors. Different material, same lesson. Fasteners need to match the product, not just the weather label on the box.
Don't trap moisture around the hardware
Keep the surface clean during the build. Sawdust, tannin-rich debris, and damp residue around screw heads can make a new deck look older than it is. Once the deck is installed, a good finishing routine also helps protect the overall appearance. If you're planning that step next, this guide to staining deck wood is a practical follow-up.
The install goal is simple. Drive each screw straight, seat it cleanly, and leave the cedar intact around it.
Our Top Screw Recommendations for Your Cedar Project
A lot of cedar jobs go wrong at the buying stage. The boards look great on delivery, then a few seasons later you start seeing black streaks around the heads, early corrosion, or a deck that still looks new except for every fastener line.
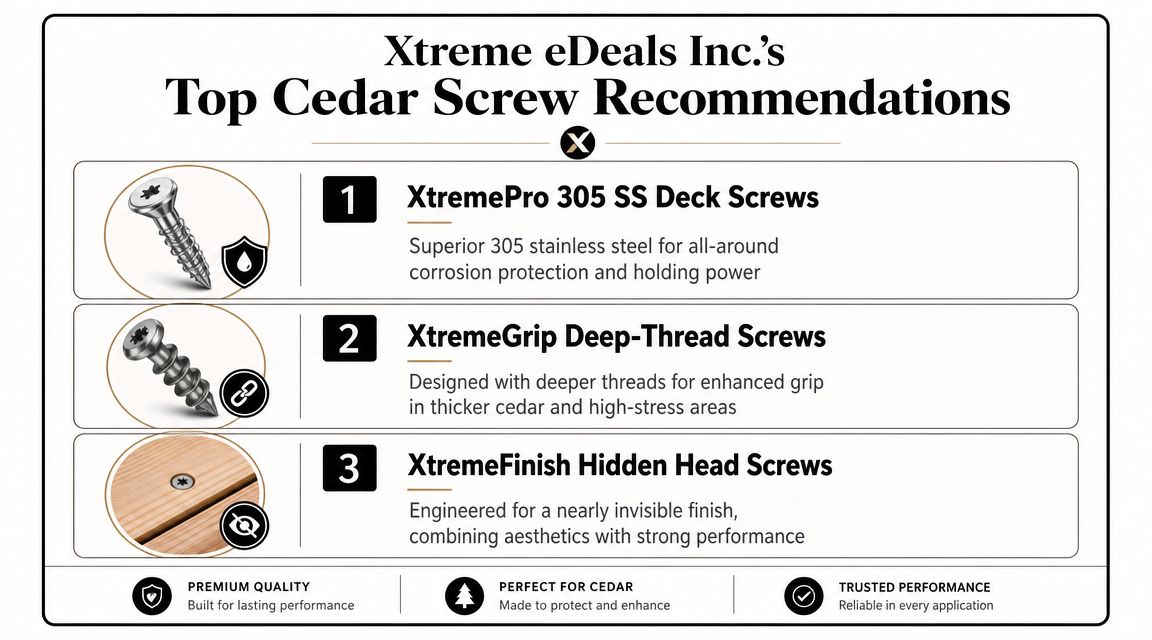
For cedar decking
For exposed deck boards, stainless steel is the safe pick because cedar tannins are hard on lesser metals. If the fastener will stay visible and you care about keeping the surface clean over time, stainless avoids the ugly staining issues that make a well-built cedar deck look cheap.
Use 304 stainless for most inland projects. Use 316 stainless near salt air, shoreline exposure, or anywhere the deck stays damp for long stretches. That extra corrosion resistance costs more up front, but coastal call-backs cost more.
A good target spec is a #10 wood screw with a star drive, sharp point or Type 17 tip, and a bugle or trim-style head that seats cleanly in cedar. The exact head depends on the board profile and how visible the fastener will be.
For cedar fencing
Fencing gives you more room to make a budget call. If the project is inland, gets decent drying time, and the customer accepts some compromise, a high-quality exterior coated screw can be good enough.
That only works if the coating is made for treated or corrosive wood exposure and the fence is not in a wet, shaded, or sprinkler-soaked spot. Cedar still contains tannins, and once the coating gets nicked or worn during driving, the base steel is more exposed. On a basic backyard fence, that may be an acceptable trade. On a premium fence meant to stay sharp for years, it usually is not.
For cedar railings and detail work
Rail caps, post wraps, fascia, and other finish details need better-looking fasteners than a generic deck screw. Head size matters here. A bulky head draws the eye and can bruise soft cedar fibers around the recess.
For visible trim work, I prefer stainless trim-head screws that drive flush and leave a smaller mark. They cost more per box, but they save a lot of cosmetic frustration.
A practical buying framework
Use this filter before you order:
- Choose coated screws for inland projects where budget matters, exposure is moderate, and a little long-term risk is acceptable.
- Choose 304 stainless for most visible cedar decking and higher-end cedar work inland.
- Choose 316 stainless for coastal jobs, docks, lake properties, or damp sites with slow dry-out.
- Choose trim heads for detail work and standard deck screw heads for main decking where more bearing surface helps.
- Choose star drive and a cutting tip if you want fewer stripped recesses and cleaner starts in cedar.
That defines the difference between good enough and best for life. Coated screws can make sense on the right inland project if you are honest about the trade-off. Stainless costs more, but it does the better job of resisting the cedar-tannin reaction that causes staining and premature fastener failure.
If you are shopping by specification instead of by brand name, look for Decorex Hardware cedar-friendly deck screws that match the material, size, and drive profile covered above. XTREME EDEALS INC. carries deck screws in sizes and finishes that fit this kind of work, including corrosion-resistant options used for decking applications.