
You're probably standing over a pile of lumber right now, looking at a box of metal brackets and wondering whether joist hangers are a small detail or a structural requirement. That question usually comes up during a deck build, a shed floor, or a tight framing job where a 2×4 has to land cleanly on a ledger or beam.
Treat them as structural hardware, not trim pieces.
A 2×4 joist hanger has one job: keep the joist fully supported and properly tied to the framing member so it can't roll, pull away, or sit on too little bearing. If you pick the wrong hanger, use the wrong coating, or fasten it with whatever screws are lying around, the assembly stops behaving like an engineered connection and starts behaving like a guess.
Why Getting 2×4 Joist Hangers Right Matters
You see the problem on repairs all the time. A 2×4 was framed into a ledger with a hanger that looked close, a few holes were left empty, and the joist end was never fully seated. The deck can look fine at handover, then start showing the mistake after one wet season. The joist twists, the connection opens up, and the load shifts onto fasteners that were never meant to carry it alone.
Joist hangers are part of the structural load path. On a 2×4 connection, there is not much extra wood to forgive a bad fit, the wrong fastener, or the wrong coating. That is why small selection mistakes matter more here than many builders expect.
The first issue is size. A nominal 2×4 is not its actual size, and hanger dimensions are built around actual lumber dimensions, not the name stamped on the stack. If the joist sits loose in the seat or binds before it bears properly, the connector cannot perform to its published load values. That is one reason it pays to check the connector schedule and deck joist hanger requirements and support details before a single nail goes in.
Code compliance is tied to that connection. In California, joists need at least 1.5 inches (38 mm) of bearing on wood or metal unless an approved hanger provides the support. In Canada, the same basic principle applies even though local requirements and referenced standards can differ by province, municipality, and application. Inspectors are looking for approved hardware, correct installation, and a connection that matches the framing member and the environment.
Material compatibility gets missed too often.
A galvanized hanger paired with the wrong screws, pressure-treated lumber, or a wet exterior location can start a corrosion problem that does not show up right away. I have seen connectors rust around the fastener holes first, which reduces holding strength long before the joist drops. Stainless hardware costs more up front, and heavier coatings are not always necessary indoors, but outside work needs a deliberate choice instead of whatever is in the truck box.
Small connector, big consequence
Raised decks, stairs, and narrow framed openings all put extra attention on joist ends because movement shows up there first. Seasonal shrinkage, vibration, and repeated loading can widen a small installation error into visible bounce or separation. In seismic regions, builders often add the specified straps, blocking, or hold-down details because a joist end cannot rely on gravity alone to stay put.
Practical rule: If the joist end does not have full bearing or an approved hanger installed with the specified fasteners, the connection is not finished.
Failures usually start with ordinary signs. A squeak. A slight gap at the seat. A rim line that is no longer staying true. Those are inspection problems first, then structural problems if they keep getting ignored.
That is why getting the hanger right before installation matters so much. The right size, the right material, and the right fasteners keep the connection within code and keep the frame behaving the way it was designed to behave.
How to Choose the Correct 2×4 Joist Hanger
You can spot a bad hanger choice before a single fastener goes in. The joist rocks in the seat, the flanges don't sit flat, or the coating already looks wrong for the job site. By the time someone starts forcing it together, the mistake has already been made.
Start with actual lumber size
Check the piece in your hand first. A nominal 2×4 is smaller in actual size, and hanger sizing follows the actual member dimensions the connector was designed for, not the name stamped on the bundle.
That detail gets missed all the time with concealed connectors. Some 2×4 hangers are built around an actual size of about 1.93 inches by 3.62 inches, as shown on VEVOR's concealed 2×4 hanger listing. If your lumber runs undersized, oversized, or swollen from moisture, the fit changes enough to matter.
A loose fit allows movement. A tight fit can keep the joist from fully bearing in the seat.
Use this quick check before you buy:
- Measure the joist width and depth: Do not rely on nominal size alone.
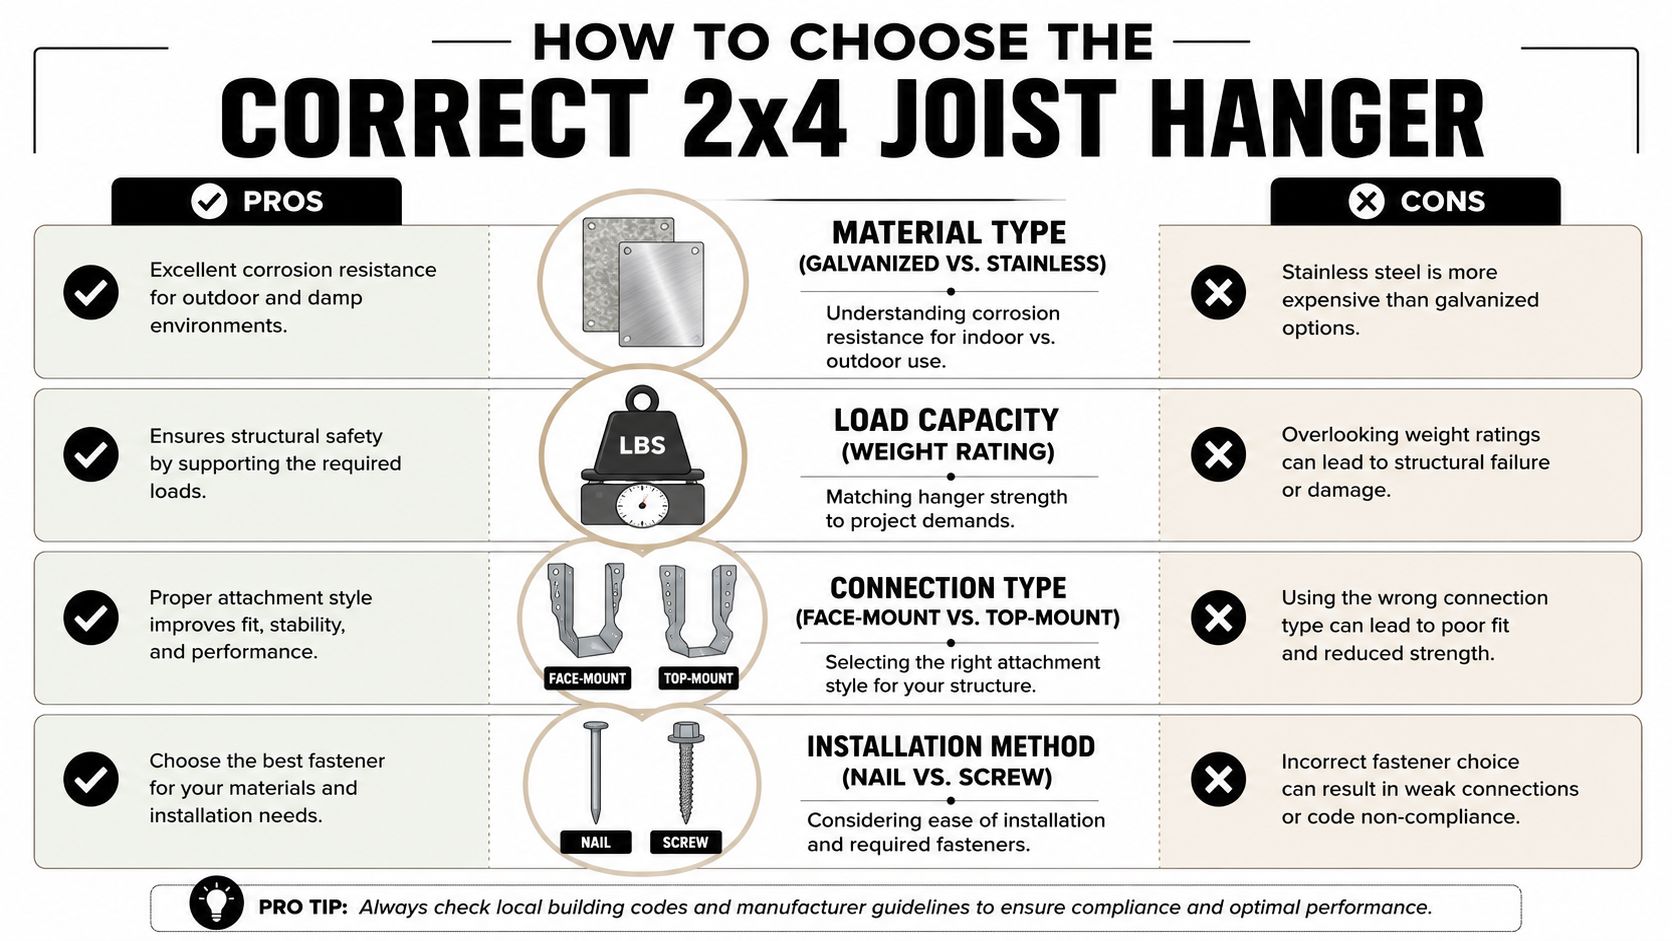
- Match the hanger type to the framing condition: Face-mount, top-mount, and concealed hangers are not interchangeable.
- Confirm the seat dimensions: The joist should sit fully without forcing or slop.
- Check manufacturer notes: Some connectors are approved only for certain species, load directions, or installation conditions.
Choose coating and fastener material as one system
Connector material and fastener material have to work together. If they do not, corrosion starts at the connection points, usually around the fastener holes first.
This shows up often on treated lumber jobs because someone grabs generic screws instead of approved connector nails or structural fasteners. In exterior work, especially with modern pressure-treated wood, that shortcut can ruin a connection long before the framing itself looks damaged. Simpson Strong-Tie's corrosion guidance explains why coating level, wood treatment, and jobsite exposure all need to be considered together when selecting connectors and fasteners: Simpson Strong-Tie corrosion information.
That matters even more in Canada, where freeze-thaw cycles, wet seasons, and coastal exposure can keep connectors damp for long stretches. Local inspectors may look closely at whether the connector and fastener combination matches the exposure class and the treated lumber being used.
Joist Hanger Material Comparison
| Material/Coating | Best For | Avoid With |
|---|---|---|
| Galvanized | Interior framing and many standard exterior projects where local code permits it | Fasteners made from incompatible metals |
| Heavier galvanized coatings such as ZMAX or G185 | Exterior framing, treated lumber, and higher-moisture conditions | Mixed hardware without manufacturer approval |
| Stainless steel | Coastal work, severe corrosion zones, and persistently wet environments | Galvanized fasteners or connectors unless the manufacturer permits that combination |
A compatible hanger with the wrong screws is still a failed selection.
Check load and code before you buy
Hanger capacity depends on the tested assembly. That means the connector model, the joist size, the header material, and the exact fastener schedule all have to match the manufacturer's table. Guessing from metal thickness or copying what was used on another job is how undersized hardware gets buried inside finished work.
For residential framing, code requires joist ends to bear on wood or be supported by approved framing anchors. The International Residential Code states that joists framing into the side of a wood girder or header must be supported by approved framing anchors or on ledger strips, as shown in the 2021 IRC text from the International Code Council digital codes library. If you are building in a Canadian jurisdiction, check the local code adoption and product evaluation requirements as well. The broad rule stays the same, but accepted products and fastening details can differ by province and municipality.
One more field rule helps here. Buy the hanger by model number after you know the joist size, exposure, and fastening schedule. Do not buy by photo, shelf label, or “close enough” fit.
Recommended Joist Hangers from Our Collection
If you've got the selection basics right, product choice gets much easier. You're no longer shopping by photo. You're shopping by lumber size, exposure, and connection type.

Standard deck and framing work
For a straightforward 2×4 deck frame, shed floor, or similar support layout, an 18G steel G185 triple zinc galvanized hanger is the sensible starting point. That kind of hanger matches the practical needs of most residential work where you want decent corrosion protection and a connector built for nominal 2×4 lumber.
A useful example is the 20 Pack Joist Hanger for 2" x 4" Nominal Lumber – 18G Steel G185 Triple Zinc Galvanized sold by XTREME EDEALS INC. It fits the common contractor pattern: bulk quantity, standardised sizing, and a coating level suited to typical outdoor hardware selection where local conditions and code allow it.
Where to move up in protection
Not every site is a basic backyard job. If the project sits in a coastal environment, sees heavy weather, or uses pressure-treated framing in harsher exposure, step up the corrosion strategy instead of pretending all galvanised hardware performs the same.
Use these practical filters:
- For sheltered or interior framing: A standard galvanised connector often makes sense if the local code and manufacturer allow it.
- For exterior deck framing: Look for heavier-duty galvanised protection and match the fasteners to the hanger material.
- For salt-heavy exposure: Follow the earlier material-compatibility rule and use the corrosion-resistant hanger/fastener system as a matched set.
Buy the hanger for the site, not for the shelf price.
One more thing new builders often miss. Product names can look nearly identical while the connector style changes the whole install. Face-mount hangers are usually the easiest choice for accessible ledger or header work. Concealed versions clean up the appearance, but they're less forgiving if your actual lumber dimensions or spacing are off.
If you're filling out a materials order, it's worth grouping hangers, approved fasteners, and any related connector hardware together so the framing crew doesn't start substituting parts halfway through the job.
Essential Tools and Fasteners for Installation
A clean-looking hanger install can still fail inspection, or worse, fail in service, if the fasteners are wrong. I see that more often than bad layout. Someone grabs a box of exterior screws, the hanger looks tight, and the connection ends up weaker than the manufacturer rated.
What needs to be on hand
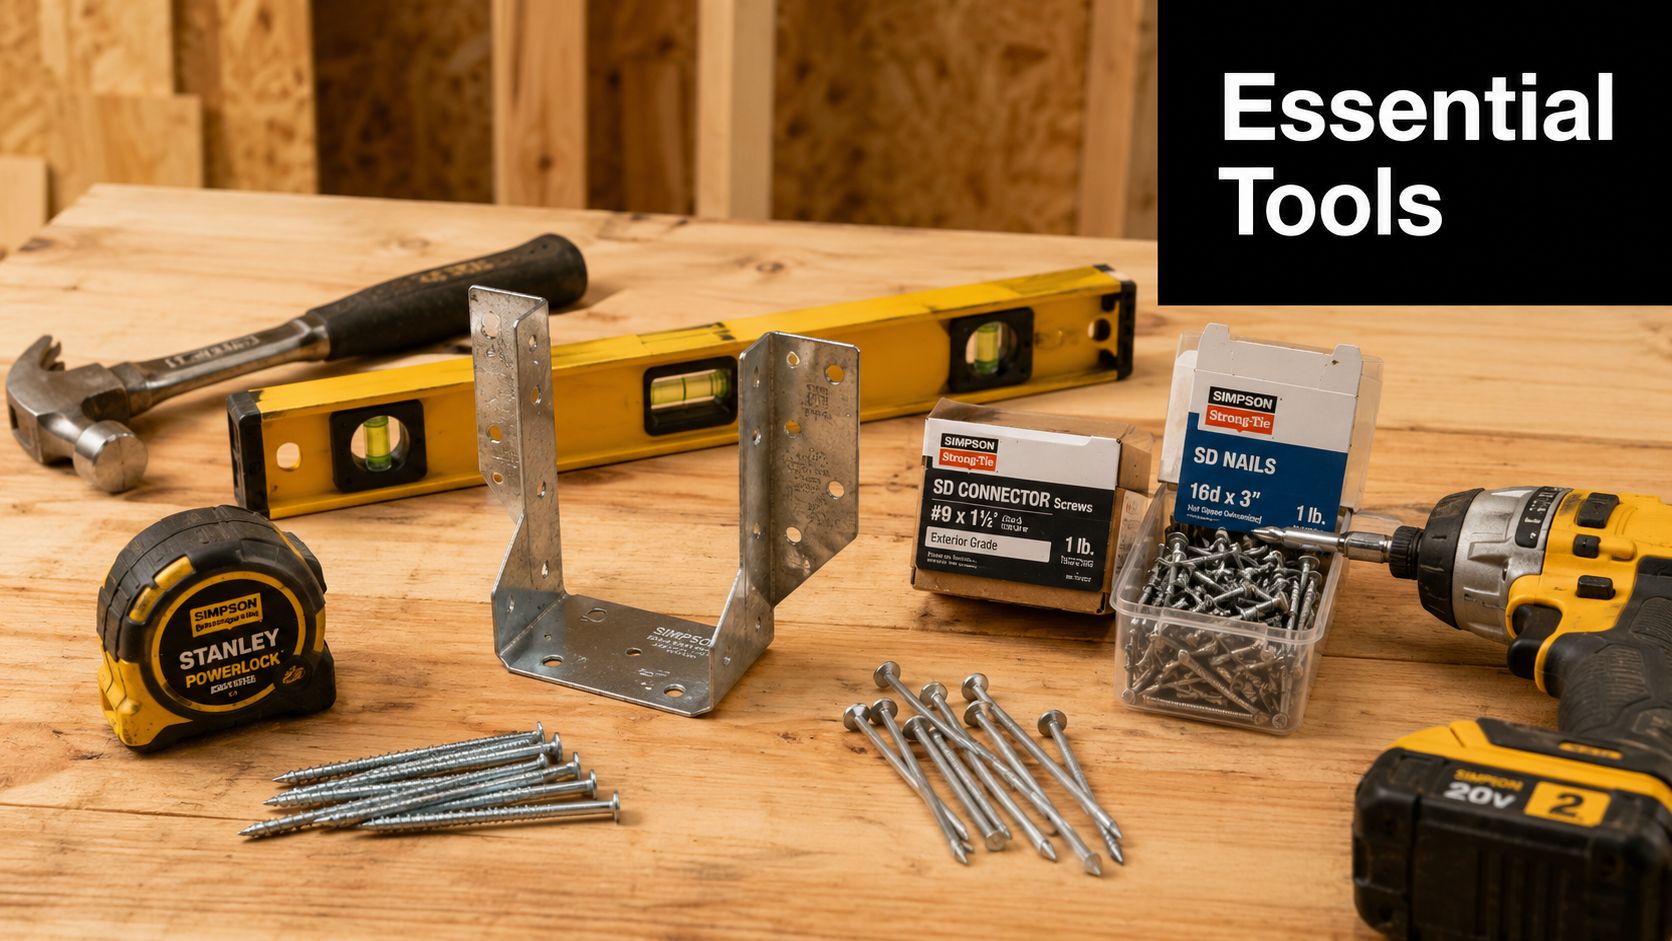
Keep the kit simple, but get the details right.
- Layout tools: Tape, pencil, square, and level.
- Driving tools: Framing hammer, palm nailer, or an approved driver if the hanger is designed for structural connector screws.
- Safety gear: Eye protection and gloves.
- Manufacturer-approved connector fasteners: Use the nails or structural screws listed for that exact hanger model.
- A scrap of the same 2×4 stock: Use it to confirm seat fit and height before you fasten a full run.
That last item saves time. A scrap cut from the actual bundle tells you quickly whether your hanger matches the actual lumber on site, not just the nominal size stamped on the plans.
If you need a broader refresher on screw types and how wood fasteners differ by job, this complete UK guide to woodworking fasteners is a useful companion read. It helps newer builders separate general wood screws from structural connector hardware.
What not to use
Deck screws and drywall screws are common mistakes. They drive fast, but joist hangers are not rated around convenience. They are rated around specific fastener diameter, length, head style, and installation pattern.
Leave out holes, substitute screws, or mix in whatever is in the pouch, and you no longer have the published connection. That matters for inspections and it matters for safety. In Canadian exterior work, it also ties back to the corrosion issue covered earlier. The hanger coating and the fastener coating need to belong to the same system, especially around pressure-treated lumber and wet exposure.
A connector can look fine on day one and still start rusting early if the metals do not match.
Fastener checklist before you start
- Match the exact hanger spec: Buy approved joist hanger screws only if the manufacturer lists that screw system for the connector you are using.
- Fill every designated hole: Empty holes mean the connection is no longer installed to its rated pattern.
- Keep metals compatible: Match the fastener finish to the hanger material and the jobsite exposure.
- Use the right fastener in the right hole: Face flange holes and joist-side holes may call for different lengths or types.
- Check the box and the technical sheet: Similar-looking hangers can have different fastener schedules.
Treat the fastener schedule as part of the connector, not as a separate choice. That is how you keep the install defensible for inspection and reliable once the deck starts carrying real load.
A Step-by-Step Guide to Installing 2×4 Joist Hangers
A bad hanger install usually starts long before the first nail goes in. The layout looked close enough, the hanger looked like it fit, and the 2×4 got shoved into place anyway. Then the joist sits 1/4 inch high, the hanger flares, or the inspector asks why the connector does not match the member size on the plans.
Good installation starts with confirming the pieces in your hands match the connection you planned. A nominal 2×4 is not 2 inches by 4 inches, and that matters at the hanger seat. If the stock is swollen, rough-cut, or slightly oversized from treatment, check the fit before you fasten a whole row.
Mark the ledger or header accurately
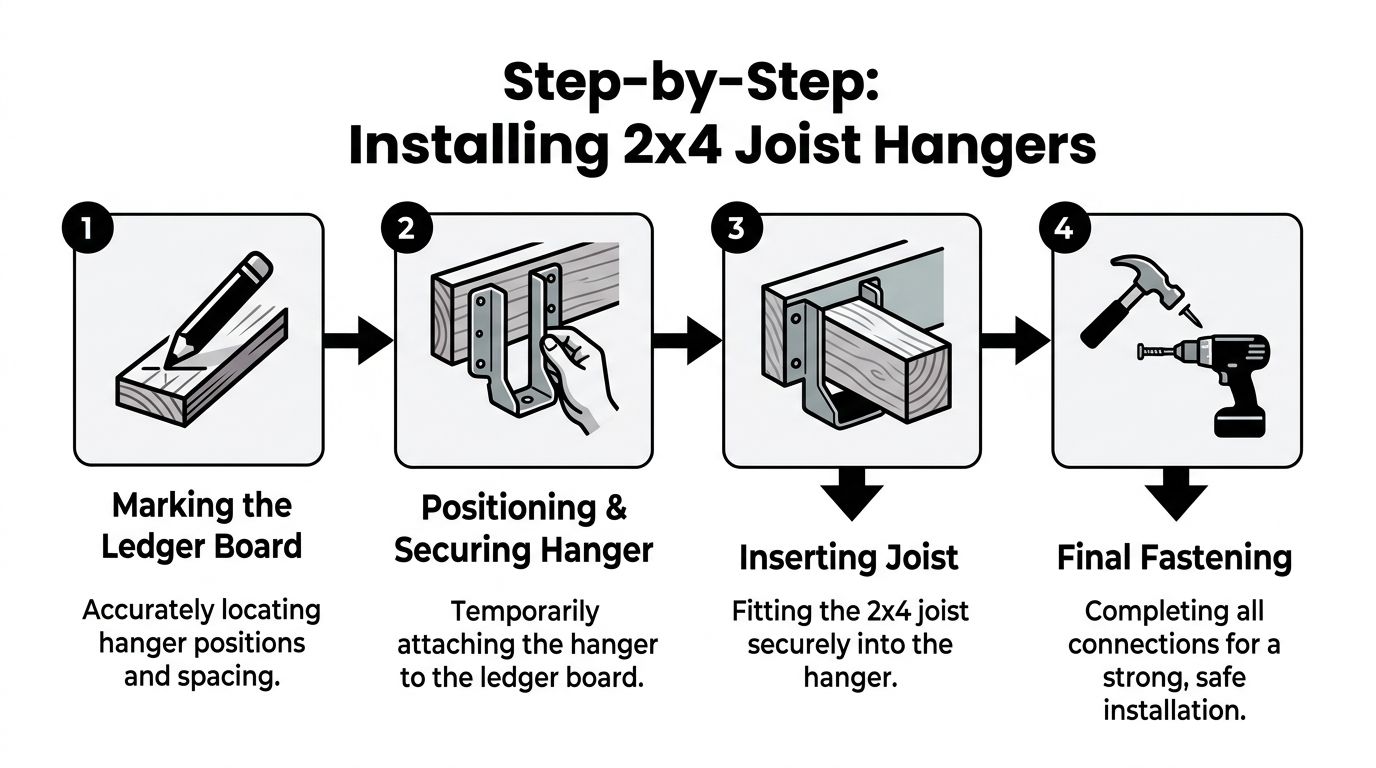
Lay out each joist position with a tape and square. Mark both edges of the joist, not just the center, so you can see whether the hanger will hold the member where it belongs.
Use a cutoff from the same batch of 2×4 material as a test piece. I do this on treated stock all the time because slight variation shows up fast when you are setting multiple hangers in a row. Catching one tight fit now is easier than pulling ten connectors later.
Set the hanger in place
Place the hanger on the ledger or header at the correct elevation and hold it tight to your layout lines. Start the approved face fasteners first so the connector stays square while you work.
If the hanger rocks, twists, or needs to be bent to match the wood, stop there. That usually points to one of three problems: the wrong hanger, bad layout, or lumber that does not match the connector you selected.
Keep the right fasteners within reach before you start the row. Use dedicated joist hanger nails for connector installation if that is what the hanger manufacturer specifies.
Seat the joist fully
Slide the 2×4 into the seat and push it in until it bears fully at the bottom and back. The joist should sit snug without being forced.
Check these points before you finish fastening:
- Top alignment: The top of the joist should match the framing plane.
- Full bearing: The joist end should sit flat in the seat with no gap underneath.
- Side fit: The hanger sides should stay straight, not spread by an oversized member.
This step gets missed more than it should. A joist hanging on one corner can look acceptable from above and still leave the connector carrying load the wrong way.
Finish the fastening pattern
Drive the remaining specified fasteners into every required hole for that hanger model. Work evenly so the connector stays flat against the support and tight to the joist.
If the manufacturer calls for angled nails or an approved structural screw in a specific hole, follow that exact pattern. Fill every hole specified by the manufacturer. They are part of the structural design, not optional.
After the row is installed, sight down the framing and check each connection. Look for a low hanger, a proud joist, a missed hole, or a member that never seated fully. Fixing those problems before decking or subfloor goes on is standard practice, and in places with stricter inspection requirements, including many Canadian jurisdictions, it can be the difference between a clean sign-off and a callback.
Common Mistakes and Professional Alternatives
The most common mistakes are predictable. Wrong hanger size. Wrong fasteners. Missing holes. Mixed metals. A joist that isn't fully seated but gets covered anyway because the frame “looks close”.
The fix is usually simple if you catch it early. Pull the incorrect fasteners, replace the connector if it has been distorted, and reinstall to the manufacturer's pattern. If the hanger was forced around the wrong-size lumber, don't try to salvage it by bending tabs back and forth.
Errors that keep showing up
- Using generic screws: They may hold the piece in place during assembly, but that's not the same as a rated structural connection.
- Leaving a gap under the joist: The load shifts unevenly and the hanger doesn't perform as intended.
- Skipping compatibility checks: Corrosion problems start at the hardware line, then spread.
- Assuming every code area is the same: Local requirements can change what connector style and fastening method are acceptable.
When pros add more than a hanger
A hanger handles end support, but some framing conditions need more than that. In high-seismic zones like California, builders often add seismic straps or blocking alongside joist hangers because local code may require those upgrades for stability and inspection approval, as noted in this guide on joist hanger safety in LA construction.
That professional mindset applies in Canada too, even when the code path differs. If the frame is exposed, tall, irregular, or carrying movement from stairs, guards, or long spans, the right answer may be a hanger plus blocking, not a hanger alone.
Sometimes the best alternative isn't a different hanger. It's correcting the framing plan so the joist has better bearing, cleaner alignment, or additional restraint where the load path needs it.
If you're ordering parts for a new deck, a repair, or a framing upgrade, XTREME EDEALS INC. carries joist hangers, connector fasteners, and related deck hardware in one place, which makes it easier to match the hanger, coating, and approved fastening method before the job starts.