

You're standing on the deck, looking at the rail line and thinking the job is basically done. The boards are down, the posts are in, the structure feels solid, and then your eye lands on the tops of those 4x4s. Bare end grain. No protection. No finished look.
That's usually the point where homeowners make one of two mistakes. They either treat post caps like a last-minute decorative extra, or they grab the first package labelled “4×4” and assume it'll fit. Both choices create avoidable problems. The first leaves the post top exposed to weather. The second often means a loose cap, a return trip, and a lot of frustration.
A good post cap finishes the deck properly, but it also provides vital protection for a vulnerable part of the post. The trick is buying the right cap for the post you have, not the one the lumber label suggests you have.
The Finishing Touch Your Deck Deserves
A nearly finished deck can look complete from ten feet away and unfinished from two. That's what exposed post tops do. They catch your eye because everything else looks deliberate, but the end grain on the posts still looks raw and temporary.
That unfinished look matters, but the practical issue matters more. The top of the post is one of the easiest places for weather to start working against you. Sun beats down on it, rain sits on it, and seasonal movement opens the door to cracking and wear. A properly chosen post cap solves both problems at once. It gives the deck a clean top line and protects the post where it needs it most.
Homeowners usually shop for 4×4 deck post caps after the hard work is already done, which is why sizing mistakes happen so often. At that stage, nobody wants a technical surprise. They want something that fits, installs cleanly, and looks like it belonged there from the start.
That's the value of getting this small detail right. It's not just trim. It's the piece that makes the whole project look organised and helps the deck hold up better over time.
Why Post Caps Are More Than Just Decoration
A lot of people shop for post caps by style first. Pyramid, flat, ball top, solar. That's understandable, but the first question should be protection. A post cap is a cover for exposed end grain, and exposed end grain is where wood is most vulnerable.
Think of the top of a wood post like the top of a bundle of straws. Moisture doesn't have to work very hard to get in. Once water starts soaking into that surface over time, the post becomes more susceptible to swelling, splitting, and internal decay. A cap acts like a small roof over the post.
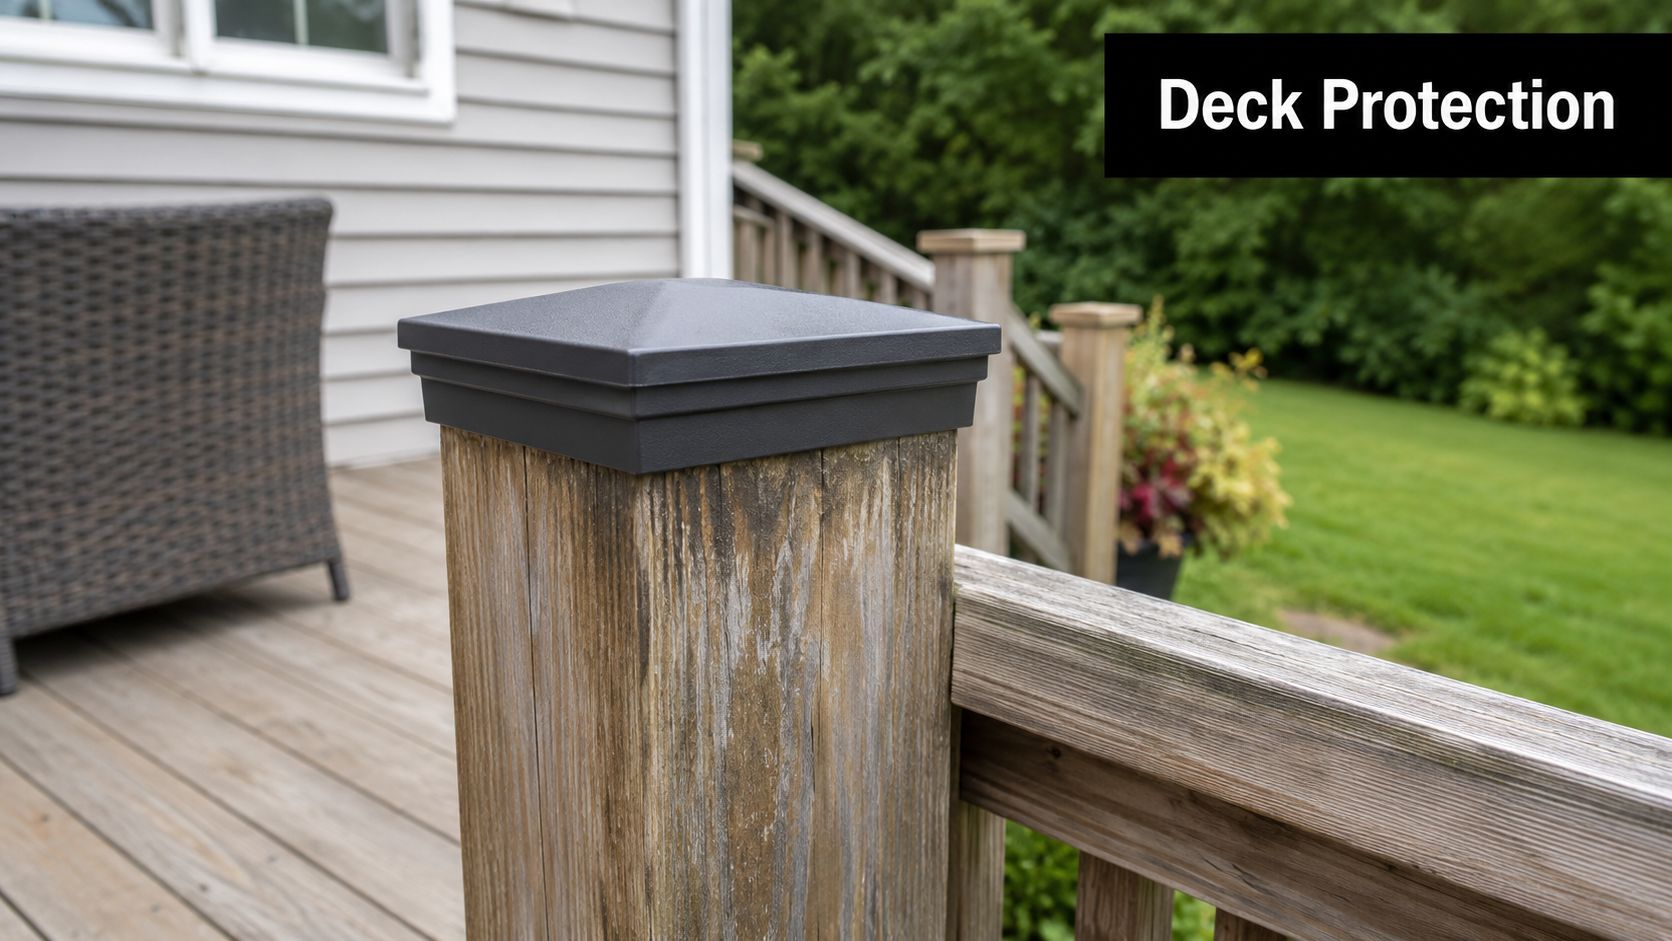
Protection comes first
The decorative side is real. A good cap sharpens the whole look of a deck. But the functional side is why it belongs there in the first place.
In California's seismic and high-wind zones, 4×4 deck post caps must secure end grain to mitigate moisture-driven decay and structural weakening; caps with a 0.75" slide depth over the post provide enhanced mechanical stability against lateral wind forces, a critical factor in coastal CA regions where gusts exceed 40 mph, according to Atlanta Post Caps on 4×4 slim profile post caps.
That matters even if you're not building on the coast. Wind, sun, standing water, and freeze-thaw cycles all punish exposed post tops. A cap helps interrupt that cycle.
Practical rule: If you spent money on pressure-treated posts, rail hardware, and decking boards, leaving the end grain open is cutting a corner in the wrong place.
Why skipping them costs more later
When a homeowner skips caps, the deck doesn't fail overnight. That's part of the problem. Damage starts subtly and often shows up later as checking, discolouration, or a post top that no longer looks sound.
Post caps also help preserve the appearance of the project. Bare post tops weather unevenly. Even a well-built deck can start to look tired faster when the posts are left uncovered.
A cap won't fix poor framing or bad lumber, but it does protect a known weak point. That makes it one of the simplest upgrades you can add for both appearance and longevity.
Choosing Your Material and Style
Once you know the cap has a real job to do, material and profile become easier to evaluate. The best choice depends on weather exposure, the look of the deck, and how much maintenance you're willing to live with.
At the product level, there isn't one perfect answer for every deck. There's a right fit for your project.
What each material does well
Here's the practical trade-off most buyers care about:
| Material | What it does well | Watch for |
|---|---|---|
| Aluminium | Lightweight, clean-looking, resists rust well, works on modern and traditional decks | Finish quality matters |
| Galvanised or coated steel | Solid feel, durable, often suits heavier visual styles | Coating damage can shorten life |
| Copper | Premium appearance, develops patina naturally | Higher cost, look changes over time |
| Vinyl or plastic | Low maintenance, won't rust, easy for many DIY installs | Some styles can look lighter-duty |
| Composite | Stable appearance, good option when you want low upkeep | Fit and design vary by manufacturer |
Metal caps remain a common choice because they give the deck a crisp, finished edge. Pyramid caps in aluminium are especially popular because they shed water well and suit a wide range of rail styles. Ball tops lean more traditional. Flat tops work when the deck design is simple and squared off.
Plastic, vinyl, and composite caps appeal to homeowners who want less upkeep and an easy install. That's especially useful on a deck that already includes low-maintenance railing or wrapped posts.
Style should match the deck, not fight it
A cap shouldn't look like an afterthought. It should echo the rest of the project.
- Pyramid tops work well on most decks because the shape helps with water runoff and looks balanced on standard posts.
- Flat caps suit contemporary builds, especially when rail lines are straight and hardware is minimal.
- Ball tops and decorative finials fit more traditional fence and deck designs where ornament is part of the look.
- Solar caps make sense when the deck needs low-level evening light without adding wiring.
If you're also comparing details across a larger backyard project, it helps to look at how post-top choices relate to gate hardware, fence lines, and trim. Homeowners planning a new fence as well as a deck often get useful design context from examples of wood fence installation, especially when trying to keep materials and finishes visually consistent across the property.
What the current market is doing
If you've shopped for caps recently, you've probably noticed more “universal” fit language than there used to be. That's not accidental. In 2026, the market for 4×4 deck post caps features universal “flex-to-fit” designs like the CAP CLAW™ that accommodate real 4×4 lumber sizes without screws, with pricing for standard 4×4 black metal caps averaging $2.57 and white vinyl solar post caps reaching $24.98 at major retailers, as described by Fence Armor's CAP CLAW product information.
That spread tells you something useful. Basic caps and decorative lighted caps serve different jobs, and price usually follows material, lighting features, and install method.
For shoppers who want standard hardware options, one example in our catalogue is the post caps for decks collection at Xtreme eDeals, which includes common profiles such as pyramid and decorative caps for wood and metal posts.
Some decks need the cap to disappear into the overall design. Others look better when the cap adds contrast. Neither approach is wrong if the fit and material are right.
The Most Common Mistake Measuring for the Right Fit
This is the mistake that sends people back to the store. They buy a cap marked 4×4 for a post they call a 4×4, and they never check the actual size.
That sounds sensible until you remember how lumber is labelled. Nominal size and actual size aren't the same thing. A nominal 4×4 post is usually not a true 4 inches wide. If you skip measuring, you can end up with a cap that wobbles, won't seat properly, or blows off.
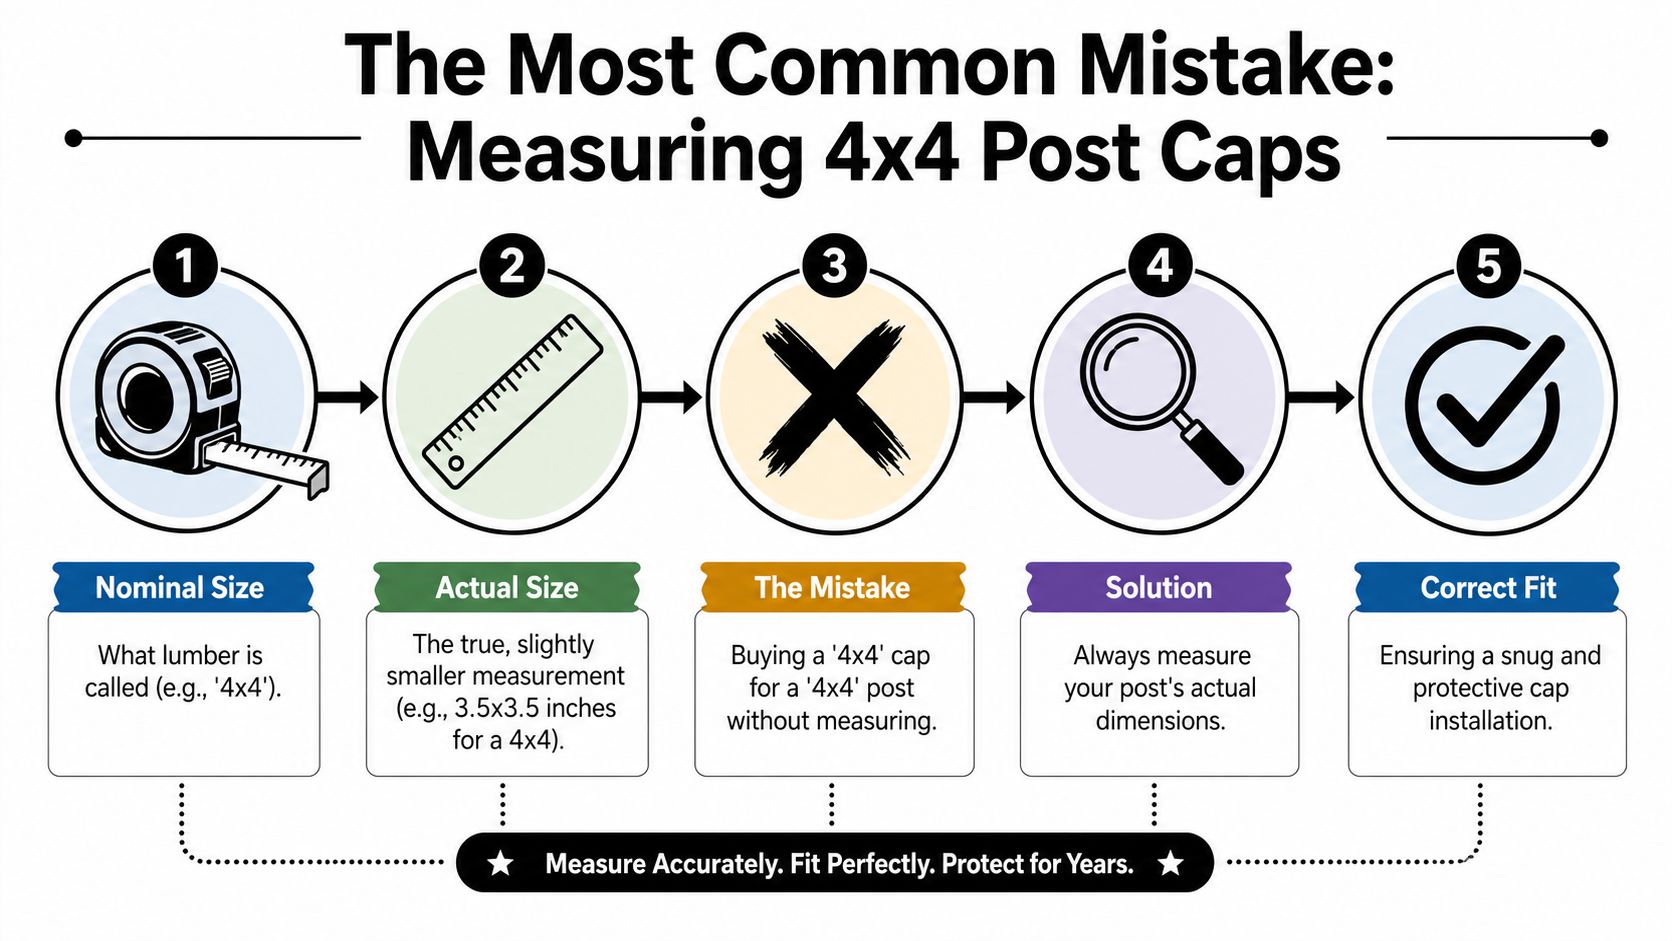
The sizing rule that prevents bad fit
The key sizing fact is simple but easy to miss. The industry-standard clearance for a 4×4 deck post cap is 1/16 to 1/8 of an inch larger than the actual post width, and the actual nominal 4×4 post measures approximately 3.5 inches rather than 4 inches, requiring caps with an internal opening of 3.625 to 3.687 inches, based on DecksDirect's post cap sizing guidance.
That clearance range matters. Too tight, and the cap won't seat properly. Too loose, and it won't stay put the way it should.
Measure the post you have, not the post name
Use this method before you buy anything:
- Measure the outside width of the post with a tape measure.
- Check at least two outside faces because posts can vary slightly.
- Measure to the closest 1/16 of an inch rather than rounding casually.
- Compare that number to the cap's internal opening, not just the product title.
- Test your assumption against the cap style. Press-fit caps, screw-fixed caps, and flexible-fit caps don't all behave the same way.
If your deck uses wrapped posts, rough-cut lumber, or a non-standard sleeve, the measurement becomes even more important. A “true” size cap and a nominal size cap are not interchangeable.
Measure first, shop second. That order saves more aggravation than any installation trick.
For homeowners comparing other post dimensions at the same time, it can help to look at adjacent sizing options such as 4 x 6 post cap products so you can see how manufacturers distinguish nominal and true-size categories across a range.
A Visual Guide to Post Cap Installation
Installation is usually straightforward once the cap fits. Most problems at this stage come from trying to force the wrong cap, using the wrong fastening method for the material, or skipping the test-fit.
The safest habit is simple. Dry-fit every cap first. If it seats properly and sits level, then choose the fastening method the cap was designed for.
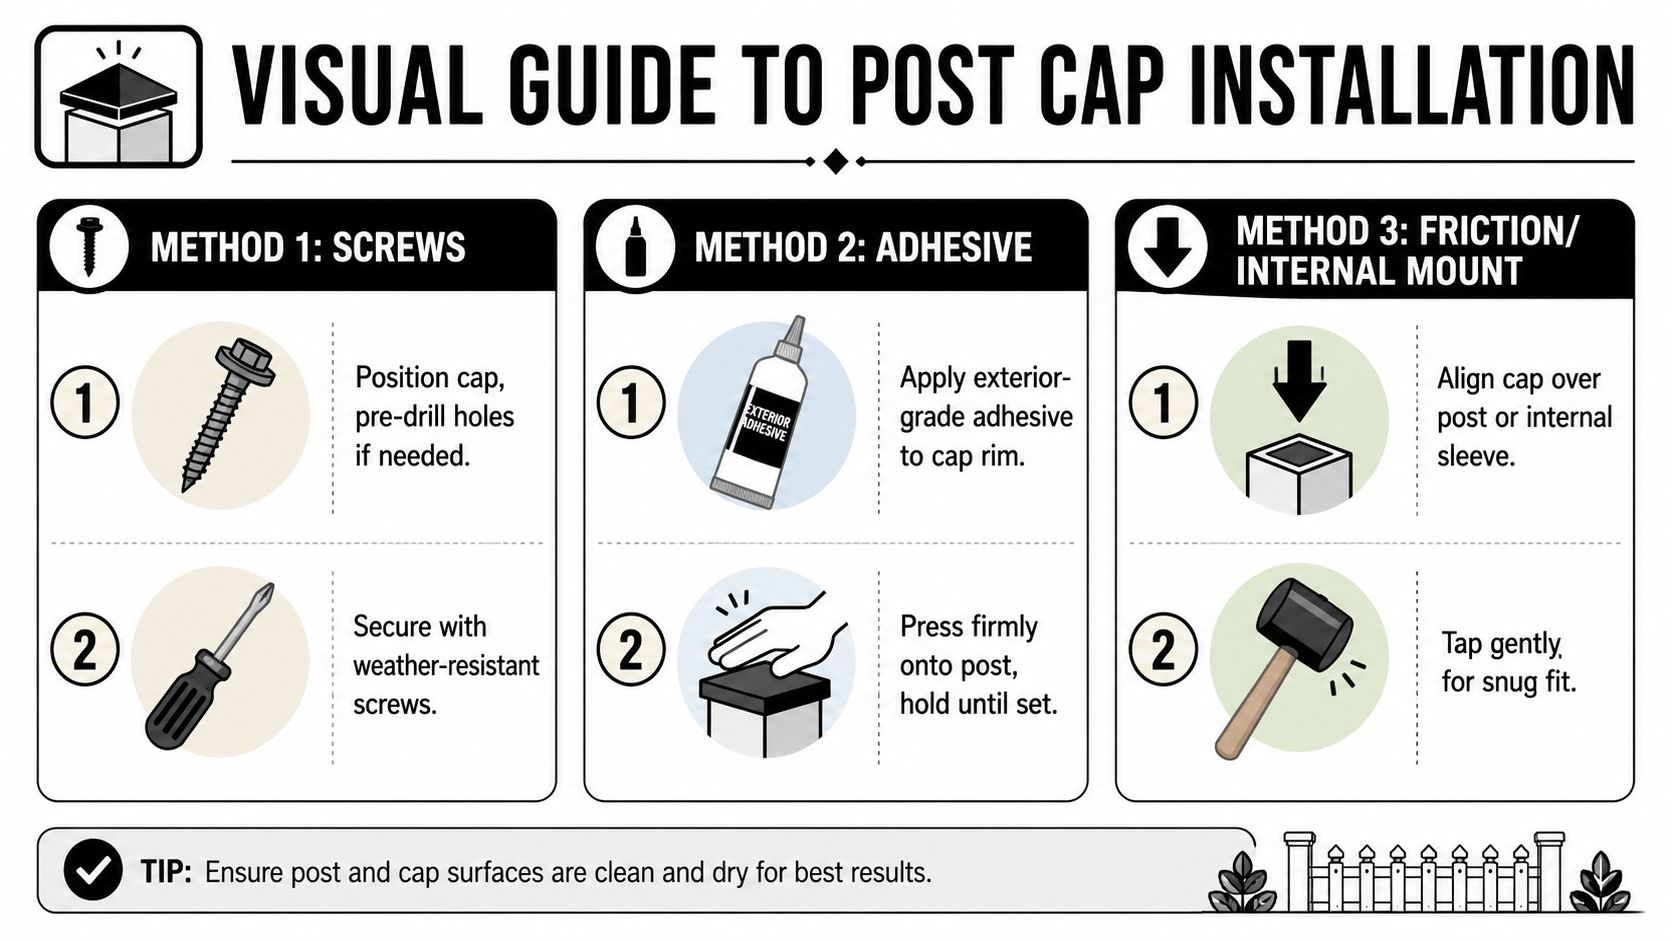
Screw-fixed caps
This is one of the most secure methods, especially for metal caps such as many Decorex Hardware styles.
- Set the cap in place first and make sure it sits fully down on the post.
- Check alignment from two sides so the cap doesn't look twisted once fastened.
- Use the provided or recommended exterior screws if the cap includes pre-drilled holes.
- Tighten evenly rather than overdriving one side and pulling the cap out of square.
This method works well when you want a firm mechanical connection and don't mind a visible fastener.
Adhesive-mounted caps
Adhesive gives a cleaner look because there are no screw heads on the side of the cap. It works best when the cap and post are dry, clean, and already a proper fit.
Apply a controlled bead to the inside lip of the cap or along the post's top edges, then press the cap into place. Wipe squeeze-out right away. If adhesive is your plan, don't use it to compensate for a poor fit. Adhesive is a fastening method, not a sizing fix.
Here's a quick install demonstration to compare with the written steps:
Press-fit and friction-fit caps
Some vinyl, polymer, and universal-fit designs are made to grip the post without screws. These are popular with DIY homeowners because installation is quick and the outside stays clean.
A rubber mallet can help seat the cap gently, but the word is gently. If you're hitting hard, something is wrong. Pull it off and check the fit again.
Don't trim a cap to “make it work”. If it doesn't fit in a normal test-fit, solve the sizing problem instead of altering the cap.
That warning matters. Current guides rarely warn that cutting or modifying post caps to fit oversized or undersized posts voids warranties and compromises UV/impact resistance. 54% of homeowners who modified caps experienced premature brittleness within 18 months, while 79% of warranty claims were denied due to unauthorized alterations, according to Atlanta Post Caps FAQs.
If you want a fuller overview of fit, materials, and buying considerations before installation day, the Xtreme eDeals guide on how to buy post caps for your fence or deck is a useful companion read.
Keeping Your Post Caps Looking Great
Once the caps are installed, maintenance is pretty light, but it shouldn't be ignored. A quick seasonal check does more than keep them looking tidy. It helps you catch loose fasteners, finish wear, or debris buildup before those small issues turn into replacement work.
Cleaning by material
Different cap materials respond best to simple care.
- Metal caps usually need nothing more than mild soap and water. Rinse off dirt, pollen, and surface grime, and avoid abrasive pads on coated finishes.
- Copper caps can be left alone if you like the natural patina, or cleaned with a copper-specific product if you want to preserve a brighter finish.
- Vinyl and plastic caps are generally the easiest to maintain. A wipe-down with a mild cleaner usually handles ordinary staining.
- Wood caps need the most attention because they weather like any other exposed wood detail. Keep them sealed or stained on the same schedule as the rest of the deck trim.
What to inspect while you clean
Cleaning time is also inspection time. Check that each cap is still seated properly, especially after winter or a stretch of hot weather.
Look for:
- Loose screws that need a light retightening
- Movement at the cap edge that might signal a fit or adhesive issue
- Cracks or finish wear on exposed, high-sun sides
- Water-holding debris collecting around profiles with decorative recesses
Caps don't ask for much. A little attention once or twice a year keeps the finished look sharp and helps the protection side of the job keep working.
Your Complete Post Cap Project Checklist
Buying and installing 4×4 deck post caps goes smoothly when you treat it like a fit-and-finish job, not an impulse add-on. Most frustration comes from rushing the buying step.
The biggest checkpoint is still measurement. Most existing content fails to address that nominal 4×4 posts rarely match true 3.5” dimensions due to regional moisture shrinkage and degradation, leading to widespread cap misfit; 68% of CA DIYers report buying ill-fitting caps because they assume nominal equals actual, yet only 22% measure post width before purchase, according to Fence Armor's post cap buying guidance.
Use this final checklist before you order and install:
- Measure the actual post width on at least two sides before choosing a cap.
- Match the cap material to the deck's conditions. Pick for weather exposure, upkeep, and appearance.
- Choose a profile that suits the deck. Pyramid, flat, decorative, or solar should look intentional with the railing and trim.
- Confirm the fastening method before buying. Screw-fixed, adhesive, and press-fit caps don't install the same way.
- Test-fit every cap before permanent installation.
- Never cut or modify a cap just to force the fit.
- Keep basic tools ready such as a tape measure, drill or screwdriver, adhesive if required, and a rubber mallet for gentle seating where appropriate.
Do those things in that order, and the job usually stays simple.
XTREME EDEALS INC. offers deck and fence hardware, post caps, fasteners, and related accessories for DIY homeowners and trade buyers who want to source these finishing components in one place. If you're comparing sizes, materials, or cap styles for your next deck project, browse the selection at XTREME EDEALS INC..