
You're probably looking at the visible parts of the job first. Deck boards, railing style, fence height, post caps, maybe the finish colour. That's normal. The top half of the build is often pictured long before its underlying support is considered.
The trouble starts when the connection at the bottom gets treated like an afterthought. A strong-looking post can still fail if the base is weak, poorly anchored, or the wrong type for the load. That's why heavy duty post brackets matter so much. They sit low, usually out of sight, and they decide whether the structure stays square, resists wind, sheds water, and holds up over time.
I've seen plenty of builds where the lumber was decent and the layout was fine, but the bracket choice didn't match the job. That's where movement starts. Posts rack. Fasteners loosen. Water sits where it shouldn't. Then the whole build begins to age faster than it should.
The Unseen Hero of Your Deck or Fence
A homeowner lays out a new deck in the garden, marks the post locations, and starts comparing cedar, composite, and railing styles. Another one is replacing a leaning privacy fence after a rough season of wind and freeze-thaw. In both cases, the eye goes to what's easy to see. Few people stop first at the base connection.
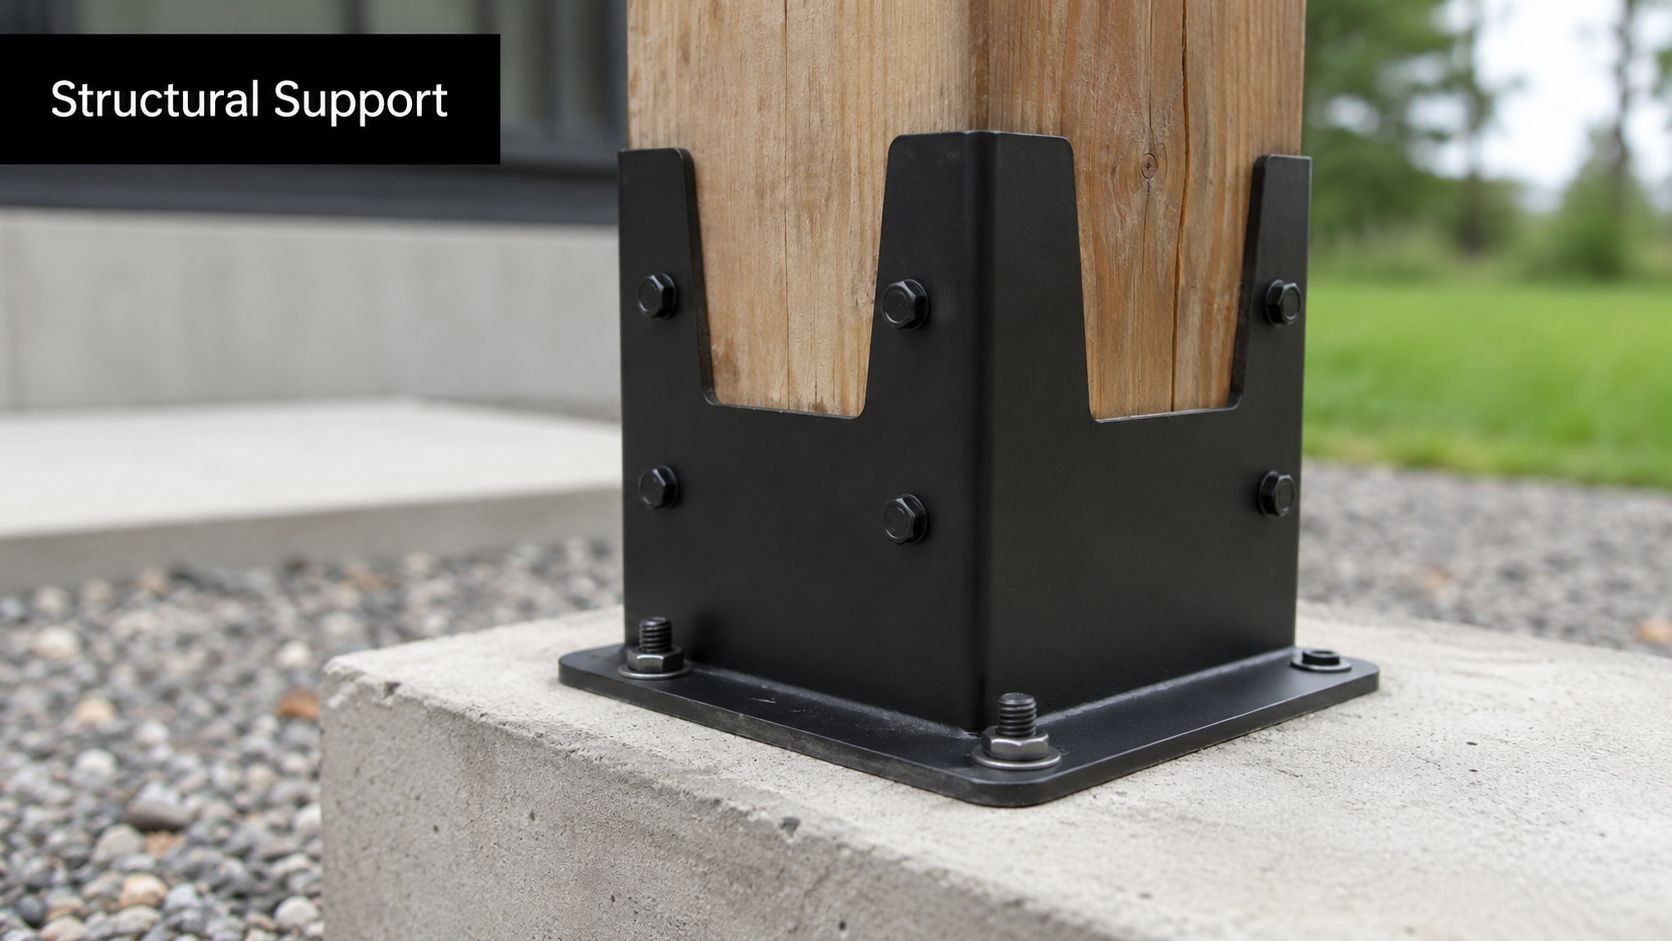
That base connection is where the project either gains real structural discipline or starts with a built-in weakness. Heavy duty post brackets don't add glamour, but they do the hard work that keeps a post standing where it belongs. They connect timber to concrete or another structural surface in a way that controls movement, improves durability, and makes the load path predictable.
A deck post without the right bracket is a bit like a table leg balanced on a coin. It may stand for now, but it doesn't take much side pressure or moisture damage to expose the weakness. A proper bracket creates a more secure seat for the post, lifts it where needed, and gives the fasteners and anchors a defined job.
A clean-looking build can still be structurally lazy if the post base wasn't chosen with the actual loads in mind.
That's the part many catalogues skip. They show bracket shapes and finishes, but not the reason one style belongs under a pergola while another is better for a deck post tied into concrete. The smart way to choose heavy duty post brackets is to work backwards from the forces the structure will see, then pick the bracket type, steel, coating, and anchoring method that suit the build.
What Are Heavy Duty Post Brackets Really Doing
Think of the bracket as the ankle of the structure. The post is the leg. The footing or slab is the foot pressing into the ground. If the ankle is weak, the leg can't do its job, no matter how solid the rest looks.
How the load path works
Every post carries more than straight downward weight. Yes, gravity pushes down from the beam, framing, roof, or fence rails above. But real structures also get shoved sideways by wind, pulled upward by uplift, and twisted by uneven forces.
A bracket's job is to take those forces and hand them off properly to the concrete or structural base below. If that transfer is sloppy, the post shifts. Once it shifts, fasteners start carrying loads they weren't meant to carry by themselves. That's when you see wobble, splitting, cracked concrete edges, or bent hardware.
Here's the practical breakdown:
- Downward load: The post supports the weight above it.
- Lateral load: Wind, impact, and sway try to push the post sideways.
- Uplift: Wind and movement can try to pull the post upward from the base.
A proper heavy duty post bracket doesn't just “hold the post in place”. It creates a controlled connection for all three.
Why the gap under the post matters
One of the biggest advantages of a true post base is separation. Wood that sits directly on concrete stays wet longer. That trapped moisture shortens the life of the post base area, which is already the most vulnerable point in many outdoor builds.
Standoff brackets help by lifting the timber off the surface. That small gap improves drainage and air flow. It also makes inspection easier. You can spot corrosion, movement, and water issues before they become structural repairs.
Practical rule: If water can sit at the bottom of the post, the post will eventually remind you.
What brackets prevent that field fixes don't
A lot of failures start with improvised connections. A couple of lag screws into the side. Nails driven on an angle. A thin utility bracket used where a structural connector should have been installed. Those fixes may look acceptable on day one, but they don't create a dependable load path.
Heavy duty post brackets bring order to the connection. The steel shape resists movement. The anchor holds the base to the concrete. The fastener pattern ties the timber to the bracket. Each part has a role, and the connection works because those roles are coordinated.
That's the difference between hardware that decorates a build and hardware that makes it safe.
A Guide to Bracket Types and Materials
A bracket choice should start with the job it has to do. A fence post on an existing patio slab has different demands than a pergola post set into a new footing. Pick the bracket after you understand the base condition, the expected movement, and the exposure. That approach avoids a lot of expensive rework.

Bracket types that solve different problems
Heavy duty post brackets fall into a few practical groups, and each one answers a different site problem.
| Bracket type | Best use | What it does well | Trade-off |
|---|---|---|---|
| Surface-mount post base | Existing concrete pads, piers, footings | Good for retrofit work, easier layout correction, straightforward install | Performance depends on anchor selection and sound concrete |
| Embedded post base | New concrete pours | Ties the connection into the footing from the start | Little room for correction after placement |
| U-bracket | Straight vertical post support | Fast post placement, simple connection geometry | Less restraint at the sides than heavier wrap styles |
| Wrap-around or saddle base | Posts with higher side load or more movement risk | Better post restraint and a more controlled connection | More visible steel and more fastening points |
| Adjustable post base | Jobs with small alignment or height issues | Lets you tune the fit during installation | More parts, so product quality and correct assembly matter |
| Standoff base | Outdoor wood posts where drainage matters | Lifts timber off concrete for airflow and drying | Still has to be matched to the post size and load |
L-brackets and T-brackets help with framing intersections and lateral support between members. They do not replace a structural post base. If the post bears on a footing, the base connector has to be selected for that role.
Surface-mount versus embedded
Surface-mount bases make sense when the concrete already exists. For repairs, replacements, and phased deck work, they save time and let you confirm layout before setting the post. They also make sense when you are shopping for post base brackets for decks and outdoor structures and need options that fit common retrofit conditions.
Embedded bases suit new work better. They can produce a cleaner, more direct connection because the bracket becomes part of the footing layout from day one. The trade-off is accuracy. If the bracket lands out of square or out of position during the pour, the post and beam layout inherit that mistake.
I treat that choice like formwork. Easy to fix before concrete. Hard to fix after.
Material choice affects service life
Material selection is really a corrosion decision. The bracket can be shaped correctly and still fail early if the finish does not match the site.
Most heavy duty post brackets are steel. What changes is the coating, the steel grade, and how much abuse the connector is expected to take outdoors.
- Galvanized steel is the standard field choice for many decks, fences, and general exterior work. It gives good protection at a manageable cost.
- Powder-coated steel works where appearance matters and the bracket will remain visible. It can suit pergolas, feature fencing, and modern rail details, but the finish needs to stay intact.
- Stainless steel belongs in harsher conditions, especially where moisture, chemical exposure, or persistent corrosion risk would shorten the life of coated steel.
That is the trade-off. Powder coat may look better on day one. Galvanizing often holds up better when the jobsite gets muddy, tools scrape the finish, and maintenance is inconsistent.
Wood treatment matters too. Pressure-treated lumber can be hard on the wrong connector finish, so the bracket, fasteners, and anchors need to be compatible as a system.
Choosing by force and exposure, not by appearance
A bracket has two jobs. It has to suit the forces in the structure, and it has to survive the environment long enough to keep doing that job. That is why the right question is not just whether a 4×4 or 6×6 post fits inside the steel.
Ask these instead:
- Is the bracket going onto cured concrete or into fresh concrete?
- Does the post need basic bearing support or stronger side restraint?
- Will the hardware live in a dry yard, a wet exposure zone, or a corrosive environment?
- Is the visible finish part of the project, or is long-term durability the priority?
Good product selection comes from matching those answers to the hardware on the shelf. That is also why supplier quality matters. A bracket that looks similar in a photo can differ in steel thickness, coating quality, hole layout, and allowable use.
On foundation-related projects, the same principle applies. Connection hardware has to match the structural job, just as homeowners looking for reliable pier and beam solutions in Texas need repairs that suit the actual foundation condition, not a generic fix.
Choose the bracket for the load path and the weather. The cleaner-looking option is not always the longer-lasting one, and the cheapest bracket is often the most expensive after a few freeze-thaw cycles and one wet season.
Matching the Bracket to the Build Load Capacity and Sizing
A bracket earns its keep when the load stops being tidy. The post may be carrying beam weight, resisting people moving across a deck, or taking repeated wind pressure on a fence line. If the base connection is undersized, the rest of the build is asking one weak point to do too much.
Consider the forces from three directions
Sizing starts with the actual forces at that post location, not just the nominal post size stamped on the box.
A deck post sees downward load from framing and live load. It also sees side load when the structure racks under movement or wind. In some layouts, especially on pergolas, privacy screens, and exposed corners, the connection also has to resist uplift when wind tries to lift or overturn the assembly.
Check these three demands together:
- Downward resistance to carry supported weight
- Lateral resistance to control side push and racking
- Uplift resistance to resist pull-out and overturning
Field failures often start at the base because the connection was chosen for bearing only, while the job also needed side restraint.
Why rated hardware matters
Certified heavy-duty brackets are built and tested for predictable performance. Improvised connections made from light angles, thin straps, or whatever fasteners are on hand can feel solid on day one, then loosen once the structure starts cycling through load, moisture, and movement.
That matters even more where the support below may shift or settle. Builders looking at older structures often end up studying reliable pier and beam solutions in Texas for the same reason. A strong connector still depends on a stable base and a clear load path from framing to footing.
Size the bracket to the post and the job
A 4×4 bracket is only the starting point. Actual dressed lumber dimensions vary from the nominal label, and two 4×4 posts can be doing very different work. A corner deck post that carries beam load and braces a guard line deserves a heavier connection than a free-standing decorative post at the end of a garden feature.
Use this quick check:
| Project condition | Better bracket choice |
|---|---|
| Simple vertical support with good drainage needed | Standoff post base |
| Higher side load or stronger restraint needed | Heavier wrap or saddle-style base |
| Existing cured concrete | Surface-mount base with correct concrete anchor |
| Fresh footing being poured | Embedded connector if layout is confirmed |
| Large timber or heavier framing | Thicker-gauge, larger-footprint bracket |
For deck work, compare products by post size, steel thickness, standoff detail, and anchor pattern. A focused category like post base brackets for deck builds makes that easier because it separates true post bases from lighter general-purpose hardware.
The post size tells you what fits. The load path tells you what belongs.
Selecting the Right Bracket for Your Project
A bracket choice usually gets tested on the first bad weather day, not at the store. If a deck post starts racking, a fence line begins to sway, or a pergola post loosens at the base, the problem is usually that the connector was chosen for fit instead of service load.

For a multi-level deck
Multi-level decks put the most demands on a post base because the bracket has to handle more than straight-down weight. It also has to resist sway from people moving across the frame, seasonal shrink and swell in the lumber, and wind working on guard assemblies and raised framing. That is why a light holder or decorative saddle is the wrong tool here.
Choose a true structural post base with a raised standoff, heavy enough steel, and a fastening pattern made for the actual post size. If you are sorting through options for standard deck posts, 4 x 4 wood post brackets for structural deck support make it easier to separate real load-bearing bases from hardware that only looks substantial in a product photo.
Visible finish still matters, especially on higher-end builds, but it comes after capacity, corrosion resistance, and anchor layout.
For a tall privacy fence
A tall fence is a wind problem before it is a weight problem. The panel works like a sail. Every gust tries to pry the post at the base, so side restraint and anchor strength matter more than simple post fit.
A heavy-duty surface-mount U-bracket or post base can work well on sound concrete if it gives enough bearing and enough side support to keep the post from walking loose over time. Gate posts deserve even more caution because they take repeated shock loads from opening, closing, and sag correction.
On larger site jobs, crews in commercial landscape construction installation often choose connectors by exposure, service load, and maintenance demands first. That same habit improves residential work. The bracket should suit the force it has to resist, not just the post it wraps around.
For a backyard pergola
Pergolas get underestimated all the time. The roof frame may look open, but tall posts and overhead members still apply great torque to the base, especially in exposed yards where wind can catch the structure from the side or lift under slats and rafters.
Use a bracket with good base stability, proper uplift restraint where needed, and a finish suitable for exposed hardware if the connection will stay visible. Powder-coated black brackets can be a good choice for appearance, but only if the underlying steel thickness, anchor pattern, and post restraint are up to the job.
A useful way to see installation logic in action is this field video:
A quick decision filter
Run through these four questions before you buy:
- What force matters most here? Pure vertical load, wind-driven side load, uplift, or a mix.
- What is the post supporting? Beam, fence panel, pergola frame, gate, or something decorative.
- What base are you fastening into? Existing concrete, a new footing, or another structural surface with known strength.
- Will the bracket live wet, exposed, or in view? That decides how much standoff, coating quality, and finish matter.
That sequence keeps the decision tied to load path, weather exposure, and service life. It also helps narrow the Xtreme EDEALS selection to brackets that match the job instead of just matching the lumber label.
Installation Essentials and Avoiding Common Mistakes
A good bracket can still fail in a bad installation. Most problems don't come from the steel itself. They come from what the installer skipped, substituted, or guessed at.

Start with the base, not the post
A bracket only performs as well as the material it's fixed to. If the concrete is weak, cracked at the edge, out of level, or too rough for the base to seat properly, the connection starts compromised. Builders sometimes notice the problem only after the post is already cut and standing.
Check the footing or slab first. Confirm the bracket sits flat. Confirm the anchor location gives the concrete enough strength around it. Then move to post placement.
If you're comparing configurations for common timber sizes, a focused set of 4 x 4 wood post brackets helps you see the difference between simple holders and genuine structural bases. That distinction matters before the drill comes out.
The fastener mistakes that cause trouble
A lot of DIY jobs go sideways when people spend properly on the bracket, then cheap out on the screws or use whatever anchors are in the van.
Watch for these common errors:
- Wrong concrete anchor: A wedge anchor, sleeve anchor, or other fixing method has to suit the concrete condition and the bracket hole pattern.
- Wrong wood fastener: Structural connectors need compatible structural screws, bolts, or manufacturer-approved fasteners. Drywall screws are not part of this conversation.
- Missing holes: If the bracket is engineered with a fastening pattern, skipping holes changes how the load spreads.
- No pre-drilling where needed: That invites splitting, especially near post ends or in dry stock.
Use the hardware the connector was designed around. “Close enough” fasteners create expensive lessons.
Alignment, drainage, and torque
A post can be perfectly cut and still poorly installed if it isn't plumb when the fasteners are set. Once the bracket is locked down and the timber is fixed, a slight lean at the base often turns into a visible problem higher up.
Keep these essential points in mind:
- Plumb first: Brace the post before final fastening.
- Protect drainage: Don't pack debris, sealant, or wet material into a standoff gap that's supposed to let water escape.
- Tighten properly: Under-tightened hardware moves. Over-tightened hardware can crush fibres, distort the bracket, or stress the anchor.
Don't let appearance overrule structure
A common mistake on visible outdoor builds is choosing the bracket that looks cleanest, then forcing it into a structural role it wasn't built for. If a project needs more side restraint, more steel, or a larger footprint, that need comes first.
Plainly put, the nice-looking bracket is the right bracket only if it also matches the load path. Otherwise it's trim, not structure.
Code Compliance Maintenance and Ensuring Longevity
Building code can feel like paperwork until you see what it's trying to prevent. In post connections, code is really a set of lessons learned from failures. It pushes builders toward rated, tested connectors because those connectors create predictable performance.
A 2012 Canadian Wood Council report found that 25–30% of inspected residential decks in Ontario and British Columbia lacked manufacturer-rated post-base connectors, and those decks accounted for a disproportionate share of reported failures, which helped drive later code amendments in Canada, as noted in this summary discussing the Canadian Wood Council findings. That's the practical reason code language keeps getting more explicit about post bases. Guesswork at the bottom of a structure has a habit of showing up at the worst time.
Code is really about predictable load paths
When an inspector asks for a rated connector, proper anchoring, or corrosion-resistant hardware, the point isn't bureaucracy. The point is to make sure the post, bracket, anchor, and footing are all working together in a way someone can verify.
That matters even more on repairs and upgrades. Older decks and fences often have serviceable lumber but weak or outdated base connections. If you're looking at retrofit options, guidance on anchoring posts to concrete is useful because the anchoring detail often decides whether the upgrade is worth doing at all.
Maintenance that actually matters
The good news is that bracket maintenance is simple if you stay consistent. You don't need a complicated schedule. You need a builder's eye and a habit of checking the points where failure starts.
Use a short inspection routine:
- Look for corrosion: Surface wear, coating damage, and rust staining are early warnings.
- Check for movement: Gaps, ovalled fastener holes, or a post that no longer sits tight in the bracket tell you something has shifted.
- Clear debris: Soil, mulch, leaves, and trapped moisture around the base shorten service life.
- Retighten when appropriate: Seasonal movement can loosen connections over time.
A post base rarely fails without leaving clues first. Someone just has to look.
Longevity comes from matching and upkeep
The bracket lasts longest when three things line up. The right connector for the load. The right finish for the exposure. The right installation for the substrate. Miss one, and service life drops.
That's why the strongest builds don't rely on one good decision. They rely on a chain of good decisions that starts at the footing and continues through inspection after the build is done.
Find Your Perfect Match at Xtreme EDEALS
Choosing heavy duty post brackets gets much easier when you stop thinking like a shopper and start thinking like a builder. Ask what the post supports. Ask what forces hit it. Ask what it's anchored to. Ask how wet, exposed, or visible the connection will be. Then choose the bracket type, steel, and finish that match those answers.
The buyer's checklist is short:
- Project type: Deck, fence, pergola, gate, or repair
- Post size: Real fit matters
- Connection style: Surface-mount, embedded, U-bracket, saddle, or adjustable
- Load demand: Downward, lateral, and uplift all count
- Exposure: Moisture, corrosion risk, and visibility affect material choice
- Hardware compatibility: Bracket, fastener, anchor, and concrete have to work as one system
That's where a curated hardware catalogue helps. XTREME EDEALS INC. carries the sort of post bases, anchors, screws, bolts, and deck and fence accessories that let DIY homeowners and trade professionals source the full connection, not just one isolated part. The range includes practical options in common post sizes, visible finishes for feature builds, and trusted brands such as Decorex Hardware, along with the fastening hardware that completes the assembly.
A good bracket doesn't make a project flashy. It makes the project trustworthy. That's the standard worth building to.
XTREME EDEALS INC. makes that next step easier with a broad selection of post base brackets, fasteners, anchors, deck and fence hardware, and finishing details in one place. If you're ready to match the right connector to your build, browse XTREME EDEALS INC. for dependable hardware, straightforward product options, and practical support for both DIY and professional projects.