
You're usually not thinking about brackets when the project starts. You're thinking about the fence line looking straight from the street, the pergola posts landing exactly where they should, or the deck feeling solid when people lean on the railing.
Then the critical work starts. A post that sits a little loose in the base, a connector that isn't meant for the load you're asking it to carry, or the wrong fastener in damp outdoor exposure can turn a clean build into a callback. That's why 4 x 4 wood post brackets matter so much. They're the connection point that decides whether the post stays aligned, drains properly, resists movement, and holds up over time.
The Unsung Hero of Your Outdoor Project
A lot of outdoor projects fail in boring ways.
Not because the lumber was bad, and not because the layout was wildly off. They fail because the connection details were treated like an afterthought. The post got set in a bracket that was close enough. The base looked strong but was really just there to hold position. The screws fit the holes, so they got used without much thought.
That's how you end up with a fence that starts to rack, a pergola post that never feels fully planted, or a deck support that looks fine until the weather and movement expose the weak point.
The bracket is doing more than holding a 4×4 upright. It manages the handoff between materials and parts that move differently, age differently, and see different loads. Wood swells and dries. Concrete holds moisture. Fasteners live outside year-round. Wind pushes from the side. People assume gravity is the only force that matters, but it rarely is.
Practical rule: If the post matters, the bracket matters. Treat it like structure, not trim.
A good bracket choice gives you three things right away:
- Cleaner layout: The post starts where you intended it to start, which makes the rest of the framing easier.
- Better durability: Keeping wood from sitting directly on a wet surface helps the assembly last longer.
- Fewer surprises at inspection: Hardware that matches the job is easier to defend than hardware that only looks the part.
When builders talk about a project feeling “professional”, this is often what they mean. The posts are plumb, the lines are consistent, the hardware matches the conditions, and nothing looks improvised. That starts at the bracket.
Decoding Bracket Types and Materials
Bracket type decides what kind of force the connection can handle. Material decides how long it keeps doing that job outdoors. Get either one wrong, and the failure usually shows up later as wobble, rust bleed, cracked fasteners, or a post that never feels fully tied into the build.
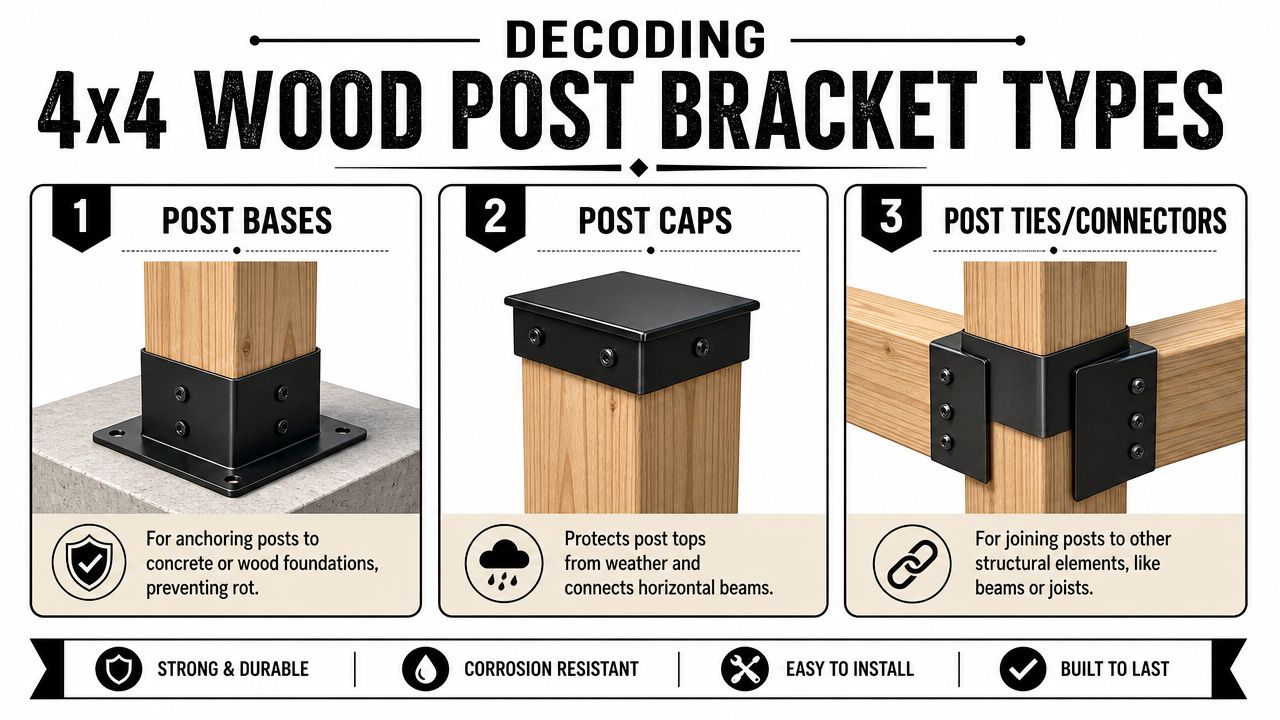
Post bases
A post base handles the transition from the post to the surface below. That may be concrete, a footing, or framed structure. The reason this bracket matters is simple. The bottom of the post is where moisture, movement, and load all meet.
A good base keeps the post located, helps transfer force into the support below, and separates wood from standing moisture. That last part matters more than many DIYers expect. Wood that sits wet at the base tends to check, stain, and decay early, even when the rest of the post still looks fine.
Base styles vary. Some are made for uplift and lateral resistance. Some mainly hold position. A bracket that only cradles the post can look substantial and still fall short on a real structural job.
Post caps
A post cap protects the end grain at the top of the post and, in some assemblies, helps connect the post to a beam. End grain takes on water fast. Once that top starts soaking and drying in cycles, the post is more likely to split and age unevenly.
On a fence or pergola, caps also affect the finished look. That is the visible part. The practical part is longer service life and less water entry where the wood is most vulnerable. For matching styles and connector options, 4×4 post and fence brackets at Xtreme eDeals give you a way to compare finish-oriented pieces with more structural hardware in the same category.
Post ties and connectors
Post ties and connectors join the post to beams, rails, or framing members. Their job is to resist movement at the joint. That can mean sway, twist, or uplift, depending on where the connector sits in the assembly.
Careful label-reading is essential. Some connectors are structural and listed for specific loads. Others are meant for alignment, trim support, or light-duty reinforcement. If the package does not clearly say what load case it is intended to handle, do not assume based on shape alone.
A bracket that wraps a post can still be the wrong bracket for the forces at that joint.
Material choices that change the outcome
The metal and finish affect corrosion, inspection confidence, maintenance, and appearance. They also need to make sense for the wood you are using, especially if the post is pressure-treated.
| Bracket material or finish | Where it makes sense | What it changes in the real world |
|---|---|---|
| Powder-coated steel | Visible projects where appearance matters and coating damage is unlikely | Cleaner appearance at install, but scratched areas can expose bare steel and lead to rust spots |
| Galvanized steel | General exterior framing, especially where treated lumber is involved | Better corrosion resistance for everyday outdoor use and a safer default for many structural connections |
| Stainless steel | Coastal areas, wet exposure, or builds where staining and corrosion would be expensive to fix | Higher upfront cost, but better long-term resistance to rust, tea staining, and hardware replacement |
The trade-off is straightforward. Powder coating usually looks better on day one. Galvanizing usually makes more sense for hard-working structural hardware. Stainless costs more, but it can save a rebuild when the site stays wet, sees salt air, or puts dissimilar metals under constant exposure.
Choose the bracket by job first, then choose the material by exposure. That order prevents a lot of expensive mistakes.
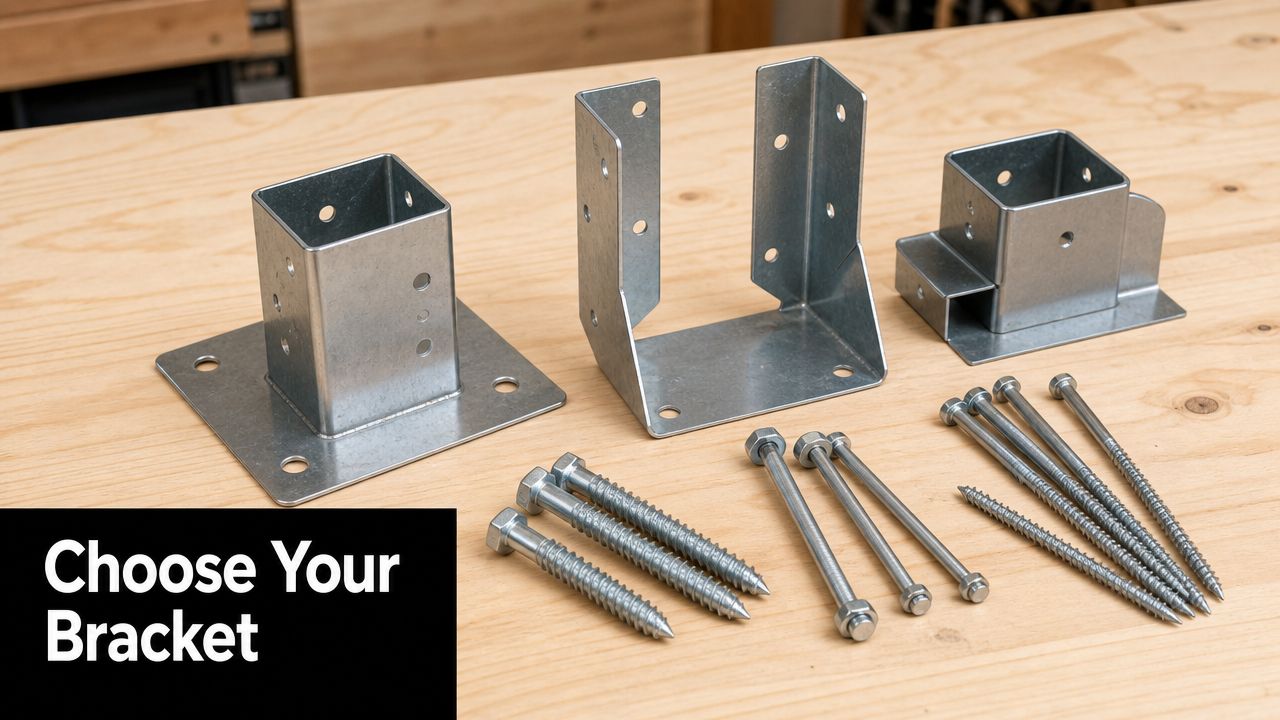
Choosing the Right Bracket and Fasteners
A lot of outdoor projects look fine until the first hard wind, the first wet season, or the first inspection. That is usually when a bad bracket choice shows up. The post may still be standing, but it starts to rack, stain the surface below, or fail at the exact point where it meets the base.
Start with the load path. A 4×4 post bracket is not just there to hold the post in place while you work. It has to move weight and force into something that can carry it.
Match the bracket to the substrate
The same post can need very different hardware depending on what sits underneath it.
On concrete, the bracket has to do two jobs. It has to locate the post and transfer load into the slab or footing through anchors rated for masonry. On wood framing, the connection only works if the load reaches joists, beams, or blocking that were built to carry it. Fastening a post base to deck boards is a common shortcut, and it is a costly one. The boards are not the structure.
For a light garden feature, a lighter connector may be acceptable if the post is mainly there for alignment or appearance. For pergolas, rail posts, shade structures, and any post that sees side load or uplift, choose hardware sold and installed as structural hardware. That choice affects whether the frame stays tight, whether the post wanders out of plumb over time, and whether the connection passes inspection without an argument.
Fasteners decide whether the bracket can do its job
I see plenty of good brackets ruined by the wrong screws.
Use the fastener type the bracket was designed around. If the manufacturer calls for structural screws, use structural screws. If the holes are sized for bolts or expansion anchors, do not substitute deck screws just because they are on hand. A screw that fits the hole can still shear, loosen in treated wood, or corrode early.
Match the fastening method to the base material:
- Concrete or masonry: use concrete anchors suited to the slab, footing, or block
- Wood framing: use structural screws or bolts long enough to bite into framing, not just surface boards
- Post to bracket: use the specified connector screws, bolts, or through-fasteners for that bracket pattern
Material compatibility matters here too. Pressure-treated lumber is hard on the wrong hardware. A mismatch between bracket coating and fastener coating can lead to rust streaks, swollen fastener heads, and hardware that looks old long before the structure is old. If you are lining up parts before the build, fasteners and fittings for deck and fence hardware make it easier to buy the bracket, anchors, washers, and connector screws as one system instead of piecing it together later.
Use a buying filter before you order anything
Ask these five questions:
- Is the post carrying real load or just defining space?
- What is the bracket fastening into, concrete, framing, or a non-structural surface?
- Will this connection see uplift, sway, or repeated wet exposure?
- Does the bracket hold the actual post size tightly enough to keep the post aligned?
- Are the bracket and fasteners rated for the same outdoor conditions and wood treatment?
That short check saves rework.
It also helps to look at the full project, not just the connection in front of you. Broader guides for DIY outdoor living can help you confirm that your post hardware matches the way the space will be used, especially on decks, pergolas, and fence-adjacent builds where layout and structure affect each other.
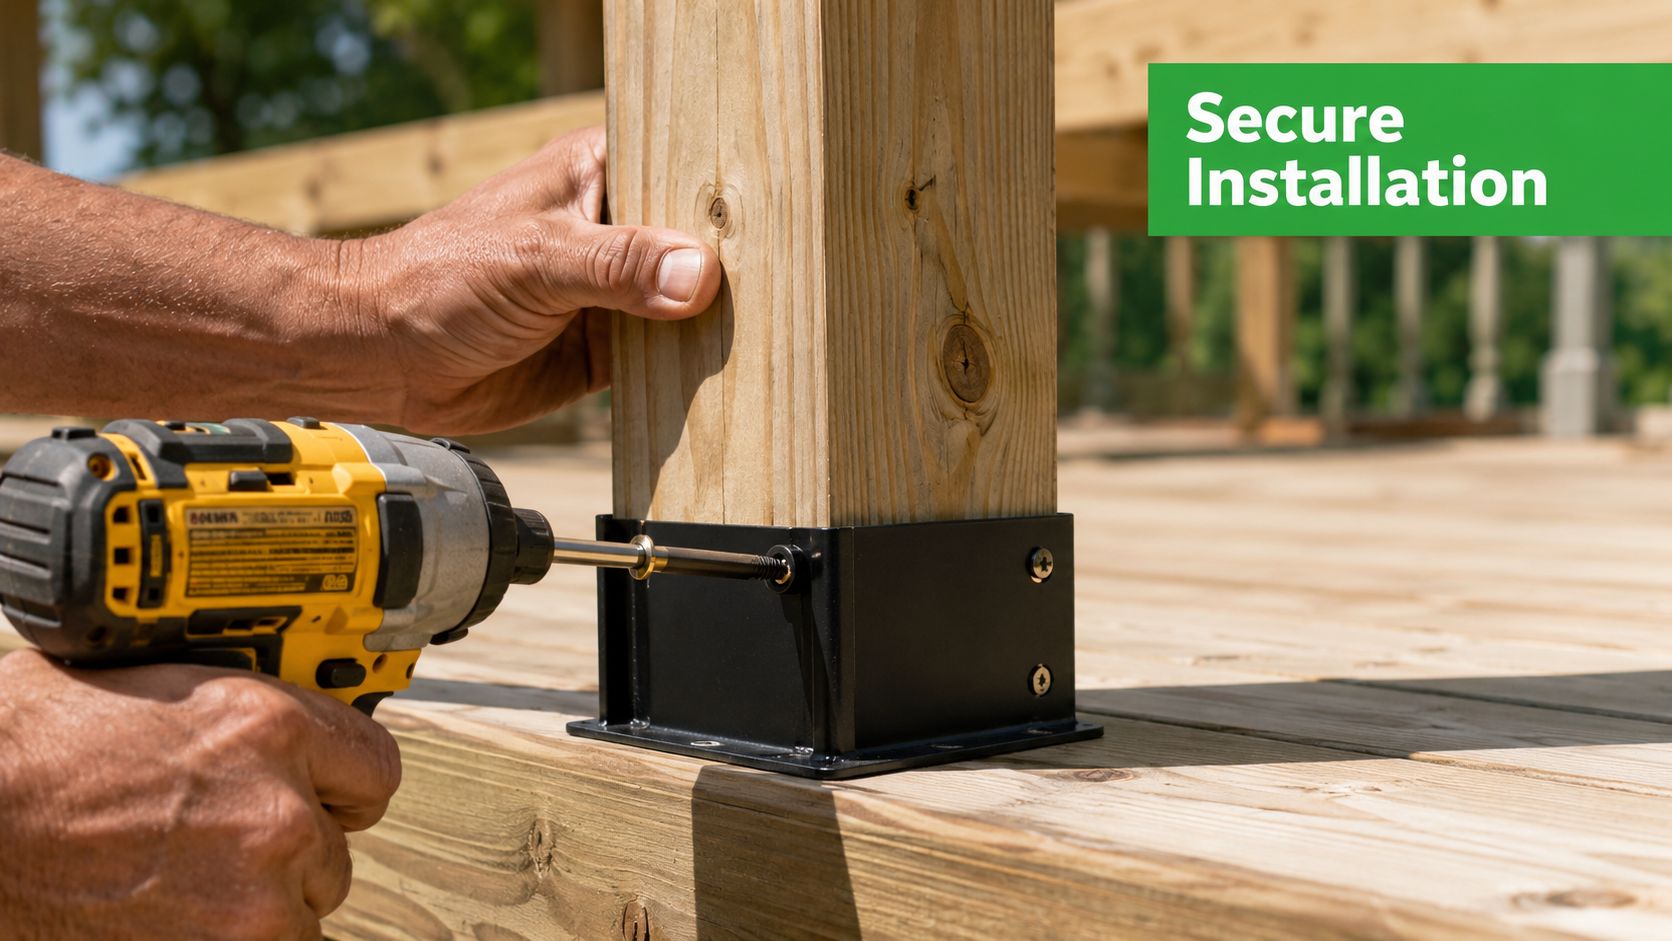
A Step-By-Step Guide to Secure Installation
A bracket install usually goes wrong before the first fastener is fully tightened. The common failure is simple. Layout is close enough, the base is a little out of flat, the post gets forced into position, and the whole assembly stays under stress from day one. That is how you end up with a post that looks plumb at first and drifts, squeaks, or loosens after a wet season.
Start with the location and the surface you are fastening into. A bracket can only hold as well as the concrete, framing, or masonry below it.
Lay out the post locations properly
Pull your measurements from a fixed reference point, such as the house wall, a snapped control line, or an established corner. Do not space posts by eye from an outside edge that may already be out of square. Check both directions before you drill. A small layout error at the base can throw off railing runs, beam bearing, and finished sightlines.
If the project ties into a bigger backyard build, review broader guides for DIY outdoor living before locking in post placement. It helps confirm that the structure works with stairs, traffic flow, roof lines, and guard locations instead of only matching a sketch.
Dry-fit the post in the bracket before installation. The fit should be snug enough to control the post without forcing it. If the post is crowned, swollen, or heavily rounded at the corners, deal with that now. Forcing a bad fit into metal hardware usually scrapes coating off the bracket, twists the base, or leaves the post sitting high.
Anchor the bracket before standing the post
Set the bracket first. That gives you one stable reference instead of trying to hold plumb, alignment, and fastener placement at the same time.
A reliable sequence looks like this:
- Clean the mounting area: Remove grit, water, old caulk, and anything else that prevents full bearing.
- Set the bracket in position: Confirm orientation and setback before marking holes.
- Mark and pre-drill as needed: Use the bracket hole pattern, and drill for the substrate and anchor type you are using.
- Install the anchors or mounting fasteners: Tighten them evenly so the base seats flat.
- Check for rock or twist: If the bracket moves now, it will still move after the post is installed.
If you need a base made for this connection, compare the hole pattern, stand-off, and mounting style on a 4 x 4 anchor post bracket before you buy. That choice affects more than fit. It determines how well the base handles uplift, how easily it passes inspection, and whether you can install the right anchors without improvising in the field.
Set the bracket flat and square at the start. A twisted base creates a plumb problem that carries all the way up the post.
Stand the post and hold it plumb
Once the bracket is secure, set the post and check it on two adjacent faces with a level. Temporary bracing saves time here, especially on tall posts or when working alone.
Start fasteners loosely so the post can still be adjusted. Bring the post to plumb, then tighten in a balanced pattern. Running one side fully tight first can pull the post off line, especially with lighter brackets or wet pressure-treated material that compresses under the screw head.
A visual walkthrough can help if you want to compare your process against a live installation:
Final tightening and inspection
After the post is secured, inspect the connection like you are trying to find a problem before weather does.
Check for:
- Full bracket bearing: The base should sit flat with no visible gap or twist.
- Stable post alignment: The post should stay plumb after all fasteners are tightened.
- Clean fastener installation: Replace any stripped, bent, or partially seated fasteners.
- Even reveal around the post: Uneven gaps usually point to a fit problem or a post pulled out of plumb.
Do not crank fasteners down harder than the hardware calls for. Over-tightening can crush wood fibers, deform thinner steel, strip connector screws, and make a bad fit look secure for a week or two. A controlled install lasts longer and gives you fewer surprises when the rest of the structure goes on.
Complying with Codes and Preventing Corrosion
A bracket can be installed perfectly and still fail inspection or start corroding early if the product choices were wrong from the start. This is the part many DIYers rush through, then end up rebuilding later.
Code compliance starts with matching the connector to the job you are building. Local inspectors usually care about three things at this connection point. Is the bracket rated for the use, is it installed with the specified fasteners, and is it acceptable for the environment. A post base on an interior plan detail may not be acceptable on an exposed deck, coastal build, or guard post that sees higher lateral loads.
For California work, the state adopted the 2022 California Building Standards Code effective January 1, 2023, published in Title 24, California Code of Regulations, with updates on a 3-year cycle. Product approval and manufacturer instructions matter because inspectors often want to see that the connector, post size, and fasteners all match the listing. If you are ordering hardware through Xtreme eDeals, check the published specs before you buy, not after the concrete is poured.
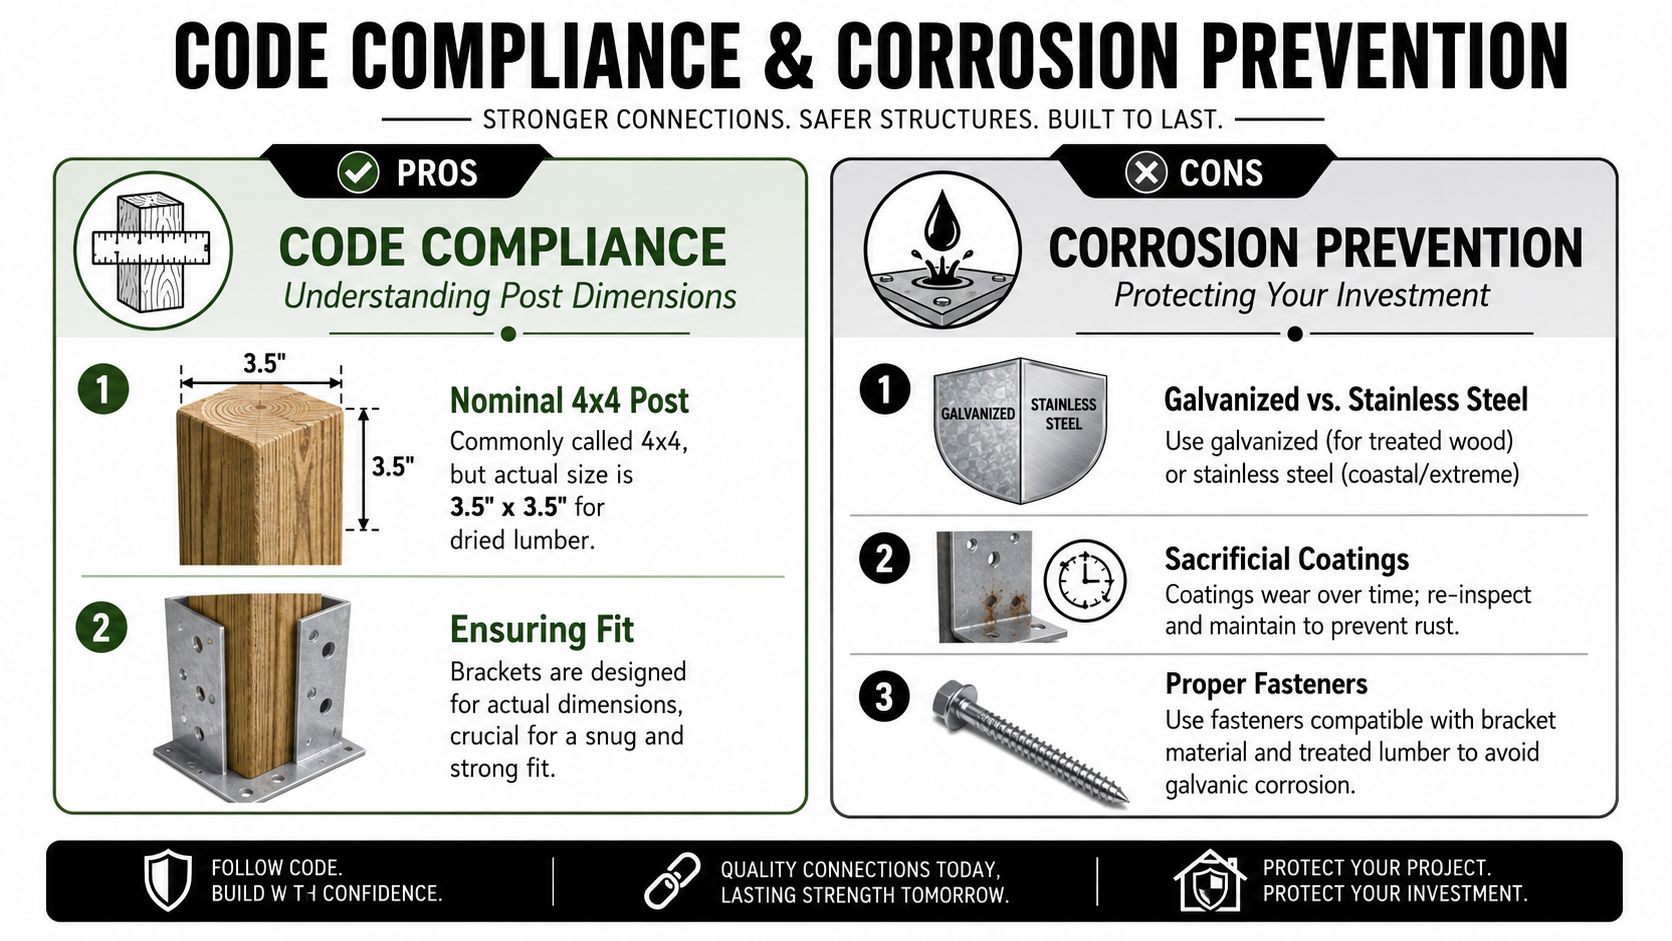
Why actual size still matters at the code stage
As noted earlier, a nominal 4×4 post is smaller than its name suggests. Brackets are manufactured around actual post dimensions, and the tolerance is usually tight enough that guessing creates problems fast. A loose fit can reduce stability and make the finished work feel sloppy. A too-tight fit can damage the coating during install, trap moisture, and start corrosion where you cannot easily see it.
That is why bracket selection is not just about getting the post to fit. It affects load transfer, inspection outcome, and how long the connection stays sound outdoors.
Corrosion starts with material compatibility
Outdoor connectors fail for predictable reasons. Pressure-treated lumber holds moisture and uses preservatives that are hard on unprotected steel. Cut edges, scratched finishes, and mixed metals speed things up. The first sign is often cosmetic staining. After that, section loss and weakened fasteners are not far behind.
Use the bracket, coating, and fasteners as one system. Hot-dip galvanized hardware should be paired with compatible galvanized fasteners. Stainless hardware should generally be paired with stainless fasteners, especially in wet or coastal conditions. Mixing a fancy stainless screw with a plated bracket, or the reverse, is how you get premature corrosion and ugly bleed marks down the post.
If you want a plain-language overview of why coatings break down and what maintenance helps, this guide on how to protect metal from rust is a useful reference.
One last practical point. If the manufacturer calls for specific connector screws or bolts, use them. Substituting deck screws because they are already in the pouch is a common mistake, and it can turn a code-approved connector into an unapproved assembly.
Troubleshooting Common Installation Issues
Even careful installs can go sideways. The good news is most bracket problems show themselves early, and early problems are usually fixable.
The post feels wobbly
Check the fit first. If the post is loose in the bracket, the bracket may be wrong for the actual post size. If the fit is acceptable, inspect whether the bracket itself is fully seated and whether all required fasteners are installed and tightened correctly. A wobble at the bottom often means the base connection is the issue, not the post.
The bracket isn't level
Don't keep building and hope the framing hides it. Remove the load from that connection, loosen the hardware if possible, and correct the base condition. If the substrate is uneven, deal with that cause rather than forcing the bracket into a twisted position.
A fastener head strips during install
Stop immediately and remove it before it becomes permanent frustration. Using a damaged fastener in outdoor structural hardware is asking for trouble later. Replace it with the correct fastener type and make sure your driver bit is the proper fit and fully seated before applying torque.
The post won't slide into the bracket cleanly
Measure the actual post, then inspect the bracket for coating build-up, distortion, or debris. Don't hammer the post into a tight metal bracket and call it good. Forced fits damage coatings, bruise wood fibres, and make alignment worse.
The finished assembly looks sloppy
That usually comes back to one of three things:
- Too much clearance: The bracket was oversized for the post.
- Poor layout: The bracket location was off before fastening.
- Uneven fastening: One side got pulled tight before plumb was confirmed.
Fixing these issues at the bracket stage is always easier than trying to disguise them once rails, beams, or fence panels are installed.
XTREME EDEALS INC. offers deck and fencing accessories, post hardware, fasteners, anchors, and related outdoor building components through its online catalogue. If you're lining up a fence, deck, or pergola build and want one place to compare hardware options before you buy, you can browse XTREME EDEALS INC..