

You're probably at the stage where the fence is up, the deck frame is solid, and the posts are standing proud. Then you look at the tops of those 4x4s and realise they still look raw, exposed, and unfinished. That last detail matters more than one might assume.
A post cap does two jobs at once. It cleans up the look, and it protects the most vulnerable part of the post. The top end grain soaks up weather fast if you leave it open, and that's where a lot of problems start.
Why Your Fence and Deck Posts Need a Finishing Touch
A deck or fence can look nearly complete and still feel unfinished because of the post tops. Fresh-cut wood at the top of a post stands out. It catches water, dries unevenly, and starts looking tired long before the rest of the build does.
That's why 4 by 4 post caps aren't just trim pieces. They're part of the protection system. The Forest Products Laboratory notes that a primary cause of deck and fence repairs stems from post-end moisture intrusion due to loose-fitting or missing caps, and even a small gap can significantly accelerate wood rot, especially in places with seasonal rain and humidity, as outlined in the Forest Products Laboratory wood durability guidance.
Practical rule: If the top of the post is exposed, it needs a cap that actually fits. Not a decorative afterthought. A proper weather cover.
I've seen plenty of otherwise solid builds age badly from the top down. The rails still looked fine. The fasteners were holding. But the post tops had split, darkened, and started breaking down because water kept getting into the end grain.
If you're already thinking about drainage around the rest of your property, the same logic applies here. Good exterior work lasts longer when water is directed away from vulnerable spots, which is why this guide on why MA homes need rainwater planning is worth a read even if your immediate job is just capping posts.
A good cap gives the project a finished line. More important, it buys protection where the wood needs it most.
The Most Critical Step Measuring Your 4×4 Posts
Most buying mistakes happen before anyone clicks “add to cart”. They happen when someone assumes a 4×4 post is 4 inches by 4 inches.
It usually isn't.
A nominal 4×4 post measures 3.5 inches by 3.5 inches, and that's the size most standard 4 by 4 post caps are built around, as explained in this guide to nominal vs actual post cap sizing. If you buy a cap made for a true 4-inch post and drop it on a standard nominal 4×4, it'll sit loose and look wrong.
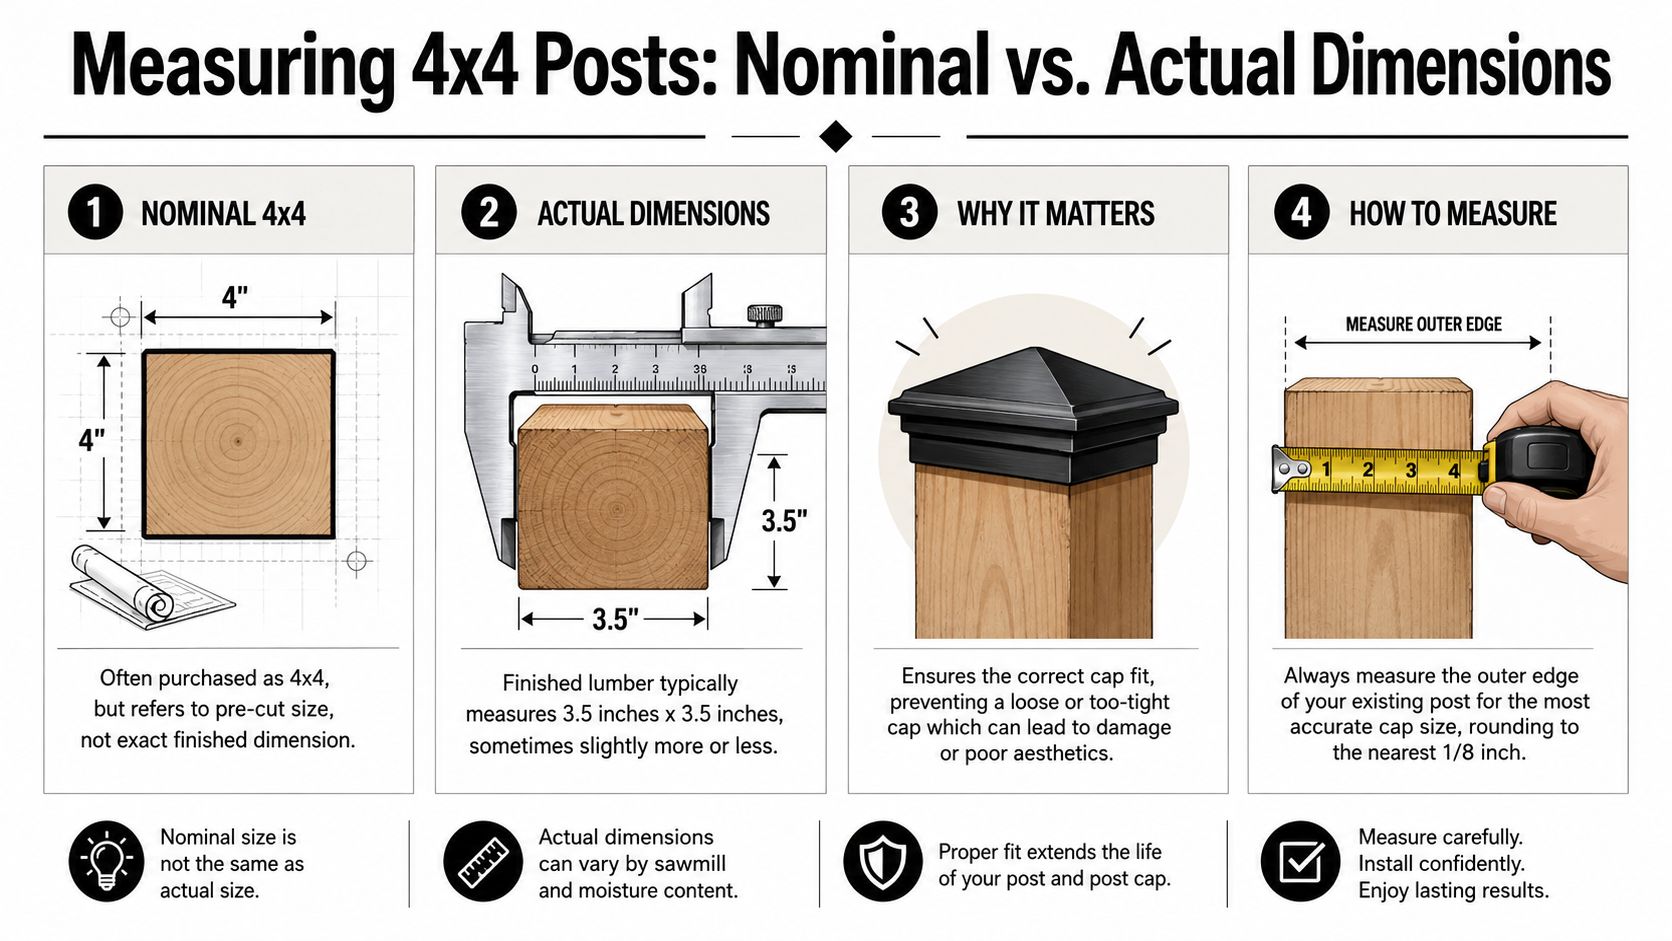
Nominal size versus actual size
This is the same reason a 2×4 isn't 2 inches by 4 inches after milling. Lumber names are nominal. Caps have to fit the finished size.
That's where buyers get tripped up. They search for “4 by 4 post caps”, see a product label that says 4×4, and assume every cap in that category fits every post. That's not how it works.
Measure the post you have. Don't buy from the name stamped on the lumber rack.
How to measure without guessing
You only need a tape measure. Measure straight across the outside edges of the post top. Then measure the other direction too. Wood posts aren't always perfectly square after weather exposure, cutting, swelling, or drying.
Use this simple approach:
- Measure the top face: Take the width from outside edge to outside edge.
- Check both directions: A post can be slightly out of square.
- Look for paint or build-up: Heavy coatings can tighten the fit.
- Round sensibly: If you're close, round to the nearest 1/8 inch when comparing fit ranges.
If you're buying for standard dimensional lumber, start your search with products meant for actual-size nominal posts, such as options in this 4×4 fence post cap collection.
Where people go wrong
The common mistake is buying by label instead of fit. The second mistake is assuming all wood behaves the same. Pressure-treated stock, rougher cedar, and site-cut posts can vary enough that a cap which fits one batch won't fit another cleanly.
Here's the practical takeaway. A snug fit keeps the cap seated, looking clean, and doing its job. A loose cap traps trouble. A cap that's too tight can distort, bind, or refuse to seat fully.
Choosing the Right Material and Style
Once the measurement is right, the next decision is material. That choice affects lifespan, maintenance, and how the finished project reads from the street.
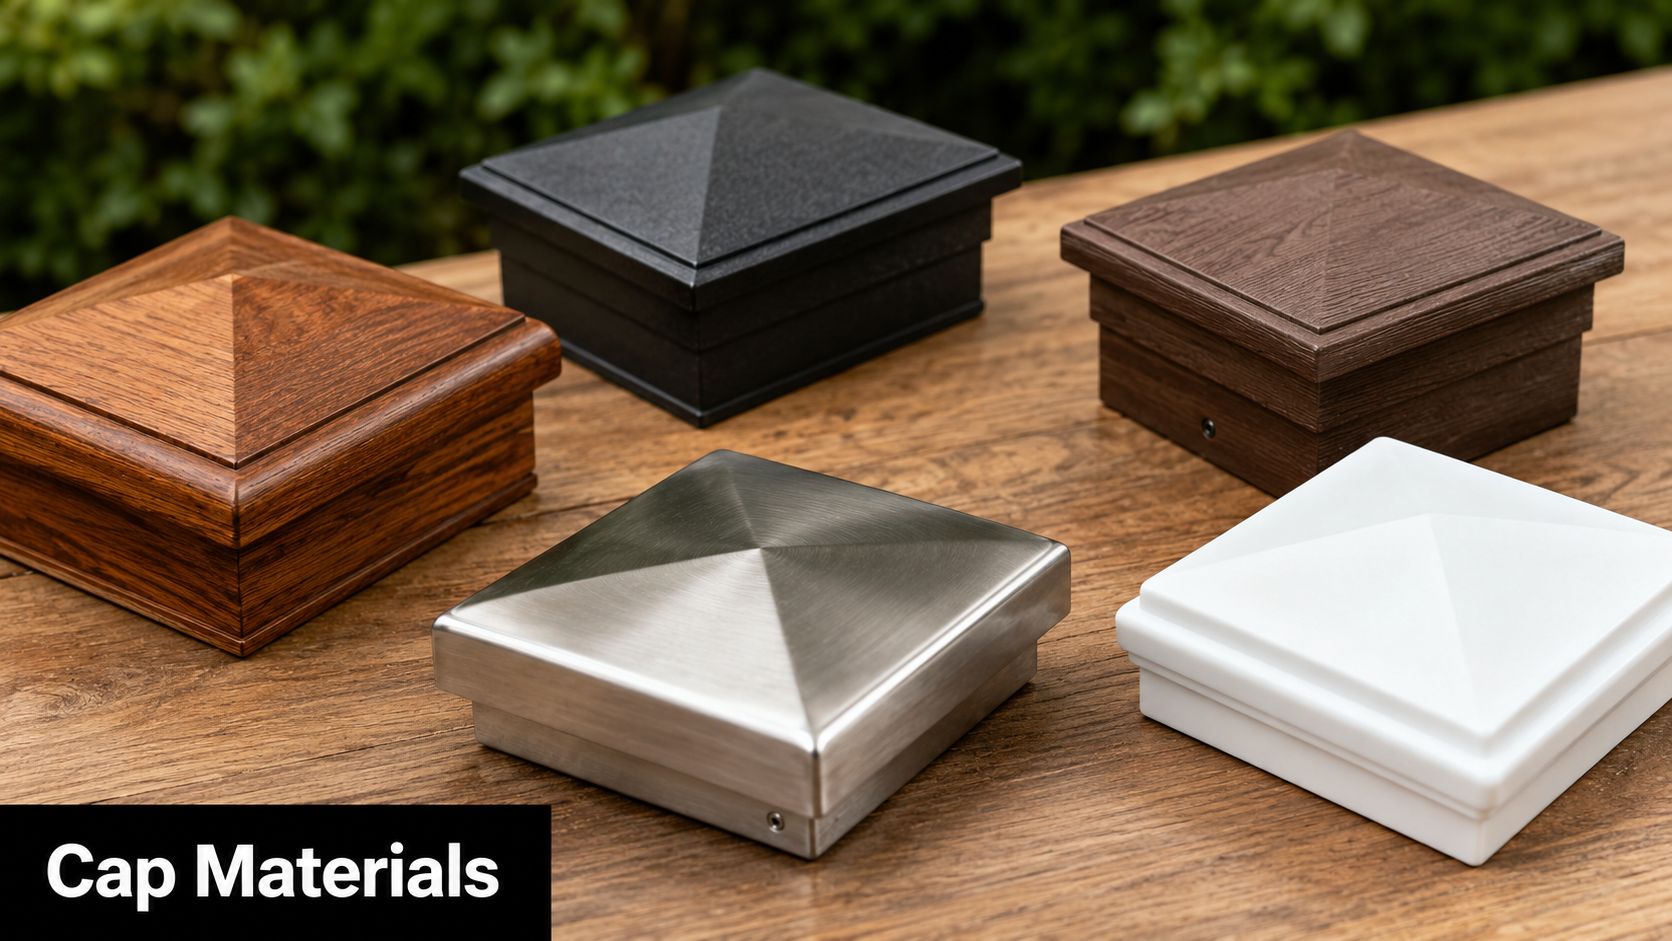
What each material does well
Wood caps work when you want the cap to disappear into a wood-heavy build. They can look right on cedar fencing or a traditional deck, but they ask for upkeep. If the finish fails, the cap itself becomes another exposed wood surface.
Aluminium is a practical choice for many homeowners because it gives you a crisp edge and low upkeep. In damp conditions, powder-coated aluminium performs well as a weather barrier.
Galvanised steel is worth a hard look where weather is rough. In regions with significant moisture, galvanised steel in 18-gauge with G90 galvanising or powder-coated aluminium caps offer superior rust prevention and act as a strong weather barrier against moisture and UV degradation, according to the product guidance for Fence Armor CAPCLAW post caps.
Vinyl caps are easy to live with and often match vinyl railing or fencing systems, but they don't suit every build visually. On a wood fence with exposed grain and black hardware, vinyl can look out of place fast.
Composite caps fit best when the rest of the system is composite. They can tie into sleeves, skirts, and railing packages cleanly, but they're usually a style-driven choice.
Quick comparison table
| Material | Best use | Maintenance | Look |
|---|---|---|---|
| Wood | Traditional wood fences and decks | Higher | Natural, blended |
| Aluminium | Low-maintenance outdoor builds | Low | Clean, sharp |
| Galvanised steel | Moisture-heavy or exposed sites | Low | Tough, utilitarian |
| Vinyl | Matched vinyl systems | Low | Smooth, simple |
| Composite | Coordinated composite rail systems | Low to moderate | Uniform, finished |
Style changes the whole build
Material protects the post. Style changes the character.
A pyramid cap is the safe choice when you want a clean finish that works on almost anything. It sheds water well and doesn't fight the lines of the deck or fence.
A ball cap reads more traditional. It suits formal fencing, gates, and front-yard work where decorative details matter.
A finial pushes the look further. It can work well on feature posts, entry points, and gates, but it's easy to overdo if every post gets the same treatment.
Some projects want the hardware to stay quiet. Others need the post cap to act as a visible design accent. Neither approach is wrong. The mistake is mixing styles without intent.
Match the cap to the project, not just the post. A cap that fits physically can still look out of place.
For buyers comparing options across decorative and functional designs, this cap for fence post selection shows the range you'll typically sort through, including pyramid and more ornamental profiles. Decorex Hardware products are a common fit for this kind of decision because the line spans straightforward utility caps as well as more decorative finishing pieces.
What I'd choose by project type
For a backyard deck with black balusters and exposed timber, I'd lean aluminium or galvanised steel in a pyramid shape. For a cedar fence facing the street, wood or a decorative metal cap can both work, depending on how formal the frontage needs to feel.
If the site stays wet, protection should win over style every time. Fancy doesn't help if the cap corrodes, loosens, or leaves the end grain exposed.
How to Install Post Caps Like a Pro
A good cap can still fail if it's installed the wrong way. Most problems come from using the wrong fastening method for the weight of the cap, the weather on site, or the movement in the wood.
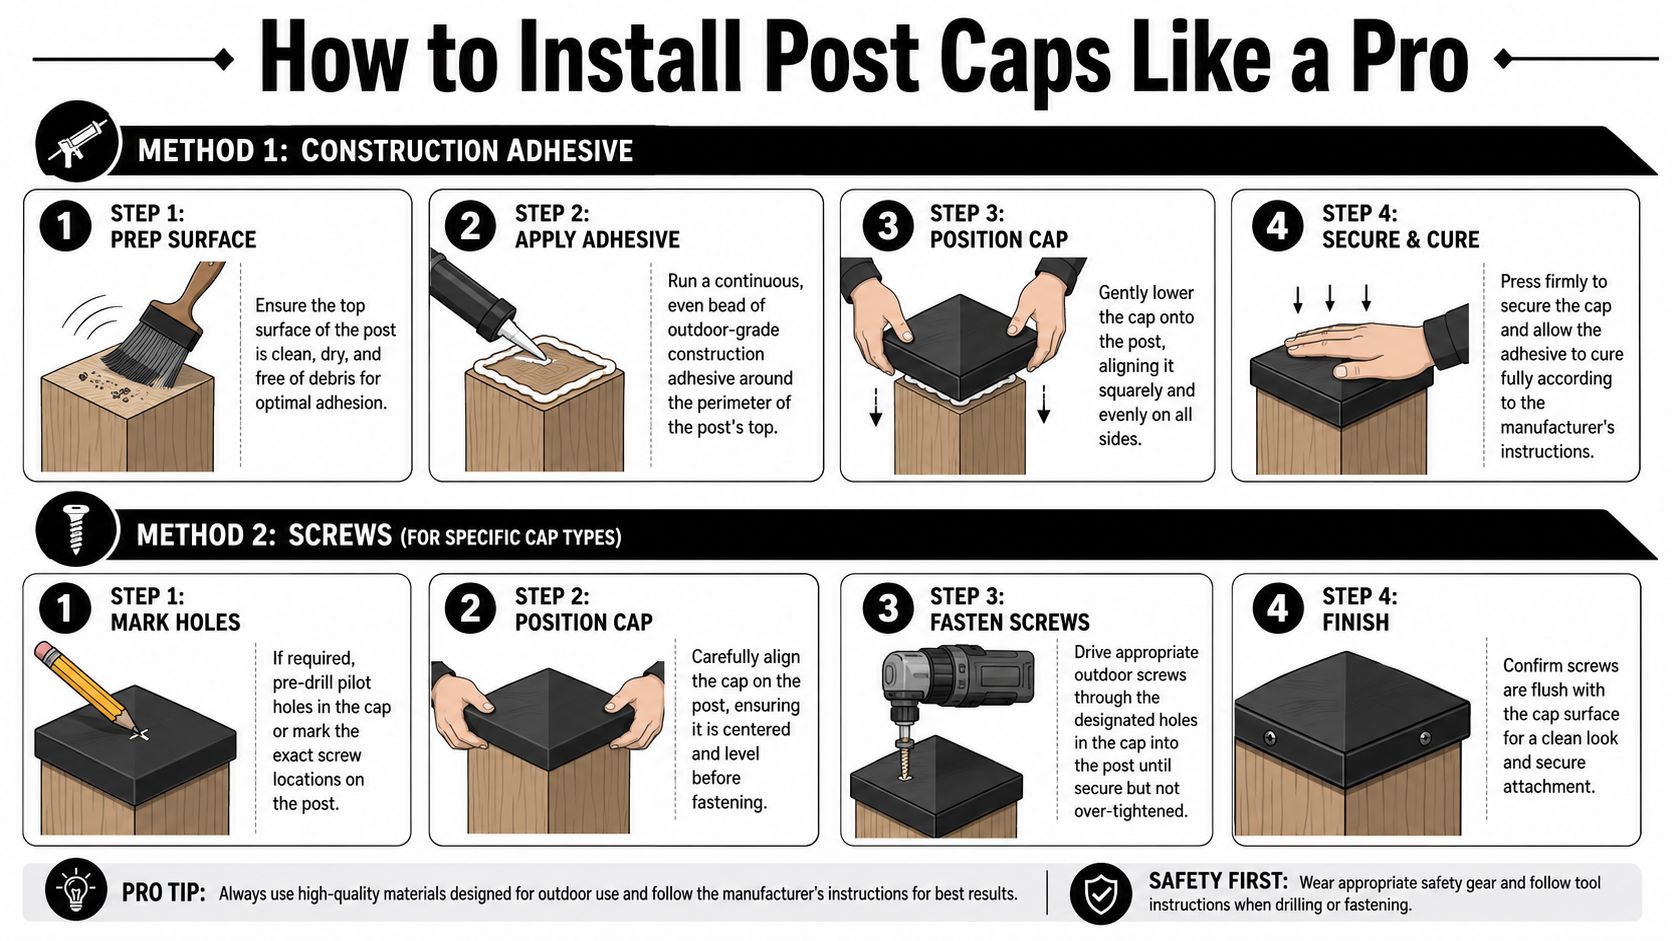
Adhesive versus mechanical fastening
Adhesive is popular because it's clean. No visible screw heads, no pilot holes, and a quick install on lightweight caps. But there's a catch. Field tests show adhesive can fail under significant thermal cycling, and mechanically fastened caps are often more reliable in extreme temperatures or seismic zones, as discussed in this article on post cap installation methods from DecksDirect.
That doesn't mean adhesive never works. It means you have to use it in the right situation.
When adhesive makes sense
Use adhesive when the cap is light, the fit is already good, and the location isn't exposed to the worst wind or temperature swings.
Basic process:
- Clean the post top: Dust, fibres, and moisture weaken the bond.
- Use an exterior-grade product: Indoor adhesive has no place outside.
- Apply a controlled bead: Too much squeezes out and looks sloppy.
- Set the cap squarely: Once it grabs, don't keep twisting it around.
A lot of DIY installs fail because the top of the post was damp or dirty when the adhesive went on.
Here's a visual walk-through of the process and hardware handling:
When screws are the better call
If the cap is metal, if the site gets hammered by wind, or if you just want a more secure attachment, use screws if the cap design allows for them.
Do it this way:
- Dry-fit first: Confirm the cap seats properly before fastening anything.
- Mark carefully: Keep the cap centred and the fasteners even.
- Pre-drill if needed: This helps prevent splitting and keeps alignment clean.
- Tighten just enough: Over-tightening can deform thinner metal caps.
On-site check: If a cap can rock, twist, or lift by hand after installation, the job isn't finished.
The best installs are boring in the best way. The cap sits flat, doesn't rattle, and doesn't leave exposed gaps where water can work in.
Beyond the Basics Lighted and Specialty Caps
Some post caps do more than cover the top of a post. They help shape how the whole space works after dark.
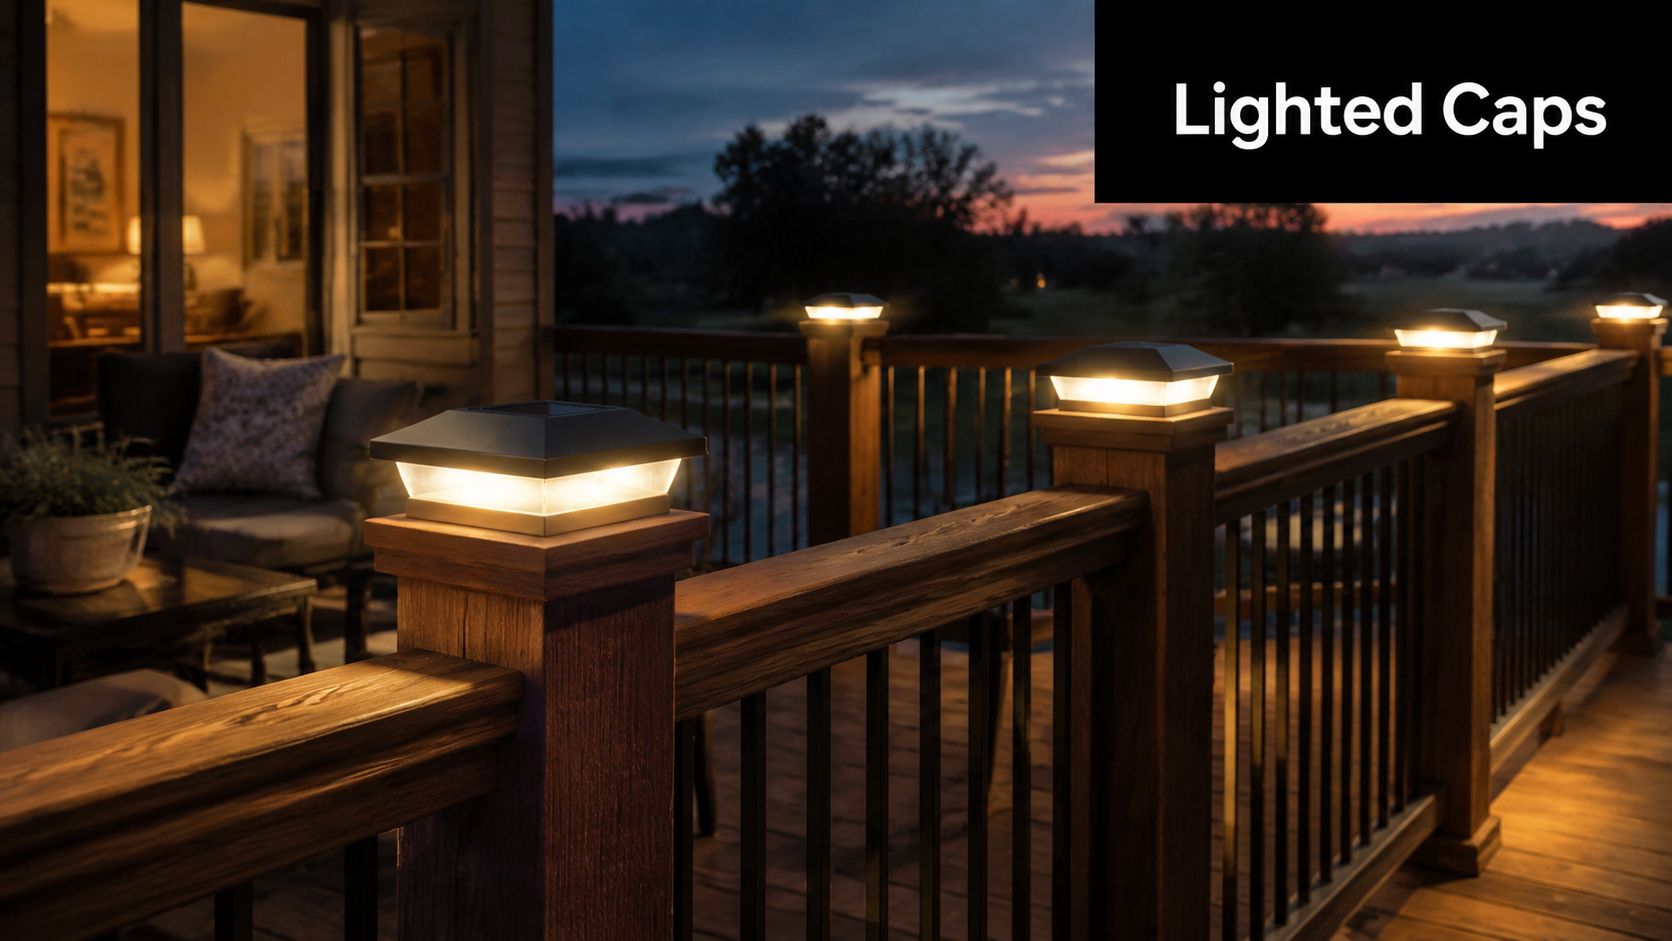
Lighted caps for decks, gates, and walkways
Solar and low-voltage caps make sense where the railing line or fence perimeter already defines movement. A lighted cap adds a soft guide along edges, stairs, and transitions without turning the yard into a floodlit job site.
They're especially useful on deck corners, gate posts, and approach paths. The effect is practical first, decorative second. You can see the boundary, guests move more confidently, and the project looks finished at night too.
If you're planning the wider lighting scheme, this overview of residential exterior lighting is useful because it puts post cap lighting in context with pathways, entries, and general outdoor safety.
Specialty caps and coordinated hardware
Not every cap has to be plain. Feature posts can carry more detail than line posts. That's where ball caps, finials, and lighted units earn their keep.
This is also where buyers usually realise the cap is only one part of the finish package. The post cap needs to sit comfortably with the rest of the hardware, including balusters, gate inserts, hinges, brackets, and visible fasteners. If the cap says modern black metal and everything else says rustic farm gate, the build feels pieced together.
For projects using illuminated tops, this solar post cap range is one way to compare styles intended for outdoor deck and fence use. XTREME EDEALS INC. also carries related hardware categories that let you match the cap to the broader build instead of treating it as a one-off accessory.
A plain cap finishes a post. A specialty cap can help finish the whole design.
Your Final Checklist Before You Buy
Most bad post cap purchases come down to one of four mistakes. The buyer didn't measure, picked the wrong material, chose style before function, or installed the cap with the wrong attachment method.
The checklist that saves you grief
- Measure the actual post, not the nominal label: Standard nominal 4×4 post caps are engineered for actual 3.5 inches by 3.5 inches, and a cap with the wrong tolerance can fit loosely or fail to secure, which compromises protection, as noted in this guide on 4×4 aluminium post cap fit and tolerance.
- Match material to exposure: Wet locations call for stronger weather resistance. Dry, sheltered areas give you more freedom to choose by look.
- Pick a style that suits the build: Pyramid for clean lines, decorative profiles for feature posts, lighted caps where visibility adds value.
- Choose fastening with intent: Adhesive for the right lightweight applications. Mechanical fastening where movement, weather, or cap weight calls for more security.
What works and what doesn't
What works is simple. Measure carefully, buy for actual fit, and treat the cap as protection first and decoration second.
What doesn't work is buying a loose cap because the listing said 4×4, forcing an ill-fitting cap onto a post that isn't square, or trusting glue alone in conditions that punish it.
Buy once with a tape measure in hand. That's cheaper than replacing damaged post tops later.
If you keep those basics straight, 4 by 4 post caps are an easy win. They sharpen the look of the project, protect the end grain, and help your fence or deck hold up the way it should.
If you're ready to buy with the sizing and material details sorted out, XTREME EDEALS INC. offers post caps, fasteners, and related deck and fence hardware so you can source the finishing pieces with the rest of your project in one place.